3 Installing and Configuring Subversion for Version Control
Subversion is a version control system that keeps track of changes made to files and folders or directories, thus facilitating data recovery and providing a history of the changes that have been made over time. This chapter describes how to install and configure Subversion for version control.
This chapter contains the following topics:
3.1 Downloading Subversion
Although Subversion is an Apache project, Apache does not build their own binary files for any operating system. The following URL provides links to the latest stable releases of Subversion built by third parties for all major operating systems:
http://subversion.apache.org/packages.html
If possible, use a package manager such as YUM or APT to manage the installation of other software.
On Windows, Oracle recommends that you use a precompiled binary package such as Silk SVN which is available in the following URL:
On Windows, if you install Subversion through the installer package, then ensure that you choose an installer which includes the server binary files.
3.2 Installing Subversion
The installation method varies depending upon the platform and distribution method.
For example, if you use YUM, the command is likely to be:
sudo yum install subversion
On Windows, you can change the default installation path to a shorter location:
C:\svn
Ensure that the PATH variable is correctly set by the installer.
To obtain the version information of svnserve, run the following command:
svnserve --version
If you cannot find the command, then do the following:
-
Open Control Panel.
-
Select System, and then Advanced System Settings.
-
Under Advanced, select Environment Variables.
-
Edit the
PATHvariable in the System variables pane by adding the path to the Subversion binary directory.
3.3 Configuring the Subversion Server as a Service
To configure the Subversion server as a service:
-
On Linux
The Linux installation process automatically creates an
/etc/init.d/svnservescript. This starts the server when you start up your system.To start the service manually, run the following command:
sudo /etc/init.d/svnserve start
-
On Windows
You must register
svnservewith the service manager. To registersvnserve, run the following command:sc create svnserver binpath= "C:\svn\svnserve.exe" --service -r "REPOS_PATH" displayname="Subversion" depend=Tcpip start=autoIn the preceding command,
REPOS_PATHis the absolute path to the local file system.
3.4 Setting Up a Repository
A Subversion repository is a collection of versioned artifacts on the Subversion server.
This section contains the following topics:
3.4.1 Creating a Repository
After Subversion is installed, you must create a repository. The command-line utility called svnadmin is the primary tool for server-side administrative operations.
To create a repository:
-
Create a directory for the repository using the following command:
(Linux) mkdir -p REPOS_PATH
(Windows) mkdir REPOS_PATH
In this command,
REPOS_PATHis the absolute path to the local file system.For example:
(Linux) mkdir –p /ciroot/subversion/repository
(Windows) mkdir C:\ciroot\subversion\repository
-
Create a repository on a given path using the following command:
svnadmin create REPOS_PATHIn this command
REPOS_PATHis the absolute path to the local file system.For example:
(Linux) svnadmin create /ciroot/subversion/repository
(Windows) svnadmin create C:\ciroot\subversion\repository
Access to the repository is controlled by file permissions and the user referenced for accessing the repository through the SVN client. Ensure that user and group permissions for all files in the new repository reflect the type of access control that you want to have over the repository contents.
By default, anonymous, read-only access is enabled for a new repository. This means that anyone with SSH access, regardless of repository permissions settings, can check out repository files. You can modify this in the REPOS_PATH/conf/svnserve.conf file.
Now that you have created a repository, you can use the Subversion client to perform standard operations against the new repository by using the following base URL:
svn+ssh://USER@HOST/REPOS_PATH
For example:
svn ls svn+ssh://mycompany@localhost/ciroot/subversion/repository
In addition to svn+ssh, there are several other protocols that are supported by Subversion. Refer to the Subversion documentation for information on how to configure other protocols. svn+ssh might not be available on Windows by default.
3.4.2 Using a Consistent Subversion Layout
Although Subversion does not require any particular subdirectory structure within a repository, it is a good idea to follow an established convention, as this book does. The typical repository layout should resemble the following figure:
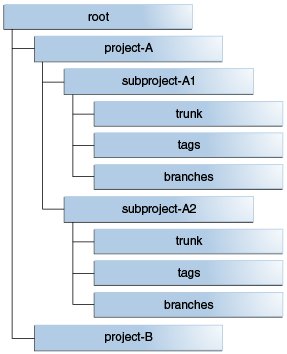
Description of the illustration ''maven_dt_008.png''
Development of the main code line occurs in the trunk directories. When a release is made, the current trunk source is copied into the tags directory, to a tag corresponding to the release. Subversion copy operations are not expensive in terms of storage because the server tracks changes internally.
The following is an example of a tag:
my-project/tags/3.0.5
In the preceding example, 3.0.5 indicates the release version to which this tag corresponds.
A tag is important for future work that might be necessary for patch creation or bug-fix releases. Another importance of a release tag is to facilitate investigation regarding issues in the associated release.
If a patch or subsequent change of a tag is considered necessary, you must create a branch. A branch is a copy of a location elsewhere in the repository and does not differ in composition from a tag. After a copy of the tag is made under the branches directory, you can check out the code and modify it as necessary. When changes are complete, the new release is made from the branch and a corresponding tag is created.
The following Project-A example outlines the general workflow for patch management of source code:
-
In Project-A, the main code line is managed under
project-A/trunk. The current version developing under thetrunkdirectory is version 2.1. The three previous releases of Project-A are 1.0, 1.1, and 2.0. -
A problem is discovered in version 1.0 that requires a patch release.
-
To address the problem, the
project-A/tags/1.0tag is copied, using thesvn copycommand, toproject-A/branches/1.0.1-SNAPSHOT. TheSNAPSHOTdesignation is a Maven device indicating a version that is not yet released, as shown in the following figure: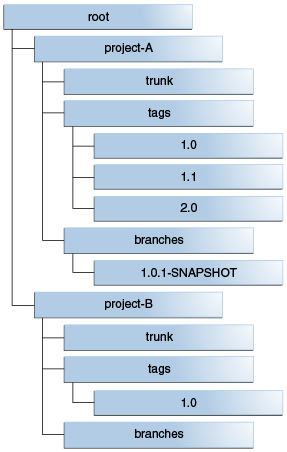
Description of the illustration ''maven_dt_005.png''
-
When the branch code fix is complete, the branch is copied from
project-A/branches/1.0.1-SNAPSHOTto aproject-A/tags/1.0.1tag. The release build can then be made from the tag.
For more information on directory structure conventions, see the section about the recommended repository layout in Version Control with Subversion at:
3.4.3 Importing Existing Projects
If you have existing projects that you want to manage in your repository, you can import them using the SVN client's import command:
svn import LOCAL_PATH REPOSITORY_URL/REPOSITORY_PATH
For example:
svn import /checkouts/project-a svn+ssh://user@svn.mycompany.com/ciroot/subversion/repository/project-a/trunk/ -m "initial import"
3.5 Understanding the SVN Workflow
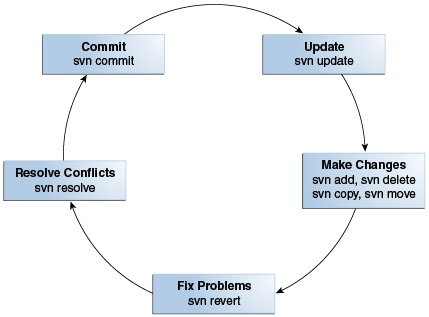
To modify code, you usually perform the following operations:
-
Update the working copy using the
svn updatecommand. -
Make changes. Use the
svn add,svn delete,svn copy, andsvn movecommands as needed to edit your files. -
Review changes through the
svn statusandsvn diffcommands. -
Fix mistakes. You can revert and abandon changes using the
svn revertcommand. -
Resolve conflicts. When they are resolved, mark them using the
svn resolvecommand. -
Commit changes using the
svn commitorsvn cicommand.
Figure 3-1 shows the complete life cycle of an SVN operation:
In a continuous integration development process, this workflow remains largely unchanged. Committed change sets tend to be smaller and occur more frequently than in a noncontinuous integration process. You must commit the active trunk or branch code for the target release so that the continuous integration system can perform an integration build. Avoid creating a personal branch with the intention of merging back to the main-line code base in the future. The personal branch and merge technique defers integration and runs counter to continuous integration precepts.
3.6 Working with Subversion Projects
To begin working on a Subversion-managed project, you must first check out the files into your local file system. The SVN client copies the project files to your system, including Subversion metadata in .svn directories located in each subdirectory.
To work with Subversion projects:
-
Run the following command to check out files:
svn co REPOSITORY_URL/REPOSITORY_PATH LOCAL_DIRECTORYIn the preceding command:
-
REPOSITORY_URLis the URL to the Subversion repository. -
REPOSITORY_PATHis the path to the directory being checked out. -
LOCAL_DIRECTORYis the path to the local directory in which the checked out project is stored.
The test-project example demonstrates main-line code development on a project:
svn checkout
 svn+ssh://user@svn.mycompany.com/subversion/repository/test-project/trunk test-project
In this case, a directory called
test-projectis created and the project contents are recursively copied into the directory from the server. -
-
You can make any number of changes to the checked out files.
After the project is checked out once on your system, there is no need to perform subsequent checkouts on that source code. To stay synchronized with the Subversion repository content, you can run the
svn updatecommand on a checked out directory or even on individual files. -
When you are ready to commit the changes to the repository, check in the files or directories that you want to commit. The file or directory set being checked in does not have to correspond to what was checked out as long as all components are members of the checked out directory. Run the following commands to commit the changes:
svn commit -m "Added code and test case" test-project/src/main/java
 test-project/src/test/resources/testdata.xml
svn resolve test-project/src/test/resources/testdata.xml
After you have resolved any conflict, proceed with a normal check-in operation.
-
Before committing local changes to the repository operation, run
svn updateto integrate any changes committed to the code by others, since your last checkout or update, by running the following command:svn update
-
Commit your changes by running the following command:
svn commit -m "description of the updates"
3.7 Considerations for Tagging and Branching
Tagging creates a named point-in-time copy of a branch. Tag releases on the following occasions:
-
Whenever a project is released
-
Whenever an important milestone occurs
It is important to tag releases, as tags provide a simple mechanism for patching releases. When a bug is found in a release, you can branch from the tag for that release, implement the fix, and then create a patch for the release. Tag this new (patched) release as well, in case you find an issue with it later and need to fix that new issue.
If you do not tag a release, it is very difficult to obtain the exact code line that was built into that release.
Note:
Treat tagged releases as read-only artifacts. You must not continue merging into a release after it is tagged.3.8 About Subversion Clients
This section describes two popular Subversion clients:
3.8.1 WebSVN
WebSVN provides a web-based view of a repository and supports visual differences, blame, and search.
WebSVN can be downloaded from:
3.8.2 TortoiseSVN
TortoiseSVN is a free Windows Subversion client that integrates with Windows Explorer. All standard Subversion client operations can be performed through the Windows user interface. Folder and file icon decorators indicate the status of Subversion files. Command-line tools are mapped with menu items and options are configurable through dialogs boxes. Tortoise also provides sophisticated graphical diff and merge tools that can be helpful for resolving conflicts.
TortoiseSVN can be downloaded from:
3.9 More Information About Subversion
This document is meant as a quick guide for starting and running Subversion. For a detailed guide, see Version Control with Subversion at:
Note:
Oracle strongly recommends reading Version Control with Subversion if you are new to Subversion.