17 Oracle Business Intelligence Enterprise Edition Data Lineage
This chapter describes how to integrate Oracle Business Intelligence Enterprise Edition (OBIEE) and Oracle Data Integrator (ODI) metadata to build report-to-source data lineage.
This chapter includes the following sections:
-
Section 17.3, "Exporting Metadata from OBIEE and Refreshing the OBIEE Lineage"
-
Section 17.4, "Refreshing the OBIEE Lineage from Existing Exports"
17.1 Introduction
OBIEE users need to know the origin of the data displayed on their reports. When this data is loaded from source systems into the data warehouse using ODI, it is possible to use the Oracle Data Integrator Lineage for Oracle Business Intelligence feature to consolidate Oracle Data Integrator (ODI) metadata with Oracle Business Intelligence Enterprise Edition (OBIEE) and expose this metadata in a report-to-source data lineage dashboards in OBIEE.
17.1.1 Components
The OBIEE Lineage is made up of the following components:
-
Lineage Tables: These tables consolidate both the OBIEE and ODI metadata. They are stored in the ODI Work Repository.
-
Lineage Artifacts for OBIEE: This pre-packaged OBIEE artifacts are deployed in OBIEE to access the lineage information. These include:
-
Lineage RPD containing the Physical, Logical and Presentation layers to access the Lineage Tables,
-
Lineage Web Catalog Requests to be used in existing dashboard to create report -to-source dashboards,
-
Images used in these dashboards.
-
-
Command Line Tools and a Wizard to automate the lineage tasks:
-
Deployment of the Lineage Artifacts for OBIEE in an OBIEE instance,
-
Extraction of the OBIEE Metadata from a OBIEE Instance,
-
Consolidation of the OBIEE and ODI Metadata in the ODI repository.
-
17.1.2 Lineage Lifecycle
This section describes the different phases of using OBIEE Lineage and the persons involved in these phases.
17.1.2.1 Setting up the Lineage
OBIEE or ODI administrators set up the lineage process. Setting up this process is required once and consists of the following tasks:
-
Deploying the Lineage Artifacts for OBIEE
-
Configuring and automating the Extraction/Consolidation (Refresh) Process
17.1.2.2 Refreshing the Lineage
OBIEE or ODI project managers refresh the lineage when either ODI or OBIEE metadata has changed, to synchronize the lineage tables content with their active OBIEE and ODI systems' metadata. This refresh process:
-
Extracts the OBIEE Metadata from a OBIEE Instance
-
Consolidates the OBIEE and ODI Metadata in the Lineage Tables stored in the ODI Work Repository.
During this phase, a correspondence between the ODI Data Models and the OBIEE Physical Databases must be provided. By doing this mapping, you indicate that an existing model definition in Oracle Data Integrator corresponds to an existing database in OBIEE. These two should contain the same tables. By providing this mapping information, you enable the lineage to consolidate the OBIEE and ODI metadata and build an end-to-end lineage.
17.1.2.3 Using the Lineage
The lineage is used to extend existing dashboards. You can create specific links in these dashboards to browse the data lineage and view the execution statistics of the ODI sessions.
You can also customize your own dashboards using the pre-packaged Lineage Artifacts for OBIEE.
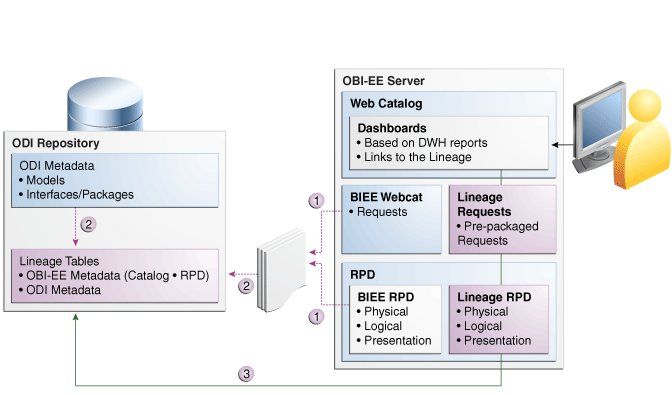
Figure 17-1 describes the Lineage lifecycle after the initial setup.
The BIEE metadata is extracted (1) and consolidated with the ODI Metadata in the lineage tables (2). The lineage tables are accessed from the end-user's dashboard (3) through the Lineage Artifacts deployed in the BIEE Server.
17.2 Installing the Lineage in an OBIEE Server
This section contains information and instructions for installing OBIEE Lineage:
17.2.1 Installation Overview
Installing Lineage in an OBIEE Server deploys the required OBIEE artifacts in the OBIEE Repository and Web Catalog. The OBIEE Lineage artifacts are the Lineage RPD, the Lineage Web Catalog Requests, and the dashboard images. These artifacts are used to access the lineage content from your reports and dashboards.
The installation is performed using the OBIEE Lineage Wizard. This wizard guides you through the installation, and also through the configuration and refresh of the Oracle Data Integrator (ODI) Lineage for Oracle Business Intelligence Enterprise edition (OBIEE).
After installation and configuration are complete, there are some post-installation tasks you need to perform, depending on your OBIEE version.
The complete installation flow is as follows:
Installation Flow when Using OBIEE 10g
When using OBIEE 10g, the OBIEE Lineage wizard installs only the Lineage RPD. To install the Lineage Web Catalog Requests and the dashboard images, you have to perform some additional tasks. The following installation flow describes the complete installation instructions, including the deployment of the Web Catalog Requests and Images:
-
Review the Requirements.
-
Installing and Starting the OBIEE Lineage Wizard.
Note that you can also use the install lineage script instead of the OBIEE Lineage wizard. See Section 17.5.2, "Automating Lineage Deployment" for more information.
-
Use the OBIEE Lineage wizard to install Lineage in OBIEE Server and deploy the OBIEE Lineage artifacts. See Section 17.2.3.2, "Deploying the OBIEE Lineage Artifacts using the Wizard".
-
Deploy the Web Catalog requests in the OBIEE 10g Web Catalog. See Section 17.2.4, "Post-Installation Tasks".
-
Deploy the images. See Section 17.2.4, "Post-Installation Tasks".
-
Update the BI Physical Layer Connection to ODI Work Repository. See Section 17.2.4, "Post-Installation Tasks".
Installation Flow when Using OBIEE 11g
When using OBIEE 11g, the OBIEE Lineage wizard installs only the Lineage RPD and the Web catalog Requests. To install the dashboard images, you have to perform some additional tasks. The following installation flow describes the complete installation instructions, including the deployment Images:
-
Review the Requirements.
-
Installing and Starting the OBIEE Lineage Wizard.
Note that you can also use the install lineage script instead of the OBIEE Lineage wizard. See Section 17.5.2, "Automating Lineage Deployment" for more information.
-
Use the OBIEE Lineage wizard to install Lineage in OBIEE Server and deploy the OBIEE Lineage artifacts. See Section 17.2.3.2, "Deploying the OBIEE Lineage Artifacts using the Wizard".
-
Deploy the images. See Section 17.2.4, "Post-Installation Tasks".
-
Update the BI Physical Layer Connection to ODI Work Repository. See Section 17.2.4, "Post-Installation Tasks".
17.2.2 Requirements
Before installing OBIEE Lineage, you should review the following requirements:
-
The OBIEE Lineage Wizard requires a Java Runtime Environment 1.6 (JRE). Before starting the wizard, make sure that your JAVA_HOME is pointing to a valid JRE.
-
The work repository has to be stored in an Oracle database.
-
Before installing the artifacts, stop the BI Server and BI Presentation services component.
-
Make a backup copy of the OBIEE RPD and Webcat.
-
Make sure the RPD file used by the server is NOT open in the BI Admin tool.
-
Install and Execute OBIEE Lineage Wizard or Command Line tools on the machine where the BI Admin tool is installed.
-
The database user used to connect the Work Repository schema must have sufficient privileges to create views in the schema hosting the Work Repository.
17.2.3 Installation Instructions
This section provides the installation instructions and contains the following topics:
Note:
After performing the installation instructions, please perform the required post-installation tasks describes in Section 17.2.4, "Post-Installation Tasks".17.2.3.1 Installing and Starting the OBIEE Lineage Wizard
The OBIEE Lineage wizard is included in the odiobilineage.zip file, which is located in the <ODI_Home>/odi/misc/biee-lineage directory.
Perform the following steps to start the OBIEE Lineage wizard:
-
Extract the contents of the zip file to a directory. For example, extract the content of this file to
C:\biee_lineage\folder. -
Start the wizard by executing one of the following commands from the
/binsub-folder:-
On UNIX operating systems:
./refreshlineage.sh -
On Windows operating systems:
refreshlineage.bat
You can also use the
installlineage.batscript to start the wizard. When one of these scripts is started with no parameter, it opens the OBIEE Lineage Wizard -
Note:
You can also use the install lineage script instead of the OBIEE Lineage wizard for installing the Lineage Artifacts from a command line. The install and export options are supported only on Windows. The refresh lineage option is supported both on Windows and Unix. See Section 17.5.2, "Automating Lineage Deployment" for more information.17.2.3.2 Deploying the OBIEE Lineage Artifacts using the Wizard
This section describes how to install OBIEE Lineage in OBIEE Server and how to deploy the required OBIEE Lineage artifacts in the OBIEE Repository and Web Catalog using the OBIEE Lineage wizard.
To install Lineage in OBIEE Server and deploy the required artifacts:
-
Start the wizard as described in Section 17.2.3.1, "Installing and Starting the OBIEE Lineage Wizard".
The wizard displays a sequence of screens, in the order listed in Table 17-1.
-
Follow the instructions in Table 17-1.
If you need additional help with any of the installation screens, click Help to access the online help.
Table 17-1 Instructions for Deploying the OBIEE Lineage Artifacts
| No. | Screen | When Does This Screen Appear? | Description and Action Required |
|---|---|---|---|
|
1 |
Welcome Screen |
Always |
Click Next to continue. |
|
2 |
Select Action Screen |
Always |
Select Install Lineage in OBIEE Server. Click Next to continue. |
|
3 |
OBIEE Repository Connection Information Screen |
If Install Lineage in OBIEE Server or Export Metadata from OBIEE and Refresh Lineage is selected on the Select Action screen. |
Provide the connection information to your existing OBIEE Repository for deploying the required Lineage Artifacts:
Click Next to continue. |
|
4 |
OBIEE Web Catalog Connection Information Screen |
If Install Lineage in OBIEE Server or Export OBIEE Metadata and Refresh Lineage is selected on the Select Action screen. If using OBIEE 10g, this screen is disabled. You must manually install the Lineage Artifacts. See Section 17.2.4, "Post-Installation Tasks" for more information. |
Provide the connection information to the OBIEE Web Catalog for installing the required Lineage Artifacts:
Click Next to continue and deploy the lineage artifacts. |
|
5 |
Wallet Information Screen |
Always |
Select Store passwords in secure wallet check box. Enter the wallet password or create a new wallet password and click OK. Click Next to continue. Note: If you do not want to store the passwords in secure wallet, ensure that the Store passwords in secure wallet check box is not selected and click Next. |
|
6 |
Action Complete Screen |
Always |
Click Finish to complete the wizard. |
After installing the Lineage on the OBIEE Server, you should deploy the OBIEE Lineage Artifacts. See Section 17.2.4, "Post-Installation Tasks" for more information.
17.2.4 Post-Installation Tasks
This section describes the post-installation tasks. Theses tasks depend on your OBIEE Server version.
For OBIEE 10g, you need to perform the following post-installation tasks:
-
Deploy the Web Catalog Requests in the OBIEE 10g Web Catalog
-
Update the BI Physical Layer Connection to the ODI Work Repository
For OBIEE 11g, you need to perform the following post-installation tasks:
Deploy the Web Catalog Requests in the OBIEE 10g Web Catalog
Note:
This procedure is required for OBIEE 10g only.The OBIEE/ODI Lineage comes with a Web Catalog for building your reports on top of the Lineage and ODI Repository tables.To import the Web Catalog requests, perform the following steps:
-
Connect to your Web Catalog.
To connect to your Web Catalog:
-
Select Start > All Programs > Oracle Business Intelligence > Catalog Manager.
-
Click File > Open Catalog.
-
Provide the path to the web catalog used by the BI Server.
-
Click OK.
-
-
(Optional Step) Make a backup copy of the catalog into which you want to install the lineage artifacts.
To make a backup copy:
-
Select the catalog.
-
Select File > Archive.
-
Provide a name for the archive file, for example
webcatalog_backup.cat. -
Click OK.
-
-
Expand the catalog and select the shared folder into which the ODI catalog items will be imported.
-
Select File > Unarchive.
-
In the Unarchive catalog window, enter in the Archive File Path field the location of the ODI catalog archive file. Note that this file is located in the
/artifacts/10gsub-folder of the Lineage installation folder.-
For OBIEE 10.1.3.3, enter
artifacts/10godi_catalog_archive_10g.cat -
For OBIEE 10.1.3.4, enter
artifacts/10g/odi_catalog_archive_10_1_3_4.cat
-
-
Click OK.
A new folder called ODI appears in the catalog folder.
The prepackaged requests use images that should be deployed into the application server that hosts the analytic application. Theses tasks depend on your OBIEE Server version:
-
For OBIEE 10g, copy the dashboard images (
hie.gifandlin.gif, located in the/artifacts/imagessub-folder of the Lineage installation folder) to theresfolder under the deployment directory of the BI analytics application.For example:
<OC4J_HOME>\j2ee\home\applications\analytics\analytics\res -
For OBIEE 11g, copy the dashboard images (
hie.gifandlin.gif, located in the in the/artifacts/imagessub-folder of the Lineage installation folder) to theresfolder under the deployment directory of the BI analytics application.For example:
<DOMAIN_HOME>\servers\<SERVER_NAME>\tmp\_WL_user\analytics_11.1.1\7dezjl\war\res
Update the BI Physical Layer Connection to the ODI Work Repository
-
Start the Oracle BI Administration tool. For example, select All Programs > Oracle Business Intelligence > Administration.
-
Open the RPD file (
.rpd) used by the BI Server. -
Expand the ORACLE_ODI_REPOSITORY database in the OBIEE Physical Layer, double-click the Connection Pool node, and edit the Connection Pool to match your ODI work repository configuration:
-
Update the Data source name, Username and Password fields.
-
Click OK.
-
Right-click the Physical schema and rename it to match the schema of the ODI Work Repository.
-
Click OK to save your changes.
-
-
Expand the renamed schema and test this updated connection as follows:
-
Right-click one of the tables of this physical schema and updating the row count.
-
Right-click the same table again and select View data to view data with the updated row count.
-
17.3 Exporting Metadata from OBIEE and Refreshing the OBIEE Lineage
This section describes how to export metadata from the OBIEE Repository and Web Catalog and how to consolidate it with ODI Metadata into the Lineage.
To export metadata from OBIEE and Refresh Lineage:
-
Start the OBIEE Lineage wizard as described in Section 17.2.3.1, "Installing and Starting the OBIEE Lineage Wizard".
Note:
With OBIEE 10g it is not possible to automatically export the web catalog content; As a consequence, you need to perform manually an export of the web catalog content. See Section 17.4.2, "Exporting the OBIEE Web Catalog Report to a Text File" for more information.You will provide the location of this export file to the wizard.
Note:
You can also use the refresh lineage script instead of the OBIEE Lineage wizard. See Section 17.5.3, "Automating Lineage Refresh" for more information.The wizard displays a sequence of screens, in the order listed in Table 17-2.
-
Follow the instructions in Table 17-2.
If you need additional help with any of the installation screens, click Help to access the online help.
Table 17-2 Instructions for Exporting Metadata from OBIEE and Refreshing Lineage
| No. | Screen | When Does This Screen Appear? | Description and Action Required |
|---|---|---|---|
|
1 |
Welcome Screen |
Always |
Click Next to continue. |
|
2 |
Select Action Screen |
Always |
Select Export Metadata from OBIEE and Refresh Lineage. Click Next to continue. |
|
3 |
OBIEE Repository Connection Information Screen |
If Install Lineage in OBIEE Server or Export Metadata from OBIEE and Refresh Lineage is selected on the Select Action screen |
Provide the connection information to the OBIEE Repository for extracting Metadata:
Click Next to continue. |
|
4 |
OBIEE Web Catalog Connection Information Screen |
If Install Lineage in OBIEE Server or Export OBIEE Metadata and Refresh Lineage is selected on the Select Action screen. If using OBIEE 10g, This screen only allows selection of a Web Catalog Export File. |
Provide the connection information to extract metadata from the OBIEE Web Catalog (OBIEE 11g), or provide the location to a web catalog export (OBIEE 10g):
Click Next to continue and install the lineage artifacts. |
|
5 |
ODI Repository Connection Information Screen |
If Export Metadata from OBIEE and Refresh Lineage or Refresh Lineage is selected on the Select Action screen. |
Provide the ODI repository connection information: Oracle Data Integrator Connection
Database Connection (Master Repository)
Work Repository
Click Next to continue. |
|
6 |
Mapping Information |
If Export Metadata from OBIEE and Refresh Lineage or Refresh Lineage is selected on the Select Action screen. |
Use this table to provide the correspondence mapping between the ODI data models and the OBIEE physical schemas:
Click Next to continue. |
|
7 |
Wallet Information Screen |
Always |
Select Store passwords in secure wallet check box. Enter the wallet password or create a new wallet password and click OK. Click Next to continue. Note: If you do not want to store the passwords in secure wallet, ensure that the Store passwords in secure wallet check box is not selected and click Next. |
|
8 |
Action Complete Screen |
Always |
Click Finish to dismiss the wizard. |
17.4 Refreshing the OBIEE Lineage from Existing Exports
This section describes how to refresh the OBIEE Lineage from existing exports. This operation consolidates OBIEE Repository and Web Catalog exports manually created with ODI Repository metadata into the Lineage. This section also describes how to export the OBIEE Repository and the Web Catalog.
This section contains the following topics:
17.4.1 Exporting the OBIEE Repository Documentation to a Text File
This section explains how to manually export the OBIEE Repository metadata for consolidating it in the OBIEE Lineage.
To export the OBIEE Repository documentation to a text file:
-
Open the Oracle BI Administration tool and connect to the OBIEE Repository containing the metadata that you want to include in the lineage.
-
In the OBIEE Administration tool, select Tools > Utilities.
-
In the Utilities dialog, select the Repository Documentation utility and click Execute.
-
Save the repository documentation in a temporary file, for example
c:\temp\repo_doc.txt.Make sure to save this repository documentation as Tab-separated values (*.txt) file type
-
Click Save.
17.4.2 Exporting the OBIEE Web Catalog Report to a Text File
This section explains how to manually export the OBIEE Web Catalog metadata for consolidating it in the OBIEE Lineage.
To export the OBIEE Web Catalog report to a text file:
-
Open OBIEE Catalog Manager and connect to the catalog that contains the metadata that you want to include in the lineage.
-
Select the catalog folder containing the reports that you want to include in the lineage, for example
/shared/Paint Demoor/shared/ODI. -
Select Tools > Create Report.
-
In the Create Catalog Report dialog, select the following columns to include in the report: Owner, Request Folder, Request Name, Request Subject Area, Request Criteria Formula, Request Criteria Table, Request Criteria Column.
M ake sure to include these columns in this precise order.
-
Save the report in a temporary file, for example
c:\temp\webcat_doc.txt. -
Click OK.
-
Check the Report Preview and click OK.
17.4.3 Refreshing the OBIEE Lineage From Existing Exports
This section describes how to refresh the OBIEE Lineage from existing OBIEE Repository and Web Catalog exports created manually.
To refresh the OBIEE Lineage:
-
Start the OBIEE Lineage wizard as described in Section 17.2.3.1, "Installing and Starting the OBIEE Lineage Wizard".
Note:
You can also use the refresh lineage script instead of the OBIEE Lineage wizard. See Section 17.5.3, "Automating Lineage Refresh" for more information.The wizard displays a sequence of screens, in the order listed in Table 17-3.
-
Follow the instructions in Table 17-3.
If you need additional help with any of the installation screens, click Help to access the online help.
Table 17-3 Instructions for Refreshing the OBIEE Lineage Artifacts
| No. | Screen | When Does This Screen Appear? | Description and Action Required |
|---|---|---|---|
|
1 |
Welcome Screen |
Always |
Click Next to continue. |
|
2 |
Select Action Screen |
Always |
Select Refresh Lineage. Click Next to continue. |
|
3 |
OBIEE Export Location Screen |
Only if Refresh Lineage is selected on the Select Action screen. |
Provide the location of the OBIEE metadata exports:
Click Next to continue. |
|
4 |
ODI Repository Connection Information Screen |
If Export Metadata from OBIEE and Refresh Lineage or Refresh Lineage is selected on the Select Action screen. |
Provide the ODI repository connection information: Oracle Data Integrator Connection
Database Connection (Master Repository)
Work Repository
Click Next to continue. |
|
5 |
Mapping Information |
If Export Metadata from OBIEE and Refresh Lineage or Refresh Lineage is selected on the Select Action screen. |
Use this table to provide the correspondence mapping between the ODI data models and the OBIEE physical schemas:
Click Next to continue. |
|
6 |
Wallet Information Screen |
Always |
Select Store passwords in secure wallet check box. Enter the wallet password or create a new wallet password and click OK. Click Next to continue. Note: If you do not want to store the passwords in secure wallet, ensure that the Store passwords in secure wallet check box is not selected and click Next. |
|
7 |
Action Complete Screen |
Always |
Click Finish to dismiss the wizard. |
17.5 Automating the Lineage Tasks
Scripts are also provided to automate the lineage tasks. These scripts can be used instead of the wizard and require that option values are provided in a property file instead.
The scripts for automating the lineage tasks are in the /bin sub-folder of the Lineage installation folder.
This section describes how to automate lineage tasks with scripts and contains the following topics:
17.5.1 Configuring the Scripts
Before starting any of the scripts, you need to provide the configuration information in a property file. This property file contains the values provided via the wizard user interface.
Note:
When running the wizard, a property file is automatically generated in the/tmp sub-folder of the Lineage installation folder. You can re-use this property file as a starting point for working with the command line scripts.Figure 17-4 lists the properties defined in the property file.
| Property | Values | Required for | Description |
|---|---|---|---|
|
OBIEE_VERSION |
|
install | export |refresh |
Version of the OBIEE Server. |
|
OBIEE_RPD |
|
install | export |
Location of the repository (.rpd) file of the BI Server. |
|
OBIEE_WEBCAT |
|
install | export Required only for OBIEE 11g |
Location of the Web Catalog folder used by the BI Server. |
|
OBIEE_RPD_PASS |
|
install | export |
The RPD File Password. |
|
OBIEE_RPD_USER |
|
install | export Required only for OBIEE 10g |
The RPD File username. |
|
OBIEE_RPD_EXPORT_FILE |
|
refresh |
Location of the OBIEE Repository Documentation export file used for refreshing the lineage. |
|
OBIEE_WEBCAT_EXPORT_FILE |
|
refresh |
Location of the OBIEE Web catalog report used for refreshing the lineage. |
|
OBIEE_ORACLE_HOME |
|
install | export |
The BI Server Oracle Home directory |
|
OBIEE_INSTANCE_HOME |
|
install | export Required only for OBIEE 11g. |
The BI Server Instance Home directory. |
|
ODI_MASTER_URL |
|
export | refresh |
The JDBC URL to connect to the ODI Master Repository |
|
ODI_MASTER_DRIVER |
|
export| refresh |
The DB Driver to connect to the ODI Master Repository |
|
ODI_SUPERVISOR_PASS |
|
export | refresh |
The ODI Password for ODI User with SUPERVISOR privileges |
|
ODI_SUPERVISOR_USER |
|
export |refresh |
The ODI user with SUPERVISOR privileges |
|
ODI_MASTER_USER |
|
export | refresh |
The ODI Master repository username |
|
ODI_MASTER_PASS |
|
export | refresh |
The ODI Master repository password |
|
ODI_SECU_WORK_REP |
|
export | refresh |
The Name of the Work Repository containing the lineage tables. |
|
OBIEE_WEBCAT_FOLDER_TO_EXPORT |
|
install | export |
The Web Catalog folder to export in the report. For example: |
|
INSTALL_ODI_LINEAGE |
|
only used in script |
Set to |
|
EXPORT_OBIEE_METADATA |
|
only used in script |
Set to |
Example 17-1 shows a sample property file:
# Version of BIEE Server. Values: 10g / 11g
OBIEE_VERSION=10g

# The location of the repository documentation (.rpd) file of the BI Server
OBIEE_RPD=C:/obiee11g/instances/instance2/bifoundation/ OracleBIServerComponent/coreapplication_obis1/repository/TechDemo_11g.rpd

# The location of the Web Catalog folder used by the BI Server.
# Required only for OBIEE 11g.
OBIEE_WEBCAT=C:/obiee11g/instances/instance2/bifoundation/ OracleBIPresentationServicesComponent/coreapplication_obips1/catalog/TechDemo

# The OBIEE Repository user. Required only for OBIEE 10g.
OBIEE_RPD_USER=Administrator
# The password of the OBIEE Repository user
OBIEE_RPD_PASS=<obiee password>

# The location of the exported Repository Documentation file
OBIEE_RPD_EXPORT_FILE=c:/odi/lineage/run/repo_doc.txt
# The location of the exported Web catalog file
OBIEE_WEBCAT_EXPORT_FILE=c:/odi/lineage/run/webcat_doc.txt

# The BI Server Oracle Home directory
OBIEE_ORACLE_HOME=C:/obiee11g/Oracle_BI1
 # The BI Server Instance Home directory. Required only for OBIEE 11g.
OBIEE_INSTANCE_HOME=C:/obiee11g/instances/instance2

# The JDBC URL to connect to the ODI Master Repository
ODI_MASTER_URL=jdbc:oracle:thin:@localhost:1521:orcl
# The JDBC Driver to connect to the ODI Master Repository
ODI_MASTER_DRIVER=oracle.jdbc.OracleDriver
# The Database user for the schema that contains the ODI master repository.
ODI_MASTER_USER=MASTER_REPO
# This user's password
ODI_MASTER_PASS=<master_password>

# The ODI user with SUPERVISOR privileges
ODI_SUPERVISOR_USER=SUPERVISOR
# The ODI Password of the ODI User with SUPERVISOR privileges
ODI_SUPERVISOR_PASS=<supervisor password>

# Work Repository containing the lineage
ODI_SECU_WORK_REP=WORK_REP1

# The Web Catalog folder to export in the report. Eg: /shared/ODI
OBIEE_WEBCAT_FOLDER_TO_EXPORT=/shared/ODI

# Option to deploy ODI Artifacts on the BI Server.
INSTALL_ODI_LINEAGE=no
# Option to export BI Metadata as flat files
EXPORT_OBIEE_METADATA=yes
To avoid storing the passwords in plain text, use the encode.[sh|cmd] <password> command to encode and store the passwords in the property file. If the password are encoded, the property names will change to ODI_MASTER_REPO_ENCODED_PASS, ODI_SUPERVISOR_ENCODED_PASS, and OBIEE_RPD_ENCODED_PASS.
17.5.2 Automating Lineage Deployment
The install lineage script deploys the following ODI Artifacts in the OBIEE Server:
-
Lineage RPD
-
Lineage Web Catalog (11g OBIEE only)
The script uses the OBIEE tools to merge the Lineage RPD and Lineage Web Catalog with the BIEE Server components.
Note:
After running this script, you have to perform the tasks described in Section 17.2.4, "Post-Installation Tasks".The script syntax is as follows:
installlineage.bat [-propertyFile=property_file] [-prop_name=prop_value [...]] [-usage]
where:
-
propertyfilerepresents the Property File that contains all the required properties to install the lineage artifacts. See Section 17.5.1, "Configuring the Scripts" for more information. If no value is specified, the User Wizard will be launched to gather the required information from the User. All the properties in the property file can be overridden by specifying the property value in the command line option-propName=propValue. -
prop_namerepresents the property that can be specified. The value specified inprop_valuewill override the value specified in the property file (if any). -
prop_valuerepresents the value for theprop_nameproperty. It will override the value specified in the property file (if any). -
usageprints the detailed usage information -
walletPasswordrepresents the value of the wallet password. If this option is not provided, you will be prompted to enter the password through command line. This option is valid only for command line mode execution of the Lineage tool and not the UI wizard mode.
17.5.3 Automating Lineage Refresh
The refresh lineage script performs one of the following operations, depending on the value set in the EXPORT_OBIEE_METADATA option defined in the property file:
-
Export and refresh metadata, if the EXPORT_OBIEE_METADATA option is set to
Yes -
Refresh lineage metadata, if the EXPORT_OBIEE_METADATA option is set to
No
Note that in order to use refreshlineage.sh you need to manually copy the repo_doc.text and the webcat_doc.txt files to the target Linux machine.
The script syntax is as follows:
refreshlineage [-propertyFile=property_file] [-mappingFile=mapping_file] [-prop_name=prop_value [...]] [-usage]
where:
-
propertyfilerepresents the Property File that contains all the required properties to export and consolidate lineage metadata. See Section 17.5.1, "Configuring the Scripts" for more information. If no value is specified, the User Wizard will be launched to gather the required information from the User. All the properties in the property file can be overridden by specifying the property value in the command line option-prop_name=prop_value. -
mappingfilerepresents the mapping of the Model code to BI_PHYSICAL_DB, BI_PHYSICAL_SCHEMA and BI_PHYSICAL_CATALOG. This mapping must be provided in the form of a comma separated values (.csv) file. -
walletPasswordrepresents the value of the wallet password. If this option is not provided, you will be prompted to enter the password through command line. This option is valid only for command line mode execution of the Lineage tool and not the UI wizard mode.
Note:
Ifpropertyfile and mappingfile options are not specified, the UI wizard will be shown to take user input. Otherwise the script will be run from command line itself taking the values from the property file and mapping file to refresh lineage and the UI wizard will not be shown.Example 17-2 shows a sample mapping file.
# (c) Copyright Oracle.  All rights reserved.
# Sample Mapping File for ODI-OBIEE Metadata Lineage
# Format: BI Physical DB, BI Physical Schema, BI Physical Catalog, ODI Model ID
# Note: Lines starting with # are considered as comments.
DB-1,Schema-1,Catalog-1,model1
DB-2,Schema-2,Catalog-2,model2
17.6 Using the Lineage in OBIEE Dashboards
The OBIEE Lineage Artifact deployed in the BIEE Server allow for many usage scenarios. The most common usage scenarios are listed in this section:
17.6.1 Viewing Execution Statistics
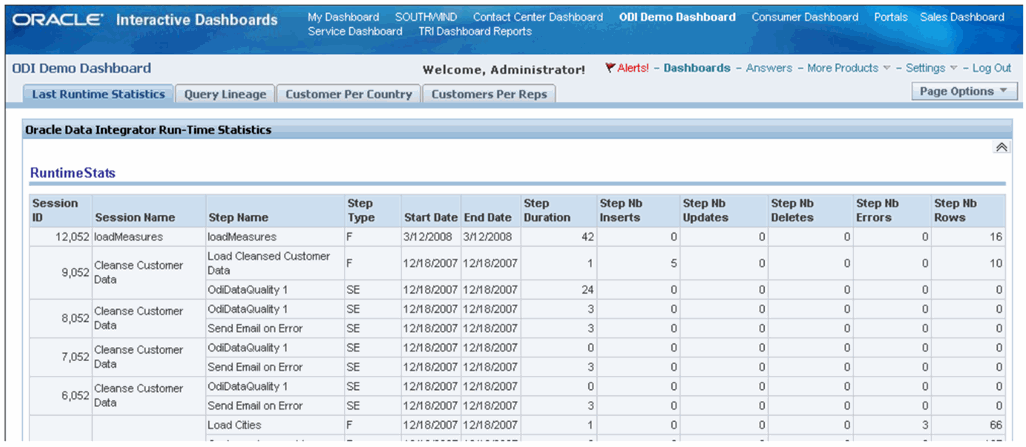
In this scenario, we want to display the execution statistics of ODI within a OBI-EE dashboard.
To add ODI statistics, insert the RuntimeStats request from the Lineage Web Catalog into your dashboard. The statistics appear as shown in Figure 17-2.
17.6.2 Viewing and Filtering Lineage Data
In this scenario, you want to view the lineage data and filter the results.
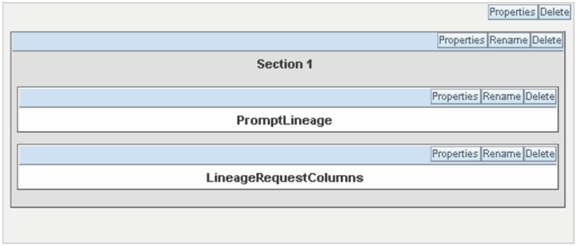
To create such a dashboard, add the Prompt Lineage dashboard prompt and the LineageRequestColumns request on a dashboard. Both objects are in the lineage web catalog as shown in Figure 17-3.
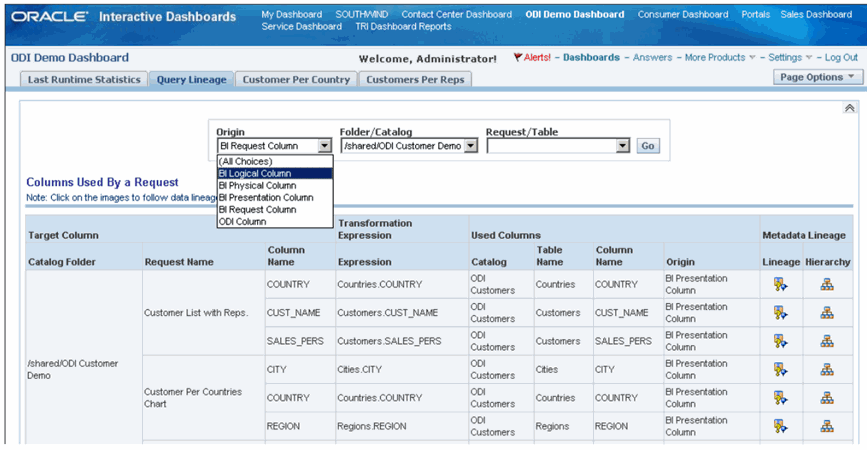
Figure 17-4 shows the resulting dashboard.
17.6.3 Using the Dashboard
In this dashboard, you can filter using:
-
The Origin of the column (ODI Column or OBI-EE Logical, Physical, Presentation or Request Column)
-
The OBI-EE Folder/Catalog or ODI Project containing the table and the column
-
The Request or table containing the column
Click Go to display the filtered list of columns.
17.6.4 Using Lineage and Hierarchy
From this request, you can display the Lineage and Hierarchy for each column by clicking one of the following buttons:
| Lineage | |
| Hierarchy |
The Lineage icon allows you to drill down into a column lineage. The lineage goes down the following path:
> The OBIEE Presentation Column(s) used in a request's column
> The OBIEE Logical Column(s) used in a Presentation Column
> The OBIEE Physical Column(s) used in a Presentation Column
> The ODI Column(s) corresponding to OBIEE Physical Column(s)
> The ODI source columns used to load a given ODI target column via an ODI mapping. This path can recurse if the source columns are targets for other ODI mappings.
For each level of the lineage, the dashboard displays:
-
The Type, Catalog, Table Name, and Column Name for the (target) column
-
The Type, Catalog, Table Name, and Column Name for the (source) column(s)
-
The transformation Expression between the source column(s) and the target column
-
If the expression is an ODI mapping, you can drill down the ODI run-time statistics (Exec. Stats) for this transformation.
-
You can drill down at any point of the lineage by clicking Lineage in the view.
Figure 17-5 shows one lineage level displayed in a dashboard.
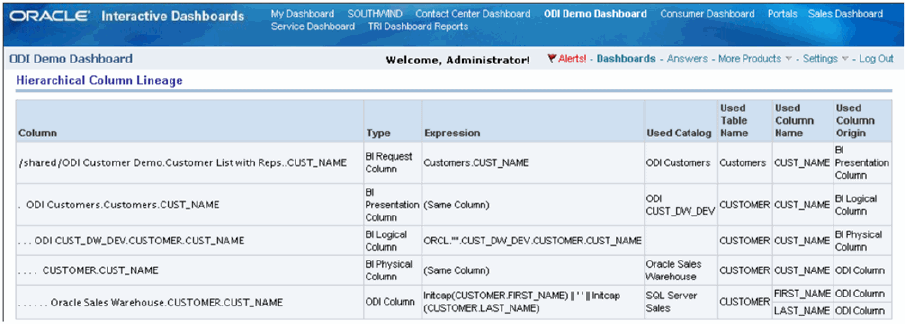
The Hierarchy displays the entire lineage of a given request column in a hierarchical view. Figure 17-6 shows the hierarchical column lineage.
17.6.5 Using Contextual Lineage
You can create contextual lineage link using the LineageRequestColumns on any dashboard. This contextual lineage link will open a dashboard showing the lineage for a given request.
To create contextual lineage:
-
Edit a Dashboard.
-
Insert a Text object with the following code:
<p><font class=Nav onclick="JavaScript:GoNavEx(event, '<lineage_requests_folder>/LineageRequestColumns','','Target Column','Catalog','<your_request_folder>','Target Column','Table Name','<your_request_name>');"><img src="res/lin.gif" alt="Navigate Metadata Lineage"> Metadata Lineage</font>
In this code, you must set the following items according to your configuration:
-
<lineage_requests_folder>is the folder containing the LineageRequestColumns request. This folder is the folder into which the OBIEE Lineage Requests have been deployed. -
<your_request_folder>is the folder containing the request for which you want to display the lineage. -
<your_request_name>is the name of the request for which you want to display the lineage.
For example, if the lineage requests are installed in the
/shared/ODIfolder, and you want to view lineage for the/shared/ODI Customer Demo/Customer Per Countries Chartrequest, the code will be:<p><font class=Nav onclick="JavaScript:GoNavEx(event, '/shared/ODI/LineageRequestColumns','','Target Column','Catalog','/shared/ODI Customer Demo','Target Column','Table Name','Customer Per Countries Chart');"><img src="res/lin.gif" alt="Navigate Metadata Lineage"> Metadata Lineage</font>
-
-
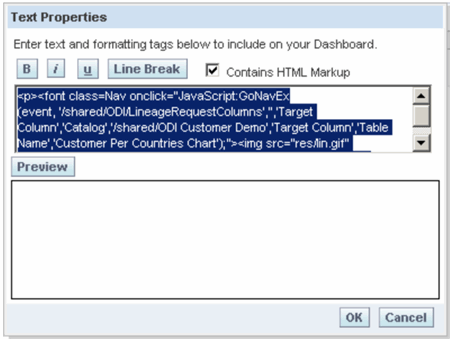
Before saving your code, make sure that Contains HTML Markup is selected in the Text Properties editor as shown in Figure 17-7.
This text will create a link on the dashboard that opens the column lineage for the given request.
-
Click OK.
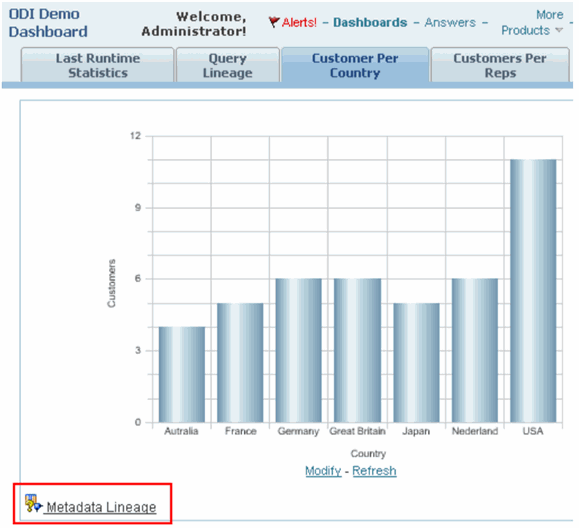
The Metadata Lineage object is added to the dashboard as shown in Figure 17-8.
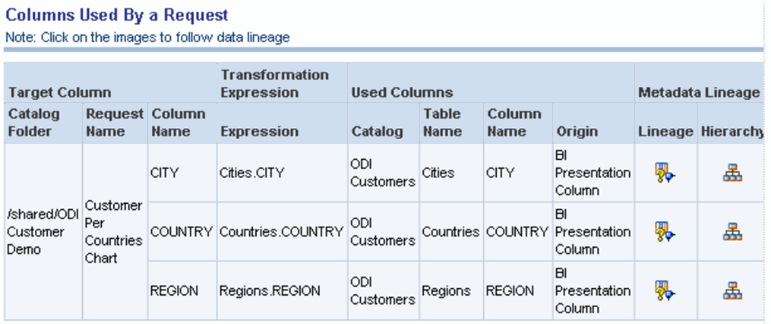
Clicking Metadata Lineage displays the dashboard shown in Figure 17-9.
Figure 17-9 What is displayed when clicking on "Metadata Lineage"
Description of ''Figure 17-9 What is displayed when clicking on "Metadata Lineage"''
