Using the Aggregate Persistence Wizard to Generate the Aggregate Specification
You can use the Aggregate Persistence Wizard to create the SQL file used to create and load aggregate tables and map them into the metadata.
The resulting SQL file must be executed against a running Oracle BI Server.
It is strongly recommended that you use the Aggregate Persistence Wizard because it automatically enforces many of the constraints necessary when generating the aggregate specification. However, you can manually write the aggregate Logical SQL as an alternative to using the wizard.
Before you run the Aggregate Persistence Wizard, you must map the target database where you plan to create the aggregates into the Physical layer. To do this, manually create the necessary database, connection pool, and physical schema objects.
Note:
If you are running Oracle Business Intelligence on Oracle Exalytics machine, you can use the Summary Advisor feature instead of the Aggregate Persistence Wizard to identify which aggregates will increase query performance and to generate a script for creating the recommended aggregates.
See the following:
-
Running the Aggregate Specification Against the Oracle BI Server
-
Using Oracle BI Summary Advisor to Identify Query Candidates for Aggregation
-
Run Model Check Manager to ensure that your repository does not contain modeling problems that can affect aggregate creation and performance.
Note:
Because Model Check Manager runs queries against back-end data sources for some checks, it is recommended to run it during off-peak periods. In addition, it can take a long time to run Model Check Manager for large repositories. Use Filtered by Statistics (where available), or run it only for selected objects, to improve performance.
-
Open your repository in the Administration Tool, if it is not open already.
You must run Model Check Manager in online mode. However, you can run the Aggregate Persistence Wizard in either online or offline mode.
-
Select Tools > Utilities > Aggregate Persistence, and then click Execute.
-
In Select File Location, specify the complete path and file name of the aggregate creation script.
You can specify a new or an existing file name.
Typically, when you run the SQL script against the Oracle BI Server, it creates DDL and runs it against the target database schema to create the aggregate tables, then loads them from the source, and finally creates the Oracle BI Server metadata so the aggregate navigation feature can use the new tables.
Alternatively, you can select Generate target DDL in a separate file if you want the DDL to be stored in a separate file from the Oracle BI Server SQL script. Selecting this option gives you the flexibility to alter the auto-generated DDL and run it independently of the Oracle BI Server. For example, you may want to alter the storage parameter or index settings.
When you select Generate target DDL in a separate file, two SQL scripts are generated in the directory you specify in the Location field:
-
The create aggregates script (script_name)
-
The prepare aggregates script (script_name_DDL)
After selecting Generate target DDL in a separate file and completing the wizard steps, you typically do the following:
-
Run the prepare aggregates script against the server. This action creates a DDL file at the following location:
ORACLE_INSTANCE\bifoundation\OracleBIServerComponent\coreapplication_obisn\
aggr
-
Run the generated DDL file against the target database to create the table.
-
Run the create aggregates script to populate the table.
Click Next after you have finished specifying options on the Select File Location screen.
-
-
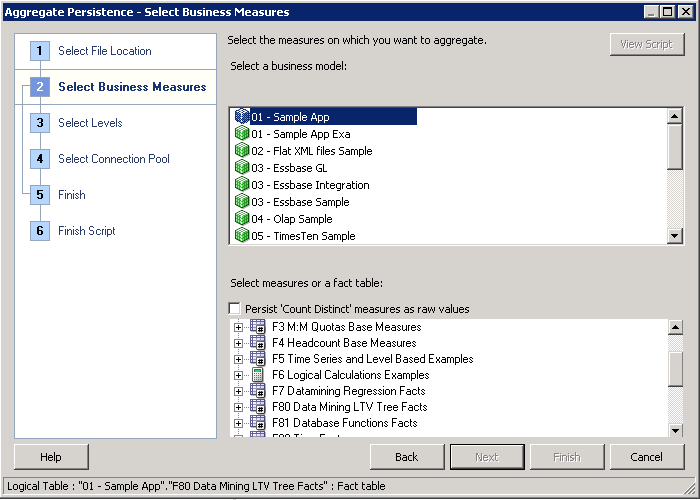
In the Select Business Measures screen, select the measures on which you want to aggregate. To do this, select a business model in the upper pane, then select a single fact table or a set of measures in the lower pane. You cannot select measures that span multiple fact tables. Use Ctrl-click to select multiple measures, or use Shift-click to select a range of consecutive measures.
Optionally select Persist 'Count Distinct' measures as raw values to add the
as_raw_valuesclause to all valid count distinct measures and to set an aggregation expression override on the corresponding logical column for each system-generated aggregate logical table source. Setting this option enables aggregate persistence to store actual values that are distinct-counted. If you do not select this option, then aggregate persistence stores pre-computed counts for the specified level combinations.The View Script button is not available during the creation of the first aggregate table block.
The image shows the Select Business Measures screen.
Click Next after you have selected the appropriate measures.
-
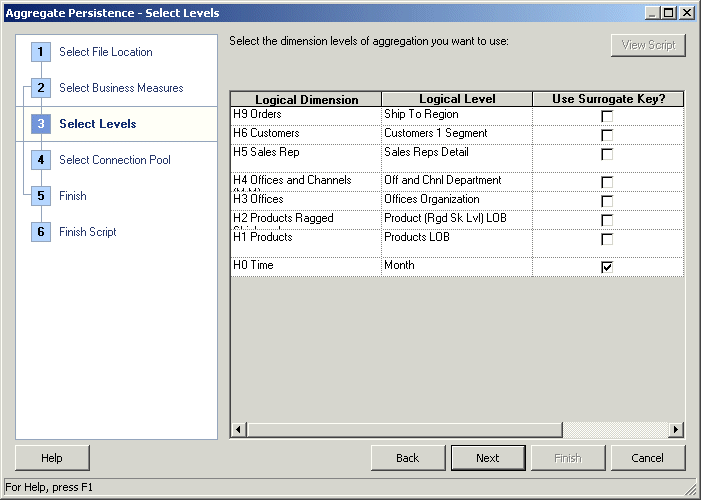
In the Select Levels screen, specify the level of aggregation by selecting a logical level for one or more dimensions. You can specify a surrogate key to be used for the fact-dimension join.
The default join option between the aggregated fact and dimension tables is the primary key defined in the logical level you selected. If the primary key of the level is large and complex, the join to the fact table is expensive, so using a surrogate key is recommended in this case. A surrogate key is an artificially generated key, usually a number. For example, a surrogate key in the level aggregate table would simplify this join, removing unnecessary (level primary key) columns from the fact table and resulting in a leaner fact table.
Using a surrogate key only changes the query response time, not the logical results of the queries. However, generating the surrogate keys can have the side effect of increasing the aggregate table load time. Therefore, the recommended setting is as follows:
-
If the primary key for the logical level you have selected is already a single, numeric column, you typically should not select the Use Surrogate Key option since it may add to load processing time without producing a performance benefit.
-
If the primary key for the logical level you have selected is a text string, or consists of multiple logical columns, you typically should use a surrogate key to improve the performance of the queries that join to that aggregate dimension. However, keep in mind that generating the surrogate key can increase the load time for that aggregate dimension table.
The image shows the Select Levels screen.
Click Next after you have selected the appropriate level of aggregation.
-
-
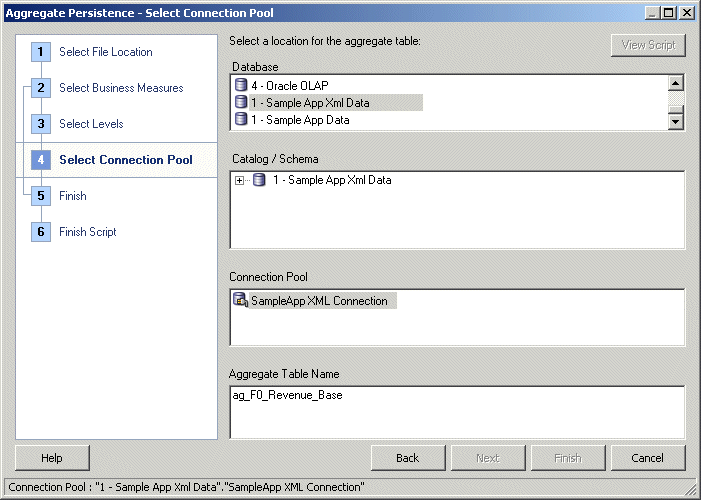
In the Select Connection Pool screen, select the appropriate items to specify a location for the aggregate table.
A default aggregate table name is provided, and a prefix is added to the table name. The default prefix for the generated fact table is
ag. For tables created for dimension (level) aggregates, the default prefix isSA_and can be changed by updating theAGGREGATE_PREFIXproperty inNQSConfig.INI.The image shows the Select Connection Pool screen.
Click Next after you have provided connection pool information.
-
In the Finish screen, the View Script button becomes available for use, and the Logical SQL script appears for your review. Choose whether to define another aggregate (default) or end the wizard, and then click Next.
-
In the Finish Script screen, the complete path and file name appears. Click Finish.


