26.2 Create a Single-Query Matrix
You can build a matrix report with a single-query in the data model. A single-query data model typically performs better than a multiple-query data model.
When you are creating a single-query report, such as this one, you can use the Report Wizard to create the data model and layout simultaneously.
To create a data model and layout:
-
Launch Reports Builder (or, if already open, choose File > New > Report).
-
In the Welcome or New Report dialog box, select Use the Report Wizard, then click OK.
-
If the Welcome page displays, click Next.
-
On the Report Type page, select Create Paper Layout Only, then click Next.
-
On the Style page, type a Title for your report, select Matrix, then click Next.
-
On the Data Source page, click SQL Query, then click Next.
-
On the Data page, enter the following
SELECTstatement in the Data Source definition field:SELECT TO_CHAR (HIREDATE, 'YY') YEAR, DEPTNO, JOB, SUM (SAL) FROM EMP GROUP BY TO_CHAR(HIREDATE, 'YY'), DEPTNO, JOB ORDER BY TO_CHAR(HIREDATE, 'YY'), DEPTNO, JOB
Note:
You can enter this query in any of the following ways:-
Copy and paste the code from the provided text file called
nested1_code.txtinto the Data Source definition field. -
Click Query Builder to build the query without entering any code manually.
-
Type the code in the Data Source definition field.
Note:
If you are not already connected to a database, you will be prompted to connect to the database when you click Query Builder or Next. Ensure that you connect to a database that has the appropriate schema for this example. Section 26.1, "Prerequisites for This Example" describes the sample schema requirements for this example. -
-
On the Rows page:
-
Click YEAR in the Available Fields list and click the right arrow (>) to move this field to the Matrix Row Fields list. YEAR should appear under Level 1.
Figure 26-2 First matrix row in the Report Wizard
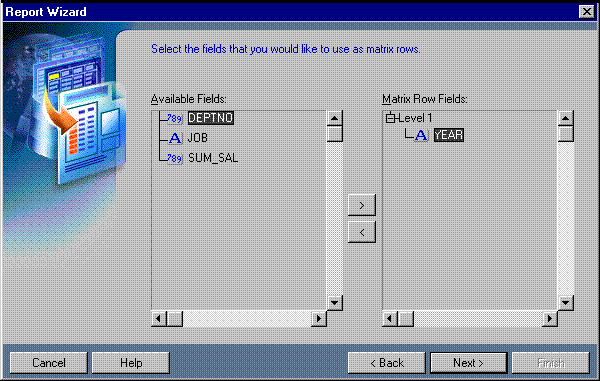
Description of ''Figure 26-2 First matrix row in the Report Wizard''
-
Click Level 1 in the Matrix Row Fields list. This step ensures that the next column added will be at Level 2 rather than Level 1.
-
Click DEPTNO in the Available Fields list and click the right arrow (>) to move this field to the Matrix Row Fields list. Notice that it is added under Level 2 rather than Level 1.
Figure 26-3 Second matrix row in Report Wizard
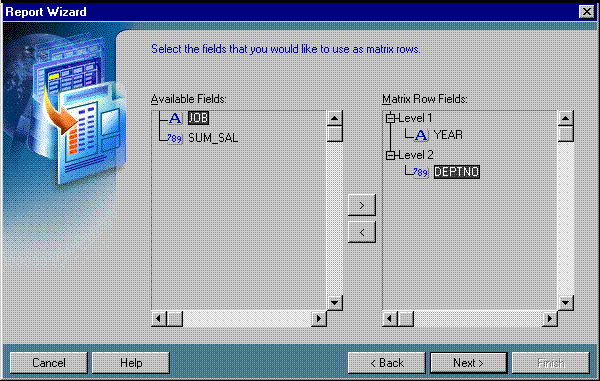
Description of ''Figure 26-3 Second matrix row in Report Wizard''
-
Click Next.
-
-
On the Columns page, click JOB and click the right arrow (>) to move this field to the Matrix Column Fields list. JOB should appear under Level 1, then click Next.
-
On the Cell page, click SUM_SAL and click the right arrow (>) to move this field to the Matrix Cell Fields list, then click Next.
-
On the Totals page, click Next.
-
On the Labels page, change the labels and field widths as follows, then click Next:
Fields Labels Width YEAR (no change)4DEPTNO (no change)(no change)JOB (no change)10SUM_SAL <none>10 -
On the Template page, make sure Beige is selected under Predefined Template, then click Finish to display your report output in the Paper Design view. It should look like this:
Figure 26-4 Paper Design view for the nested matrix report
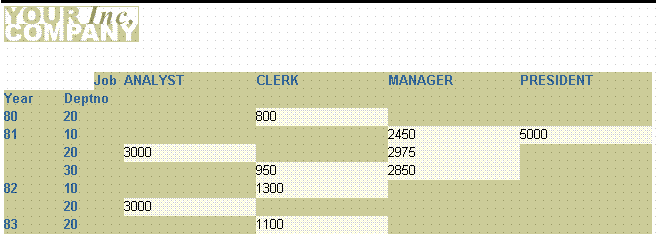
Description of ''Figure 26-4 Paper Design view for the nested matrix report''
Note:
You can set alignment and format monetary values directly in the Paper Design view. Simply click the item, then click the appropriate toolbar button (if you run the mouse over these buttons, hint text displays). If the Paper Design view and the Object Navigator are displayed side-by-side, notice that when you select an item in one, the selection is reflected in the other.