D Installing ODI SAP Components
This appendix describes how to update, install, and uninstall ODI SAP components. It also provides information on how to validate the ODI SAP setup.
This appendix includes the following sections:
D.1 Updating ODI SAP Components
The update path for the ODI SAP Components depends on which ODI SAP Adapter version had been used for installation.
-
Installations of ODI SAP Adapter prior to v32
For ODI SAP Adapter versions prior to v32 (= SAP package name is
ZODIBW_PCKG,ZODIERP_PCKG, orZODI_DEVCLASS, or the SAP function group isZODI_FGR, then please contact Oracle support for details on upgrading, particularly on how to uninstall the existing ODI SAP Components and how to handle any SAP function modules and reports for existing ODI SAP mappings or interfaces.To check the SAP package name, log in to SAP system >Go to transaction
SE80> provide package name as above. -
Installations of ODI SAP Adapter v32 or later
For any SAP systems, which have been installed using the ODI SAP Adapter v32 or later, there is no need for uninstallation. The new ODI SAP Components can be installed on top of an existing installation following the instructions in Section D.2, "Installing ODI SAP Components".
If you have any queries, please contact Oracle Technical Support.
D.2 Installing ODI SAP Components
Installation of the ODI SAP components is done through the use of TRs (SAP Transport Requests). These transport requests also contain the SAP user profiles. This section describes how to import the ODI SAP components and grant the required authorizations to the ODI SAP user by assigning the ODI SAP profiles.
This section includes the following topics:
D.2.1 Installing SAP Transport Request (TR)
Installation of SAP Transport Request requires downloading the TRs from Bristlecone e-delivery website.
This section includes the following topics:
-
Section D.2.1.3, "Creating Transport Request for ODI SAP Production Objects"
-
Section D.2.1.4, "Creating Transport Request for ODI SAP Development Objects"
D.2.1.1 Downloading the Transport Request files
Perform the following steps to download the TR files:
-
Go to the following Download URL:
http://www.bristleconelabs.com/edel/showdownload.html?product=odi_sap_km_transport -
Select the required file and click Download. You will be redirected to Login Page.
If you are a registered user, log in with the registered Email Id as user name and the password received.
If you are a new user, perform the following steps to register:
-
Go to the following URL:
-
Click Register.
-
Fill in the details in the registration form.
In the Email ID field, provide a valid business email address. This will be used to email your password.
-
Reopen the download link mentioned in step 1.
-
Select the appropriate SAP version of the TR and download.
-
D.2.1.2 Installing the Transport Request Files
Perform the following steps to install the TR files:
-
Log in to the desired SAP System where you want to import the Transport Request.
-
In the command field, type Tcode
STMSand press Enter.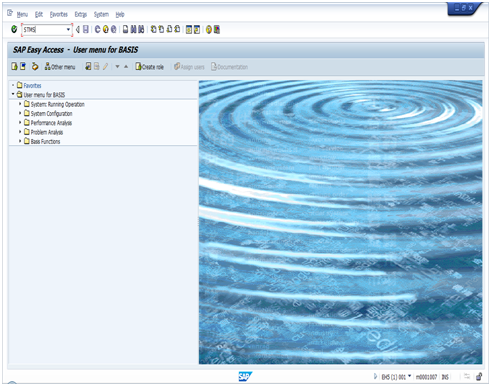
Description of the illustration ''command_STMS.png''
The Transport Management System screen appears.
-
Click the
 icon or press F5.
 -
In the Import Overview screen, double click on the target system. In this case, transport request is imported to Sandbox server by double clicking on SMX.
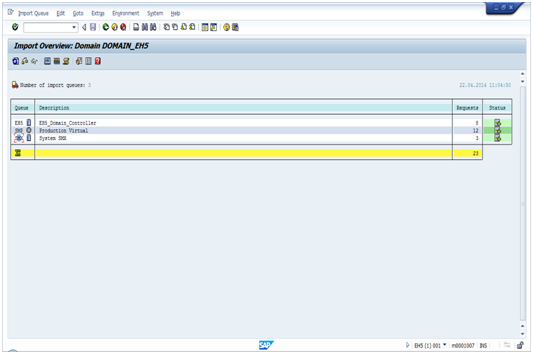
Description of the illustration ''importoverview.png''
-
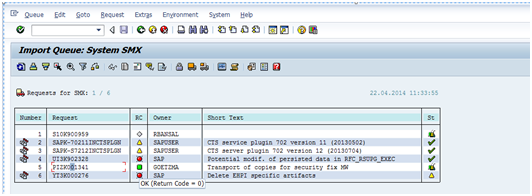
Refresh to update the transport list.
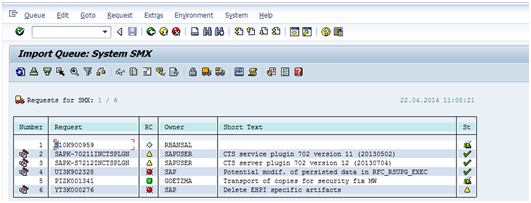
Description of the illustration ''importqueue.png''
-
If you want to add other Transport Request, click Extras> Other Requests> Add on the menu.
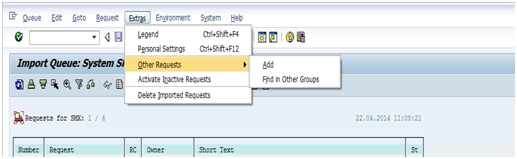
Description of the illustration ''extrasmenu.png''
The added Transport Request can be seen in the System Import Queue.
-
Type the Transport Request Number, click Import Again check box, and then click Continue.
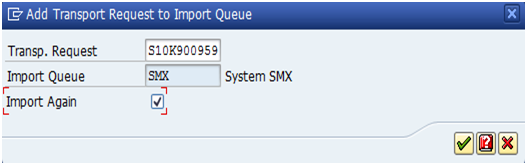
Description of the illustration ''addtrtoimportq.png''
-
Select the Transport Request and click the
 icon or press Ctrl + F11.
 -
Specify your target client, for example, Client is 001.
-
Click the Options tab, choose first three options and click Continue.
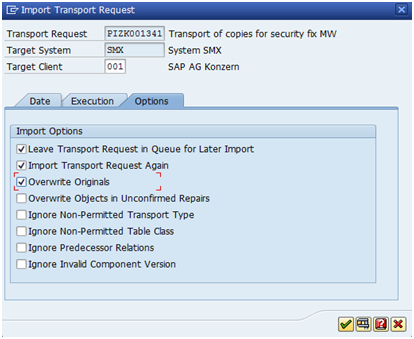
Description of the illustration ''importoptions.png''
-
On the Start Import dialog, click Yes.
The Transport Request import will start. Wait until the Transport Request import is completed successfully as shown below.
Description of the illustration ''importtrcomplete.png''
Caution:
Artefacts of TR Files: Naming convention used is R<6 digits>.<source system> and K<6 digits>.<source system>.The Source system is the developers source system.
K Type Transport : Cofile (1 - 3 KB in size)
R Type Transport : Datafile (size more than the Cofile)
-
K file is a Cofile: All transport requests' control and metadata attributes gets stored in this file, which are in the format of R<T.RNo>.<SID>. These are command or change request information files that include information about the transport type, object classes, required import steps, and post-processing exit codes.
-
R file is a Datafile: All transport requests' data gets stored in this file, which are in the format of K<T.RNo>.<SID>. This contains the actual data for the Transport i.e. what changes will be made in your system.
D.2.1.3 Creating Transport Request for ODI SAP Production Objects
Log in to the SAP system and perform the following steps to create transport request for ODI SAP Production Objects.
-
Go to
Tcode SE80. -
Provide package name
ZODI_LKM_PCKGand press enter key. -
Right-click on package name and click Write Transport Entry.
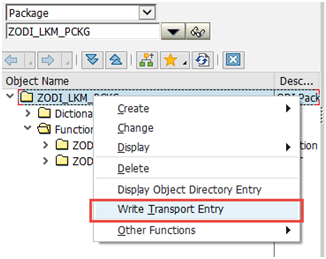
Description of the illustration ''writetr.png''
-
Click All Objects on the Transport Package pop-up message.
-
Click the New Transport Request button.
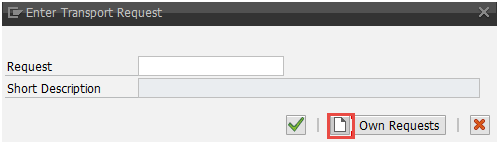
Description of the illustration ''newtr.png''
-
On the Select Request Type dialog, select Workbench Request and click OK.
-
Enter a description for the transport request and a valid target system and then click Save.
Target system name will be system default or as per configuration
Note:
Description should be ODI SAP Production Objects in order to easily identify and understand the grouping of SAP Objects. -
Go to
SE10and click the Display button (shown in the following image).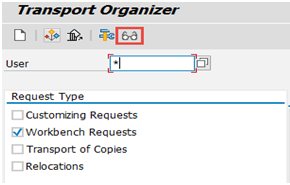
Description of the illustration ''displaybutton.png''
-
On the Display dialog, enter the transport request number and click OK.
-
Expand the transport request tree and verify whether all the objects are included.
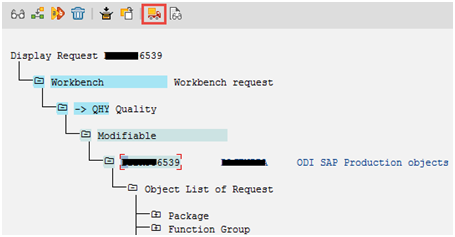
Description of the illustration ''trtree.png''
-
Copy the request number for further references.
D.2.1.4 Creating Transport Request for ODI SAP Development Objects
Log in to the SAP system and perform the following steps to create transport request for ODI SAP Development Objects.
-
Go to
Tcode SE80. -
Provide package name
ZODI_RKM_PCKGand press enter key. -
Right-click on package name and click Write Transport Entry.
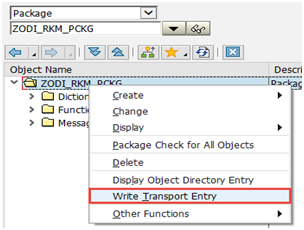
Description of the illustration ''writetr_dev.png''
-
Click All Objects on the Transport Package pop-up message.
-
Click the New Transport Request button.
Description of the illustration ''newtr.png''
-
On the Select Request Type dialog, select Workbench request and click OK.
-
Enter a description for the transport request and a valid target system and then click Save.
Target system name will be system default or as per configuration
Note:
Description should be ODI SAP Development Objects in order to easily identify and understand the grouping of SAP Objects. -
Go to
SE10and click the Display button (shown in the following image).
Description of the illustration ''displaybutton.png''
-
On the Display dialog, enter the transport request number and click OK.
-
Expand the transport request tree and verify whether all the objects are included.

Description of the illustration ''trtree_dev.png''
-
Copy the request number for further references.
D.2.2 Installing and Assigning SAP User Profile
Perform the following steps to install and assign SAP user profile:
-
Execute PFCG, on the menu, click Role and then select Upload.
-
Click Continue
 on the Information dialog.
 -
Specify the path where you have saved the .SAP file and then click Open.
-
Scroll down the drop down list and provide the appropriate input and click Allow.
-
Click Continue
on the subsequent screen.Role is successfully uploaded.
-
Type the name of uploaded role and click the Edit icon as shown below.
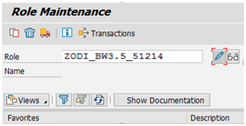
Description of the illustration ''upload_role.png''
-
Click the Roles tab.
-
Perform the following steps to activate each role:
-
Double click the role
Z:ODI_ANU_LBU. -
Click the Authorizations tab.
-
Click the Change Authorization Data icon shown below.
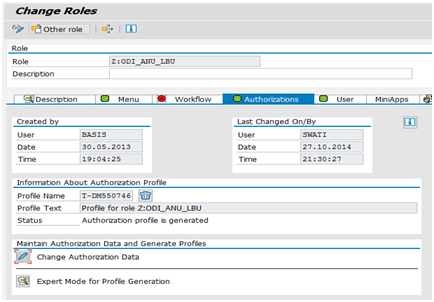
Description of the illustration ''changeauthdata.png''
-
Click the Generate
 icon.
icon. 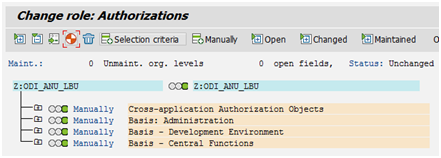
Description of the illustration ''changeroleauth.png''
-
Click Generate and then click Back.
-
Click the User tab and compare the user.
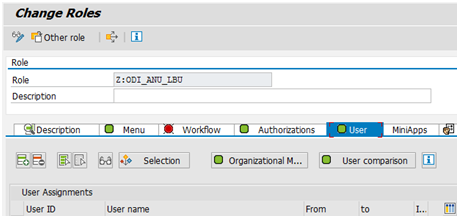
Description of the illustration ''changeroles.png''
Note:
The status of Authorizations and User tab must be green. -
Repeat these steps to activate for all roles inside
Z:ODI_COMPOSITE.
-
-
Click Save.
-
Once the import process is done successfully, assign the imported profile to the SAP ODI user.
-
Request and assign SAP Developer License Key to ODI SAP User as described in section Section A.1, "SAP ABAP BW Required Privileges" or Section B.1, "SAP ABAP ERP Required Privileges". This is mandatory for the ODI SAP Adapter to work.
Note:
In a few use-cases (use in production) the developer key can be omitted. For details refer to Section A.1, "SAP ABAP BW Required Privileges" or Section B.1, "SAP ABAP ERP Required Privileges".
D.3 Validating the ODI SAP Setup
This section describes some basic validation steps for the SAP administrators. Executing these steps ensures that previous installation steps were successful.
This section includes the following topics:
D.3.1 Validating the Shared Folder Setup
Validating a shared folder setup applies only if you plan to transfer data using a Shared Directory. This section can be skipped, if the FTP transfer is used. The validation of the shared folder setup needs to be performed before any subsequent steps in this guide can be performed. This validation is typically performed by your SAP Basis team.
Step 1: Validating folder access from the SAP application server
-
Start the SAPGUI.
-
Use the ODI SAP user and password to connect to the SAP system and client.
-
Go to transaction AL11.
-
Select the shared folder.
-
Double-click the shared folder to test the directory declaration.
This should report a successful connection. If not, please contact your SAP basis team. Do not continue until this test passes.
Note:
SAP uses the OS user <sid>adm to connect to the directories declared in AL11. -
Print screen.
Step 2: Validating folder access from the ODI agent machine
-
Log in to the ODI agent machine using the Windows user ID used for executing the ODI agent.
-
Open shared directory path in Windows Explorer.
This should list the content of the shared folder. Please make sure that you do NOT need to enter any credentials. If this does not work or you had to enter credentials, please contact your windows administrator or the system administrator of the system your shared folder is physically located on. Do not continue until this test passes.
-
Print screen.
D.3.2 Validating the FTP Setup
Validating an FTP setup applies only, if you plan to transfer data using FTP. This section can be skipped, if you use a Shared Directory for the data transfer. The validation of the FTP setup needs to be performed before any subsequent steps in this guide can be performed. This validation is typically performed by your SAP Basis team.
Step 1: Validating SAPFTPA destination
-
Start the SAPGUI.
-
Use the ODI SAP user and password to connect to the SAP system and client.
-
Go to transaction SM59.
-
Expand TCP/IP connections.
-
Open the SAPFTPA destination.
-
Click Test connection.
This should report a successful connection. If not, please contact your SAP basis team. Do not continue until this test passes.
-
Print screen.
Step 2: Testing FTP connection
-
Go to transaction SE38.
-
View the function module RSFTP002.
-
Hit F8 to run the ABAP program.
-
Enter the FTP userID and password.
-
Enter the FTP server host name or IP address.
-
Enter
cd/ orcd <ODI target directory>. -
In the RFC_DESTINATION field, enter
SAPFTPA. -
Hit F8 to run the test.
This should report a successful connection. The message should be similar to the following:
250 CWD successful.If this test is not successful, please contact your SAP basis team. Do not continue until this test passes.
-
Print screen.
D.3.3 Validating SAP Privileges
This section describes how to test some of the key SAP privileges. Proceed with the subsequent steps in this guide only after successful validation of these tests. This validation is typically performed by your SAP Basis team.
Perform the following steps to validate whether a SAP user has appropriate dev rights and owns a dev license key:
-
Start SAPGUI.
-
Use the ODI SAP user and password to connect to the SAP system and client.
-
Go to transaction SE38.
-
Enter any sample program name like ZSAP_TEST in the program name field.
-
Click Create.
-
Perform similar tests for the transaction SE37 and SE11.
If a transaction allows the creation of a program without asking for any key or other authorization message, then the SAP user has validated that it has the appropriate dev rights and license key. Otherwise your SAP basis team needs to register the SAP user in service.sap.com to get the license key and a Basis person can help him with dev rights.
D.3.4 Validating SAP Transport Layer Name
As the SAP connector creates SAP objects, such as, for example, function modules, into the SAP development system, these changes need to be transported into QA and production systems once the development is done. The SAP's change and transport system uses the SAP Transport Layer Name to identify the route a change has to take. A transport layer is assigned to each development class and thus to all objects in that class. The transport layer determines:
-
In which SAP System developments or changes to the repository objects are made
-
If objects are transported to other systems within the group when development work has been completed
A consolidation route is created from the development system to the quality assurance system through the transport layer Z<SID>. It then becomes the standard transport layer for customer development and customizing.
A consolidation route is created from the development system to the quality assurance system through the transport layer SAP for the transport of SAP Standard objects.
It is important to specify the correct transport layer name before running the RKM SAP ERP for the first time.
Perform the following steps to identify the list of defined transport layers in your SAP landscape:
-
Log on in client 000 in the SAP System serving as the transport domain controller via transaction STMS.
-
Select Overview > Transport Routes. The Display Transport Routes dialog is displayed.
-
Select Goto > Graphical Editor.
-
To switch the mode, select Configuration > Display <-> Change.
-
Position the cursor on the SAP System.
-
Select Edit > System > Change. The Change System Attriburtes dialog is displayed.
-
Select the StandardTransport Layer tab.
-
Change the transport layer of the SAP System.
-
The result is the list of the different transport Layers.
By default, the RKM option SAP_TRANSPORT_LAYER_NAME is set to SAP. Ask your SAP basis admin which transport layer you should use. This transport layer name must be set on the SAP_TRANSPORT_LAYER_NAME RKM option. A wrong or invalid transport layer name will cause serious delays during the installation process.
D.4 Uninstalling ODI SAP Components
This section describes how to remove the ODI SAP Components from an SAP system. In case you plan to update to a newer ODI SAP Component version, please see Section D.1, "Updating ODI SAP Components" to identify whether the uninstallation step is required or can be skipped.
Perform the following steps to uninstall ODI SAP components:
-
Start the SAP GUI.
-
Connect to the SAP systems you want to uninstall.
-
Go to the transaction
SE80and provide Package name, for example,ZODI_LKM_PCKG. -
Right click on package name, and select other options >rebuild object list from the context menu.
-
Expand the object list and delete individual objects in the order listed below:
-
Program
-
Function group
-
Table type
-
Structure
-
Message class
If asked for transport request, create a new request and copy the requested number in Notepad.
-
-
Repeat step 4.
If any object is remaining, it will be displayed. Delete the object.
-
Right click the package name, go to display object directory entry> press lock overview button, copy the request number, and save it in Notepad.
-
Go to transaction
SE10, and release all the transport requests. -
Go to Transaction
SE16, enter package name in DEVCLASS field of table TADIR.There should be a single record for the package name. If there are entries in the table, then go to
SE11and table E071. Specify the Object and object name whose entry is in the TADIR. -
Mark the field LOCKFLAG as X and execute.
From there you will get the task or request. Go to Tcode
SE01and release this request. -
Go to transaction
SLG0, and search forzodi*select message class and go to sub-objects and delete the object.Now press back button and delete message class. Press Save button. It will ask for transport request, create a new request and save it in Notepad.
-
Delete the package from
SE80.It will ask for a transport request. Create the request and release it using transaction
SE10. -
Repeat the steps 3 to 12 for package
ZODI_RKM_PACKAGE.
If any of the objects is not deleted, then go to SU53 and check missing privileges. Try to grant the same to that SAP user and then continue with deleting that object.
See Section D.4.1, "Validating Uninstallation of ODI SAP Components" for information on how to validate uninstallation of ODI SAP components.
D.4.1 Validating Uninstallation of ODI SAP Components
Perform the following steps to validate the uninstallation of the ODI SAP components:
-
Go to transaction
SE11. -
Enter the table name TADIR and click Display.
-
On the Application toolbar, click Contents.
-
Specify the package name in the field DEVCLASS and press F8.
If there are no entries, a message no table entries found is shown.
If any entries are listed, the uninstallation is incomplete and reinstallation must not be attempted.
-
Go to transaction
SE11. Enter the table name T100 and click Display. -
On the Application toolbar, click Contents.
-
Type
zodi*in the field ARBGB and press F8.If there are no entries, a message no table entries found is shown.
If any entries are listed, the uninstallation is incomplete and reinstallation must not be attempted.