2 Setting Up the Environment
This chapter describes how to set up your SAP BW environment for use with Oracle Data Integrator.
This chapter includes the following sections:
Before You Begin
Before you begin, consider the following:
System Requirements and Certification
Before performing any installation you should read the system requirements and certification documentation to ensure that your environment meets the minimum installation requirements for the products you are installing.
The Oracle Data Integrator requirements are listed in the Installing and Configuring Oracle Data Integrator.
The requirements specific to the Oracle Data Integrator SAP ABAP - BW Adapter are:
-
Oracle Data Integrator 11.1.1.7.0 or above.
-
A Java Connector (JCo) version compatible with adapter must be used. The list of supported JCo versions is available in the Compatibility Matrix available from the Oracle Technology Network (OTN). A minimum version of JCo 3.0.2 is required.
-
A JVM version compatible with both Oracle Data Integrator and JCo must be used. A minimum version of JVM 1.5 is required due to JCo pre-requisites.
-
The connector supports two transfer modes for transferring data from SAP system to the ODI agent: data transfer using a Shared Directory and data transfer through FTP. For details and restrictions see "File Transfer Considerations" of Application Adapters Guide for Oracle Data Integrator. Depending on the chosen file transfer mode the following requirements must be met:
-
Data transfer through a Shared Directory (recommended transfer method) The LKM SAP BW to Oracle (SQLLDR) requires a folder that is shared between the SAP system and the ODI agent. The SAP application server transfers the data by writing it out into a folder that is accessible from the SAP system and the ODI agent machine. This is typically done by sharing a folder of the ODI agent machine with the SAP system. Note that the shared folder does not necessarily have to be located on the ODI agent machine. A shared folder on a third machine is also possible, as long as the shared folder is accessible to both the ODI agent machine and the SAP system.
Note:
For security reasons, the SAP folders should not be shared with the ODI agent. Share only folders of the ODI agent machine with the SAP system.The shared folder must be accessible to SAP system and not just to the underlying operating system. This means that the folder needs to be declared in SAP transaction AL11 and the folder opens successfully in AL11.
-
Data transfer through FTP LKM SAP BW to Oracle (SQLLDR) requires a FTP server to upload data from the SAP BW system. This data is either read locally by the agent executing the mapping (when this agent runs on the FTP server machine), or remotely (when this agent is located on a different machine than the FTP server). This FTP server must be accessible over the network from both the SAP BW machine and the agent machine.
-
-
For LKM SAP BW to Oracle (SQLLDR) only: SQLLoader is required on the machine running the agent. SQLLoader is used for loading data extracted from SAP BW system to the Oracle staging area.
Getting the Right Privileges
The SAP Adapter requires privileges to perform set up and execution operations. Please provide your administrators with the list of privileges listed in Appendix A, "SAP ABAP BW Required Privileges."
These privileges are required for the SAP BW user which will be used to connect SAP BW system by the ODI SAP BW Adapter
Please note that a developer key is mandatory for the SAP user.
Gathering SAP Connection Information
In order to connect to the SAP BW system, you must request the following information from your SAP administrators:
-
SAP BW System IP Address or Hostname: IP address/ Hostname is the technical name given to the host on which SAP is running.
-
SAP User: SAP User is the unique user name given to a user for logging on the SAP BW System.
-
SAP Password: Case-sensitive password used by the user to log in.
-
SAP Language: Code of the language used when logging in For example: EN for English, DE for German.
-
SAP Client Number: The three-digit number assigned to the self-contained unit which is called Client in SAP. A Client can be a training, development, testing or production client or represent different divisions in a large company.
-
SAP System Number: The two-digit number assigned to a SAP instance which is also called Web Application Server or WAS.
-
SAP System ID: The three-character, unique identifier of a SAP system in a landscape.
-
SAP Transport Layer Name: This string uniquely identifies a transport layer in a SAP landscape. It allows ODI to create transport requests for later deployment in SAP. Even though there is a default value here, this transport layer name must be provided by your SAP Basis team. Not doing so may result in significant delays during installation.
-
SAP BW Version: BW 3.5 or BI 7.0.
-
SAP Character Set: The character set is only required if your SAP system is not a UNICODE system. For a complete list of character sets, see "Locale Data" in the Oracle Database Globalization Support Guide. For example,
EE8ISO8859P2for Croatian Data. For UNICODE systems, useUTF8.
Note:
All the connection data listed above (except SAP SNC Connection Properties and SAP Router String) are mandatory and should be requested from the SAP Administrators. You may consider requesting support during connection setup from your SAP administrators.Requesting FTP Server Access
This section applies only if you plan to transfer data using FTP. You can skip this section if you use a Shared Directory for the data transfer or if your SAP system is older than the following:
-
SAP ECC6 EHP6 or later
-
SAP BW/BI 7.4 or later
The following steps must be performed before any subsequent steps in this guide can be performed. These steps are typically performed by your SAP Basis team. Failure to perform these setup instructions will lead to FTP failure when running any ODI SAP extraction jobs.
To request FTP server access:
-
Login to SAP server.
-
Execute transaction SE16.
-
Enter
SAPFTP_SERVERSin the Table Name field and click icon to create entries.
 -
Enter IP address of the FTP server in the FTP_SERVER_NAME field.
-
Enter port of the FTP server in the FTP_Server_Port field.
-
Click
 icon to save.
Validating the Shared Folder Setup
Validating a shared folder setup applies only if you plan to transfer data using a Shared Directory. This section can be skipped, if the FTP transfer is used. The validation of the shared folder setup needs to be performed before any subsequent steps in this guide can be performed. This validation is typically performed by your SAP Basis team.
Step 1: Validating folder access from the SAP application server
-
Start the SAPGUI.
-
Use the ODI SAP user and password to connect to the SAP system and client.
-
Go to transaction AL11.
-
Select the shared folder.
-
Double-click the shared folder to test the directory declaration.
This should report a successful connection. If not, please contact your SAP basis team. Do not continue until this test passes.
Note:
SAP uses the OS user <sid>adm to connect to the directories declared in AL11. -
Print screen.
Step 2: Validating folder access from the ODI agent machine
-
Log in to the ODI agent machine using the Windows user ID used for executing the ODI agent.
-
Open shared directory path in Windows Explorer.
This should list the content of the shared folder. Please make sure that you do NOT need to enter any credentials. If this does not work or you had to enter credentials, please contact your windows administrator or the system administrator of the system your shared folder is physically located on. Do not continue until this test passes.
-
Print screen.
Validating the FTP Setup
Validating an FTP setup applies only, if you plan to transfer data using FTP. This section can be skipped, if you use a Shared Directory for the data transfer. The validation of the FTP setup needs to be performed before any subsequent steps in this guide can be performed. This validation is typically performed by your SAP Basis team.
Step 1: Validating SAPFTPA destination
-
Start the SAPGUI.
-
Use the ODI SAP user and password to connect to the SAP system and client.
-
Go to transaction SM59.
-
Expand TCP/IP connections.
-
Open the SAPFTPA destination.
-
Click Testconnection.
This should report a successful connection. If not, please contact your SAP basis team. Do not continue until this test passes.
-
Print screen.
Step 2: Testing FTP connection
-
Go to transaction SE38.
-
View the function module RSFTP002.
-
Hit F8 to run the ABAP program.
-
Enter the FTP userID and password.
-
Enter the FTP server host name or IP address.
-
Enter
cd/ orcd <ODI target directory>. -
In the RFC_DESTINATION field, enter
SAPFTPA. -
Hit F8 to run the test.
This should report a successful connection. The message should be similar to the following:
250 CWD successful.If this test is not successful, please contact your SAP basis team. Do not continue until this test passes.
-
Print screen.
Validating SAP Privileges
This section describes how to test some of the key SAP privileges. Proceed with the subsequent steps in this guide only after successful validation of these tests. This validation is typically performed by your SAP Basis team.
Perform the following steps to validate whether a SAP user has appropriate dev rights and owns a dev license key:
-
Start SAPGUI.
-
Use the ODI SAP user and password to connect to the SAP system and client.
-
Go to transaction SE38.
-
Enter any sample program name like ZSAP_TEST in the program name field.
-
Click Create.
-
Perform similar tests for the transaction SE37 and SE11.
If a transaction allows the creation of a program without asking for any key or other authorization message, then the SAP user has validated that it has the appropriate dev rights and license key. Otherwise your SAP basis team needs to register the SAP user in service.sap.com to get the license key and a Basis person can help him with dev rights.
Validating SAP Transport Layer Name
As the SAP connector creates SAP objects, such as, for example, function modules, into the SAP development system, these changes need to be transported into QA and production systems once the development is done. The SAP's change and transport system uses the SAP Transport Layer Name to identify the route a change has to take. A transport layer is assigned to each development class and thus to all objects in that class. The transport layer determines:
-
In which SAP System developments or changes to the repository objects are made
-
If objects are transported to other systems within the group when development work has been completed
A consolidation route is created from the development system to the quality assurance system through the transport layer Z<SID>. It then becomes the standard transport layer for customer development and customizing.
A consolidation route is created from the development system to the quality assurance system through the transport layer SAP for the transport of SAP Standard objects.
It is important to specify the correct transport layer name before running the RKM SAP BW for the first time. Perform the following steps to identify the list of defined transport layers in your SAP landscape:
-
Log on in client 000 in the SAP System serving as the transport domain controller via transaction STMS.
-
Select Overview > Transport Routes. The Display Transport Routes dialog is displayed.
-
Select Goto > Graphical Editor.
-
To switch the mode, select Configuration > Display <-> Change.
-
Position the cursor on the SAP System.
-
Select Edit > System > Change. The Change System Attriburtes dialog is displayed.
-
Select the StandardTransport Layer tab.
-
Change the transport layer of the SAP System.
-
The result is the list of the different transport Layers.
By default, the RKM option SAP_TRANSPORT_LAYER_NAME is set to SAP. Ask your SAP basis admin which transport layer you should use. This transport layer name must be set on the SAP_TRANSPORT_LAYER_NAME RKM option. A wrong or invalid transport layer name will cause serious delays during the installation process.
Installing Oracle Data Integrator
Before starting with this project, you need to install and configure Oracle Data Integrator. See the Oracle Fusion Middleware Getting Started with Oracle Data Integrator and the Installing and Configuring Oracle Data Integrator for more information.
Installing and Configuring the Oracle DB Target
This project uses an Oracle database engine as the target and as the staging area for the mappings. You can download for example an Oracle XE database from the Oracle Technology Network (OTN). Install and configure this database.
This project targets an Oracle table that can be created using the following script:
-- Create demo target schema

CREATE USER ODI_SAP_DEMO IDENTIFIED BY ODI_SAP_DEMO DEFAULT TABLESPACE USERS TEMPORARY TABLESPACE TEMP;
GRANT CONNECT, RESOURCE TO ODI_SAP_DEMO;


-- Create demo target tables
-- For ODS/DSO

CREATE TABLE ODI_SAP_DEMO.W_PURCH_DS (
PO_GUID VARCHAR2(100),
ORDER_ITEM_GUID VARCHAR2(100),
ACC_ASS_GUID VARCHAR2(100),
GUIDE_CONTRCT VARCHAR2(100),
ORDER_QUANT NUMBER,
NET_PRICE NUMBER,
PRICE_UNIT CHAR(5),
NO_OF_PURCH_ODR NUMBER);
ALTER TABLE ODI_SAP_DEMO.W_PURCH_DS ADD CONSTRAINT PK_W_PURCH_DS PRIMARY KEY (PO_GUID);


-- For INFO OBJECT

CREATE TABLE ODI_SAP_DEMO.W_ACCNT_VENDR_DS (
VENDOR CHAR(10),
PCOMPANY CHAR(10),
PHONE CHAR(20),
PLANT CHAR(10),
STREET VARCHAR(50),
MED_DESC VARCHAR(100));
ALTER TABLE ODI_SAP_DEMO.W_ACCNT_VENDR_DS ADD CONSTRAINT PK_W_ACCNT_VENDR_DS PRIMARY KEY (VENDOR);


-- For INFO OBJECT HIERARCHY

CREATE TABLE ODI_SAP_DEMO.W_GL_ACCOUNT_HIER_DS (
HIER_NAME CHAR(50),
NODEID NUMBER(20),
INFOOBJECT_NAME CHAR(80),
NODENAME CHAR(80),
TLEVEL NUMBER(5),
PARENTID NUMBER(20),
CHILDID NUMBER(20),NEXTID NUMBER(20));

ALTER TABLE ODI_SAP_DEMO.W_GL_ACCOUNT_HIER_DS ADD CONSTRAINT PK_W_GL_ACCOUNT_HIER_DS PRIMARY KEY (HIER_NAME, NODEID);

-- For INFO OBJECT INTERVAL HIERARCHY

CREATE TABLE TARGET_INTERVAL_HIERARCHY
(
RSHIENM VARCHAR2(30 BYTE),
NODEID NUMBER(8),
PARENTID NUMBER(8)
INTERVL VARCHAR2(1 BYTE)
LEAFFROM VARCHAR2(60 BYTE),
LEAFTO VARCHAR2(60 BYTE),
VERSION VARCHAR2(3 BYTE),
CHRT_ACCTS VARCHAR2(4 BYTE),
GL_ACCOUNT VARCHAR2(10 BYTE),
BAL_FLAG VARCHAR2(1 BYTE),
GLACCEXT VARCHAR2(18 BYTE),
INCST_FLAG VARCHAR2(2 BYTE)
)


-- For INFO CUBE

CREATE TABLE ODI_SAP_DEMO.W_VENDR_BAL_DS (
OCOMP_CODE CHAR(6),
OCREDITOR CHAR(10),
ORC_ACCOUNT CHAR(10),
TOT_DEBT_POST NUMBER,
TOT_CR_POST NUMBER,
CUMULATIVE_BAL NUMBER);

ALTER TABLE ODI_SAP_DEMO.W_VENDR_BAL_DS ADD CONSTRAINT PK_W_VENDR_BAL_DS PRIMARY KEY (OCOMP_CODE);


-- For INFO CUBE & INFO OBJECT Join

CREATE TABLE ODI_SAP_DEMO.W_VENDER_CUBE_OBJ_DS (
COMP_CODE CHAR(10),
VENDOR CHAR(10),
GL_ACCOUNT CHAR(10),
SALES_FOR_PERIOD NUMBER,
CUM_BALANCE NUMBER,
PLANT CHAR(10),
MEDIUM_DESC VARCHAR2(100));

ALTER TABLE ODI_SAP_DEMO.W_VENDER_CUBE_OBJ_DS ADD CONSTRAINT PK_W_VENDER_CUBE_OBJ_DS PRIMARY KEY (COMP_CODE);

CREATE TABLE "TARGET_NAVIGATIONAL_ATTRIBUTES"
(
IOPK_CUSTOMER VARCHAR2(10 BYTE),
IOPKCUST_GROUPVARCHAR2(2 BYTE),
IOPKPK_CUSTOMERVARCHAR2(10 BYTE),
IOPK_PK_PLANT VARCHAR2(4 BYTE),
IOPKCALMONTH NUMBER(6),
IOPK_CALWEEK NUMBER(6),
IOPKTHIP_POINTVARCHAR2(4 BYTE),
REQUIDVARCHAR2(30 BYTE),
KF_ODEL_VOL NUMBER(17,3),
KF_OSHIPDATE NUMBER(17),
KF_OLOADDATEK NUMBER(17),
KF_OACT_GI_DTKNUMBER(17),
KF_OMATAV_DATKNUMBER(17),
KF_OLATE_QTY NUMBER(17,3),
CUSTOMERVARCHAR2(10 BYTE),
PLANT VARCHAR2(4 BYTE),
PHONE VARCHAR2(16 BYTE),
PCOMPANYVARCHAR2(6 BYTE),
OUTL_TYPEVARCHAR2(4 BYTE),
NIELSEN_ID VARCHAR2(2 BYTE),
LOGSYSVARCHAR2(10 BYTE),
VISIT_RYTVARCHAR2(4 BYTE),
USAGE_INDVARCHAR2(3 BYTE),
SRCID VARCHAR2(4 BYTE),
PRECISIDNUMBER(4),
POSTCD_BOX VARCHAR2(10 BYTE),
CUS_F_CONS VARCHAR2(1 BYTE),
COUNTRYVARCHAR2(3 BYTE),
BPARTNERVARCHAR2(10 BYTE),
ACCNT_GRPVARCHAR2(4 BYTE),
LANGU VARCHAR2(1 BYTE),
KEYACCOUNT VARCHAR2(1 BYTE)
)

-- For OPEN HUB DESTINATION

CREATE TABLE ODI_SAP_DEMO.W_OPENHUB_SALES_DS (
OHREQUID NUMBER,
DATA_PACKAGE NUMBER,
DATA_RECORD NUMBER,
CUSTOMER CHAR(1),
MATERIAL CHAR(1),
MATERIAL_PRICE NUMBER,
CURRENCY NUMBER,
QUANTITY NUMBER,
TOTAL_REVENUE NUMBER);

ALTER TABLE ODI_SAP_DEMO.W_OPENHUB_SALES_DS ADD CONSTRAINT PK_W_OPENHUB_SALES_DS PRIMARY KEY (OHREQUID);
Installing and Configuring JCo
The SAP adapter uses Java Connector (JCo) to connect to the SAP system. JCo must be configured before proceeding with the project.
To install and configure JCo:
-
Download a supported JCo version for your configuration from http://service.sap.com/connectors. Check the supported JCo version in the Certification Matrix available at Oracle Technology Network. Note that a minimum version of JCo 3.0.2 is required.
Notes:
-
Choose the SAP JCo package matching your operating system and your system architecture (32/64Bit). E.g. if you are running ODI inside a 32-Bit JVM, you must download the 32-Bit SAP JCo, even if the CPU and OS are 64-Bit. Mixing 32-bit and 64-bit architecture is not possible due to native libraries required by SAP JCo and will result in connection failure.
-
odi.conf contains the JDK path used for ODI Studio.
-
-
Unzip the appropriate distribution package into an arbitrary directory
<sapjco-install-path>. -
Follow the installation instructions in
<sapjco-install-path>/javadoc/installation.htmlfor the respective platform. -
Copy
sapjco3.jarandsapjco3.dll:For ODI 10g: Copy
sapjco3.jarandsapjco3.dll(or respective binary likelibsapjco3.so) into theoracledi/driversdirectory.For ODI 11g: Copy
sapjco3.jarandsapjco3.dll(or respective binary likelibsapjco3.so) into the<ODI_HOME>/odi_miscdirectory (ODI Studio) and into the<ODI_HOME>/oracledi/agent/driversdirectory (Standalone Agent) and into the <WLS_DOMAIN>/lib directory (JEE Agent).For ODI 12c: Copy
sapjco3.jarandsapjco3.dll(or respective binary likelibsapjco3.so) into the<ODI_HOME>/odi/sdk/libdirectory (ODI Studio, ODI Standalone Agent) and into the <WLS_DOMAIN>/lib directory (JEE Agent). -
Restart ODI Studio and any agents.
-
Check the JCo installation. This will be also checked later in this guide.
Configuring Oracle Data Integrator
Perform the following steps to configure Oracle Data Integrator:
Add the Open Tool
The complete process of installing and adding an Open Tool to ODI is described in Oracle Data Integrator Tool Reference. This section details only the SAP ABAP specific steps.
-
Connect to Designer.
-
Select File > Add/Remove Open Tools…
-
In the Add/remove Open Tools window, enter the following name in the Open Tool class name field:
oracle.odi.sap.km._OdiSapAbapExecuteStoppable. -
Click Add Open Tool.
-
The Open Tool appears as shown below.
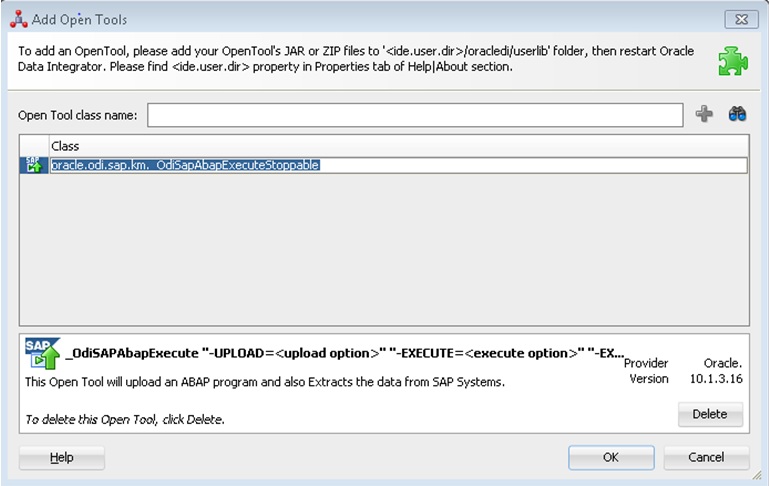
Description of the illustration ''image002.jpg''
-
Click OK.