33.3 Create a Data Model With a Data Link
When you create a report with multiple queries, it is typically easier to create all of the queries with the Data Wizard in the Data Model view. In this report, you will create two queries, linked with a group-to-group data link.
-
In the Data Model view, choose Insert > Query to display the Data Wizard.
-
If the Welcome page displays, click Next.
-
On the Query page, type
Q_Orderfor the Query name, then click Next. -
On the Data Source page, select SQL Query, then click Next.
-
On the Data page, enter the following
SELECTstatement in the Data Source definition field:SELECT ORDER_ID, ORDER_DATE, ORDER_TOTAL, ORDERS.CUSTOMER_ID, SALES_REP_ID, C1.CUST_FIRST_NAME, C1.CUST_LAST_NAME, C1.CUST_ADDRESS, C1.CUSTOMER_ID, C2.CUST_FIRST_NAME, C2.CUST_LAST_NAME, C2.CUST_ADDRESS, C2.CUSTOMER_ID FROM ORDERS, CUSTOMERS C1, CUSTOMERS C2 WHERE ORDERS.CUSTOMER_ID = C1.CUSTOMER_ID AND ORDERS.SALES_REP_ID = C2.CUSTOMER_ID
This query joins the Orders table to the Customers table for customer information and sales representative information.
Note:
You can enter this query in any of the following ways:-
Copy and paste the code from the provided text file called
invoice_code.txtinto the Data Source definition field. -
Click Query Builder to build the query without entering any code manually.
-
Type the code in the Data Source definition field.
-
-
Click Next.
Note:
If you are not already connected to a database, you will be prompted to connect to the database when you click Query Builder or Next. Ensure that you connect to a database that has the appropriate schema for this example. Section 33.1, "Prerequisites for This Example" describes the sample schema requirements for this example. -
On the Groups page, click Next.
-
Click Finish to display your first query in the Data Model view.
-
Repeat the steps above for a second query, but this time name your query
Q_Itemand use the followingSELECTstatement:SELECT O.ORDER_ID, O.LINE_ITEM_ID, O.PRODUCT_ID, O.QUANTITY, O.UNIT_PRICE, TRANSLATED_DESCRIPTION, P.PRODUCT_ID, O.QUANTITY * O.UNIT_PRICE FROM ORDER_ITEMS O, PRODUCT_DESCRIPTIONS P WHERE O.PRODUCT_ID = P.PRODUCT_ID AND P.LANGUAGE_ID = 'US'
This query joins Order items to the Product table for product descriptions.
-
In the Data Model view, double-click the title bar of the G_ORDER_ID group (for the master query Q_ORDER) to display the Property Inspector, and set the following properties:
-
Under General Information, set the Name property to G_ORDER.
-
-
Double-click the title bar of the G_ORDER_ID1 group (for the detail query Q_ITEM) to display the Property Inspector, and set the following properties:
-
Under General Information, set the Name property to G_LIST.
Your data model should now look something like this:
Figure 33-2 Queries in the Data Model view
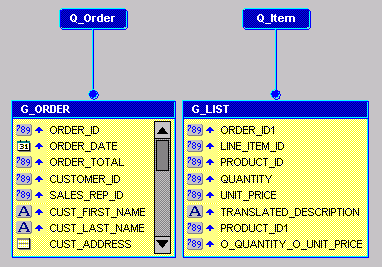
Description of ''Figure 33-2 Queries in the Data Model view''
-
-
In the Data Model view, click the Data Link tool in the tool palette.
-
Click and drag from the ORDER_ID column in the G_ORDER group to the ORDER_ID1 column in the G_LIST group. Notice that a line is drawn from the bottom of the G_ORDER group to the Q_Item query. Labels for ORDER_ID and ORDER_ID1 are created at each end of the line to indicate they are the columns linking G_ORDER to Q_Item.