6 Privately Owned Relationships
This chapter includes the following sections:
6.1 Mapping Privately Owned One-to-One Relationships
This section demonstrates several ways to map a one-to-one relationship between objects. By default, one-to-one relationships are privately-owned in JAXB – their XML content will appear nested inside the owning element. For example, a Customer with a one-to-one mapping to a PhoneNumber would be marshalled as:
Example 6-1 Sample XML Mapping
<customer>
   <name>Bob Smith</name>
   <id>1982812</id>
   <phone-number>
      <area-code>613</area-code>
      <number>5550210</number>
      <extension>20016</extension>
   </phone-number>
</customer>
6.1.1 Mapping to an Element
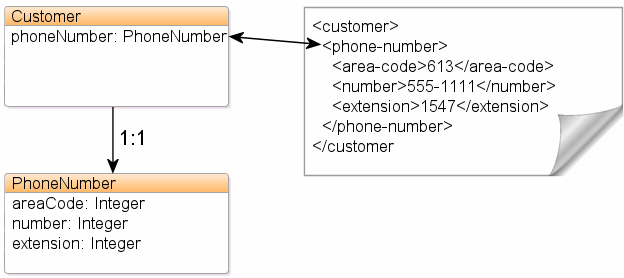
Given the XML schema in Example 6-2, Figure 6-1 illustrates a one-to-one (1:1) relationship between two complex types.
<?xml version="1.0" encoding="UTF-8"?>
<xsd:schema xmlns:xsd="http://www.w3.org/2001/XMLSchema">

   <xsd:element name="customer" type="customer-type"/>

   <xsd:complexType name="customer-type">
      <xsd:element name="phone-number" type="phone-type"/>
   </xsd:complexType>

   <xsd:complexType name="phone-type">
      <xsd:element name="area-code" type="xsd:int"/>
      <xsd:element name="number" type="xsd:int"/>
      <xsd:element name="extension" type="xsd:int"/>
   </xsd:complexType>

</xsd:schema>
Example 6-3 shows how to annotate your Java class to obtain this mapping with EclipseLink. The standard JAXB @XmlElement annotation can be used to indicate that the associated Java field should be mapped to an XML element.
Note:
By default, JAXB will assume all fields on your Java object are@XmlElements, so in many cases the annotation itself is not required. If, however, you want to customize the Java field's XML name, you can specify an @XmlElement annotation with a name argument.Example 6-3 Using the @XmlElement Annotation
package example;

import javax.xml.bind.annotation.*;

@XmlRootElement
@XmlAccessorType(XmlAccessType.FIELD)
public class Customer {
   @XmlElement(name="phone-number")
   private PhoneNumber phoneNumber;

   ...
}

package example;

import javax.xml.bind.annotation.*;

@XmlAccessorType(XmlAccessType.FIELD)
public class PhoneNumber {
   @XmlElement(name="area-code")
   private Integer areaCode;

   private Integer number;

   private Integer extension;

   ...
}
Example 6-4 shows how to define your mapping information in an EclipseLink's XML Bindings document.
Example 6-4 Sample XML Mapping
...
<java-type name="Customer">
   <xml-root-element name="customer"/>
   <java-attributes>
      <xml-element java-attribute="phoneNumber" name="phone-number" type="PhoneNumber"/>
   </java-attributes>
</java-type>

<java-type name="PhoneNumber">
   <java-attributes>
      <xml-value java-attribute="areaCode" name="area-code" type="java.lang.Integer"/>
      <xml-value java-attribute="number" type="java.lang.Integer"/>
      <xml-value java-attribute="extension" type="java.lang.Integer"/>
   </java-attributes>
</java-type>
...
6.1.2 Using EclipseLink's @XmlPath Annotation
By default, your Java attributes will be mapped to XML based on their attributes Java name, or by a name specified in an @XmlElement annotation. This mapping is based on XPath, and EclipseLink's @XmlPath annotation allows you to customize this mapping. For example, you can use it to control the nesting of your elements in XML:
Example 6-5 Using the @XmlPath Annotation
package example;

import javax.xml.bind.annotation.*;
import org.eclipse.persistence.oxm.annotations.*;

@XmlRootElement
@XmlAccessorType(XmlAccessType.FIELD)
public class Customer {
   @XmlPath("contact-info/phone-number")
   private PhoneNumber phoneNumber;

   ...
}
Example 6-6 Using EclipseLink XML Bindings
...
<java-type name="Customer">
   <xml-root-element name="customer"/>
   <java-attributes>
      <xml-element java-attribute="phoneNumber" name="phone-number"
         type="PhoneNumber" xml-path="contact-info/phone-number"/>
   </java-attributes>
</java-type>
...
This will produce the following XML:
<customer>
   <contact-info>
      <phone-number>
         <number>555-631-2124</number>
      </phone-number>
   </contact-info>
</customer>
You can also use @XmlPath to map to different occurrences of the same element in XML, by index. For example:
Example 6-7 Using the @XmlPath Annotation
package example;

import javax.xml.bind.annotation.*;
import org.eclipse.persistence.oxm.annotations.*;

@XmlRootElement
@XmlAccessorType(XmlAccessType.FIELD)
public class Customer {
   @XmlPath("contact-info/phone[1]")
   private PhoneNumber homePhone;
   @XmlPath("contact-info/phone[2]")
   private PhoneNumber workPhone;
   ...
}
will produce the following XML:
<customer>
   <contact-info>
      <phone>
         <number>555-631-2124</number>
      </phone>
      <phone>
         <number>555-631-8298</number>
      </phone>
   </contact-info>
</customer>
For information on using XPath in your mappings, see "Mapping Using XPath Predicates".
6.2 Mapping Privately Owned One-to-Many Relationships
This section illustrates how to map one-to-many relationships with EclipseLink.
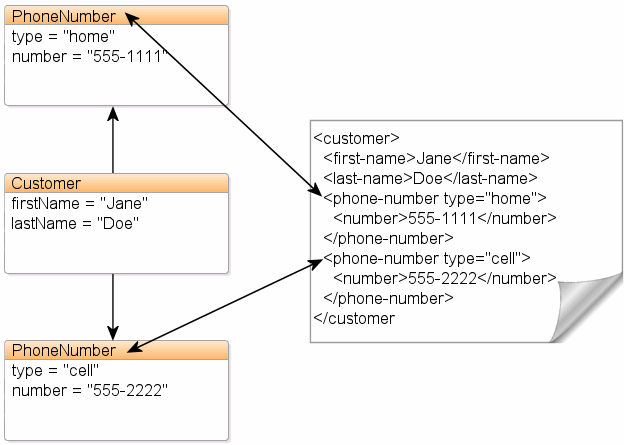
The schema in Example 6-8 a typical one-to-many (1:M) relationship between Customer and PhoneNumber, as shown in Figure 6-2.
Example 6-8 Sample XML Mapping
<?xml version="1.0" encoding="UTF-8"?>
<xsd:schema xmlns:xsd="http://www.w3.org/2001/XMLSchema">

   <xsd:element name="customer" type="customer-type"/>

   <xsd:complexType name="customer-type">
      <xsd:sequence>
         <xsd:element name="first-name" type="xsd:string"/>
         <xsd:element name="last-name" type="xsd:string"/>
         <xsd:element name="phone-number" type="phone-type" minOccurs="0" maxOccurs="unbounded"/>
      </xsd:sequence>
   </xsd:complexType>

   <xsd:complexType name="phone-type">
      <xsd:sequence>
         <xsd:attribute name="type" type="xsd:string"/>
         <xsd:element name="number" type="xsd:int"/>
      </xsd:sequence>
   </xsd:complexType>

</xsd:schema>
6.2.1 Mapping to Elements
Example 6-9 shows how to annotate your Java class to obtain this mapping with EclipseLink. The standard JAXB @XmlElement annotation, when used on a Collection or array field, can achieve this.
Example 6-9 Using the @XmlElement Annotation
package example;

import javax.xml.bind.annotation.*;

@XmlRootElement
@XmlAccessorType(XmlAccessType.FIELD)
public class Customer {
   @XmlElement(name="first-name")
   private String firstName;
   @XmlElement(name="last-name")
   private String lastName;
   @XmlElement(name="phone-number")
   private List<PhoneNumber> phoneNumbers;

   ...
}

package example;

import javax.xml.bind.annotation.*;
import org.eclipse.persistence.oxm.annotations.*;

@XmlAccessorType(XmlAccessType.FIELD)
public class PhoneNumber {
   @XmlAttribute
   private String type;
   private Integer number;

   ...
}
Example 6-10 shows how to define your mapping information in EclipseLink's OXM metadata format.
Example 6-10 Sample XML Mapping
...
<java-type name="Customer">
   <xml-root-element name="customer"/>
   <java-attributes>
      <xml-element java-attribute="firstName" name="first-name" type="java.lang.String"/>
      <xml-element java-attribute="lastName" name="last-name" type="java.lang.String"/>
      <xml-element java-attribute="phoneNumbers" name="phone-number" type="PhoneNumber" container-type="java.util.ArrayList"/>
   </java-attributes>
</java-type>

<java-type name="PhoneNumber">
   <java-attributes>
      <xml-attribute java-attribute="type" type="java.lang.String"/>
      <xml-value java-attribute="number" type="java.lang.Integer"/>
   </java-attributes>
</java-type>
...
6.2.2 Grouping Elements using the @XmlElementWrapper Annotation
To make the elements of the Collection appear inside a grouping element, you can use @XmlElementWrapper:
Example 6-11 Using the @XmlElementWrapper Annotation
package example;

import javax.xml.bind.annotation.*;

@XmlRootElement
@XmlAccessorType(XmlAccessType.FIELD)
public class Customer {
   @XmlElement(name = "phone-number")
   @XmlElementWrapper(name="phone-numbers")
   private List<PhoneNumber> phoneNumbers;

   ...
}
This will produce the following XML:
<customer>
   <first-name>Bob</first-name>
   <last-name>Smith</last-name>
   <phone-numbers>
      <phone-number type="Home">
         <number>5559827222</number>
      </phone-number>
      <phone-number type="Work">
         <number>5558872216</number>
      </phone-number>
   </phone-numbers>
</customer>