10 Customizing MAF Application Artifacts with MDS
This chapter describes how to use Oracle Metadata Services (MDS) to preform customization of MAF application-level artifacts.
This chapter includes the following sections:
-
Section 10.1, "Introduction to Applying MDS Customizations to MAF Files"
-
Section 10.5, "Understanding a Customization Developer Role"
-
Section 10.8, "Upgrading a MAF Application with Customizations"
10.1 Introduction to Applying MDS Customizations to MAF Files
Oracle Metadata Services (MDS) enables applications to be rebranded, customized, and personalized at runtime. MDS enables a single application to adapt to different industries, locations, or user groups. In the latter case, for example, you can use MDS to tailor the look and feel to a user group, or user responsibility.
A customized application contains a base application along with one or more layers of customizations. An application can have multiple customization layers and each layer can have multiple layer values. You can apply these layer values in a specified order in terms of precedence on top of the base metadata. MDS stores these customizations in a MDS Repository and retrieves them at runtime. Because MDS saves the customizations made in a separate MDS Repository, the base application remains unchanged. For more information about configuring Metadata Services Repositories, see the "Managing the Metadata Repository" chapter in Oracle Fusion Middleware Administrator's Guide.
MDS enables two customization patterns:
-
Seeded Customization—For seeded customization, you adapt a general application to a particular group, such as a specific industry or a site by defining layers of customization that are applied at runtime. These seeded customizations exist as part of the deployed application and endure for the life of a given deployment.
-
User Customization (change persistence)—Enables an end user to personalize the content of an application at runtime to suit individual preferences (for example, a user can select which columns display on a table). These changes persist across user sessions; they display consistently each time the user accesses the application.
You can customize the following artifacts of a MAF application using MDS:
-
The
maf-feature.xmlfile -
The
maf-skins.xmlfile -
The
maf-application.xmlfile -
The
maf-config.xmlfile -
MAF AMX files and metadata files (see Chapter 18, "Customizing MAF AMX Application Feature Artifacts").
You customize a MAF application using MDS by performing the following:
-
Defining one or more global or application-specific customization layers. For more information, see Section 10.2, "Configuring Customization Layers."
-
Creating a customization class that MDS uses to determine which customization to apply to the base application. Each customization class defines a base customization layer. For more information, see Section 10.3, "Creating Customization Classes."
-
Enabling the JDeveloper design time to access the customization by packaging the customization class (a
.javafile) as a JAR file and then adding this JAR file to one of the projects of the MAF application. For more information, see Section 10.4, "Consuming Customization Classes." -
Adding the customization class to the
cust-configsection of theadf-config.xmlfile to register the customization classes in the order of precedence. -
Launching JDeveloper in the Customization Developer role (or switching to that role). For more information, see Section 10.5, "Understanding a Customization Developer Role."
-
Performing the required modifications to the files. The changes are recorded by MDS in the
mdssysdirectory of the ViewController project: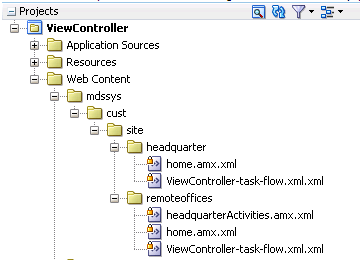
-
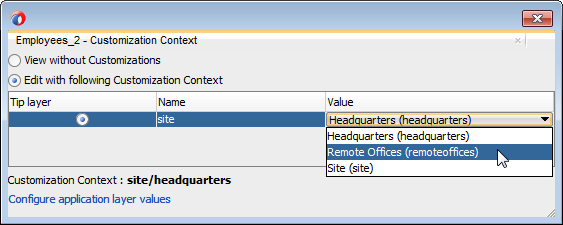
Select the customization layer from the Customization Context window, as shown in Figure 10-1.
Note:
When you work in the Customization Developer role, the layer and layer value that you select in the Customization Context window is called the tip layer. The changes you make while in the Customization Developer role are applied only to this layer. -
Deploying the application to a device, emulator, or as a platform-specific application package. The Customization Developer role must be used to deploy a customized application, as follows:
-
Launch the application in the Customization Developer role.
-
In the Customization Context window, shown in Figure 10-1, select the layer and value for which you want to implement customizations.
-
Select from among the deployment options (accessed by choosing Application, then Deploy, and then by selecting the deployment profile). For more information, see Chapter 27, "Deploying MAF Applications."
-
Perform a separate deployment for each customization context.
During deployment, the base file and the delta files are merged to create the customized version of the application at runtime. The deployed application has no MDS dependencies.
Tip:
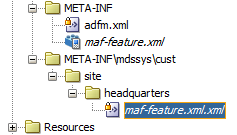
You can deploy the customized application as a MAF Application Archive (.maa) file and then import it into an application to perform additional customization and upgrades. The delta files included in the.maafile are merged with the base files after deployment. For more information, see Section 10.8, "Upgrading a MAF Application with Customizations."When the customization process is completed, JDeveloper creates a metadata file for these customizations and a subpackage for storing them. The metadata file contains the customizations for the customized object, which are applied over the base metadata at runtime. JDeveloper gives the new metadata file the same name as the base file for the object, but includes an additional
.xmlextension, as illustrated bymaf-feature.xml.xmlin Figure 10-2. -
10.2 Configuring Customization Layers
To customize an application, you must specify the customization layers and their values in the CustomizationLayerValues.xml file so that they are recognized by JDeveloper.
When you open a customizable application in the Customization Developer role, JDeveloper reads the adf-config.xml file to determine the customization classes to use and their order of precedence. JDeveloper also reads the CustomizationLayerValues.xml file to determine the layer values to make available in the Customization Context window. If there are layer values defined in the CustomizationLayerValues.xml file that are not defined in the customization classes listed in the adf-config.xml file, they are not displayed in the Customization Context window.
Therefore, you can have a comprehensive list of layer values for all of your customization projects in the CustomizationLayerValues.xml file, and only those appropriate for the current application are available in the Customization Context window. Conversely, you could have a comprehensive list of customization classes for a MAF application in the adf-config.xml file, and only the subset of layer values on which you would work in your CustomizationLayerValues.xml file.
Note:
At design time, JDeveloper retrieves customization layer values from theCustomizationLayerValues.xml file. However, at runtime the layer values are retrieved from the customization class.The names of the layers and layer values that you enter in the CustomizationLayerValues.xml file must be consistent with those specified in your customization classes. Example 10-1 shows the contents of a sample CustomizationLayerValues.xml file.
Example 10-1 Layers and Layer Values Defined in CustomizationLayerValues.xml
<cust-layers  xmlns="http://xmlns.oracle.com/mds/dt">
   <cust-layer name="industry" id-prefix="i">
      <cust-layer-value value="financial"
                        display-name="Financial"
                        id-prefix="f"/>
      <cust-layer-value value="healthcare"
                        display-name="Healthcare"
                        id-prefix="h"/>
   </cust-layer>
   <cust-layer name="site" id-prefix="s">
      <cust-layer-value value="headquarters"
                        display-name="HQ"
                        id-prefix="hq"/>
      <cust-layer-value value="remoteoffices"
                        display-name="Remote"
                        id-prefix="rm"/>
   </cust-layer>
</cust-layers>
For each layer and layer value, you can add an id-prefix token. This helps to ensure the uniqueness of the id, so that customizations are applied accurately: when you add a new element during customization, JDeveloper adds the id-prefix of the layer and layer value (determined by the selected tip layer) to the autogenerated identifier for the element to create an id for the newly added element in the customization metadata file. In the preceding example, the site layer has an id-prefix of s and the headquarters layer value has an id-prefix of hq . Therefore, when you select site/headquarters as the tip layer and add an element, that element's id will be set to shqel in the metadata customization file.
For each layer value, you can also add a display-name token to provide a human-readable name for the layer value. When you are working in the Customization Developer role, the value of the display-name token is shown in the Customization Context window for that layer value.
For each layer, you can optionally provide a value-set-size token that defines the size of the value set for the customization layer. This can be useful, for example, when using a design-time, application-specific CustomizationLayerValues.xml file. By setting value-set-size to no_values you can exclude runtime-only layers at design time.
<cust-layer name="runtime_only_layer" value-set-size="no_values"/>
You can define the customization layer values either globally for JDeveloper or in an application-specific file. If you use an application-specific file, it takes precedence over the global file. For more information on configuring layer values globally for JDeveloper, see Section 10.2.1, "How to Configure the Layer Values Globally." For more information on configuring application-specific layer values, see Section 10.2.2.1, "Using the Studio Developer Role."
10.2.1 How to Configure the Layer Values Globally
-
Create your customization classes, as described in Section 10.3, "Creating Customization Classes"
-
Make your classes available to JDeveloper, as described in Section 10.4, "Consuming Customization Classes"
To configure design time customization layer values globally for JDeveloper:
-
Open the
CustomizationLayerValues.xmlfile located in thejdevsubdirectory of your JDeveloper installation directory (jdev_install\jdev\CustomizationLayerValues.xml). -
For each layer, enter a
cust-layerelement, as shown in Example 10-1, "Layers and Layer Values Defined in CustomizationLayerValues.xml". -
For each layer value, enter a
cust-layer-valueelement, as shown in Example 10-1, "Layers and Layer Values Defined in CustomizationLayerValues.xml". -
Save and close the
CustomizationLayerValues.xmlfile. -
After you have made changes to the global
CustomizationLayerValues.xmlfile, restart JDeveloper.
10.2.2 How to Configure the Application-Level Layer Values
When configuring layer values for an application, you can use either the Studio Developer role (see Section 10.2.2.1, "Using the Studio Developer Role") or the Customization Developer role (see Section 10.2.2.2, "Using the Customization Developer Role"). Note that when you configure an application-specific CustomizationLayerValues.xml file, you can create and modify layer values, but you cannot create additional customization layers. It is not necessary to restart JDeveloper to pick up changes made to the application-specific layer values.
When you create an application-specific CustomizationLayerValues.xml file, JDeveloper stores it in an application-level directory (for example, workspace-directory\.mds\dt\customizationLayerValues\CustomizationLayerValues.xml). You can access this file in the Application Resources window of the Applications window, under the MDS DT node.
10.2.2.1 Using the Studio Developer Role
The following procedure describes how to configure the CustomizationLayerValues.xml file for a specific application from the Studio Developer role.
-
Create your customization classes, as described in Section 10.3, "Creating Customization Classes"
-
Make your classes available to JDeveloper, as described in Section 10.4, "Consuming Customization Classes"
To configure design-time customization layer values at the workspace level from the Studio Developer role:
-
In the Application Resources window, expand the Descriptors > ADF META-INF node, and then double-click adf-config.xml.
-
In the Overview editor, click the MDS Configuration navigation tab.
-
On the MDS Configuration page, below the table of customization classes, click Configure Design Time Customization Layer Values to open the workspace-level
CustomizationLayerValues.xmlfile in the Source editor.Note:
If the override file does not exist, JDeveloper displays a confirmation dialog. Click Yes to create and open a copy of the global file. -
In the file, specify layer values as necessary, as described in Section 10.2, "Configuring Customization Layers."
-
Save your changes.
10.2.2.2 Using the Customization Developer Role
The following procedure describes how to configure the CustomizationLayerValues.xml file for a specific application from the Customization Developer role.
-
Create your customization classes, as described in Section 10.3, "Creating Customization Classes"
-
Make your classes available to JDeveloper, as described in Section 10.4, "Consuming Customization Classes"
To configure design-time customization layer values at the workspace level from the Customization Developer role:
-
In the Customization Context window, click Configure application layer values to open the
CustomizationLayerValues.xmlfile in the Source editor.Note:
If the override file does not exist, JDeveloper displays a confirmation dialog. Click Yes to create and open a copy of the global file. -
In the file, specify layer values as necessary, as described in Section 10.2, "Configuring Customization Layers."
-
Save your changes.
After you make changes to the application-specific CustomizationLayerValues.xml file while you are in the Customization Developer role, any tip layer you have selected in the Customization Context window is deselected. You can then select the desired tip layer.
10.3 Creating Customization Classes
A customization class is a POJO class that extends oracle.mds.cust.CustomizationClass. It evaluates the current context and returns a String result. This String result is used to locate the customization layer.
The customization class provides the following information:
-
A name that represents the name of the layer.
-
An IDPrefix, for objects created in the layer. When new objects are created in a customization layer, they need a unique ID. The IDPrefix is added to the autogenerated identifier for the object to create an ID for the newly added object. Each layer needs a unique IDPrefix so that objects created at different customization layers have unique IDs.
-
A cache hint (CacheHint), for the layer defined by the customization class. In MAF, the cache hint defines a static customization layer and the
getCacheHintmethod always returnsALL_USERSwhich means the customization is applied globally (unconditionally) for a given deployment.
Note:
Since customization classes are likely to be executed frequently, once for each document being accessed to get the layer name and layer value, you should ensure their efficiency.Customizations can be used to tailor a MAF application to suit a specific industry domain (verticalization). Each such domain denotes a customization layer and is depicted using a customization class.
Static customizations have only one layer value in effect for all executions of the application. A static customization has the same value for all users executing the application.
In the customization class used in a MAF application, the getCacheHint method always returns ALL_USERS meaning that the customization layer is always static.
All objects could have a static customization layer, depending on how the customization classes are implemented.
Do not create the customization file in the MAF application that you plan to customize. Instead, create a separate Java application for the customization class. After you complete the Java class, you import it into the MAF application that you plan to customize.
To create a customization class:
-
Create a Java application.
-
Click File, New, and then Project.
-
In the New Gallery, choose Java Application Project, and then complete the wizard.
-
In the Applications window, right-click the Java application project, and then choose Project Properties.
-
In the Project Properties dialog, select Libraries and Classpath, and then click Add Library.
-
In the Add Library dialog, select MDS Runtime and then click OK. Click OK to close the Project Properties dialog.
-
In the Applications window, right-click the Java application project and then choose New and then Java Class.
-
In the Create Java Class dialog, enter the class' name and package.
-
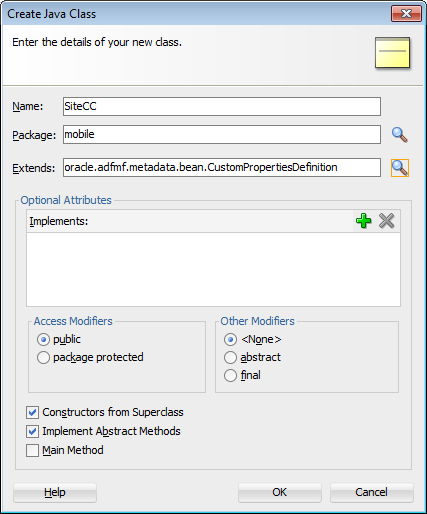
In the Extends field, browse the class hierarchy and retrieve
oracle.mds.cust.CustomizationClass, as shown in Figure 10-3, and then click OK.Note:
Implement Abstract Methods (the default setting) must be selected in the Create Java Class dialog. -
Update the stub file. Example 10-2 illustrates a customization class.
Example 10-2 Customization Class
package mobile; import java.io.IOException; import java.io.InputStream; import java.util.Properties; import oracle.mds.core.MetadataObject; import oracle.mds.core.RestrictedSession; import oracle.mds.cust.CacheHint; import oracle.mds.cust.CustomizationClass; public class SiteCC extends CustomizationClass { private static final String DEFAULT_LAYER_NAME = "site"; private String mLayerName = DEFAULT_LAYER_NAME; public SiteCC() {} public SiteCC (String layerName) { mLayerName = layerName; } public CacheHint getCacheHint() { return CacheHint.ALL_USERS; } public String getName() { return mLayerName; } public String[] getValue(RestrictedSession restrictedSession, MetadataObject metadataObject) { // This needs to return te site value at runtime. // For now, it's always null Properties properties = new Properties(); String configuredValue = null; Class clazz = SiteCC.class; InputStream is = clazz.getResourceAsStream("/customization.properties"); if (is != null){ try { properties.load(is); String propValue = properties.getProperty(mLayerName); if (propValue != null){ configuredValue = propValue; } } catch (IOException e) { e.printStackTrace(); } } return new String[] {configuredValue}; } } -
Rebuild the Java application project.
10.4 Consuming Customization Classes
After you have created your customization classes, you can use them at design time in the Customization Developer role, as well as at runtime in the application. To be consumed in an application or in JDeveloper, the classes must be packaged appropriately.
Because the customization classes are reusable components, you can create a separate project to contain them and package them into their own JAR file. You can then import the JAR into the consuming application, which makes the customization classes available to JDeveloper.
You must first package the customization class as a JAR file and then register the class with the MAF application. To package the customization class and any related artifacts into a JAR file, you must create a deployment profile using the Create Deployment Profile wizard. For more information, see Section 27.2.1, "About Automatically Generated Deployment Profiles."
To add customization classes to a JAR:
-
In the Applications window, right-click the Java application project and choose New > From Gallery.
-
In the New Gallery, expand General, select Deployment Profiles and then JAR File, and click OK.
Tip:
Click the All Features tab if the Deployment Profiles node does not appear in the Categories tree. -
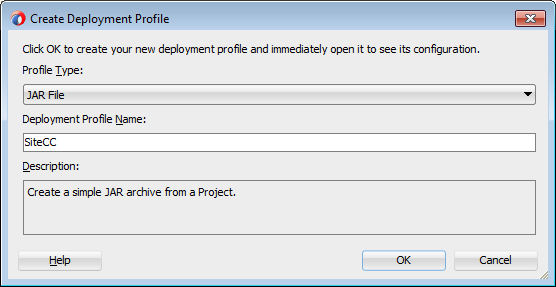
In the Create Deployment Profile -- JAR File dialog, enter a name for the project deployment profile (for example,
SiteCCin Figure 10-4) and then click OK. -
In the Edit JAR Deployment Profile Properties dialog, select JAR Options.
-
If needed, enter a location for the JAR file. Otherwise, accept the default location.
-
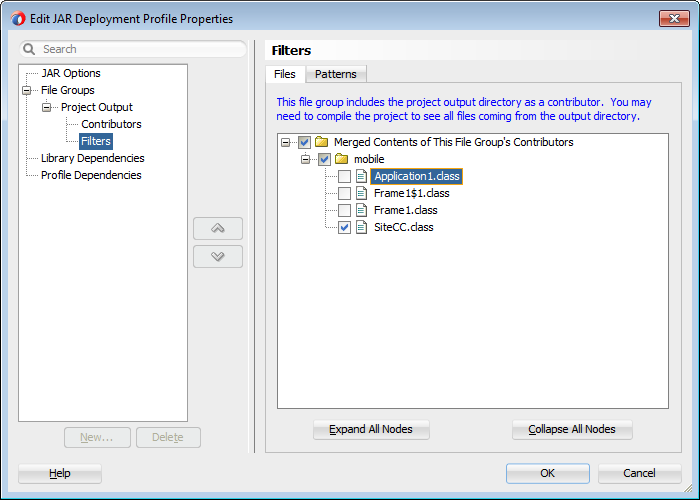
Expand Files Groups > Project Output > Filters to list the files that can be selected to be included in the JAR.
-
In Filters page, in the Files tab, select the customization classes you want to add to the JAR file, as illustrated in Figure 10-5.
-
Click OK to exit the Edit JAR Deployment Profile Properties dialog.
-
Click OK again to exit the Project Properties dialog.
-
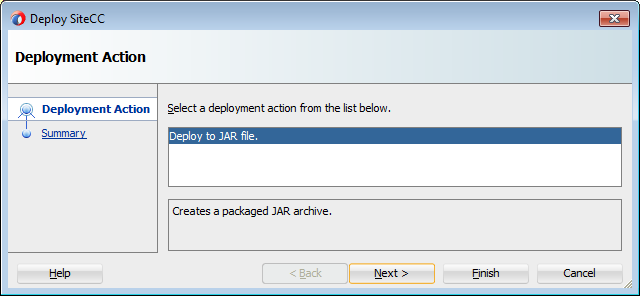
In the Applications window, right-click the Java application project and then choose the deployment profile. In the Deployment Action page, illustrated in Figure 10-6, Deploy to JAR is selected by default. Click Next.
-
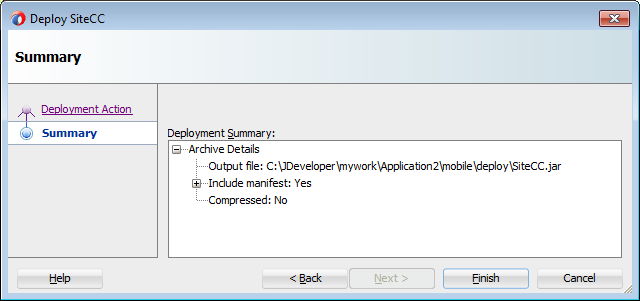
Review the confirmation for the output location of the JAR file. Click OK.
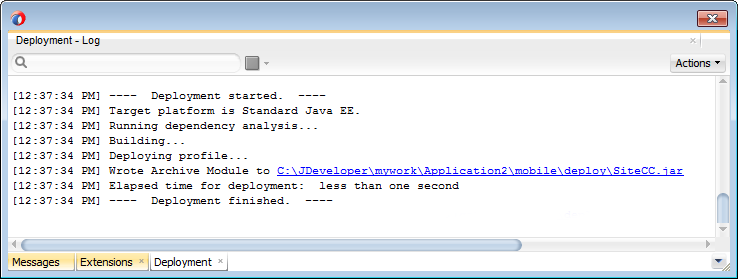
The log file window, shown in Figure 10-8, displays the status of the deployment.
Use the following procedure to make the customization classes visible to the application, and then add the customization classes to the cust-config section of the adf-config.xml file.
Note:
The following procedure is not required if you created your customization classes in the data model project of the consuming application.-
Create your customization classes in an external project.
-
Create a JAR file that includes the customization classes.
-
Launch JDeveloper using the Studio Developer role, and open the application that you want to customize.
To register the customization class with the MAF application:
-
In the Applications window, click the Application Menu icon and select Application Properties.
-
In the Application Properties dialog, select Libraries and Classpath, and click Add JAR/Directory.
-
In the Add Archive or Directory dialog, select the JAR file you created that contains the customization classes, and click Open.
-
Click OK.
The next step is to add the customization class to the adf-config.xml file. The application's adf-config.xml file must have an appropriate cust-config element in the mds-config section. The cust-config element allows clients to define an ordered and named list of customization classes. You use the Overview editor for the adf-config.xml file to add customization classes (see Figure 10-9).
To identify customization classes in the adf-config.xml file:
-
In the Application Resources window, expand the Descriptors > ADF META-INF nodes, and then double-click adf-config.xml.
-
In the Overview editor, select MDS navigation tab and then click the Add ( + ).
-
In the Edit Customization Class dialog, search for or navigate to the customization classes you have already created.
-
Select the appropriate classes and click OK.
-
After you have added all of the customization classes, you can use the arrow icons to arrange them in the appropriate order.
Figure 10-9 shows the Overview editor for the adf-config.xml file with two customization classes added.
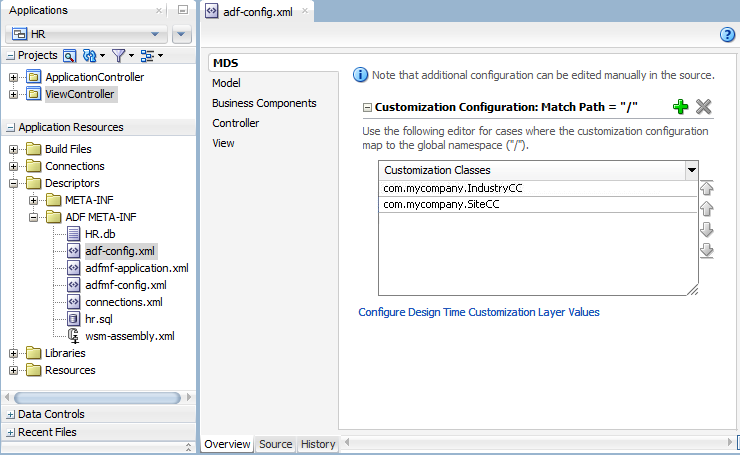
The order of the customization-class elements defines the precedence of customization layers. For example, in the code shown in Example 10-3, the IndustryCC class is listed before the SiteCC class. This means that customizations at the industry layer are applied to the base application, and then customizations at the site layer are applied.
Example 10-3 Customization Class Order in the adf-config.xml File
<adf-config xmlns="http://xmlns.oracle.com/adf/config">
   <adf-mds-config xmlns="http://xmlns.oracle.com/adf/mds/config">
      <mds-config xmlns="http://xmlns.oracle.com/mds/config" version="11.1.1.000">
         <cust-config>
            <match path="/">
               <customization-class name="com.mycompany.IndustryCC"/>
               <customization-class name="com.mycompany.SiteCC"/>
            </match>
         </cust-config>
      </mds-config>
   </adf-mds-config>
</adf-config>
Upon completion, the customization classes are available to JDeveloper for customization and for running your project locally in JDeveloper. They will also be packaged to the EAR class path when you package the application.
10.5 Understanding a Customization Developer Role
In JDeveloper, the Customization Developer role is used to customize the metadata in a project. Customization features are available only in this role. When working in a Customization Developer role, you can do the following:
-
Create and update customizations.
-
Select and edit the tip layer of a customized application.
-
Remove existing customizations.
When you use JDeveloper in the Customization Developer role, the Source editor is read-only and the following JDeveloper features are disabled:
-
Workspace migration.
-
Creation, deletion, and modification of application and IDE connections. You must configure connections in Default role before opening an application in Customization Developer role.
When working with an application in the Customization Developer role, new objects and files cannot be created, and noncustomizable objects cannot be modified. In addition, you cannot edit noncustomizable files, such as Java classes, resource bundles, security policies, deployment descriptors, and configuration files.
Note:
Noncustomizable files are indicated by a lock icon when you are working in the Customization Developer role.You are also restricted from modifying project settings, and you cannot refactor or make changes to customizable files that would, in turn, necessitate changes in noncustomizable files.
For more information, see the "Working with JDeveloper Roles" section in Oracle Fusion Middleware User's Guide for Oracle JDeveloper.
10.5.1 How to Switch to the Customization Developer Role in JDeveloper
The customization features of JDeveloper are available to you in the Customization Developer role. To work in this role, you can either choose it when you start JDeveloper or, if JDeveloper is already running, you can use the Switch Roles menu to switch to the Customization Developer role.
To switch to the Customization Developer role in JDeveloper:
From the main menu in JDeveloper, choose Tools > Switch Roles > Customization Developer.
Optionally, you can toggle the Tools > Switch Roles > Always Prompt for Role Selection at Startup menu to specify whether or not you want to choose the role when JDeveloper is launched. If deselected, JDeveloper launches in the role in which it was when you last closed it.
10.5.2 What You May Need to Know About the Tip Layer
When working in the Customization Developer role, the layer and layer value combination that is selected in the Customization Context window is called the tip layer. The changes you make while in the Customization Developer role are applied to this layer.
Note:
When working in the Customization Developer role, if the Customization Context window is not displayed, you can access it from JDeveloper's Window menu.The metadata displayed in the JDeveloper editors is a combination of the base metadata and the customization layers up to and including the tip layer, according to the precedence set in adf-config.xml, with the values specified in the Customization Context window for each layer.
When working in the Customization Developer role, you can also see the noncustomized state of the application. When you select View without Customizations in the Customization Context window, there is no current tip layer. Therefore, what you see is the noncustomized state. While you are in this view, all customizable files show the lock icon (in the Applications window), indicating that these files are read-only.
When you make customizations in a tip layer, these customizations are indicated by an orange icon in the Properties window. A green icon indicates non-tip layer customizations. When you see an orange icon beside a property, you have the option of deleting that customization by choosing Remove Customization from the dropdown menu for that property.
10.6 What You May Need to Know About Web Service Data Controls and Customized Application Deployments
Because web service Java Bean Definition (JBD) files cannot be created by a customization deployment, you must perform a non-customization deployment to create these files before performing a customization deployment, as follows:
-
Launch the application in the Studio Developer role.
-
Choose Build and then Clean All to remove any web service JDB files that may have become obsolete since the previous deployment.
-
Select from among the deployment options (accessed by choosing Application, then Deploy, and then by selecting the deployment profile). For more information, see Chapter 27, "Deploying MAF Applications."
-
Launch the application in the Customization Developer role.
-
Select the same deployment profile chosen in Step 3 to enable the customization deployment to access the JBD files created by the non-customization deployment.
10.7 Enabling Customizations in Resource Bundles
To implement customization for resource keys, you must create additional resource bundle files; you cannot use the base resource bundle file.
In the Studio Developer role, create an application or project resource bundle. Edit the bundle that you create to define string values for resource keys.
Familiarize yourself with the "How to Use Multiple Resource Bundles" section in Oracle Fusion Middleware Developing Fusion Web Applications with Oracle Application Development Framework.
To create an application resource bundle:
-
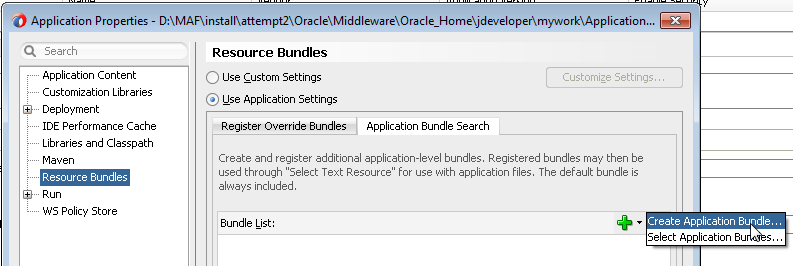
In the Studio Developer role, click Application > Application Properties > Resource Bundles.
-
In the Resource Bundle page, click Application Bundle Search, then click the dropdown menu icon to the right of the Add bundle icon and choose Create Application Bundle, as shown in Figure 10-10.
-
In the Create Xliff File dialog that appears, enter a name for the resource bundle and click OK.
-
Edit the resource bundle, as described in Section 6.9, "Editing a Resource Bundle File."
Note:
MAF does not support the Overridden property in the application-level Resource Bundle page. -
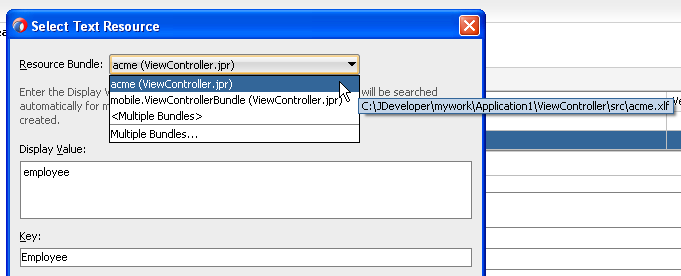
In the Customization Developer role, open the Select Text Resource dialog and choose from among the resource bundles that contain the appropriate string. Because you cannot change strings or create new ones in the Customization Developer role, you can only choose from the strings in the selected bundle.
Note:
Do not select strings from the base resource bundle in the Customization Developer role, as doing so may cause problems when upgrading the application.
To create a project resource bundle:
-
In the Studio Developer role, right-click the project where you want to create the resource bundle and choose New > From Gallery > General > XML > XML Localization File (XLIFF).
-
In the Create Xliff File dialog that appears, enter a name for the resource bundle and click OK.
-
Edit the resource bundle, as described in Section 6.9, "Editing a Resource Bundle File."
-
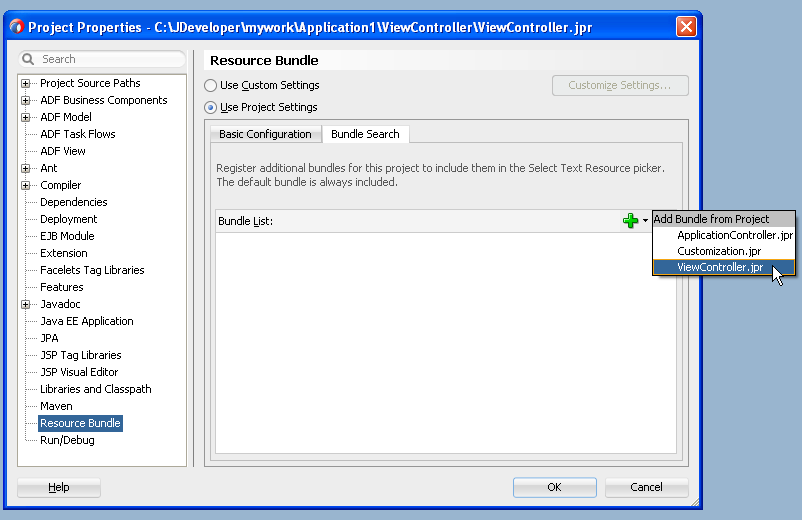
In the Bundle Search tab of the Resource Bundle page, register the resource bundle by selecting a project (
.jpr) file, as shown in Figure 10-11.Registering a resource bundle includes it in the Select Text Resource dialog, shown in Figure 10-12.
-
Use the Select Text Resource Dialog to define the key as follows:
-
Select the bundle from the Resource Bundle dropdown list.
The dialog displays the strings that are currently defined in the selected resource bundle.
-
Enter a new string and then click Save and Select.
JDeveloper writes the string to the selected resource bundle.
-
-
In the Customization Developer role, open the Select Text Resource dialog and choose from among the resource bundles that contain the appropriate string. Because you cannot change strings or create new ones in the Customization Developer role, you can only choose from the strings in the selected bundle.
Note:
Do not select strings from the base resource bundle in the Customization Developer role, as doing so may cause problems when upgrading the application.
10.8 Upgrading a MAF Application with Customizations
Customizations are upgrade-safe because they are saved separately from the base applications. Because customizations retain changes, they enable you to upgrade an application by applying these changes to newer versions of the application. The MAF Application Archive (.maa) file provides the mechanism for upgrading MAF applications. When you create an application from an .maa file, you can upgrade the application using an updated version of the .maa file.
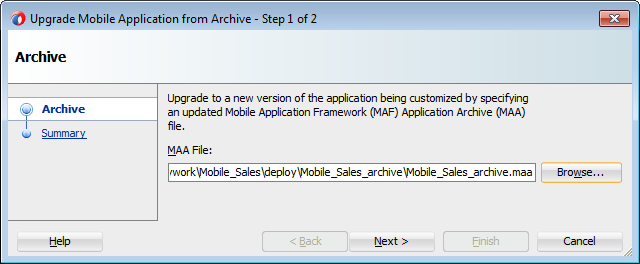
Using the Upgrade Mobile Application from Archive wizard, you can upgrade an application to a higher version while retaining the customizations made prior to the upgrade.
You may want to familiarize yourself with the MAF Application Archive (.maa) file. For more information, see Section 27.6, "Creating a Mobile Application Archive File" and Section 27.7, "Creating Unsigned Deployment Packages."
Ensure that the application that is packaged into the .maa file and used for the upgrade has the same application ID as the application to which it will be applied. It must also have a higher version number than the application targeted for the upgrade.
-
Create a MAF application from an
.maafile. -
Apply customization to the MAF application, as described in Section 10.7, "Enabling Customizations in Resource Bundles."
-
Click Application, and then choose Select Mobile Application from Archive.
-
Browse to and select the
.maafile. The wizard discontinues the upgrade if the application packaged in the.maahas the same (or lower) version number than the current application, or a different application ID. -
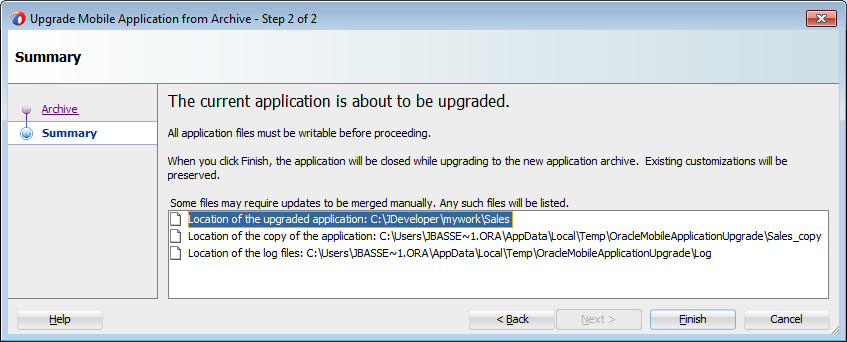
Review the Summary page for files that require a manual merge. As noted in Figure 10-14, MAF saves the initial version (Version 1) of the application in the
Tempdirectory. The Summary page also notes the temporary location of the log files. -
If the upgrade completes successfully, restart JDeveloper. JDeveloper notifies you if different versions of a configuration file require reconciliation, as illustrated by Figure 10-15.
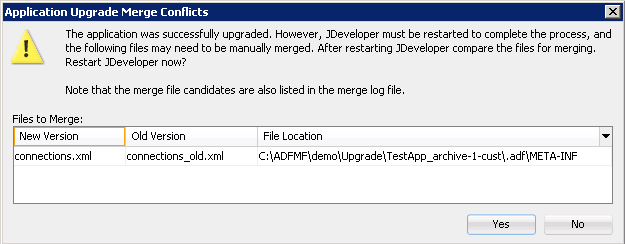
During the upgrade, MAF copies a set of files that cannot be customized for both Version 1 of the application and Version 2 (the upgraded version of the application). These files include the connections.xml and adf-config.xml files. If MAF detects differences between Version 1 and Version 2 connections.xml and adf-config.xml files, it retains both copies of these files and writes an entry to the merge log file. MAF differentiates Version 1 by appending a version number if version numbers exist to the file name. If version numbers do not exist, MAF adds _old to the file name, as illustrated by connections_old.xml in Figure 10-15. If needed, you can manually merge the differences into the new version. As illustrated in Figure 10-16, MAF places the merge file log in the temporary location noted in the Summary page. MAF names the files as workspace name_timestamp.

10.8.1 What Happens in JDeveloper When You Upgrade Applications
In addition to copying Version 1 to the Temp directory and creating Version 1 and Version 2 copies of the non-upgradable configuration files, MAF also performs the following when you upgrade an application using the Upgrade Mobile Application from Archive wizard:
-
Saves the libraries and resource bundles settings for each project in a map keyed with the project file name.
-
Saves the resource bundle settings for the workspace.
-
Saves the registered customization class in the
adf-config.xmlfile. -
Imports the Version 2
.maafile to the temporary directory. -
Copies the application from the
.maafile used for the upgrade to Version 1. -
Updates each Version 2 project (
.jpr) file with the registered resource bundle and library dependency map. The new version of the library overrides the previous version. However, the Version 1 library remains unchanged if it shares the same name as the library used in Version 1. -
Updates the Version 2 workspace (
.jws) file with the registered resource bundle settings. -
Updates the Version 2
adf-config.xmlfile to register the customization class.
10.8.2 What You May Need to Know About Upgrading FARs
If the application includes a FAR file that was not packaged in the original .maa file that was used to create the application (or included in the .maa file that is used to upgrade the application), then you must upgrade the FAR file separately. For example, you can create an application from an .maa file, add a FAR file, and then perform customization. You can upgrade the application to use a newer version of the FAR by adding the updated FAR from the Resources window as described in Section 8.2, "Using FAR Content in a MAF Application."