16 Working with REST Services
This chapter describes the REST Service Editor, which allows you to create REST APIs and data types which can be used to generate code, and to access, use, and test REST services, and to use Oracle Mobile Cloud Service to develop mobile applications.
This chapter includes the following sections:
16.1 Introduction to Working with REST Services
The REST Service Editor allows you to create REST APIs and data types from which you can generate code to use in applications. It helps you to develop applications which interact with REST APIs, and test how a REST API that you are developing works. You can use the editor when you are developing an application that will be used with a REST service to see how the application handles REST requests.
You can:
-
Connect to a live REST service and send requests to examine the responses returned by the server.
-
Create a REST API and data types either from scratch, or by importing the REST API and data types of a live service and modeling your own REST API based on it.
The editor works with REST service descriptions, which are XMI files which store the description of a web service.
The editor has three pages, which you navigate between using the tabs on the bottom left of the editor:
-
REST Client
-
REST API
-
Data Types
The REST Service Editor has undo/redo support. The pages work together, but only the REST Client interacts with a live REST service. The other two pages allow you to model a REST API and its data types. When you save the editor, only the REST API and Data Types pages are saved.
16.1.1 REST Client Page
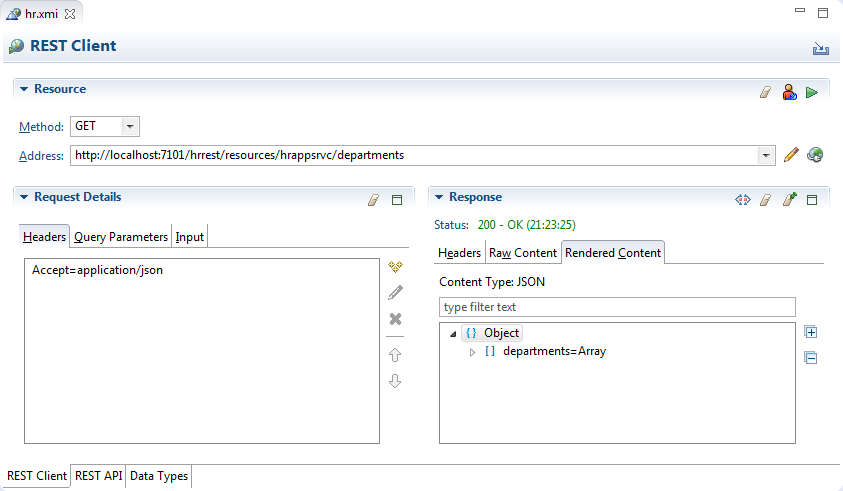
REST Client page, shown in Figure 16-1, allows you to experiment with existing applications that expose REST APIs. You can, for example, find out how your application will interact with a REST API, and send requests to the service and see the responses from the server. This page is not part of the persistent state of the REST Service Description, so changes neither dirty the editor nor are they persisted when you save the editor.
You can import REST client information using ![]() which opens the Import REST Client Information dialog, where you choose to import.
which opens the Import REST Client Information dialog, where you choose to import.
You can modify the requests by:
-
Choosing the method. Those available are GET, POST, PUT, and DELETE.
-
Only addressing part of the service by using fragments in the URI.
-
Sending queries as part of the request to return just the responses which match.
-
Using headers to define what is returned in the response, for example, to specify the content type.
-
Using query parameters to configure the response, for example
verbose=false. -
Inputting information as part of the request when using POST or PUT, or output information when using GET.
In addition, from the REST Client page you can import REST Client information from the REST service.
16.1.2 REST API Page
The REST API page, shown in Figure 16-2, allows you to model a REST API, or to import a RAML definition from an MCS backend.
If you are modelling a REST API and you have connected to a REST Service using the REST Client you can import REST client information from the server. The REST API is displayed on this page, and you can model changes to it.
If you are working with MCS APIs you can import a RAML definition from a file on the local file system, or from an API in a mobile backend, and model it as a REST API.
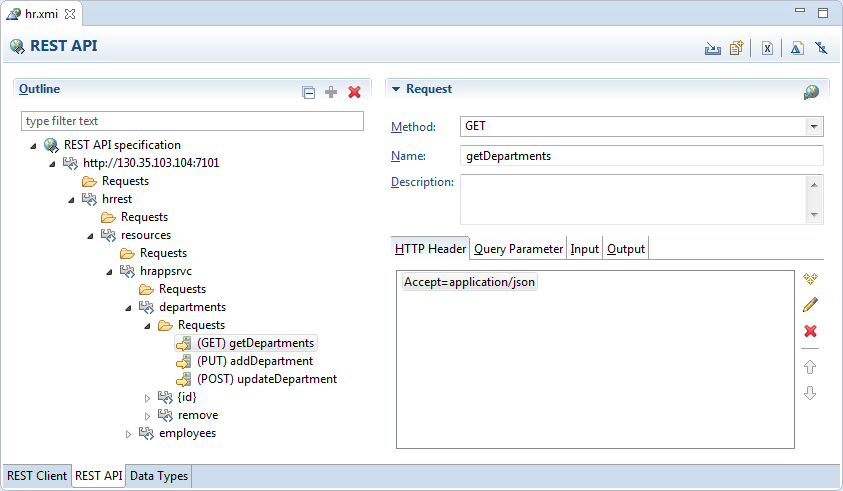
Paths are made up of path segments and they may contain variables of the form {variable-name}. In Figure 16-2, the path to the variable {id} is made up of the path segments shown in the outline to form http://130.35.103.104:7101/hrrest/resources/hrappsrvc/departments/{id}.
For the Java domain, the default value of the variable is java.lang.Object.
You can hover the mouse over a path segment or variable for more information.
You can import a REST API from a RAML file or a Mobile Cloud Service backend by clicking ![]() . For more information, see Section 17.2.1.4.2, "Importing a REST API Using the REST Service Editor."
. For more information, see Section 17.2.1.4.2, "Importing a REST API Using the REST Service Editor."
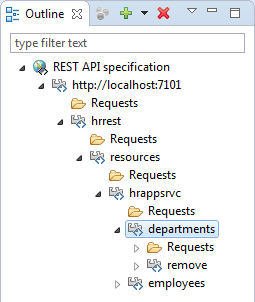
The Outline area displays the REST API specification for the service. The content of the area on the right depends on what is selected in the specification. The outline is reflected in the Outline window of the OEPE IDE, shown in Figure 16-3. You can perform operations in the REST API page of the REST Service Editor, or in the Outline window when the REST API page is selected in the editor.
In the REST API page, you can modify the REST API by:
-
Specifying new paths to services.
-
Creating new requests, and modify them using HTTP headers, query parameters, and specifying input and output parameters.
Once you are happy with the REST API you can copy your changes to the REST Client page to try the request against a live REST service.
If you are developing MAF applications to work with the REST service, you can generate JAVA artifacts based on the REST API to use in your application.
16.1.3 Data Types Page
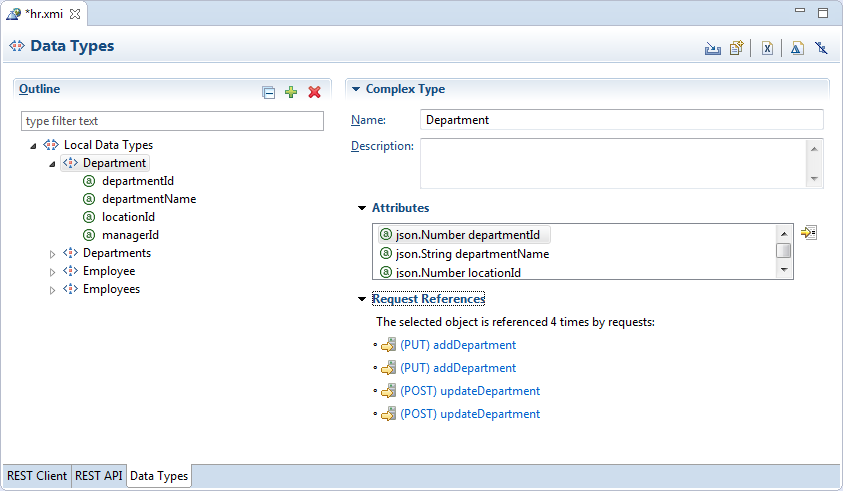
The Data Types page, shown in Figure 16-4, allows you to model the data types used by a REST API. The imported data types are displayed on this page, and you can model changes to them.
If you have connected to a REST Service using the REST Client you can import REST client information from the server.
If you are working with MCS APIs, you can import the data types associated with a mobile backend or a RAML file on the local file system. You can also import a JSON Example or JSON Schema defined in a file from local file system.
The Outline area displays the data types used by the modeled REST API. The content of the area on the right depends on what is selected in the specification. The outline is reflected in the Outline window of the OEPE IDE, shown in Figure 16-5. You can perform operations in the Data Types page of the REST Service Editor, or in the Outline window when the Data Types page is selected in the editor.
In the Data Types page, you can modify the local data types by:
-
Creating new attributes.
-
Specifying new complex or simple data types.
You can import data types from a file.
If you are developing MAF applications to work with the REST service, you can generate JAVA artifacts based on the data types to use in your application.
16.1.4 Using Authentication
The REST Service Editor support connecting to REST services that use authentication. The types of authentication that you can use are:
-
HTTP (basic, digest, universal)
-
OAuth2 ('code' grant type)
-
OAuth2 ('resource owner password credentials' type)
You set authentication details when you create connections to the REST service. For more information, see Section 16.2.1.8, "How to Use Authentication."
16.1.5 How to Open the REST Service Editor
The REST Service Editor opens when:
-
You open an existing REST service description in an OEPE application.
-
You create a new REST service description in OEPE. For more information, see Section 16.1.6, "How to Create a REST Service Description.".
16.1.6 How to Create a REST Service Description
You can create a REST service description to contain a modeled REST API for MAF applications created or migrated to MAF 2.1 or later. The description is stored in the view project in an appropriate folder.
You can also create a REST service description by importing a RAML definition from an MCS API. For more information, see Section 17.2.1.4.1, "Importing a REST API from Oracle Cloud View."
Before you begin:
-
Choose the Oracle MAF perspective.
-
Open or create a MAF application.
To create a REST service description:
-
Either, from the main OEPE menu or from the context menu of one of the projects of the MAF application, choose File > New > REST Service Description.
Or:
-
In the Project Explorer, right-click the assembly project, and then choose File > New > Other from the main OEPE menu.
-
In the New dialog, expand Oracle and choose REST Service Description. In the New dialog, click Next.
-
-
On the REST Service Description page, select the parent folder in the view project for the application to store the description. For example, a folder in the view project called src.rest.
Give the description a name and click Finish. The REST Service Description opens in the REST Service Editor.
16.2 Using the REST Client
The REST Client, shown in Figure 16-1, allows you to connect to and work with a live REST service.
16.2.1 Specifying REST Service Connections
You specify the method to be used for the connection and the URI of the REST service in the Resource area at the top of the REST Client, as shown in Figure 16-6. Connections you define here are available in the Connections view, where you can edit them or reuse them elsewhere in the mobile application. For more information, see Section 16.8, "Using the Connections View."

The REST Client can use the following HTTP methods:
-
GET, to retrieve a representation of a resource.
-
POST, used to create new resources. You POST to the parent of the new resource you want to create, and the service takes care of creation and assigning a new id.
-
PUT, used to update a representation of a resource. The input specifying the update is sent in the body of the request.
-
DELETE, used to delete a resource.
The connection to the REST service is specified by a URI. Usually URIs are available for just the current session, although you can define persistent URIs which are available in future sessions. If you have used multiple URIs, all those that made valid connections are available from the address dropdown.
You can define the connection in a number of ways:
-
You can simply enter a valid address for a REST API in Address. For more information, see Section 16.2.1.1, "How to Enter a Simple URI."
-
The Compose Address functionality allows you to separately enter segments, a query, and a fragment for an address, and it handles the encoding for you. For more information, see Section 16.2.1.2, "How to Compose an Address to a REST Service" and Section 16.2.1.4, "How to Include Fragments in the Request."
-
You can use connections which are defined in the application, that is a connection in the application's
connections.xmlfile. For more information, see Section 16.2.1.5, "How to Use Connection Names from the Application." -
You can define persistent URIs which are available in future sessions. For more information, see
16.2.1.1 How to Enter a Simple URI
You connect to a REST service from the REST Service Editor from the REST Client page.
To enter a simple URI to a REST service:
-
Enter the URI in the Address field. As you start to type the editor suggests URIs based on previous entries during the same session.
16.2.1.2 How to Compose an Address to a REST Service
You connect to a REST service from the REST Service Editor from the REST Client page. The dialog will do any encoding for any characters that cannot be directly represented in the URI.
To compose the address:
-
Click
 to open the Compose Address dialog.
 -
In Segments, enter the URI.
Alternatively, you can use connection names from the application to create the URI. For more information, see Section 16.2.1.5, "How to Use Connection Names from the Application."
-
To use a query so that the server returns just the result of the query, see Section 16.2.1.3, "How to Include Queries in the Request."
-
To use a fragment which locates a specific location at the destination, see Section 16.2.1.4, "How to Include Fragments in the Request.".
-
If authentication is required, in the Resource section click
 to open the Authentication Information wizard. For more information, see Section 16.2.1.8, "How to Use Authentication."
16.2.1.3 How to Include Queries in the Request
You can send a query as part of the URI so that the server returns just the result of the query. You can enter the query value, or use variable that you specify when you make the connection.
To enter a query:
-
Click
to open the Compose Address dialog. -
To enter a query, enter the value in Query.
For example, if you are sending the request to
http://server:port/hrrest/resources/hrappsrvc/departmentsand you specifically want details about a department with the id=10, you can use the addresshttp://server:port/hrrest/resources/hrappsrvc/departments/10to return a response just about this object.You can also use variables as queries. Enter a variable delimited by { }, for example
{id}. When you send the request, a Replace Variables dialog is displayed where you enter the value for each variable.
16.2.1.4 How to Include Fragments in the Request
You can use a fragment as part of the URI so that the server locates a specific location at the destination.
To use a fragment:
-
Click
to open the Compose Address dialog. -
To use a fragment which locates a specific location at the destination, enter the fragment name in Fragment.
16.2.1.5 How to Use Connection Names from the Application
The connection URI is a specific type of URI that you can use with the REST client. The form for a connection URI is connection://connection-name.
In this example, the connection with the name rest_conn identifies a connection to http://localhost:7101" name="rest_conn.
<Reference className="oracle.adf.model.connection.url.HttpURLConnection" name="rest_conn" xmlns="">
      <Factory className="oracle.adf.model.connection.url.URLConnectionFactory"/>
      <RefAddresses>
         <XmlRefAddr addrType="rest_conn">
            <Contents>
               <urlconnection url="http://localhost:7101" name="rest_conn"/>
            </Contents>
         </XmlRefAddr>
      </RefAddresses>
   </Reference>
To use a URI based on this connection in the REST Client, type c in Address. The editor displays a list of possible URIs, and one of them will be connection://rest_conn. When you run the request, this connection resolves to an actual URI of http://localhost:7101.
In some cases, such as this example, you also need to add an additional part of the path in order to return a valid response. For example, connection://rest_conn/departments.
To create a URI based on the application:
-
Open the application's
connections.xmlfile and identify the name of the connection you want to use. In the menu bar of the Connections view, click . connections.xml open in the OEPE source editor.
 -
In the REST Client page of the REST Service Editor, start typing the connection name in Address.
-
Choose the connection you want from the list of those available, and add any additional part of the path.
You can use a connection URI for a connection that has authentication set in the application. In the connections.xml file, HttpURLConnection for the connection has an adfCredentialStoreKey set to a value.
When you click ![]() , an Authentication Information dialog is displayed where you enter the username and password associated with the connection.
, an Authentication Information dialog is displayed where you enter the username and password associated with the connection.
16.2.1.6 How to Create Persistent Connections
You can create persistent connections, which will be available to you at any time, rather than just for the current session. Persistent addresses are available from the names you enter for them.
Persistant connections appear in the Connections view. For more information, see Section 16.8, "Using the Connections View."
To create a persistent connection:
-
In the REST Client page of the REST Service Editor, click
to open the Manage Connection wizard. -
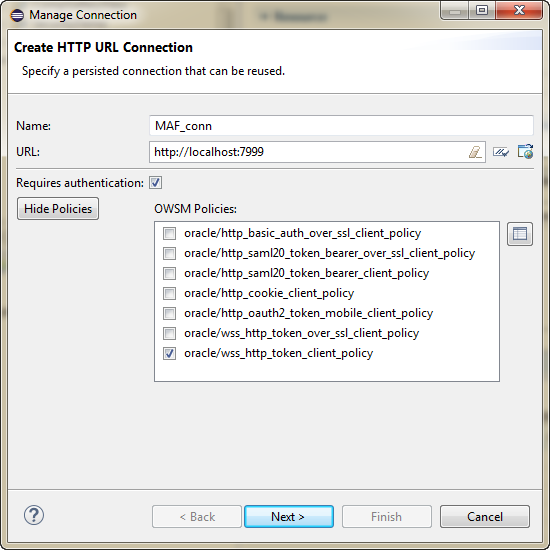
In the dialog, shown in Figure 16-7, enter a name and the URL for the connection. In this page of the wizard, you can:
-
Test the URI by clicking
 .
. -
Open the URI in a browser by clicking
 .
. -
If you need to specify authentication details for the connection, select Requires Authentication and enter the authentication values on the remaining pages of the wizard. For more information, see Section 16.2.1.8, "How to Use Authentication."
-
To specify security policies, click Show Policies and select the appropriate one. For more information, see Section 15.6, "Accessing Secure Web Services."
-
16.2.1.7 Overriding OWSM Policies
You can override some of the OWSM Mobile Agent properties to modify the underlying behavior of the OWSM policy being enforced. This is only available for the following policies:
-
oracle/http_basic_auth_over_ssl_client_policy -
oracle/wss_http_token_over_ssl_client_policy -
oracle/wss_http_token_client_policy
You can set preemptive to be either true or false. Setting preemptive to true on these policies inserts a basic authentication header into the first request to a secured REST web service
To use override properties to modify an OWSM policy:
-
In the Manage Connection dialog, select the OWSM policies you want to set an override property for.
-
Click
 to open the Override Properties dialog.
 -
Click
 to open the Select Override Property dialog. Select from the list of available properties and click OK.
 -
In the Override Properties dialog, choose the value for the property. Click OK to return to the Manage Connection dialog.
16.2.1.8 How to Use Authentication
When you connect to a REST service which is protected by authentication, you enter the authentication as part of the connection information. In the REST Client page, this is either:
-
When you create a session connection by entering a URI in the Address field, or when you click
to open the Compose Address dialog. In this case, click .Alternatively, you can use a connections URI which points to an application connection which already has authentication applied. For more information, see Section 16.2.1.5, "How to Use Connection Names from the Application,".
-
When you create a persistent connection by clicking
to open the Manage Connection wizard. In this case, select Requires Authentication on the create HTTP URL Connection page.
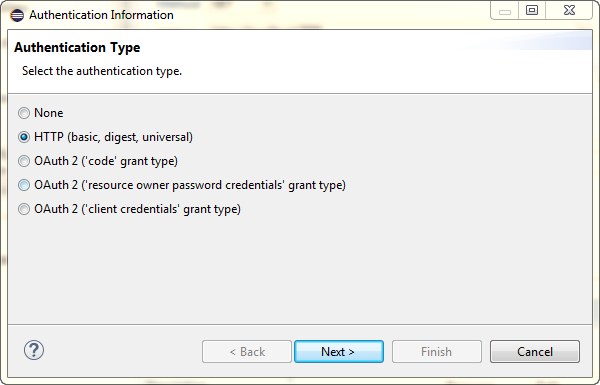
The REST Service Editor supports HTTP Basic and OAUTH 2 connections, as shown in Section 16.2.1.8, "REST Service Authentication.":
-
HTTP Basic, digest, universal: Enter a username and password to be used when sending a request to a server.
-
OAuth 2 ("code" grant type): OAuth 2 authentication using an authorization URI.
-
OAuth 2 ("resource owner password credentials" type): OAuth 2 authentication using a username and password.
-
OAuth2 ("client credentials" grant type): OAuth 2 authentication using client credentials.
To enter authentication for a REST service connection:
-
On the REST Client page:
-
If you creating a session connection by entering a URI in the Address field or clicking
to open the Compose Address dialog, click to open the Authentication Information dialog. -
If you create a persistent connection by clicking
to open the Manage Connection wizard, select Requires Authentication on the create HTTP URL Connection page.
-
-
On the Authentication Type page, choose the type of authentication you want to use and click Next.
-
Enter the authentication details for the connection and click Finish.
You may also have to use authentication when you create Java artifacts from a modeled REST API to use with a MAF application. For more information, see Section 16.7.1, "How to Generate Java Artifacts for REST Services."
16.2.2 Sending Requests to the REST Service
Once you have specified the URI you can send the request to the server.
To send a request to the REST Service:
-
Choose the method you want to use.
-
Ensure that the correct URI is specified in Address.
-
Run the request by either:
-
With the cursor in Address, press Return.
-
Click
 .
.
-
16.2.3 What Happens When You Send a Request
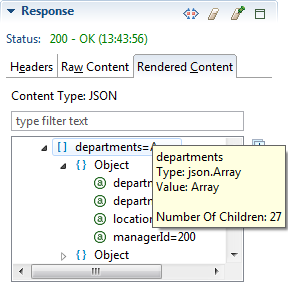
When you send the request the HTTP response returned by the server to the client is displayed in the Response area, as shown in Figure 16-9.
The HTTP status code of the response is shown.
The response itself is displayed in the three tabs:
-
Headers, which shows the names and associated values of the headers, for example
Content-Length,ContentType,Date. -
Raw Content shows the string that comes from the server. You can wrap the lines by clicking
 . If the content is binary you can display it as a string by clicking
  .
. -
Rendered Content displays the response formatted according to the content type: JSON, XML, HTML, or images. Other content types are not displayed in this tab. Hover the mouse over the nodes to see additional information to help you understand the REST API.
You can display the data types in the response area by clicking ![]() .
.
16.2.4 Generating Response Types
Because a REST API request does not specify an output, upon code generation OEPE returns oracle.eclipse.tools.rest.runtime.client.ResponseObject as the generated java return type. This allows you handle request response information in the most appropriate manner for your application.
You will to specifically handle the code in situations where the mediatype is either:
-
Wildcard(
*/*) -
Image(
image/*
ResponseObject provides access to:
-
Response headers—a
not-<code>null</code>map with the response headers. -
Mediatype—a
not-<code>null</code>array with either a zero length if there is no media type information or length equals3in which the first element is the full media type string (likeapplication/json), the second element the media type'type' (application), and the third the subtype(json). -
Charset—
<code>null</code>or the character set applicable to the response's media type. -
Entity—
<code>null</code>, a not-empty string, or any object representing the entity of the response (the entity is typically a representation of the content returned by the server). -
Raw Entity—
<code>null</code>or the object returned by the server as is, typically an input stream or a byte array. If this object's entity is not{@link #isBufferedEntity() buffered}, this method returns abytearray.
16.3 Modifying the Request Content
You can modify the content of the request message to determine what is returned in the response from the server. You can do this for requests in the REST Client page, and when you are modeling REST APIs in the REST API page.
You can use:
-
HTTP headers
-
Query parameters
-
Input (when the method is PUT or POST)
-
Output (when the method is GET or POST)
16.3.1 How to Use REST Headers in the Request
You can add HTTP headers to modify how the server responds to the request. For example, you can specify the content type to be returned, for example Accept=application/json for GET, or Content-Type=application/json for POST.
To specify the content type to be returned by the server:
-
With the Headers tab in the Request Details area selected, click
to open the Add Header dialog. -
In the dialog, enter the values for the request header and click OK. Content assist is available for the name and value fields, and will display possible options as you start typing.
-
In the Headers tab of the Request Details area, you can edit or delete a selected header, or reorder, or delete the headers using the appropriate buttons.
16.3.2 How to Use Query Parameters to Configure the Response.
You can use query parameters to configure the response the server returns, for example verbose=false.
To use query parameters:
-
With the Query Parameters tab in the Request Details area selected, click
to open the Add Query Parameter dialog. -
In the dialog enter the values for the query parameter and click OK.
-
In the Query Parameters tab of the Request Details area, you can edit or delete a selected query parameter, or reorder, or delete the query parameters using the appropriate buttons.
16.3.3 How to Send Input
If you are using the method PUT or POST, you can send input in the body of the request message.
Note:
The only input on the REST Client is in the body of the request.To send input:
-
Select the Input tab, and choose either Body or Representation.
-
For Body, either enter the input directly in the text area. For example:
{"name":"demo department"}You can wrap the lines by clicking
. -
Alternatively, click Show as parameter list and click
to open the Add Body Parameter dialog. Enter the name and value pairs, and click OK.In the Input tab in the Request Details area the Query Parameters tab of the Request Details area, you can edit or delete a selected input parameter, or reorder, or delete the input parameters using the appropriate buttons.
-
For representation, click
to open the Representation dialog, and choose the data type for the input.If necessary, deselect All Attributes and select just those you want to use. It is important that you select data types and attributes that can be returned by the server.
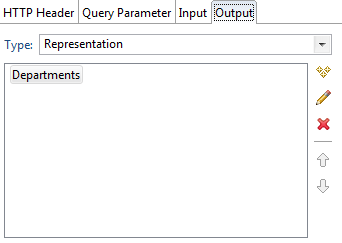
16.3.4 How to Specify Output
If you are using the method GET or POST, you can specify the output that is returned. For example, you could specify that only a few out of the available attributes of a data type are returned in the response.
To specify output:
-
Select the Output tab.
-
Choose whether the output is representation or redirection.
-
For representation, click
to open the Representation dialog, and choose the data type for the response.If necessary, deselect All Attributes and select just those you want returned. It is important that you select data types and attributes that can be returned by the server.
-
For redirection, enter the required HTTP headers, and then enter the representation.
16.4 Importing and Modeling the REST API
The REST API and Data Types pages of the REST Service Editor allow you to model REST APIs. You can start by importing REST Client information from an existing live REST service which you may be developing an application to run against. Alternatively, you can create a completely new REST API, for example, to test how your application may run against a proposed REST service.
You can import a RAML definition from an MCS API. It is saved as a local REST API, allowing you to work with it.
Once you are happy with the REST API you can copy your changes to the REST Client page to run the request against a live REST service and examine the response that is returned.
16.4.1 Importing REST Client Information
Before you can model the REST API for an existing REST service, you must import REST client information from the service. You can choose to import requests, or data types, or both.
Before you begin, you must have:
-
Created a connection to the REST service in the REST Client page of the REST Service Editor, described in Section 16.2.1, "Specifying REST Service Connections."
-
If you want to import data types, set an HTTP header to specify that the response is a JSON payload, described in Section 16.3.1, "How to Use REST Headers in the Request."
-
Run the request against the REST service, described in Section 16.2.2, "Sending Requests to the REST Service."
To import REST Client information:
-
In the REST Client page of the REST Service Editor, click
 to open the Import REST Client Information wizard.
 -
On the Import REST Client Information page of the wizard, choose what you want to import and click Next.
-
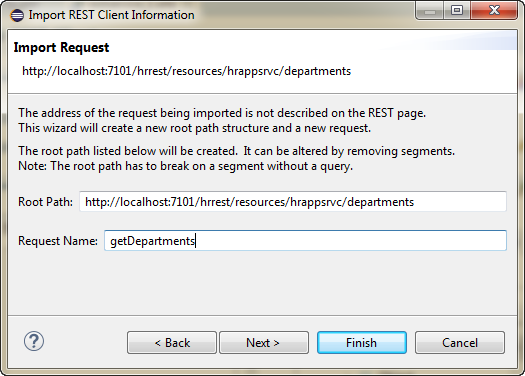
The Import Request page only appears if you are importing requests. Enter the root path and a name for the request, as shown in Figure 16-10. Click Next.
-
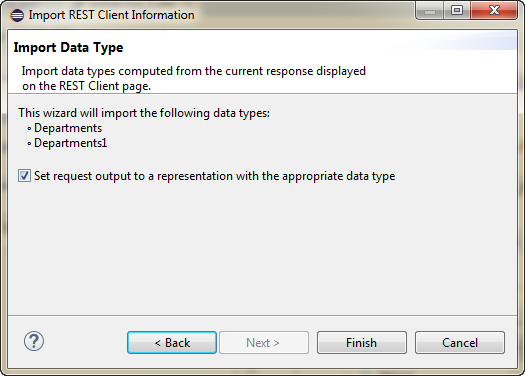
The Import Data Types page only appears if you are importing data types. The wizard infers the data types from the tables and it displays them, as shown in Figure 16-11, To import the information, click Finish.
16.4.2 What Happens When You Import REST Client Information
When you import requests, or requests and data types, the REST Service Editor returns to the REST API page, where you can continue to model the REST API.
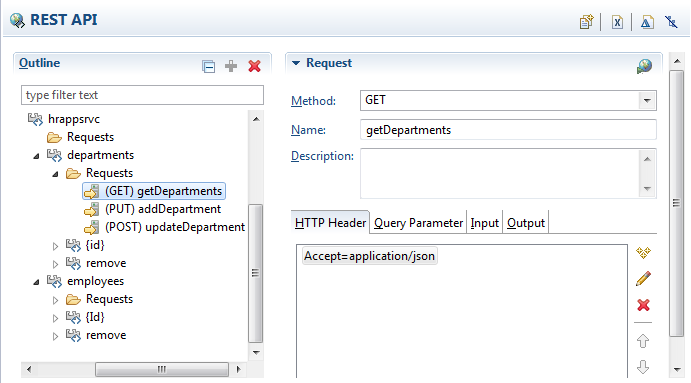
The path you specified in the wizard is shown as a node, and the request you entered is listed under it, as shown in Figure 16-12.
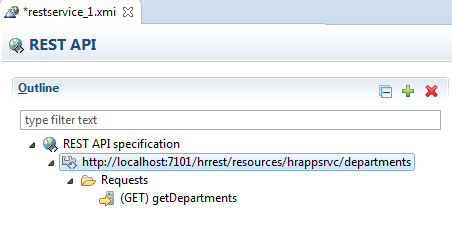
When you select the request, in this example getDepartments, you can see that:
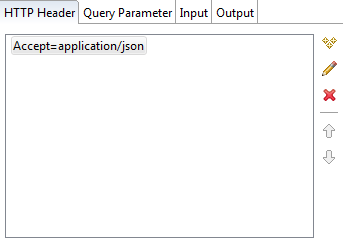
-
The HTTP Header is imported, as shown in Figure 16-13.
-
The Output is imported, as shown in Figure 16-14.
In addition, if you have imported data types the Data Types page will show the data types and attributes that the editor has inferred from the REST service.
16.4.3 Manually Modeling the REST API
Importing a REST API is a foolproof way of starting to model a REST API for a live service. Alternatively, you can completely model the REST API from scratch. You can also continue to model the API by:
-
Specifying paths, which are addresses of REST service segments.
-
Creating requests which can return responses for the server, and modify them using HTTP headers, query parameters, and specifying input and output parameters.
-
Creating new data types and attributes on the Data Types page of the editor.
Once you are happy with the REST API you can copy your changes to the REST Client page to run the request against a live REST service and examine the response that is returned. For more information, see Section 16.6, "Testing Modeled Requests Against the REST Service."
Select a suitable node to further define the request.
In the HTTP Headers tab, you can:
-
Define name-value pairs for the request header by clicking
and entering them in the Add Header dialog. -
You can edit or delete a selected header, or reorder the headers using the buttons.
In the Query Parameter tab, you can:
-
Define name-value pairs for the query parameters by clicking
and entering them in the Query Parameters dialog. -
You can edit or delete a selected query parameter, or reorder the query parameter using the buttons.
Use the Input tab to send input with a PUT or POST request.
In the Output tab you can choose what happens to the results returned from the request:
-
Choose the type from none, Representation, or Redirection.
-
For Representation, click
to open the Add Representation dialog where you specify the data type.For Redirection, enter header name value pairs in the Headers tab by clicking
, then choose the Representation tab and specify the data type.
16.4.3.1 How to Create New Requests
To create a new request:
-
Right-click a node in the outline, and choose New and Request.
-
Under Request (on the right), choose a method and add a name, and define the rest of the request.
16.4.3.2 How to Create New Paths
You can create a new path to a different URI.
To create a new path:
-
Right-click a node in the outline, and choose New and Path.
-
Under Path (on the right), either:
-
Enter a variable using { }, for example {id}.
-
Enter a URI.
-
Click
to open the Compose Address dialog where you can define the URI.
-
16.4.4 Working with Path Variable Types
On the REST API page of the REST Service Editor, a path segment may contain variables of the form {variable-name}, as shown in Figure 16-15. You can assign types to variables that are then applied in the generated code.
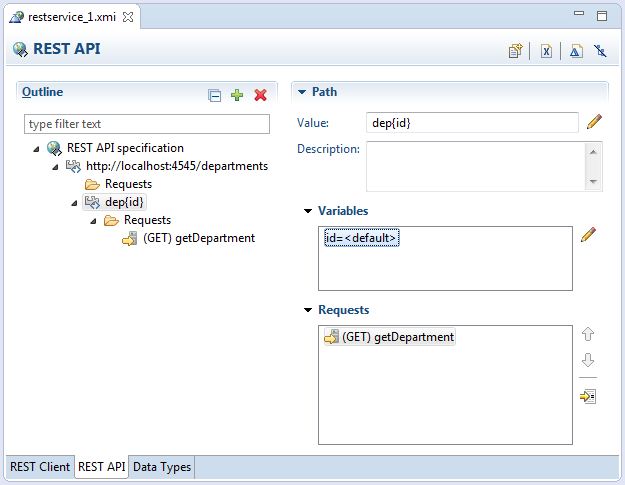
For the Java domain, the default value of the variable is java.lang.Object.
When there are variables on a path segment that have the same name you can only assign them the default value.
The supported data types are:
-
<default>
-
java.boolean
-
java.byte
-
java.char
-
java.double
-
java.float
-
java.int
-
java.long
-
java.short
-
java.lang.String
-
java.math.BigInteger
-
java.math.BigDecimal
-
java.util.Date
-
java.net.URI
-
java.lang.Object
-
java.time.LocalDateTime
-
java.time.LocalDate
-
java.time.LocalTime
-
json.String
-
json.Number
-
json.TRUE
-
json.FALSE
-
json.NULL
Notes:
If a variable has been assigned a data type other than the default type, and that variable is then renamed, the data type assignment is lost, and you can either undo the action, or assign the data type again.16.4.4.1 How to Edit a Path Variable Type
To edit a path variable type:
-
Double-click on the variable in the Variables section on the right of REST API page under Path. This opens the Edit Variable Type dialog.
-
Choose the new data type for the variable from the list.
16.4.4.2 Path Variable Types in Artifact Generation
The type of a path variable is used in the artifact generation functionality of the REST Service Editor to give you more control over how code is generated as the type is used in the generated method signature. For more information about path variables and generation, see Section 16.7.1, "How to Generate Java Artifacts for REST Services."
If you have specified a type for a path variable, the type is used in the generated method signature. The string value representation of the path variable will replace the corresponding path variable template value. In the case of duplicate path variables, for example {id}/{id2}/{id}, the method signature will contain mapping information for path variable id and id2 and the string value equivalent of the type represented by the id parameter will replace all matching values within this path segment, and the string value equivalent of id2 will replace its value within the specified path segment.
You can control the behavior of the parameter variable default type. In the Artifact Generation wizard described below, the pass through default behavior is to set the Parameter Type to java.lang.Object. So where the REST API Data type is <default>, and No Parameter Default Type is chosen in Generation Settings page of the wizard, the Java method parameter type signature is set to java.lang.Object. In the Generation Settings UI page, can control the Parameter Default Type by setting java.lang.String or java.lang.Object explicitly. This choice is persisted as an annotation within the REST Description .xmi, so it is a stateful choice when you re-enter the Artifact Generation wizard.
16.4.4.3 Path Variable Types and the REST Client
If you have specified types for variables with duplicate names, then when you send a request from the REST Client page of the REST Service Editor the Replace Variables dialog is displayed so that you can specify the value for each request variable, as shown in Figure 16-16.
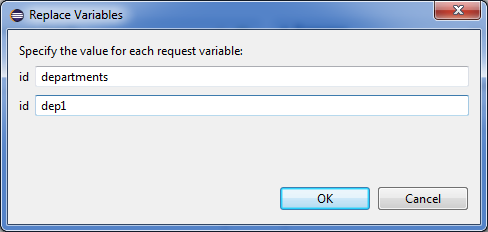
You can make use of the type information on the Replace Variables dialog.
-
For example, if there is a
java.boolean typefor a path variable, the dialog displays a check box. -
You can validate that the value entered for a path variable with type
java.float, for example, conforms to the format for a Java floating point number.
In the Replace Variables dialog, <default>, java.lang.String and java.lang.Object are treated like strings. The JSON types are mapped to Java types:
-
json.Stringis mapped tojava.lang.String -
json.Numberis mapped tojava.math.BigDecimal -
json.Trueandjson.FALSEare mapped tojava.boolean -
json.NULLis mapped tojava.lang.Object, which is treated asjava.lang.Stringin the dialog.
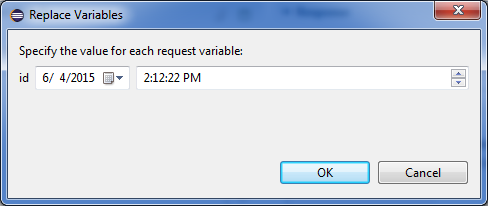
For the Boolean type and for any of the date/time types (java.util.Date, java.time.LocalDateTime, java.time.LocalDate and java.time.LocalTime), the Replace Variables dialog represents these variables as shown in Figure 16-17, which illustrates java.time.LocalDateTime and java.util.Date.
16.5 Importing and Modeling Data Types
The Data Types page of the REST Service Editor allows you to work with data types. When you use the REST Client to connect to a REST service, the editor infers the data types used by the service you are connected to, and displays them here.
You import data types associated with an API in an MCS backend, or with a RAML file on the local file system using the Data Types page of the REST Service Editor.
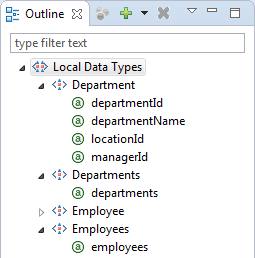
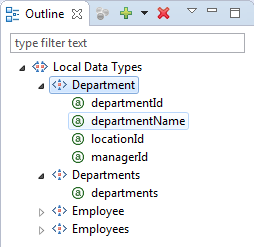
In Figure 16-18, Departments is a local data type that has the attributes listed on the right.
The Outline, on the left of the Data Types page is also available in the Outline window, shown in Figure 16-19.
16.5.1 How to Create Data Types
You can create new complex or simple data types.
To create a complex data type:
-
Right-click Local Data Types, and choose New and Complex Type.
-
Under Complex Type, enter a name for the type.
-
In the outline, right-click the new type and choose New and Attribute.
-
In the Attributes area (under Complex Type on the right), click
 to open the Select Data Type dialog where you can choose from the list of available data types.
To create a simple data type:
-
Right-click Local Data Types, and choose New and Simple Type.
-
Under Simple Type, enter a name for the type.
16.5.2 How to Import Data Types
You can import data types from:
-
An Eclipse workspace
-
An external file
-
MCS Backend API
-
RAML file from local file system
To import data types:
-
In the Data Types page of the REST Service Editor, click
to open the Import Data Type Information wizard. -
In the Select a REST import mechanism, choose the source for the data types. The options are:
JSON Schema. Choose to import data types from a JSON schema definition.
JSON Text. Choose to import data types from a JSON example text.
Mobile Backend's Data Type. Choose when the data types are associated with an API from MCS Backend.
RAML File. Choose to import the data types used in a RAML file on the local file system.
-
If you have selected JSON Schema or JSON Text, click Browse, and in the Select Content File navigate to the location of the file containing the JSON payload. Alternatively, you can copy the JSON payload and paste it directly into the Context text area.
-
In the Select Content File dialog, enter the character set for the JSON payload, for example
UTF-8. -
In the Import Data Type Information wizard, click Next.
-
On the Import Data Type page you will see a summary of the data types that will be imported or merged.
To merge types that match existing domain types, select that option.
Click Finish.
16.6 Testing Modeled Requests Against the REST Service
You can copy requests from the modeled REST API to the REST Client page of the REST Service Editor to run them against the live REST service.
Note:
You may not be able to test all secured modeled requests against the REST service where OWSM Mobile agent is required. However, Basic Authorization with OWSM policy is supported.To run the request from the modeled API:
-
In the REST API page, select the request you want to run.
-
Click
 , which is in the upper right of the Request area.
 -
The REST Client page opens with the request ready to run.
-
Click
.
16.7 Creating REST Service Artifacts
Oracle Enterprise Pack for Eclipse lets you create Java artifacts to create a MAF AMX application that runs against a REST service.
Use the REST Service Editor, described in Section 16.1, "Introduction to Working with REST Services." to connect to the REST service you want to use and use the functionality available to you to model the REST API to achieve the results you want.
The steps to perform before generating Java artifacts that you can use in a MAF application are:
-
Create a REST service description, described in Section 16.1.6, "How to Create a REST Service Description."
-
Connect to the REST service, described in Section 16.2.1, "Specifying REST Service Connections."
-
Model the REST API until you are confident that it represents the functionality you want, described in Section 16.4, "Importing and Modeling the REST API."
16.7.1 How to Generate Java Artifacts for REST Services
You generate Java artifacts in the REST Service Editor from either the REST API page or the Data Types page.
Before you begin, ensure that you have tested the requests and data types against a live version of the REST service, and that the responses from the server are what you expect.
To generate Java artifacts:
-
In the REST Service Editor, select either the REST API page or the Data Types page.
-
Click
 to open the Artifact Generation wizard.
 -
On the Select an artifact generator page, choose the code that is compatible with the Oracle MAF runtime that you are developing the application for. Click Next.
-
On the BASE URL Selection page:
-
Base Resource Path is the path at the base of the REST API specification.
-
Name and URL are a persistent connection. Click
to open the Manage Connection wizard.
-
-
In the Manage Connection dialog, enter a name and the URL for the connection. In this page of the wizard, you can:
-
Test the URI by clicking
. -
Open the URI in a browser by clicking
. -
If you need to specify authentication details for the connection, select Requires Authentication and enter the authentication values on the remaining pages of the wizard.
Click Finish to return to the RESTful Web Service wizard, and click Next.
-
-
On the Java Class and Package Names page:
-
Expand the REST API Model Path to check that it is correct.
-
Change the Java Name, if necessary.
Click Next.
-
-
On the Generation Settings page:
-
Choose the source folder from those available.
-
Accept the package prefix, or enter a new one, or browse to a different one.
Note:
If there are any contents in this package location, they can potentially be overwritten. Oracle recommends that multiple BASE URL selections are written into different package schemes. -
Parameter Default Type When the REST API Data type is
<default>, the default isjava.lang.Object. If necessary, set tojava.lang.String. -
Generate Service Class is selected by default. Deselect if you want to write your own.
-
MAF Rest Classpath Select when you are generating an API to work with MCS, so that additional dependencies are added to the project classpath and runtime deployment.
Click Next.
-
-
On the Service Class page:
-
Examine the request listed and the method name it is associated with. To change the method name, select the request and edit the method name in Method Name.
-
To add a new request, click
. to open the Select Requests dialog. Choose one or more requests (use Shift and Ctrl for multi select), and click OK.
Click Next.
-
-
On the Summary page, review the options you have specified. When you are satisfied, click Finish. A Confirm Changes dialog is displayed. If you have happy to proceed, click OK.
16.7.2 What Happens When You Generate Java Artifacts
Code is generated for the requests you have selected for the REST service. If you have already generated artifacts and there are differences, a diff window appears allowing you to reconcile the changes you want to keep.
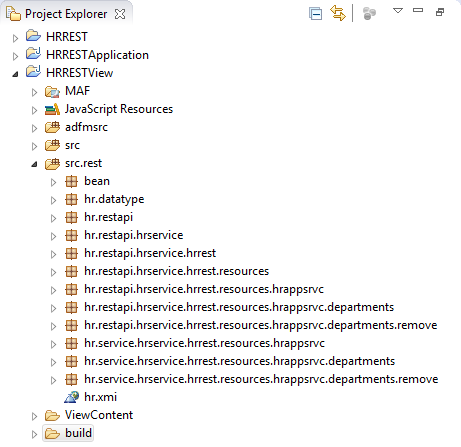
The generated files are listed in the Project Explorer under the package you named, shown in Figure 16-20.
16.7.3 About the Generated Artifacts for REST Services
When you generate JAVA artifacts from a modeled REST API in the REST Service Editor, there are three types of package generated:
-
datatypes. -
restapi -
services
Figure 16-20 shows the generated packages for an application called hrrest which have been generated into a package called hr.
16.7.3.1 Generated Data Type Artifacts
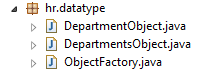
In the datatype package, hr.datatype in Figure 16-20, there is:
-
One interface for each data type.
-
The data type interface exposes the modeled attribute as getters and setters.
-
Instances of the data type support reflection.
-
-
An object factory.
You can see this in Figure 16-21, where there is an interface for each data type and an object factory.
The data type interfaces contain getters and setters. In this example, DepartmentObject.java contains:
public interface DepartmentObject extends ObjectType {
  BigDecimal getDepartmentId();
  void setDepartmentId(BigDecimal value);
  String getDepartmentName();
  void setDepartmentName(String value);
  BigDecimal getLocationId();
  void setLocationId(BigDecimal value);
  BigDecimal getManagerId();
  void setManagerId(BigDecimal value);
}
16.7.3.2 Generated REST API Artifacts
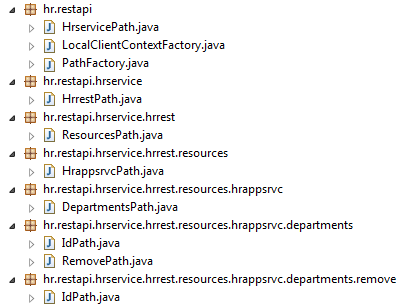
The generated REST API artifacts have a path interface that has a nested interface that exposes the requests as Java methods. A number of REST API packages are generated, as shown in Figure 16-22.
The Request interfaces contain:
-
A method for each request to the REST service, for example
createDepartmentJSON -
The Invoke method that exposes the class
For example, IdPath.java in hr.restapi.hrservice.hrrest.resources.hrappsrvc.departments contains:
public interface IdPath extends PathObject {
  @RequestAccessor
  public static interface Request {
    @Action(HTTPMethod.GET)
    @Header(name="Accept", value="application/json")
    @Output(representations=@Representation(type=DepartmentsObject.class))
    DepartmentsObject getDepartmentById() throws RequestException;
  }
  @Override
  DepartmentsPath parent();
  /**
   * @return creates a new object that exposes the requests
   *         defined for this path
   */
  Request invoke();
}
It relates to the getDepartments request in the REST API page of the REST Service Editor, shown in Figure 16-23, where the HTTP header is Accept=application/json, and the output is representations of the data type Departments.
16.7.3.3 Generated Service Artifacts
The generated services packages, shown in Figure 16-24, contains one POJO for each path that defines a request, (apart from the root which does not have a requests). The POJO is a class you can use with Data Controls, and it gives guidance on how to use the content of other packages.
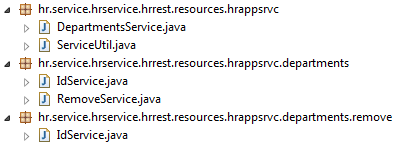
In the example, DepartmentsService.java is a POJO and it contains a method for each request method on the REST API path.
public class DepartmentsService {
  public DepartmentsObject getDepartments() throws Exception {
    try (ClientContext context = LocalClientContextFactory.INSTANCE.create(ServiceUtil.CONNECTION_NAME)) {
      return PathFactory.INSTANCE.createHrservicePath(context).path(context.getConnectionPath())
        .getHrrestPath()
        .getResourcesPath()
        .getHrappsrvcPath()
        .getDepartmentsPath()
        .invoke()
        .getDepartments();
    }
  }
  public DepartmentObject addDepartment(DepartmentObject department) throws Exception {
    try (ClientContext context = LocalClientContextFactory.INSTANCE.create(ServiceUtil.CONNECTION_NAME)) {
      return PathFactory.INSTANCE.createHrservicePath(context).path(context.getConnectionPath())
        .getHrrestPath()
        .getResourcesPath()
        .getHrappsrvcPath()
        .getDepartmentsPath()
        .invoke()
        .addDepartment(department);
    }
  }
  public DepartmentObject updateDepartment(DepartmentObject department) throws Exception {
    try (ClientContext context = LocalClientContextFactory.INSTANCE.create(ServiceUtil.CONNECTION_NAME)) {
      return PathFactory.INSTANCE.createHrservicePath(context).path(context.getConnectionPath())
        .getHrrestPath()
        .getResourcesPath()
        .getHrappsrvcPath()
        .getDepartmentsPath()
        .invoke()
        .updateDepartment(department);
    }
  }
}
16.7.4 How to Use the Generated Artifacts in Your MAF Application
To allow your MAF applications to interact with REST services, you use the REST Service Editor to model the REST API and then you can generate artifacts to use in your applications.
The data logic is exposed through a JavaBean data control which you create from the generated service POJO.
To create a JavaBean data control for a REST service:
-
Select the generated service POJO described in Section 16.7.3.3, "Generated Service Artifacts."
-
In the Project Explorer or Package Explorer right-click the service file and choose Model Components > Create Data Control to open the New Data Control wizard.
-
Complete the wizard. The JavaBean data control is created and you can use it in your MAF application.
16.8 Using the Connections View
The Connections View displays the connections defined by a MAF application that are shared between the editors and artifacts of a MAF application. For example, connections that are used in the REST Client or for security.
You create the connection in the editor or tool in which is it first used, for example in the REST Client window and use the Connections View to edit subsequently the connection, or to reuse the connection elsewhere in the MAF app.

The Connections view lists all available projects that can host a connection. So a MAF application that uses the MAF 2.0.2 runtime or later will be listed in the view. An ADF application or a MAF application that uses an earlier runtime will not be listed. As shown in Figure 16-25, under the node for the application the connections are listed. They are:
-
Connections of type URL, which use the
 icon.
icon. -
Mobile login connections which use any of the available authentication types: HTTP Basic, Web Single Sign-on, OAMMS, and OAuth2. These use the
 .
.
You can double click a connection name to open the Manage Connection wizard, where you can edit various settings of the connection.
The content of these connections is stored in connections.xml for the project, and that file is updated when you make changes from the Connections view. If you delete a project, the node for that project is removed from the Connections view.
16.8.1 How to Open the Connections View
The Connections view is available with the Oracle MAF perspective. If it is closed, you can open it using Window > Show View > Connections from the main menu.
16.8.2 How to Edit a Connection
In the Connections view, expand the node for the project and double-click the connection you want to edit.
Alternatively, select the connection and click ![]() .
.
If a connection is invalid, for example if the authentication details are not valid, the connection has a red cross at the node. You can edit the connection to provide the correct details.