2 Configuring Mobile Application Framework
This chapter provides information on setting up and configuring the Mobile Application Framework (MAF) environment for application development and deployment.
This chapter includes the following sections:
-
Section 2.2, "Prerequisites for Developing MAF Applications"
-
Section 2.4, "Setting Up Development Tools for iOS Platform"
-
Section 2.5, "Setting Up Development Tools for Android Platform"
2.1 Introduction to the MAF Environment
Before developing a MAF application, you must set up your development environment by downloading, installing, and configuring various software components.
To set up a typical MAF development environment that consists of an IDE, mobile platform-specific tools, and, possibly, a mobile device, follow steps described in Section 2.2, "Prerequisites for Developing MAF Applications."
For complete list of supported versions of development and runtime tools, see Oracle Mobile Application Framework Certification Matrix by following the Certification Information link on the MAF documentation page at http://www.oracle.com/technetwork/developer-tools/maf/documentation/.
2.2 Prerequisites for Developing MAF Applications
Prerequisites for developing an application vary depending on your target platform and the type of work you are planning to do:
You do not need to install any additional tools for creating specific types of MAF application content (HTML, remote URL, or MAF AMX).
2.2.1 What You Need to Develop an Application for iOS Platform
Before you start creating a MAF application for iOS, ensure that you have the following available:
-
A computer running Mac OS X
-
OEPE (see Section 2.3, "Setting Up OEPE")
-
Xcode and iOS SDK (see Section 2.4.1, "How to Install Xcode and iOS SDK")
-
The most recent version of JDK 8
Before you start deploying your application to a development environment (see the "Getting Started with Mobile Application Development" chapter in Developing Mobile Applications with Oracle Mobile Application Framework (OEPE Edition)), decide whether you would like to use a mobile device or its simulator: if you are to use a simulator, see Section 2.4.3, "How to Set Up an iPhone or iPad Simulator"; if your goal is to deploy to a mobile device, ensure that, in addition to the components included in the preceding list, you have the following available:
-
Various login credentials. For more information, see the "Deploying Mobile Applications" chapter in Developing Mobile Applications with Oracle Mobile Application Framework (OEPE Edition).
-
iOS-powered device. For more information, see Section 2.4.2, "How to Set Up an iPhone or iPad."
2.2.2 What You Need to Develop an Application for Android Platform
Before you start creating a MAF application for Android, ensure that you have the following available:
-
A computer running an operating system listed in the Desktop OS Requirements section of the Oracle Mobile Application Framework Certification Matrix that you access by following the Certification Information link on the MAF documentation page at
http://www.oracle.com/technetwork/developer-tools/maf/documentation/. -
The most recent version of JDK 8
-
Android SDK with platform and build tools (see Section 2.5.1, "How to Install the Android SDK")
-
OEPE (see Chapter 1, "Installing Oracle Enterprise Pack for Eclipse.")
Before you start deploying your application to a development environment (see the "Getting Started with Mobile Application Development" chapter in Developing Mobile Applications with Oracle Mobile Application Framework (OEPE Edition)), decide whether you would like to use a mobile device or its emulator: if you are to use an emulator, see Section 2.5.3, "How to Set Up an Android Emulator"; if your goal is to deploy to a mobile device, ensure that, in addition to the components included in the preceding list, you have the following available:
-
Various login credentials. For more information, see the "Deploying Mobile Applications" chapter in Developing Mobile Applications with Oracle Mobile Application Framework (OEPE Edition).
-
Android-powered device. For more information, see Section 2.5.2, "How to Set Up an Android-Powered Device."
2.3 Setting Up OEPE
Setting up OEPE is an important part of developing MAF applications.
2.3.1 How to Configure the Development Environment for Target Platforms
Before you start developing and deploying a MAF application, you may need to configure preferences for appropriate platforms.
2.3.1.1 Configuring the Environment for Target Platforms
For successful packaging and deployment of your application to target platforms supported by MAF, OEPE must be provided with information such as the name of the platform and directories on your development computer that contain the platform-specific tools and data.
Depending on your target platform, download and configure either the Android SDK (see Section 2.5.1, "How to Install the Android SDK") or iOS SDK and Xcode (see Section 2.4.1, "How to Install Xcode and iOS SDK").
To configure your environment for target platforms:
-
Select Window > Preferences from OEPE's main menu to open the Preferences dialog.
-
In the Preferences dialog, open the folder Oracle > Mobile Application Framework > Android or Oracle > Mobile Application Framework > iOS from the tree to open a page that contains the path and configuration parameters for the supported platforms.
Each platform-specific page hosts the preferences for the platform SDK (Android or iOS), collecting any necessary information such as the path that MAF needs to compile and deploy either Android or iOS projects:
-
For Android platform, specify the Android SDK location on your computer, the local directory of your target Android platform, and provide information on the signing credentials by selecting Android Keystores from the Android Platform section of the tree.
-
For iOS platform, specify the location of the
Xcodebuildutility. For more information, see "How to Deploy an iOS Application to an iOS Simulator" in Developing Mobile Applications with Oracle Mobile Application Framework (OEPE Edition).
-
2.4 Setting Up Development Tools for iOS Platform
In addition to general-purpose tools listed in Section 2.2, "Prerequisites for Developing MAF Applications," you might want to set up an iPhone or iPad when getting ready for development of a MAF application for the iOS platform (see Section 2.4.2, "How to Set Up an iPhone or iPad").
Since iPhone and iPad simulators are included in the iOS SDK installation, you do not need to separately install them. For more information, see Section 2.4.3, "How to Set Up an iPhone or iPad Simulator."
2.4.1 How to Install Xcode and iOS SDK
You download Xcode from http://developer.apple.com/xcode/. This download includes the iOS SDK.
After installing Xcode, you have to run it at least once and complete the Apple licensing and setup dialogs. If these steps are not performed, any build and deploy cycle from OEPE to Xcode or a device simulator fails with a "Return code 69" error.
Note:
Since older versions of Xcode are not available from the Mac App Store, in order to download them you must obtain an Apple ID fromhttp://appleid.apple.com, and then register this Apple ID with the Apple Developer Program to gain access to the Apple developer site at http://developer.apple.com.2.4.2 How to Set Up an iPhone or iPad
In your MAF application development and deployment, you can use either the iPhone, iPad, or their simulators (see Section 2.4.3, "How to Set Up an iPhone or iPad Simulator"). If you are planning to use an actual iPhone or iPad, which is preferable for testing (see the "Testing MAF Applications" section in Developing Mobile Applications with Oracle Mobile Application Framework (OEPE Edition)), you need to connect it to your computer to establish a link between the two devices.
To deploy to an iOS-powered device, you need to have an iOS-powered device with a valid license, certificates, and distribution profiles. For more information, see the "Deploying Mobile Applications" chapter in Developing Mobile Applications with Oracle Mobile Application Framework (OEPE Edition).
Note:
Since Apple's licensing terms and conditions may change, ensure that you understand them, comply with them, and stay up to date with any changes.2.4.3 How to Set Up an iPhone or iPad Simulator
In your MAF application development and deployment, you can use either the iOS-powered device itself (see Section 2.4.2, "How to Set Up an iPhone or iPad") or its simulator. Deploying to a simulator is usually much faster than deploying to a device, and it also means that you do not have to sign the application first.
A simulator can be invoked automatically, without any additional setup.
Note:
Before attempting to deploy your application from OEPE to a device simulator, you must first run the simulator.If you are planning to use web services in your application and you are behind a corporate firewall, you might need to configure the external network access. You do so by modifying the network settings in the System Preferences on your development computer. For more information, see the "Configuring the Browser Proxy Information" section in Developing Mobile Applications with Oracle Mobile Application Framework (OEPE Edition).
2.5 Setting Up Development Tools for Android Platform
In addition to the general-purpose tools listed in Section 2.2, "Prerequisites for Developing MAF Applications," you might want to set up an Android-powered device when getting ready for development of a MAF application for the Android platform (see Section 2.5.2, "How to Set Up an Android-Powered Device").
Since emulators are included in the Android SDK installation, you do not need to separately install them. However, you cannot use an emulator until you create its configuration (see Section 2.5.3, "How to Set Up an Android Emulator").
To develop for the Android platform, you can use any operating system that is supported by both OEPE and Android.
For more information, see the "Developer Tools" section of the Android Developers website at http://developer.android.com/tools/index.html.
2.5.1 How to Install the Android SDK
Android SDK includes the development tools that you need to build applications for Android-powered devices. Since the Android SDK is modular, it allows you to download components separately depending on your target Android platform and your application requirements.
Make sure that your environment meets the operating system, JDK version, and hardware requirements listed in the "System Requirements" section of the Android Developers website at http://developer.android.com/sdk/index.html.
-
Download the Android SDK starter package from
http://developer.android.com/sdk/index.html. -
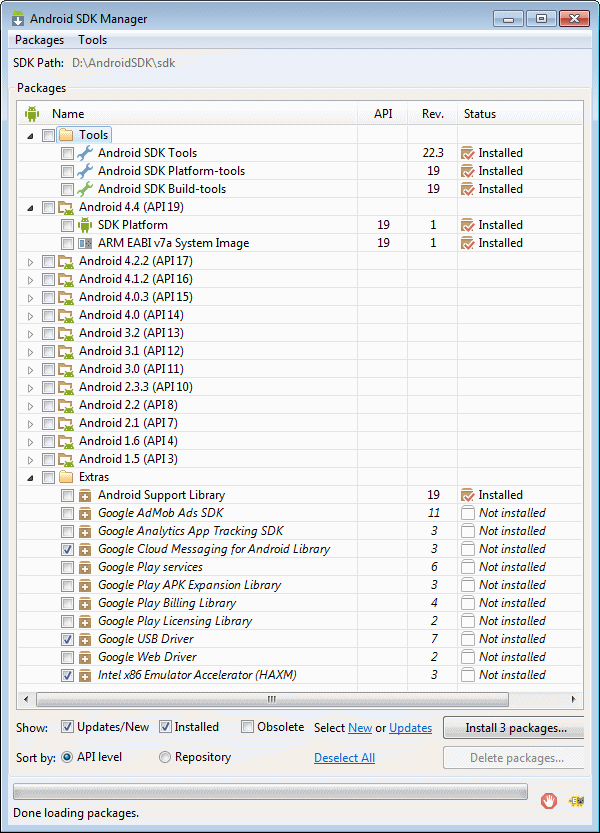
By default, the Android SDK Tools, Android SDK Platform-tools and several other packages are installed. You can install additional packages using the Android SDK Manager, as shown in Figure 2-1.
-
Complete the installation by following the instructions provided in the "Installing the Android SDK" section of the Android Developers website at
http://developer.android.com/sdk/installing/index.html.Note:
Do not start the Android SDK Manager when prompted. Instead, follow the instructions on installing the Eclipse plugin called Android Development Tools (ADT), located athttp://developer.android.com/sdk/installing/installing-adt.html
2.5.2 How to Set Up an Android-Powered Device
In your MAF application development and deployment, you can use either the Android device itself, which is preferable for testing (see the "Testing MAF Applications" section in Developing Mobile Applications with Oracle Mobile Application Framework (OEPE Edition)), or an emulator (see Section 2.5.3, "How to Set Up an Android Emulator").
For information on how to set up the Android-powered device, follow the instructions from the "Using Hardware Devices" section of the Android Developers website at http://developer.android.com/tools/device.html.
Note:
You might experience issues when using USB connectivity for the device-based debugging. For more information, see the "Testing and Debugging MAF Applications" chapter in Developing Mobile Applications with Oracle Mobile Application Framework (OEPE Edition).Your target Android-powered device might not be listed in the USB device driver's.inf file, resulting in the failure to install the Android Debug Bridge (ADB). You can eliminate this issue as follows:
-
Find the correct values for your device.
-
Update the
[Google.NTx86]and[Google.NTamd64]sections of theandroid_winusb.inffile.
For more information, see the "Google USB Driver" section of the Android Developers website at http://developer.android.com/sdk/win-usb.html.
2.5.3 How to Set Up an Android Emulator
In your MAF application development and deployment, you can use either the Android device itself (see Section 2.5.2, "How to Set Up an Android-Powered Device") or its emulator. Deploying to an emulator is usually much faster than deploying to a device, and it also means that you do not have to sign the application first.
For information on how to create an emulator configuration called Android Virtual Device (AVD), follow the instructions from the "Managing Virtual Devices" section of the Android Developers website at http://developer.android.com/tools/devices/index.html. When creating an AVD through the Create New Android Virtual Device dialog (see "Managing AVDs with AVD Manager" at http://developer.android.com/tools/devices/managing-avds.html), review all the settings to ensure that configuration matches what you are planning to emulate. In particular, you should verify the following:
-
The Target field should define the desired Android platform level for proper emulation.
-
The CPU/ABI field should reflect the Intel Atom system image (see Section 2.5.3.2.1, "Configuring AVD for Intel HAXM").
-
The SD card field should be defined based on whether the application uploads files or files install themselves to the SD card.
-
Default settings for the Hardware field (see the "Hardware Options" table at
http://developer.android.com/tools/devices/managing-avds.html#hardwareopts) should be acceptable for a typical MAF application. For additional hardware capabilities you may want to use in your application, such as cameras or geolocation services, create new properties.
You need to create an AVD for each Android platform on which you are planning to test your application.
For information on how to use the emulator, see the "Using the Android Emulator" section in the Android Developers website at http://developer.android.com/tools/devices/emulator.html.
2.5.3.1 Configuring the Android Emulator
After the basic Android emulator setup is complete, you may choose to perform the following configurations:
-
Save the emulator state (see Section 2.5.3.1.1, "Saving the Emulator State")
-
Create, save, and reuse the SD card (see Section 2.5.3.1.2, "Creating, Saving, and Reusing the SD Card")
-
Configure the network (see Section 2.5.3.1.3, "Configuring the Network")
-
Configure the network proxy (see Section 2.5.3.1.4, "Configuring the Network Proxy")
2.5.3.1.1 Saving the Emulator State
You can reduce the emulator's load time by saving the emulator state or reusing the saved state. To do so, you manipulate the avd files or folders that are located in the C:\Users\username\.android\avd directory (on a Windows computer). Each avd folder contains several files, such as userdata.img, userdata.qemu.img, and cache.img. You can copy the cache.img file to another emulator's avd folder to use that state with another emulator.
Alternatively, you can use the command line to run relevant commands, such as, for example, -snapshot-list, -no-snapstorage, and so on. You can access these commands through emulator -help command.
Caution:
When using this utility, keep in mind that in the process of loading, all contents of the system, including the user data and SD card images, will be overwritten with the contents they held when the snapshot was made. Unless saved in a different snapshot, any changes will be lost.2.5.3.1.2 Creating, Saving, and Reusing the SD Card
The "SD Card Emulation" section of the Android Developers website at http://developer.android.com/tools/devices/emulator.html#sdcard lists reasons for creating, saving, and reusing the SD card. You can perform these operations by executing the following commands:
-
To create an SD card:
C:\android sdk directory\tools>mksdcard -l SD500M 500M C:\Android\sd500m.img -
To list existing AVDs:
C:\android sdk directory\tools>android list avdThis produces a listing similar to the following:
Available Android Virtual Devices:
Name: AVD_for_Nexus_S
Device: Nexus S (Google)
Path: C:\Users\username\.android\avd\AVD_for_Nexus_S.avd
Target: Android 5.0.1 (API level 21)
Tag/ABI: default/armeabi-v7a
Skin: 480x800
------------
Name:    AndroidEmulator2
Device:  Nexus S (Google)
Path:    C:\Users\username\.android\avd\AndroidEmulator2.avd
Target:  Android 5.0.1 (API level 21)
Tag/ABI: default/armeabi-v7a
Skin:    480x800
Sdcard:  500M
-
To start the AndroidEmulator2 with the SD card that has just been created:
C:\Android\android sdk directory\tools>emulator -avd AndroidEmulator2 -sdcard C:\Android\sd500m.img -
To list the running Android emulator instances:
C:\Android\android sdk directory\platform-tools>adb devices -
To copy a test image to the SD card (this requires the emulator to restart):
C:\Android\sdk\platform-tools>adb push test.png sdcard/Pictures
85 KB/s (1494 bytes in 0.017s)
For more information, see the Android Tools Help at http://developer.android.com/tools/help/index.html.
2.5.3.1.3 Configuring the Network
From the Android emulator, you can access your host computer through the 10.0.2.2 IP address. To connect to the emulator from the host computer, you have to execute the adb command from a command line on your development computer or from a script to set up the port forwarding.
To forward socket connections, execute
adb forward local remote
using the following forward specifications:
-
tcp:port -
localabstract:unix domain socket name -
localreserved:unix domain socket name -
localfilesystem:unix domain socket name -
dev:character device name -
jdwp:process pid(remote only)
For example, an arbitrary client can request connection to a server running on the emulator at port 55000 as follows:
adb -e forward tcp:8555 tcp:55000
In this example, from the host computer, the client would connect to localhost:8555 and communicate through that socket.
For more information, see the "Android Debug Bridge" section in the Android Developers website at http://developer.android.com/tools/help/adb.html.
2.5.3.1.4 Configuring the Network Proxy
If your development computer is behind a corporate firewall, you might need to configure a proxy by using one of the following techniques:
-
Execute this command to start the emulator and initiate its connection with the browser:
emulator -avd myavd -http-proxy myproxy
-
Start the emulator and then use its Settings utility as follows:
-
Select Wireless & Networks
-
Select Mobile Networks > Access Point Names
-
Select the appropriate internet option
-
Set the proxy, port, username, and password using the Edit access point list
-
2.5.3.2 Speeding Up the Android Emulator
The Intel Hardware Accelerated Execution Manager (Intel HAXM) is designed to accelerate the Android-powered device emulator by making use of Intel drivers.
The Intel HAXM is available for computers running Microsoft Windows, Mac OS X, and a separate kernel-based virtual machine option (KRM) for Linux. See http://software.intel.com/en-us/android/articles/intel-hardware-accelerated-execution-manager to access installation guides and detailed descriptions of system requirements for each operating system.
Regardless of which operating system your development computer is running on, it must have the following:
-
Version 17 or later of the Android SDK installed (see Section 2.5.1, "How to Install the Android SDK").
-
Intel processor with support for Intel VT-x, EM64T and Execute Disable (XD) Bit functionality at the BIOS level.
Note:
It may be necessary to edit your system's BIOS to enable Intel VT-x support. To do this, restart your computer but do not let it boot normally: interrupt your boot process, then select the menu to edit your BIOS. Scroll through the BIOS selections until you see the entry for VT-x, then toggle it to select Enabled. -
At least 1 GB of available RAM.
To download the Intel HAXM, either use the Android SDK Manager (see the "Speeding Up the Android Emulator on Intel Architecture" article available at http://software.intel.com/en-us/android/articles/speeding-up-the-android-emulator-on-intel-architecture) or use the following Intel locations:
-
For Microsoft Windows:
http://software.intel.com/en-us/android/articles/intel-hardware-accelerated-execution-manager-end-user-license-agreement
To install the Intel HAXM, follow steps described in the "Speeding Up the Android Emulator on Intel Architecture" article available at http://software.intel.com/en-us/android/articles/speeding-up-the-android-emulator-on-intel-architecture. Particularly important is to configure AVD (see Section 2.5.3.2.1, "Configuring AVD for Intel HAXM").
If your development computer is running either Microsoft Windows 8.n or later, or Mac OS X 10.9.n or later, you have to apply a Hotfix provided by Intel before using emulator with the Intel HAXM.
Note:
If you do not apply the Hotfix, your computer will freeze and you will lose your work.To download the Hotfix, use the following locations:
-
For Microsoft Windows:
http://software.intel.com/en-us/android/articles/intel-hardware-accelerated-execution-manager-end-user-license-agreement-windows-hotfix
For more information, see the following:
-
Installation Guide and System Requirements - Windows at
http://software.intel.com/en-us/android/articles/installation-instructions-for-intel-hardware-accelerated-execution-manager-windows -
Installation Guide and System Requirements - Mac OS X at
http://software.intel.com/en-us/android/articles/installation-instructions-for-intel-hardware-accelerated-execution-manager-mac-os-x -
Installation Guide and System Requirements - Linux at
http://software.intel.com/en-us/blogs/2012/03/12/how-to-start-intel-hardware-assisted-virtualization-hypervisor-on-linux-to-speed-up-intel-android-x86-gingerbread-emulator
2.5.3.2.1 Configuring AVD for Intel HAXM
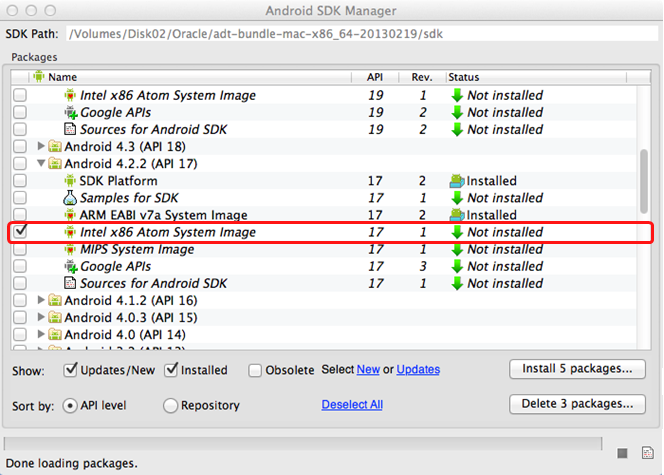
When enabling the Intel HAXM, ensure that you download the Intel system image for the Android API level using the Android SDK Manager (see Figure 2-1). As described in "Speeding Up the Android Emulator on Intel Architecture" article at http://software.intel.com/en-us/android/articles/speeding-up-the-android-emulator-on-intel-architecture:
-
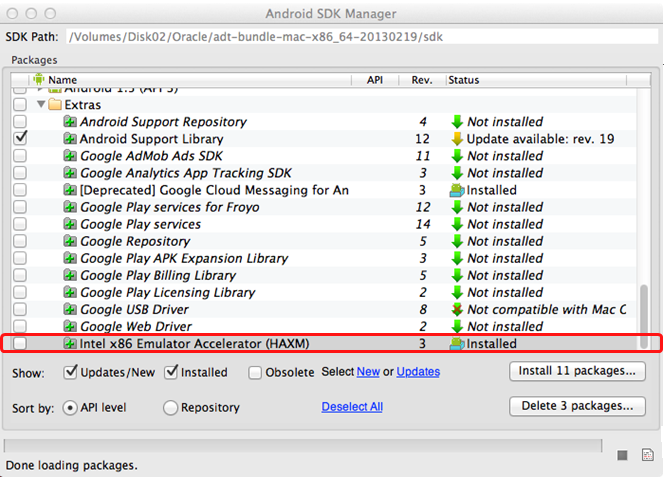
After you have installed the Android SDK, open the SDK Manager and then find the Intel HAXM in the extras section.
-
Select Intel x86 Emulator Accelerator (HAXM) and click Install packages.
Once you have installed the package, the status changes to Installed, which is not accurate: the SDK only copies the Intel HAXM executable on your computer; you have to manually install the executable.
-
To install the Intel HAXM executable, depending on your development platform search your hard drive for one of the following:
-
On Windows, search for
IntelHaxm.exe -
On Mac OS X, search for
IntelHaxm.dmg
If you accepted default settings, the executable should be located at
C:\Program Files\Android\android-sdk\extras\Intel\Hardware_Accelerated_Execution_Manager\IntelHaxm.exeon Windows. -
The Intel HAXM only functions in combination with one of the Intel Atom processor x86 system images, which are available for Android 2.3.3 (API 10), 4.0.3 (API 15), 4.1.2 (API 16), 4.2.2 (API 17). These system images can be installed exactly like the ARM-based images through the Android SDK Manager.
To complete the process, use the AVD Manager to create a new virtual device that has hardware-accelerated emulation by selecting Intel Atom (x86) as the CPU/ABI, (see Figure 2-4).
Note:
This option appears in the list only if you have the Intel x86 system image installed.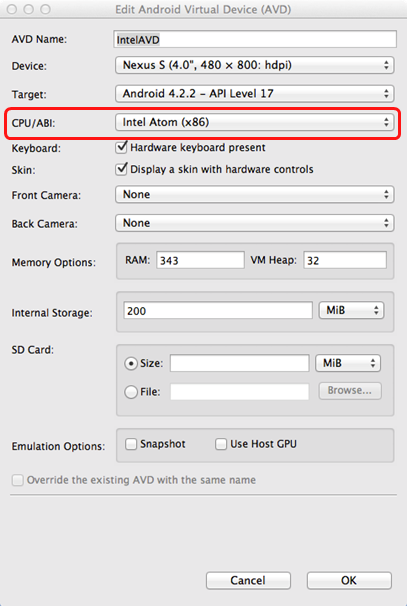
2.6 Testing the Environment Setup
You can test your environment setup as follows:
-
In OEPE, open the HelloWorld sample application by selecting New > Example > MAF Examples, then click to select the HelloWorld example and click Finish.
-
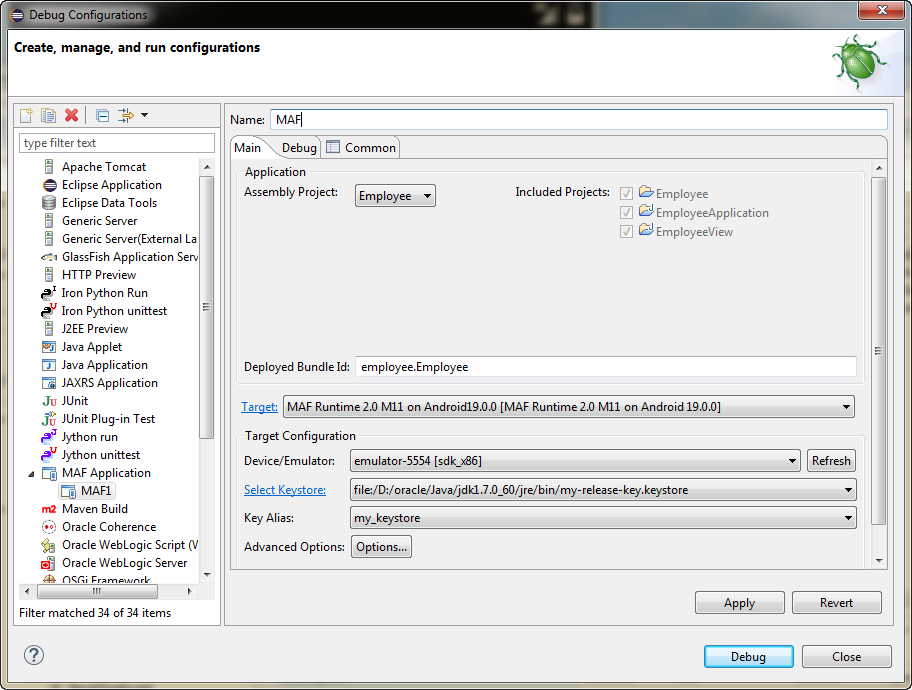
Select Run > Debug Configurations from the main menu.
For more information, see the "Deploying Mobile Applications" chapter in Developing Mobile Applications with Oracle Mobile Application Framework (OEPE Edition).
-
From the configuration pane at the left of the Debug Configurations dialog, select MAF Application and click
 to create a new configuration. If you set the environment following the instructions in Section 2.3.1.1, "Configuring the Environment for Target Platforms" correctly the dialog will show the correct target, as shown in Figure 2-5.
Sometimes Devices/Emulator is not listed in the configuration, and clicking Refresh still does not display it. In this case, you need to kill and restart it the adb daemon.
To kill the process, use:
-
Windows: use the process manager
-
Mac terminal: use the
kill -9procIDcommand
Restart the adb daemon by executing the following command on a terminal:
adb devices
A deployment that succeeded before adb froze will still be deployed. To debug an application, redeploy it.
-
-
Click Debug to deploy the application to the target platform. When the deployment is complete, you will see a BUILD SUCCESSFUL message in the Log Window.
For more information, see one of the following sections in Developing Mobile Applications with Oracle Mobile Application Framework (OEPE Edition):
-
"How to Deploy an iOS Application to an iOS Simulator"
-
"How to Deploy an Android Application to an Android Emulator"
-
For more information on deployment, see the "Deploying Mobile Applications" chapter in Developing Mobile Applications with Oracle Mobile Application Framework (OEPE Edition).
After a successful deployment (which might take a few minutes), your iOS-powered device simulator or Android-powered device emulator will display the HelloWorld application icon that you have to activate to launch the application.