1 Installing Oracle Enterprise Pack for Eclipse
This chapter provides information on installing Oracle Enterprise Pack for Eclipse.
It contains the following sections:
1.1 Installing Your OEPE Application
OEPE is easily installed.
If you are installing Eclipse and OEPE, install using:
-
The Eclipse Installer - installs Eclipse and OEPE from an installer launched from a Java plugin running in a browser. For more information, see Section 1.4, "Installing with the Eclipse Installer."
-
The distro - download and unzip the kit which includes Eclipse along with OEPE. For more information, see Section 1.3, "Installing with the Distro."
If you already have Eclipse installed:
-
You can install OEPE using Eclipse Marketplace. For more information, see Section 1.5, "Installing with Eclipse Marketplace."
-
You can install from a repository. For more information, see Section 1.6, "Installing Using the Repository."
1.2 System Requirements
For information about system requirements and components supported by OEPE, see the System Requirements link under the Technical Information section of the following OEPE page on the Oracle Technology Network (OTN) at http://www.oracle.com/technetwork/developer-tools/eclipse/learnmore/index.html.
1.3 Installing with the Distro
The distro is a zip archive that contains Eclipse with OEPE already loaded.
-
From the Oracle Technology Network (OTN) web site:
http://www.oracle.com/technetwork/developer-tools/eclipse/downloads/index.html, download the archive file appropriate for your operating system and Eclipse version. -
Extract the archive file to a folder of your choice.
1.4 Installing with the Eclipse Installer
The Network Installer (Eclipse installer) installs Eclipse and OEPE. It also gives you control over the components that you install.
1.4.1 How to install using the Eclipse Installer
From the Oracle Technology Network (OTN) web site at http://www.oracle.com/technetwork/developer-tools/eclipse/downloads/index.html, launch the Eclipse Installer. The installer downloads and opens.
To install using the installer:
-
On the Eclipse Location page of the installer, enter or browse to the location where you want to install OEPE.
-
On the Guidance Level of the installer, choose the level of guidance you want. For more information, see Section 1.4.2, "Choosing What to Install."
-
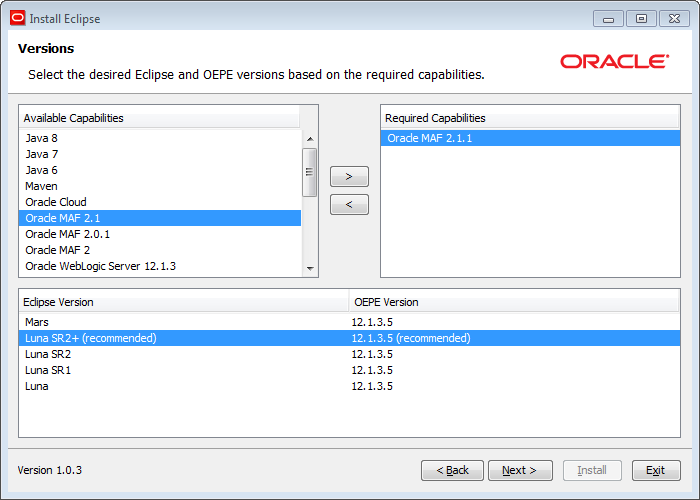
If you select the Explore available versions based on the required capabilities guidance level, the next page is the Versions page. Move the capabilities you want to the Required Capabilities list, then select the Eclipse Version and OEPE version to install.
-
The Java Location page displays the detected JVM. If necessary, browse to another choose another Java version.
-
On the Components Page, choose the components that you want installed.
-
On the Licenses page of the installer, review the licence terms and accept them.
-
Click Install to download and install the versions of Eclipse and OEPE that you have specified.
1.4.2 Choosing What to Install
The Eclipse Installer provides three levels of guidance to help you choose the Eclipse and OEPE versions, and you should choose the one that best suits your requirements. With each option, you can choose the OEPE components to install.
1.4.2.1 Install Eclipse version and OEPE version
This is the simplest method of installing Eclipse and OEPE. The most recent version of Eclipse and the appropriate OEPE version are selected.
1.4.2.2 Choose an OEPE Version Based on an Eclipse Version
This option allows you to choose the Eclipse version you want, and then choose from the available OEPE versions for that Eclipse version.
1.4.2.3 Explore Available Versions Based on the Required Capabilities
This option allows you specify the capabilities you want. The installer displays the Eclipse and OEPE versions that provide this, as shown in Figure 1-1.
1.4.3 Selecting the Components to Install
Once you have determined which Eclipse version and OEPE version you want, you can choose the specific components to install, as shown in Figure 1-2.

1.5 Installing with Eclipse Marketplace
If you already have an installation of Eclipse, you can install OEPE using Eclipse Marketplace.
Note:
The Eclipse Marketplace only allows you to install the latest OEPE version for a given Eclipse platform. If you want to install a specific version, install from the release repository.To install using Eclipse Marketplace:
-
In Eclipse, choose Help > Eclipse Marketplace.
-
In the Eclipse Marketplace dialog, search for
Oracle. The Marketplace returns all Oracle entries, such as OEPE, and Oracle Cloud Tools. You can choose to install OEPE, which includes all the features, or just the specific components you want. -
Choose the appropriate version of OEPE for the version of Eclipse you are using. For example, if you are using Eclipse Luna, choose
Oracle Enterprise Pack for Eclipse Luna. Click Install. -
On the next page, the features that will be installed are listed. Click Confirm.
-
On the Review Licenses page, accept the terms of the license agreements and click Finish.
The software is installed. You can choose to run the installation in the background by clicking Run in Background.
1.6 Installing Using the Repository
Use the Install New Software feature from the repository.
To install using the repository:
-
From the Eclipse main menu, select Help > Install New Software.
-
Click Add to add a new update site.
-
In the Add Repository dialog, enter the repository location which you can find under the Plugin Repository section on the Oracle Technology Network (OTN) web site at
http://www.oracle.com/technetwork/developer-tools/eclipse/downloads/index.html.Then click OK.
Note: This URL works only from within Eclipse, and will not work if accessed through a browser.
-
In the software list, select Oracle Enterprise Pack for Eclipse, select the subcomponents you want, and then click Next.
-
Confirm information presented on the Install Details, and then click Next.
-
Review licenses on the Review Licenses page and click Finish.
1.7 Updating an Existing Installation
Eclipse allows you to browse for updates and install them, or to uninstall features that are already installed. You control this functionality from the Install/Update page of the Preferences dialog (available from the Window menu).
1.7.1 How to Update Using Check for Updates Option
You can use the Update wizard to download new components.
Updating OEPE Using Check for Updates:
-
In Eclipse, choose Help > Check for Updates. This launches an Update wizard.
-
In the wizard, select the appropriate options.
-
Agree to any licences, and start the download.
1.7.2 Troubleshooting Update
An OEPE update can fail if conflicting versions of plugins are found on non-Oracle sites. If update fails, de-select all non-Oracle repositories and try again.
To select the appropriate site:
-
Select Window > Preferences, then expand the category Install/Update.
-
Select Available Software Sites.
-
In the list of Available Software Sites, select just the appropriate Oracle repository, then click OK.
Now try using update again.