Editing a Portal
Use the portal editor to customize your portal pages. Add and edit portal navigation to help portal users easily find the information they need.
Permissions: To perform the tasks in this chapter, you must be a portal manager or a portal member with the permission
Basic Services: Edit Page Access, Structure, and Content(standard permissions) orPages: Create, Edit, and Delete Pages(advanced permissions).
Note that a user with a role that grants them permissions to create, edit, or publish a portal page, or even manage a portal, is not automatically allowed to view the portal. To view a portal, a user must be explicitly granted the portal-level permission Basic Services: View Pages and Content (standard permissions) or Pages: View Pages (advanced permissions).
For more information about permissions, see About Roles and Permissions for a Portal.
Topics
Opening the Portal Editor
You can open the portal editor in any of the following ways:
-
From theportalbrowser. Locate the portal you want to edit, then click Flip icon to display the portal actions menu and select Edit to open it in the portal editor. This link is shown only if you are the portal manager or member with editing permissions in the portal. To edit a page, select the page in the navigation pane, and click Edit Page.
Figure: Portal Editor

Description of the illustration wcpaa_designview.png
-
Fromportaladministration. From any portal administration page, click the Edit Portal icon in the left pane to open the portal editor.
Figure: Edit Portal Icon

-
From theportalviewer. When viewing a portal, click the Actions icon Expression Editor icon in the floating toolbar and select Edit Portal. This selection is shown only if you are the portal manager or member with editing permissions in the portal. To edit a page, select the page in the navigation pane, and click Edit Page.
Tip: The keyboard shortcut to go to the portal editor when viewing a portal is Ctrl+Shift+E. In the portal editor, you can press Ctrl+Shift+E to return to view mode.
Figure: Floating Toolbar
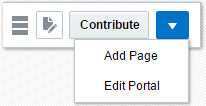
Description of the illustration float_tbar.gif
-
From the Portals page inWebCenter Portaladministration. Locate the portal you want to edit, then click the Edit link for the portal. This link is shown only if you are the portal manager or member with editing permissions in the portal.
Figure: Accessing Portal Editor from Portals Administration Page
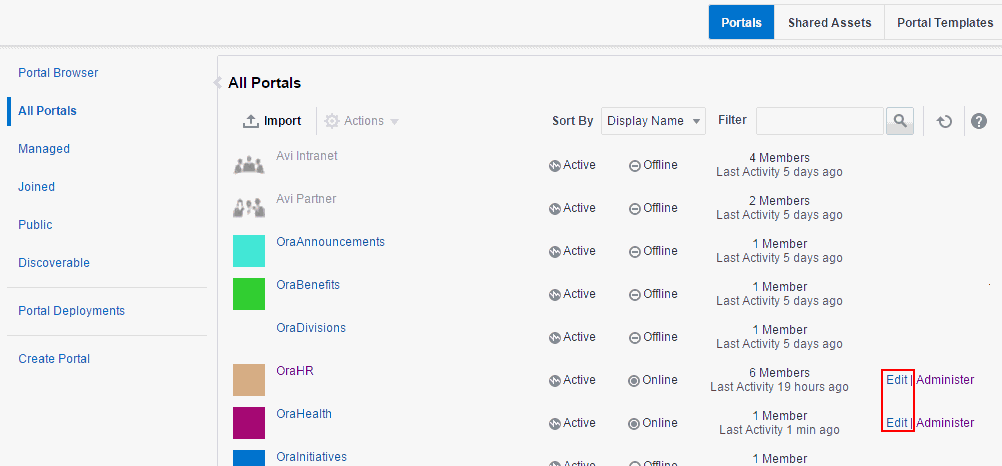
Description of the illustration wcpaa_port_admedt.gif
- From Page Information view. When managing a page (Summary, Parameters, Source, Security, or Advanced tabs), select Edit beneath the page name to open the portal editor, where you can edit the page in the page editor.
Working with Pages in the Portal Editor
Permissions: To work with pages in the portal editor, you must be a portal manager or a portal member with the permission
Basic Services: Edit Page Access, Structure, and Content(standard permissions) orPages: Create, Edit, and Delete Pages(advanced permissions). Users with this permission can edit pages, revise page properties, add page content, and delete pages from a portal. This includes delegated administration to override the page security and grant other users permissions to create subpages, edit the page, and so on, overriding any permission limits of user roles.
In the portal editor, you can select existing pages, subpages, or page variants in the left navigation pane to edit or manage them, or you can create new navigation items. You can also modify the portal navigation, and preview the page in the viewport for different devices. To hide or show the left navigation pane, click the Pages icon.
Figure: Portal Editor
Description of the illustration wcpaa_designview.png
-
To create and edit pages, subpages, page variants, or modify the portal navigation, see Creating, Editing, and Publishing a Portal Page.
-
To manage the current page or navigation item, see Managing a Portal Page.
Note:
In WebCenter Portal, you can choose to display only the visible navigation items or all the navigation items in the left navigation pane. By default, all the navigation items are displayed. To display only the visible items, click  at top of the page. To display all the items in a portal, click .
The following example displays all the portal items.
Figure: Left Navigation Pane Showing All Items

Description of the illustration portal_nav_allexp.png
The following figure displays only the visible portal items.
Figure: Left Navigation Pane Showing Only Visible Items

Description of the illustration portal_nav_visibleexp.png
Customizing Portal Navigation
You can add both pages and non-page navigation items to the navigation for a portal, and remove any items you no longer wish to expose in the portal navigation. Mostly, the navigation will provide links to portal pages, but it can also include items such as documents, external web sites, portlets, and task flows.
This section includes the following topics:
Editing Portal Navigation
To edit a portal’s navigation:
-
Open the portal editor.
-
To add an item to the portal navigation, refer to the steps for the type of item that you want to add:
-
To add non-page items to the portal navigation, see Adding Items to the Portal Navigation.
-
To add an existing portal page to the portal navigation, see Adding an Existing Page to the Portal Navigation.
-
To create and add a new page or subpage, see Creating Pages or Subpages in a Portal.
-
To create and add a new page variant (for device groups) to the portal navigation, see Creating a Page Variant for a Device Group.
-
-
To edit the properties of an existing item:
-
For pages, click the Actions icon (page menu icon), and select Page Information.
-
Edit the item properties as desired.
For more information, see Setting Properties for a Portal Navigation Item.
-
Click Save.
-
-
To change the order of an item in the navigation, either drag the item to a new position in the navigation, or click its Actions icon (page menu icon) and select Move Up or Move Down.
-
To change the item hierarchy, click its Actions icon (page menu icon) and select Indent to make it a child of the item above it, or select Outdent to move it to a higher level in the navigation hierarchy.
Note: You cannot indent a page if it is the only page or the only visible top level page in the portal.
-
To copy an existing item, click its Actions icon (page menu icon) and select Copy.
A copy of the item is added to the portal navigation as the last item at the same level as the original item in the navigation hierarchy. You can edit the new item and change its properties, as described in Setting Properties for a Portal Navigation Item.
-
To hide an item from the portal navigation, without deleting it:
-
For pages, see Showing or Hiding a Page in the Portal Navigation.
-
For non-page navigation items, deselect the Visible property, as described in Setting Properties for a Portal Navigation Item.
-
-
To delete an existing navigation item, click its Actions icon (page menu icon) and select Delete.
In the Delete dialog, click Delete to confirm that you want to delete the item from the portal navigation.
Note: If you delete an item from a portal navigation in the portal editor, you are also deleting the item itself.
Adding Items to the Portal Navigation
You can add several different item types to a portal’s navigation. Mostly, portal navigation provides links to portal pages, but it can also include documents, external web sites, portlets, and task flows.
Note:
If the portal navigation includes many nodes, there may be more nodes than fit in the area of the page template used for navigation. In this case, a » icon provides access to a drop-down list of the remaining nodes. However, if this drop-down list is longer than the available screen size, you will not be able to access the nodes at the end of the list. For example, this situation may arise if you are using a page template where the navigation is displayed in a bar along the top of the page.
To work around this issue, consider using a different page template that displays navigation down the side of the page. Alternatively, you can use folders in your portal navigation to group similar nodes together and reduce the number of nodes displayed at any one level of the portal navigation.
To add items to the portal navigation:
-
Open the portal editor.
-
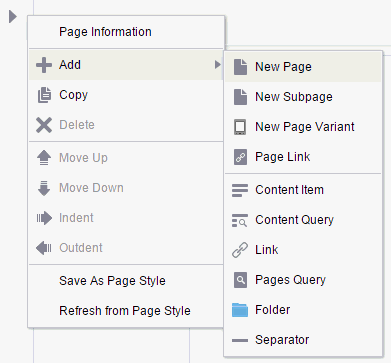
Select an existing navigation item, then click its Actions icon (page menu icon) and select Add to add a new item immediately below it.
Figure: Adding a Navigation Item
-
Select the type of navigation item that you want to add:
-
New Page, New Subpage, New Page Variant to add a new page, subpage, or page variant (for device groups).
-
Page Link to add an existing page
-
Content Item to add a document
-
Content Query to add a collection of documents that meet specific query criteria
-
Link to add a link to a web page (URL) or external application
-
Pages Query to add a list of pages
-
Folder to add a folder to the portal navigation
-
Separator to add a separator to the portal navigation
-
-
Edit the properties as desired.
Adding an Existing Page to the Portal Navigation
When you create new pages, they are added to the portal navigation as follows:
-
If you create pages or subpages during portal creation, they are immediately added to the portal navigation and are visible to others who view the portal.
-
If you create a new page or subpage while editing a portal, when page drafts are enabled in portal administration, the new page is initially a page draft and not immediately available when viewing the portal. If page drafts are not enabled, then the new page is immediately added to the portal navigation and is visible to others who view the portal.
-
If you create a page while viewing a portal, the new page is immediately added to the portal navigation and is visible to others who view the portal
In all cases, users with appropriate permissions can edit or manage the page as required. Changes made to the page are saved as a page draft and are not immediately available when viewing the portal. To make updates available to others who view the portal, you must publish the page.
To expose a page that is not shown in the portal navigation, such as a system page (tool console), a page in the Home portal, or a page previously removed from the portal navigation:
- Open the portal editor.
-
Select the navigation item immediately above the location where you want to add the page, then click its Actions icon (page menu icon) and select Add, then Page Link.
Figure: Adding Existing Page to Portal Navigation (in Portal Editor)
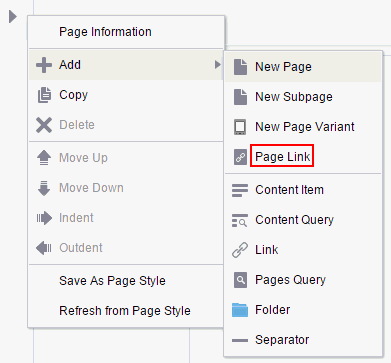
Description of the illustration wcpaa_page_new.gif
-
In the Pages dialog, select the page you want to add to the page navigation for the portal, and click Select.
Figure: Pages Dialog
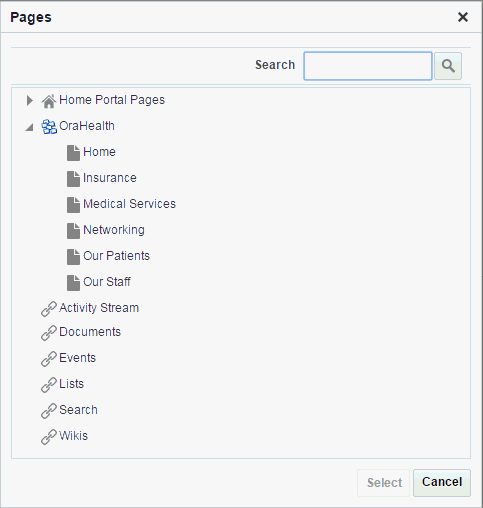
Description of the illustration wcpaa_pages_pagesdlg.gif
The page you selected is added to the portal navigation. You can now manage the page as described in the sections of this chapter. For example, you may wish to adjust the order and hierarchy in the portal navigation.
Setting Properties for a Portal Navigation Item
You can specify various properties and display options for non-page navigation items (including page links) to determine their appearance and behavior when the portal navigation is rendered. The options available depend on the type of item.
See Also: To set properties on page navigation items, see Setting Navigation Properties and Display Options for a Page.
To set properties for a non-page portal navigation item:
-
Open the portal editor.
-
Select the item in the left navigation pane.
-
On the Target tab, enter or modify properties for the item.
Table 5-1 Properties for Specific Portal Navigation Items
| Property | Applies to | Description |
|---|---|---|
|
ID |
All item types |
Enter a unique ID for the item. This property is automatically populated with a generated ID, for example, The ID must be unique within the portal navigation. The first character must be either an uppercase or lowercase letter or the underscore character ( If the item is at the top level of the portal navigation, the ID must not be |
|
Name |
All item types |
Enter a name to display for the item in the portal navigation. |
|
Description |
All item types |
Enter a brief description of the item. |
|
Visible |
All item types |
Select to display a node for this item when the portal navigation is displayed on a page. Alternatively, you can specify an EL expression to determine under which conditions the item is included in the navigation. For example, to specify that the item should be visible only to users with the #{WCSecurityContext.userInScopedRole[Manager]}
|
|
Path |
Content Item Link Page Link |
Enter an external URL, or click the search icon to select a target resource to include in the portal navigation. Note: For an external URL to be found valid by WebCenter Portal, the system administrator must add it to the list of valid URLs in the The URL entered is not available in the list of valid URLs. Contact your system administrator for the list of valid URLs. Note: In the Select dialog, the Select button becomes active only when you select an item that can be included in the portal navigation. |
|
Content Presenter Template |
Content Item |
Select the Content Presenter display template to use to render the document when it is selected in the navigation. |
|
Hide Top-Level Folder |
Content Query Pages Query |
Select to display the results of the query or reference directly rather than displaying them under a folder. |
|
Page Template |
Content Item Link Page Link Pages Query |
Select the page template to use to display the item when it is selected in the portal navigation. Select [system default] to use the portal or application default page template. |
|
Query String |
Content Query |
Enter the query criteria to identify the content to include in the portal navigation, for example: SELECT * FROM cmis:document WHERE cmis:name LIKE 'Foo%' |
|
Find Pages in |
Pages Query |
Select:
|
|
Page Style |
Pages Query |
Select the style of page to include in the portal navigation. For example, select Wiki to add only pages that use the Wiki page style to the portal navigation. Select [system default] to display all pages, regardless of style. |
|
Excluded Page Styles |
Pages Query |
Enter the paths of one or more page styles, separated by commas or spaces, to exclude from the page query. For example: /oracle/webcenter/siteresources/scopedMD/s8bba98ff_4cbb_40b8_beee_296c916a23ed/ pageStyle/gsr1b60e8a7_2e23_48ff_9571_31ede592de1a/TemplateWiki.jspx, /oracle/webcenter/siteresources/scopedMD/s8bba98ff_4cbb_40b8_beee_296c916a23ed/ pageStyle/gsr1b60e8a7_2e23_48ff_9571_31ede592de1b/TemplateBlog.jspx Tip: You can find the path of a page style by selecting it on the Assets page and choosing Show Properties from the Actions menu. |
|
Visibility |
Pages Query |
Select:
|
- On the Options tab, set the navigation display options for the item.
Table 5-2 Navigation Item Display Options
| Option | Description |
|---|---|
|
Access Key |
Enter a key mnemonic (single character) that can be used to access the navigation item without using the mouse. |
|
Icon URI |
Enter a path and file name of an image to use to represent the item in the portal navigation. |
|
Search Keywords |
Enter keywords to facilitate searching of the navigation item. |
|
Tool Tip |
Enter brief descriptive text to display when users hover the mouse over the item in the portal navigation. |
|
External ID |
Enter an ID to enable a direct reference to the item from a static link in the page. Navigation items with this attribute defined can be accessed using Tip: To directly access a node for a particular portal, you must specify the portal by setting the /faces/wcnav_externalId/myNavigationItem?wc.contextURL=/spaces/myProjectSpace Depending on where you are using the link, you may need to encode the URL parameters, for example, if the External ID contains spaces or special characters, such as |
|
Open Link in |
Select where to display the item when it is selected. The options available depend on the type of navigation item. Note: Popups are not supported for pages. |
|
Redirect |
For External Link navigation items only Select to redirect the URL specified for the external link. If you do not select this option, then the URL is rendered within the current page template. |
|
New Attribute Name |
Enter the name of an attribute that has been defined for the item but not exposed in the dialog. You can also select an attribute from the drop-down list. You can also create your own attributes that can then be referenced in page templates to render the item. |
|
New Attribute Value |
Enter a value for the attribute specified in the New Attribute Name field, and click Add. Tip: To delete an attribute, clear the attribute value and click Save. |
- On the Parameters tab, enter values for any parameters supported by the item, or add new parameters by entering values in the New Parameter Name and New Parameter Value fields.
Tip: To delete a parameter, clear the parameter value and click Save.