将容器添加到 Oracle JET Web 应用程序
简介
响应式页面布局可以灵活扩展,以适应从小型电话到桌面显示器的各种屏幕大小。Oracle JavaScript Extension Toolkit (JET) 弹性布局具有可在任何方向安排的子元素。当屏幕大小发生变化时,这些元素会自行调整并增长以填充未使用的空间或收缩,以避免布局中父元素或子元素的溢出。您可以使用 Oracle JET 布局类 oj-flex 和 oj-flex-item 创建响应式容器以设计响应式页面布局。Oracle JET 样式类 oj-panel 和 oj-panel-bg 为容器添加边框和颜色。您可以使用这些样式类来帮助可视化布局,也可以在最终应用程序中删除它们。
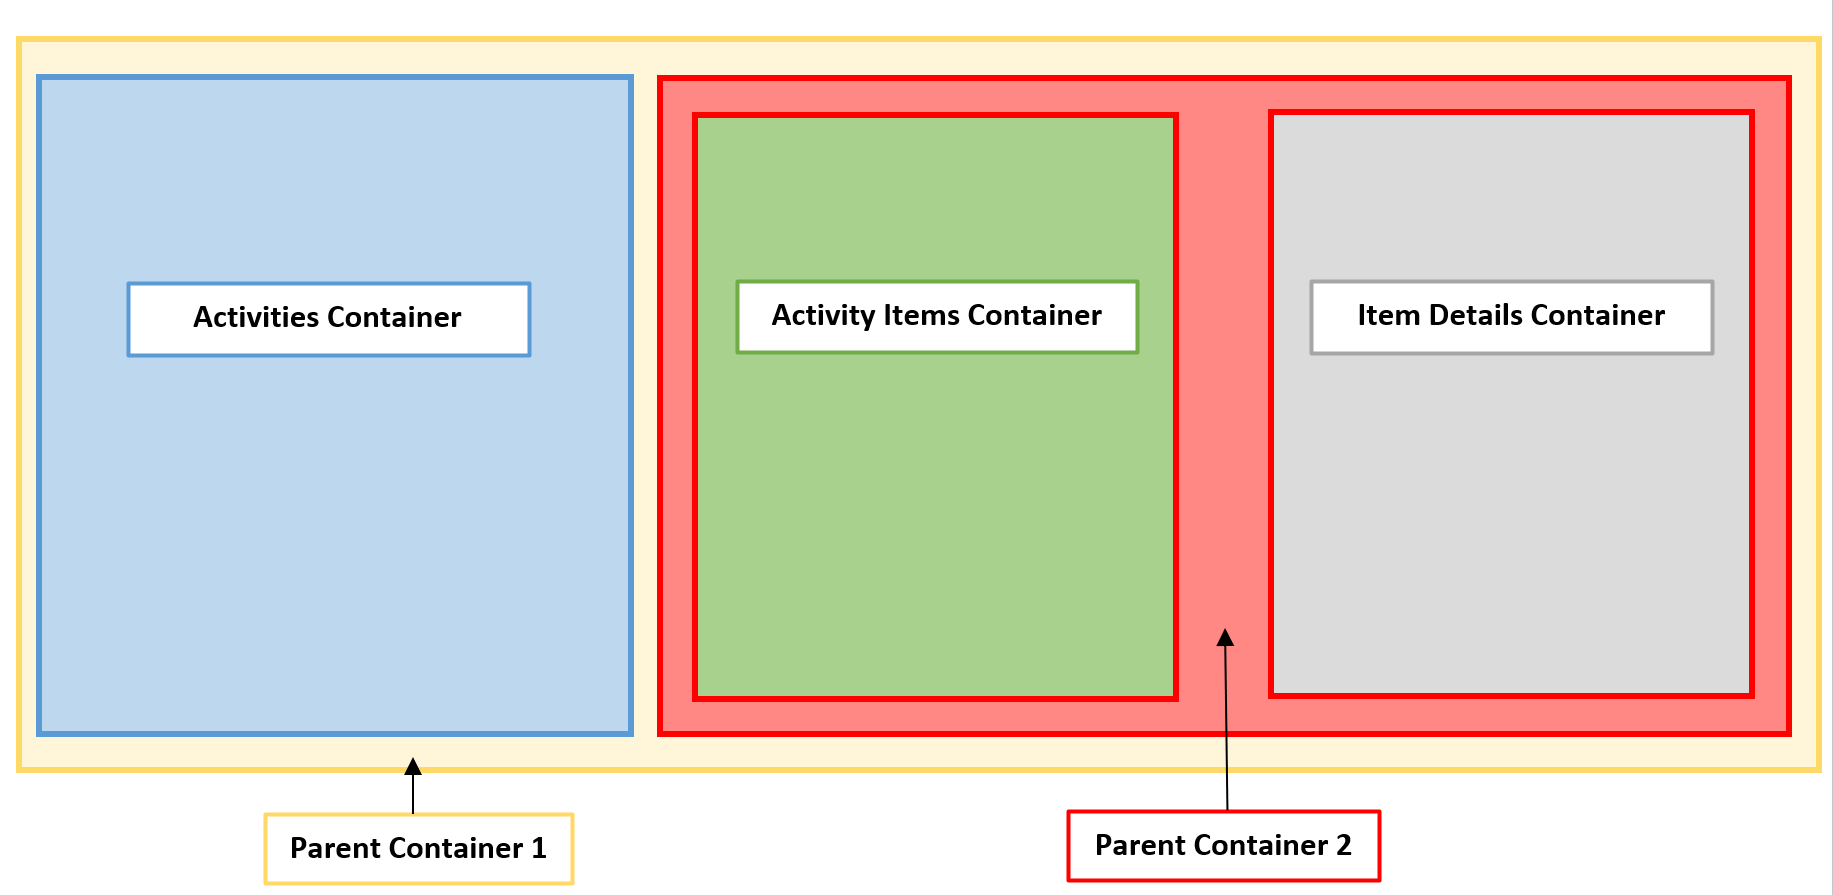
您将在本教程中创建的 Web 应用程序具有一个页面布局结构,其主父容器围绕着第二个父容器和子容器“活动”容器。第二个父容器包含两个子容器:活动项目和项目详细信息容器。

父容器是保存子容器的容器。但是,如果子容器包含子容器(例如上面的父容器 2),则子容器也可以是父容器。
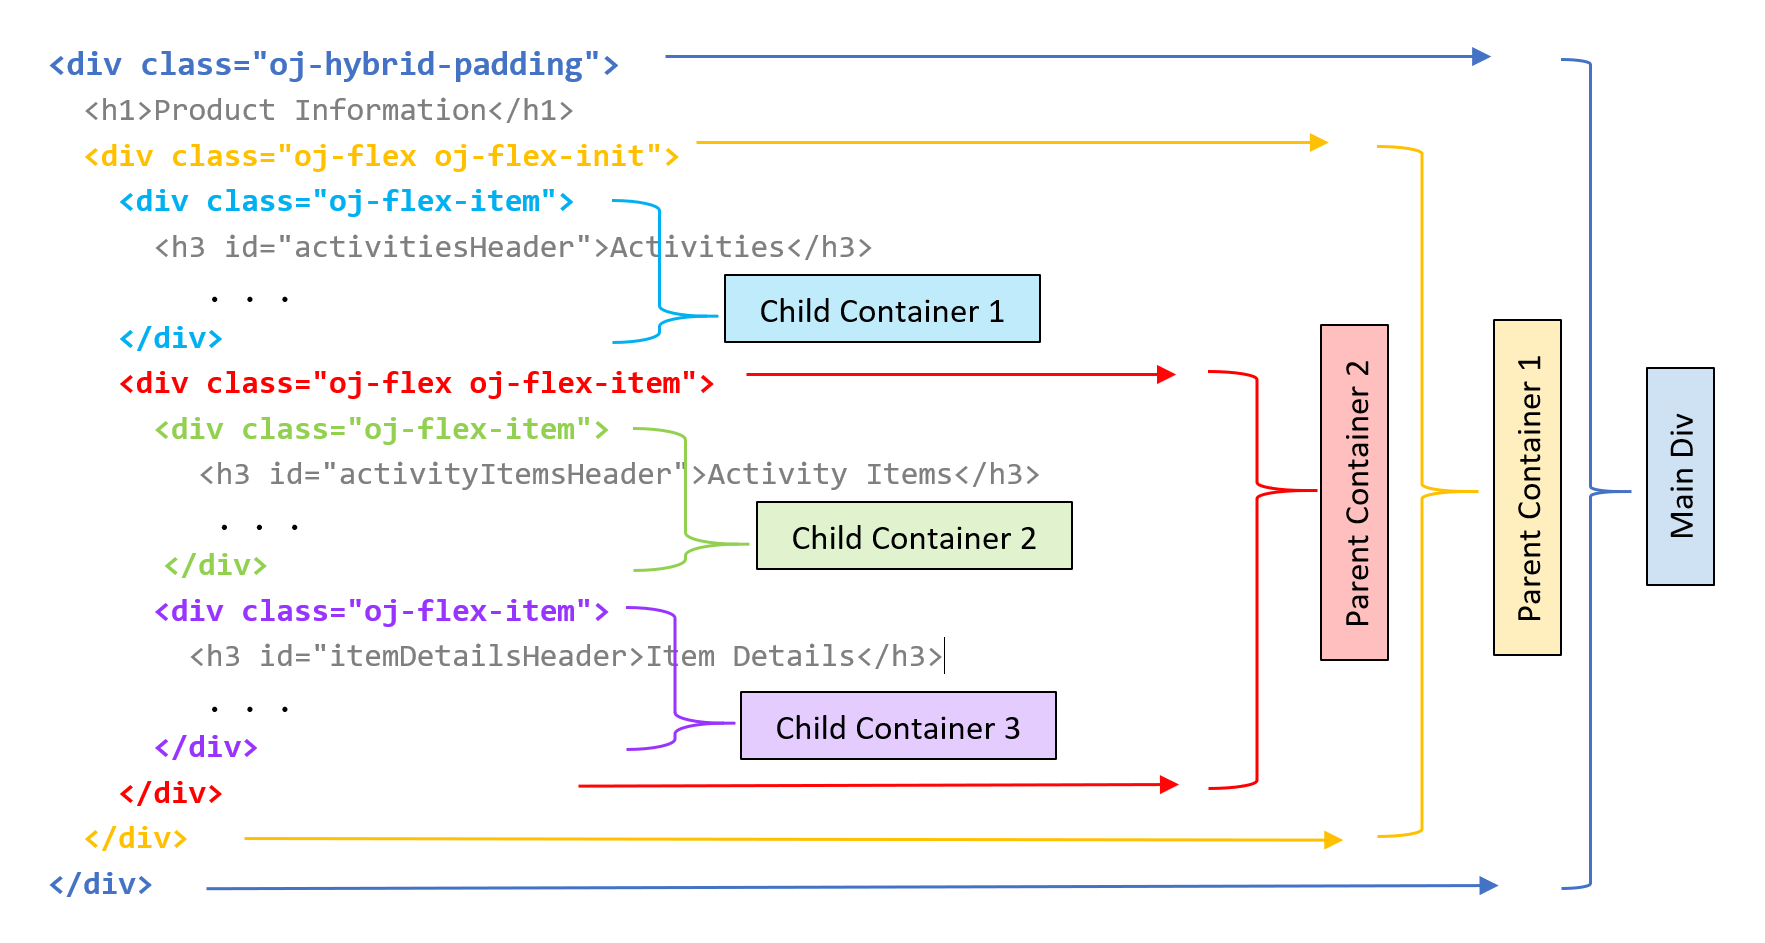
在要创建的页面布局的下图中,主 div 元素包含父容器 1。父容器 1 在子容器 1 和父容器 2 周围进行包装。父容器 2 包含两个子容器,即子容器 2 和子容器 3。

目标
在本教程中,您将添加容器和面板,通过使用 Oracle JET 布局和样式类将页面布局转换为 Oracle JET Web 应用程序中的响应式页面布局。
先决条件
- 开发环境已设置为创建 Oracle JET 应用程序,并安装了 JavaScript 运行时、Node.js 和最新的 Oracle JET 命令行界面
- 已安装 Google Chrome Web 浏览器并将其设置为默认 Web 浏览器
- 访问 Oracle JET 开发人员 CookBook
- (选项 1) 完成此系列中的上一个学习路径:在 Oracle JavaScript Extension Toolkit 中开发 Web 应用程序
- (选项 2) 如果您尚未完成此系列中的上一个学习路径:下载的 jet_web_application_temp.zip
任务 1:下载入门应用程序
如果您继续在上一学习路径中创建的应用程序中工作,请跳过此任务。
-
将
jet_web_application_temp.zip重命名为JET_Web_Application.zip。将内容提取到JET_Web_Application文件夹。 -
在终端窗口中,验证是否安装了最新版本的 Oracle JET。如果没有,请更新您的 Oracle JET 版本。
$ npm list -g @oracle/ojet-cli$ npm install -g @oracle/ojet-cli -
导航到
JET_Web_Application文件夹,然后恢复 Oracle JET 应用程序。$ ojet restore您的应用程序已就绪, 可以使用。
任务 2:添加活动容器
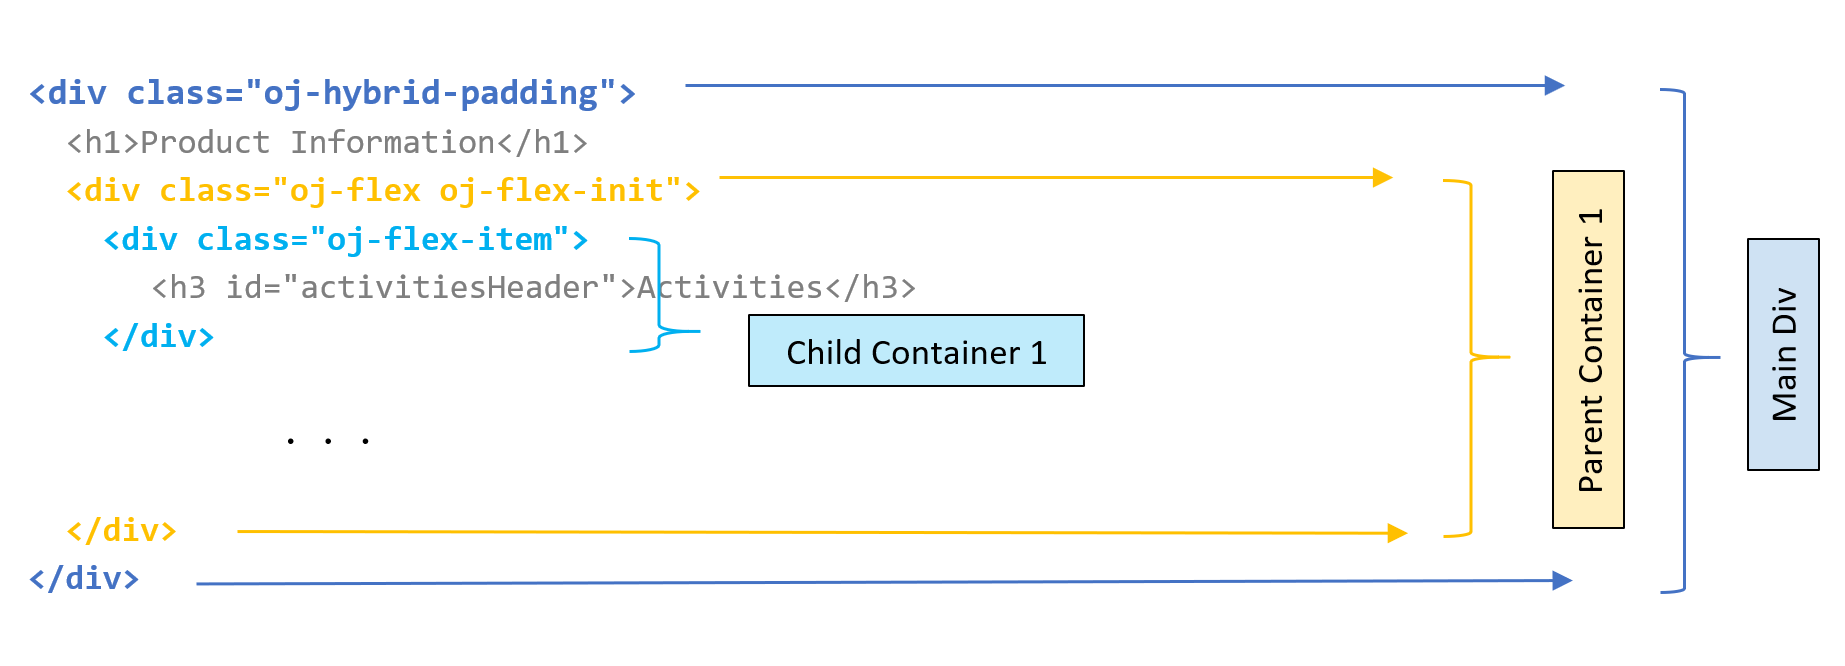
修改 Oracle JET Web 应用程序布局以添加灵活的框布局。要创建弹性布局,请将 Oracle JET oj-flex 类添加到父 div 元素,将 oj-flex-item 类添加到子 div 元素。父容器 1 是包含其中所有其他容器的父容器。子容器 1 是第一个子容器,包含“活动”列表。

插图 Activity-containers.png 的说明
-
打开 Oracle JET CookBook,单击菜单栏中的布局和导航,然后选择弹性布局组件。在工具栏中,单击 API 文档,然后选择 flex。
-
在 Flex Layout API 文档中,滚动到描述 Oracle JET 布局类的表并阅读有关
oj-flex类的信息。 -
导航到
JET_Web_Application/src/ts/views目录并在编辑器中打开dashboard.html文件。 -
查找产品信息标题
h1元素,并在该元素下添加外部div元素和id属性值parentContainer1以及 Oracle JET 容器类。此div元素包含其中的所有其他容器。在文件末尾的最后一个关闭</div>上方添加一个关闭</div>标记。<div class="oj-hybrid-padding"> <h1>Product Information</h1> <!-- Parent Container 1 contains all the panels in the app --> <div id="parentContainer1" class="oj-flex oj-flex-init"> <div id="activitiesContainer"> <h3 id="activitiesHeader">Activities</h3> . . . </oj-chart> </div> </div> </div> -
在“活动”标题之前查找
div元素(其中id="activitiesContainer"),然后添加 Oracle JET 容器项类。<!-- The Activities container displays the Activities list --> <div id="activitiesContainer" class="oj-flex-item"> <h3 id="activitiesHeader">Activities</h3> -
保存
dashboard.html文件。您的代码应类似于 parent-containers-dashboard-html.txt。
任务 3:添加项目详细信息容器
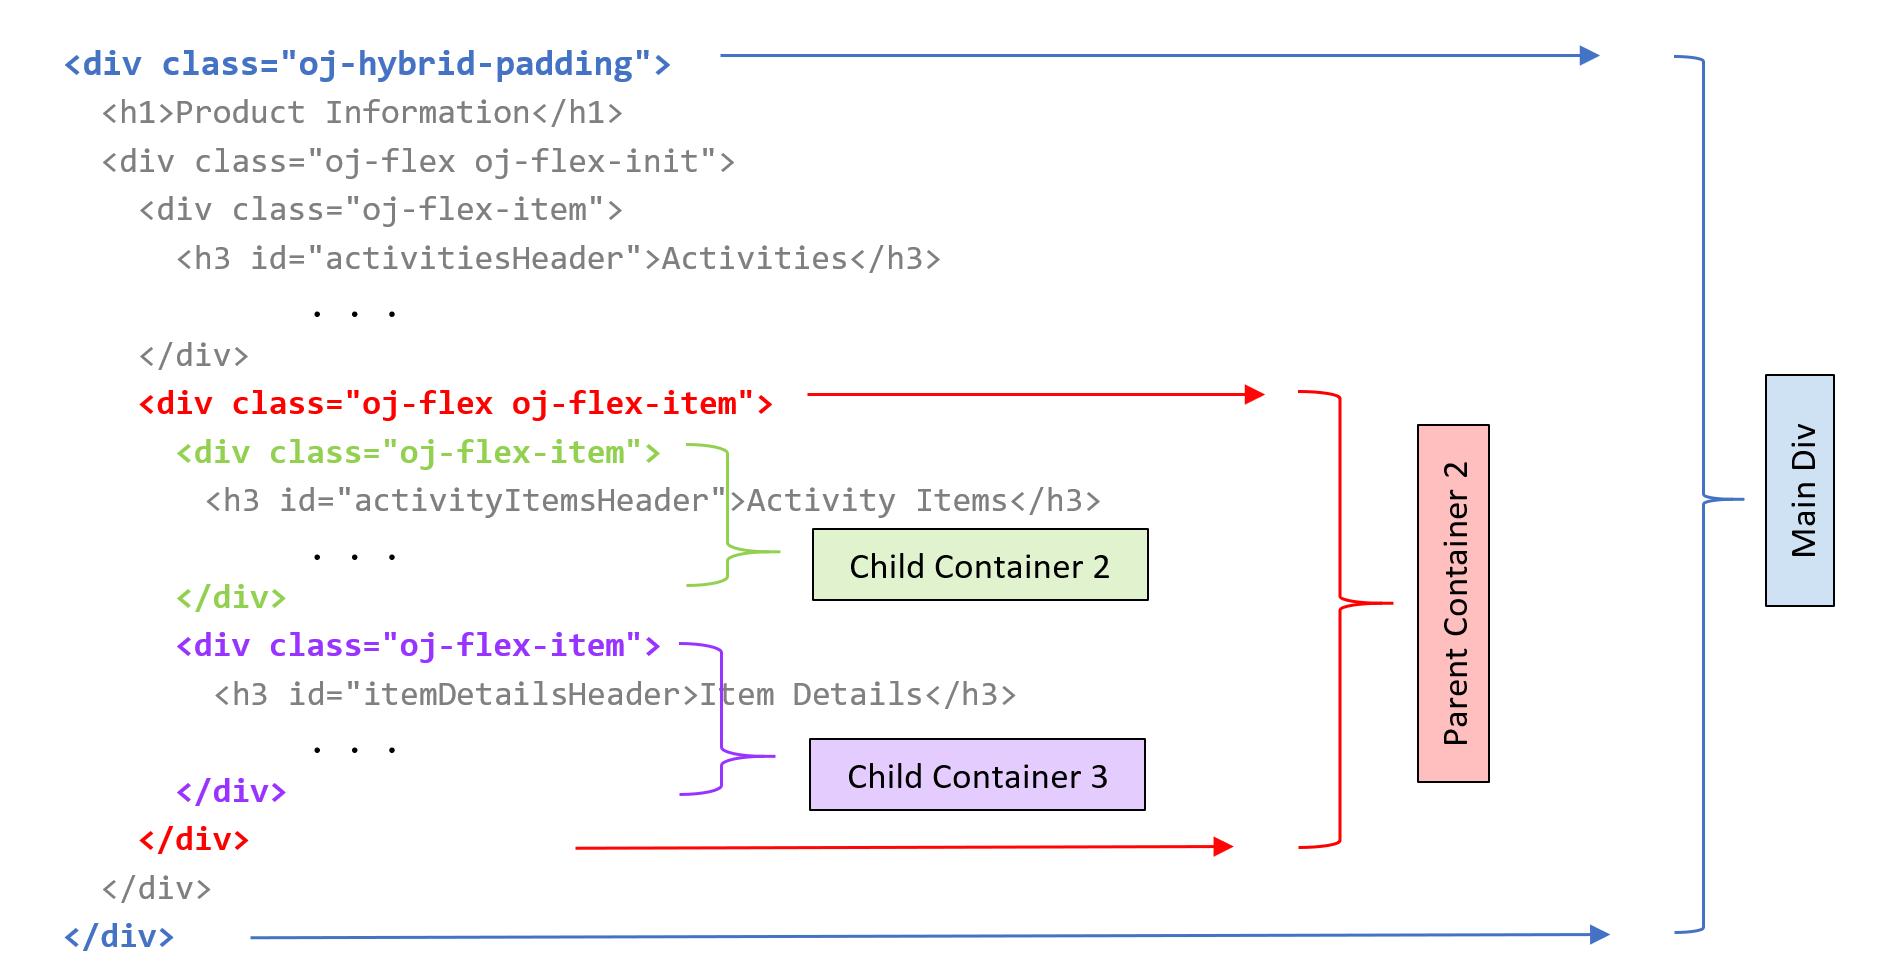
修改 Oracle JET Web 应用程序响应式布局以添加项详细信息容器。父容器 2 包含两个子容器。子容器 2 留空,但以后的教程中将包含其中的“活动项”列表。子容器 3 包含货品详细信息图表。

插图 item-details-containers.png 的说明
-
找到
div元素,其中id="itemDetailsContainer"。在上方,添加具有值parentContainer2的id属性的外部div元素,以及 Oracle JET 容器类和容器项类。在文件中的第二到最后关闭</div>上方添加一个关闭</div>标记。<!-- Parent Container 2 surrounds the Item Details container --> <div id="parentContainer2" class="oj-flex oj-flex-item"> <div id="itemDetailsContainer"> <h3>Item Details</h3> . . . </oj-chart> </div> </div> </div> </div> -
在
id="parentContainer2"的div元素下,添加具有id属性且值为activityItemsContainer的空div元素以及 Oracle JET 容器项类。<!-- Parent Container 2 surrounds the Activity Items and Item Details child containers --> <div id="parentContainer2" class="oj-flex oj-flex-item"> <div id="activityItemsContainer" class="oj-flex-item"> </div> <div id="itemDetailsContainer"> <h3>Item Details</h3> . . . -
最后,将 Oracle JET 容器项类添加到
div元素(其中id="itemDetailsContainer")。<!-- Item Details container displays a chart upon selection --> <div id="itemDetailsContainer" class="oj-flex-item"> <h3>Item Details</h3> -
保存
dashboard.html文件。您的代码的外观应与 containers-dashboard-html.txt 类似。
任务 4:添加面板和面板颜色
应用 Oracle JET 样式类将面板和面板颜色添加到 Web 应用程序中的容器和容器项,以帮助可视化布局。
-
找到
div元素(其中id="parentContainer1"),然后添加两个样式类以指定边框和背景颜色的面板。<!-- The border and color for Parent Container 1 --> <div id="parentContainer1" class="oj-flex oj-flex-init oj-panel oj-bg-warning-20"> -
找到
div元素(其中id="activitiesContainer"),然后添加两个样式类以指定边框和背景颜色的面板。<!-- The border and color for the Activities container --> <div id="activitiesContainer" class="oj-flex-item oj-bg-info-30"> <h3 id="activitiesHeader">Activities</h3> -
找到
div元素(其中id="parentContainer2"),然后添加两个样式类以指定边框和背景颜色的面板。<!-- The border and color for Parent Container 2 --> <div id="parentContainer2" class="oj-flex oj-flex-item oj-panel oj-bg-danger-30"> -
找到
id="itemDetailsContainer"中的div元素,然后添加两个样式类以指定面板和面板颜色。<!-- The border and color for the Item Details container --> <div id="itemDetailsContainer" class="oj-flex-item oj-panel oj-bg-neutral-30"> -
保存
dashboard.html文件。您的代码应类似于 final-containers-dashboard-html.txt。
任务 5:运行 Web 应用程序
-
在终端窗口中,转到
JET_Web_Application目录并运行应用程序。$ ojet serveOracle JET 工具在本地 Web 浏览器中运行 Web 应用程序,您可以在其中查看仪表盘内容。

-
关闭显示正在运行的 Web 应用程序的浏览器窗口或选项卡。
-
在终端窗口中,按 Ctrl+C,如果出现提示,输入
y以退出 Oracle JET 工具批处理作业。
更多学习资源
在 docs.oracle.com/learn 上浏览其他实验室,或者在 Oracle Learning YouTube 渠道上访问更多免费学习内容。此外,访问 education.oracle.com/learning-explorer 以成为 Oracle Learning Explorer。
有关产品文档,请访问 Oracle 帮助中心。
Add containers to the Oracle JET web app
F53118-01
February 2022
Copyright © 2022, Oracle and/or its affiliates.