增强并存档 Oracle JET Web 组件
简介
Web 组件是可重用的用户界面,可以将其作为定制 HTML 元素嵌入到 Web 应用程序中。Web 组件可以包含 Oracle JavaScript Extension Toolkit (Oracle JET) 组件、其他 Web 组件、HTML、JavaScript、TypeScript 和级联样式表 (CSS)。您可以使用 Oracle JET 工具创建 Web 组件,并且可以使用 Oracle JET 启动器模板生成要添加和配置 Web 组件的 HTML 和 Typescript 或 JavaScript 文件。
在上一教程中,您创建了一个显示四个输入文本字段的 Web 组件。在此教程中,您将学习如何将“货品 ID”字段更改为只读字段,将货币转换器添加到“货品价格”字段,并将长度验证器添加到“货品说明”字段。要将值传递给这些字段,请在 Web 应用程序的 HTML 源中定义四个输入文本字段的属性。您使用的属性必须具有在 Web 组件元数据文件中定义的相应属性。您可以将静态值传递给属性,或者对 Web 应用程序与 Web 组件之间的一向或双向数据绑定使用数据绑定表达式语法。
目标
在本教程中,您将利用 Oracle JET Web 应用程序中的其他功能增强 Web 组件。您还将学习如何打包 Web 组件并准备与其他应用程序共享。
先决条件
- 开发环境已设置为创建 Oracle JET 应用程序,并安装了 JavaScript 运行时、Node.js 和最新的 Oracle JET 发行版命令行界面
- 完成此学习路径中的上一个教程,以便已在
JET_Web_Component_Application文件夹中创建demo-update-itemWeb 组件
任务 1:编辑项 ID 以只读
Web 组件中的项目编号字段必须为只读。为了便于访问,请将项目 ID 字段的 oj-input-text 自定义 HTML 元素替换为 oj-label-value 自定义 HTML 元素。oj-label-value 元素定义使用 oj-bind-text 元素将项 ID 字段修改为只读的插槽。
-
导航到
JET_Web_Component_Application/src/ts/jet-composites/demo-update-item目录并在编辑器中打开demo-update-item-view.html文件。 -
找到带有属性
value="ID number"的oj-input-text自定义 HTML 元素,并将oj-input-text元素替换为oj-label-value元素。<oj-form-layout id="form-container" label-edge="[[labelEdge]]"> <oj-label-value> <oj-label slot="label">Item ID</oj-label> <div slot="value"> <oj-bind-text value="ID number"></oj-bind-text> </div> </oj-label-value> <oj-input-text value="Name" label-hint="Item Name"></oj-input-text> . . . </oj-form-layout> -
保存
demo-update-item-view.html文件。您的
demo-update-item-view.html代码应类似于 readonly-itemid.txt。 -
导航到
JET_Web_Component_Application/src/ts/jet-composites/demo-update-item目录并在编辑器中打开demo-update-item-viewModel.ts文件。 -
在
demo-update-item-viewModel.ts文件中,在导入ojs/ojinputtext模块的条目之后导入ojs/ojlabelvalue加载器模块。"use strict"; import * as ko from "knockout"; import componentStrings = require("ojL10n!./resources/nls/demo-update-item-strings"); import Context = require("ojs/ojcontext"); import Composite = require("ojs/ojcomposite"); import "ojs/ojknockout"; import * as ResponsiveUtils from "ojs/ojresponsiveutils"; import * as ResponsiveKnockoutUtils from "ojs/ojresponsiveknockoututils"; import "ojs/ojformlayout"; import "ojs/ojinputtext"; import "ojs/ojlabelvalue"; -
保存
demo-update-item-viewModel.ts文件。 -
在终端窗口中,转到
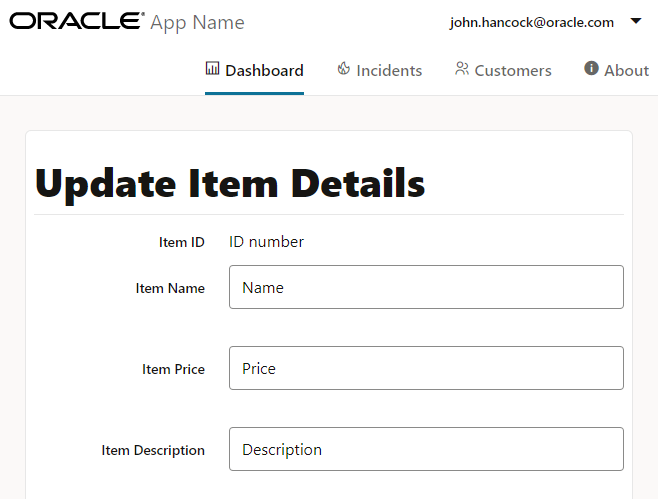
JET_Web_Component_Application目录并运行应用程序。$ ojet serve浏览器将显示 Web 组件,其中包含 Web 应用程序的仪表盘选项卡中的四个输入文本字段。项目 ID 字段现在是只读字段。

-
将终端窗口和显示 Web 应用程序的浏览器窗口或选项卡保持打开状态。
ojet serve命令允许您更改在浏览器中立即反映的应用程序代码。
任务 2:添加货币转换器
对项目价格字段使用货币换算器。
-
导航到
JET_Web_Component_Application/src/ts/jet-composites/demo-update-item目录并在编辑器中打开demo-update-item-view.html文件。 -
找到属性为
value="Price"的oj-input-text自定义 HTML 元素,然后更新该元素以使用稍后步骤中定义的货币转换器。我们输入00而不是Price作为value属性的占位符值,因为转换器需要有效数字而不是字符串。<oj-form-layout id="form-container" label-edge="[[labelEdge]]"> ... <oj-input-text value="Name" label-hint="Item Name"></oj-input-text> <oj-input-text value="00" help.instruction="enter an amount with or without grouping separator" converter="[[currency]]" label-hint="Item Price"> </oj-input-text> <oj-input-text value="Description" label-hint="Item Description"></oj-input-text> </oj-form-layout> -
保存
demo-update-item-view.html文件。demo-update-item-view.html代码应类似于 currency-code-html.txt。 -
导航到
JET_Web_Component_Application/src/ts/jet-composites/demo-update-item目录并在编辑器中打开demo-update-item-viewModel.ts文件。 -
在
demo-update-item-viewModel.ts文件的顶部,从ojs/ojconverter-number模块导入IntlNumberConverter:"use strict"; import * as ko from "knockout"; . . . import "ojs/ojinputtext"; import "ojs/ojlabelvalue"; import { IntlNumberConverter } from "ojs/ojconverter-number"; -
在
ViewModel类中,为将在下一步中初始化的货币转换器添加货币字段。export default class ViewModel implements Composite.ViewModel<Composite.PropertiesType> { busyResolve: (() => void); . . . currency: IntlNumberConverter; constructor(context: Composite.ViewModelContext<Composite.PropertiesType>) { . . . -
在示例可观察条目之后的
constructor()方法中,添加货币转换器。constructor(context: Composite.ViewModelContext<Composite.PropertiesType>) { . . . this.res = componentStrings["demo-update-item"]; this.currency = new IntlNumberConverter({ style: "currency", currency: "USD ", currencyDisplay: "code", }); -
保存
demo-update-item-viewModel.ts文件。您的
demo-update-item-viewModel.ts代码应类似于 currency-code-ts.txt。 -
返回浏览器以查看 Web 应用程序中的更改。
-
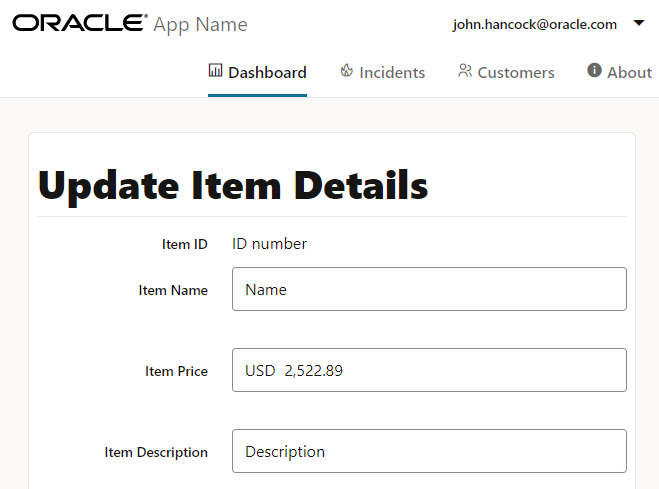
在项目价格字段中输入价格,然后按 Enter 验证更改。

插图 form-wc-currency-converter.png 的说明
输入的价格显示美元前缀。如果输入非数值,则项目价格字段将显示错误。
-
将终端窗口和显示 Web 应用程序的浏览器窗口或选项卡保持打开状态。
ojet serve命令允许您更改在浏览器中立即反映的应用程序代码。
任务 3:添加长度验证器
对项目说明字段使用长度验证器。
-
导航到
JET_Web_Component_Application/src/ts/jet-composites/demo-update-item目录并在编辑器中打开demo-update-item-view.html文件。 -
找到属性为
value="Description"的oj-input-text自定义 HTML 元素,然后将其更新为使用稍后步骤中定义的长度验证器。<oj-form-layout id="form-container"> ... <oj-input-text value="00" help.instruction="enter an amount with or without grouping separator" converter="[[currency]]" label-hint="Item Price"> </oj-input-text> <oj-input-text value="{{lengthValue1}}" validators="[[validators]]" placeholder="Enter a description of 5-50 characters" label-hint="Item Description" ></oj-input-text> </oj-form-layout> -
保存
demo-update-item-view.html文件。demo-update-item-view.html代码应类似于 validator-code-html.txt。 -
导航到
JET_Web_Component_Application/src/ts/jet-composites/demo-update-item目录并在编辑器中打开demo-update-item-viewModel.ts文件。 -
在
demo-update-item-viewModel.ts文件的顶部,从ojs/ojasyncvalidator-length模块导入AsyncLengthValidator:import * as ko from "knockout"; . . . import { IntlNumberConverter } from "ojs/ojconverter-number"; import AsyncLengthValidator = require("ojs/ojasyncvalidator-length"); -
在
ViewModel类中,为将在下一步中初始化的 Knockout 可观察文件添加字段。export default class ViewModel implements Composite.ViewModel<Composite.PropertiesType> { busyResolve: (() => void); . . . currency: IntlNumberConverter; lengthValue1: ko.Observable<string>; validators: ko.ObservableArray<AsyncLengthValidator<string>>; -
在货币转换器之后的
constructor方法中,添加长度验证器。constructor(context: Composite.ViewModelContext<Composite.PropertiesType>) { . . . this.res = componentStrings["demo-update-item"]; this.currency = new IntlNumberConverter({ style: "currency", currency: "USD ", currencyDisplay: "code", }); this.lengthValue1 = ko.observable(""); this.validators = ko.observableArray([ new AsyncLengthValidator({ min: 5, max: 50 }), ]);长度验证器为项目说明字段定义最小字符长度 5 和最大字符长度 50。
-
保存
demo-update-item-viewModel.ts文件。您的
demo-update-item-viewModel.ts代码应类似于 final-demo-update-item-viewModel-ts.txt。 -
返回浏览器以查看 Web 应用程序中的更改。
-
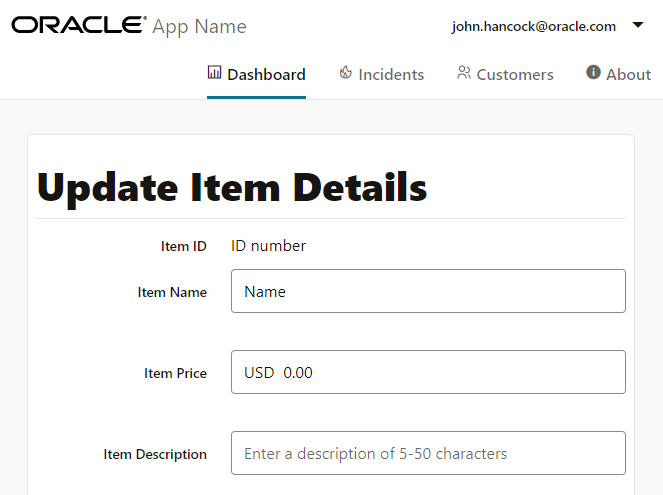
在项目说明字段中输入说明,然后按 Enter 键,然后按 Tab 键清除工具提示。

插图 form-wc-length-validator.png 的说明
如果说明超过设置范围,则项目说明字段将显示错误。
-
将终端窗口和显示 Web 应用程序的浏览器窗口或选项卡保持打开状态。
ojet serve命令允许您更改在浏览器中立即反映的应用程序代码。
任务 4:定义 Web 组件元数据
Web 组件元数据文件定义 Web 组件的必需属性。Web 组件的每个输入文本字段都必须有一个关联的属性,该属性将回写来自 Web 组件的更新。
-
导航到
JET_Web_Component_Application/src/ts/jet-composites/demo-update-item目录并在编辑器中打开component.json文件。 -
定义
displayName和description元数据属性。{ "name": "demo-update-item", "version": "1.0.0", "jetVersion": "^12.0.0", "displayName": "demo-update-item", "description": "A Web Component with form layout", ... } -
在
description元数据属性下,使用驼峰字命名约定定义绑定到 Web 组件视图中字段的属性。"description": "A Web Component with form layout", "properties": { "itemId": { "type": "number" }, "itemName": { "type": "string", "description": "Description for the item-name attribute", "writeback": true }, "itemPrice": { "type": "number", "writeback": true }, "itemDesc": { "type": "string", "writeback": true } },writeback属性设置为true可确保这些属性从在双向数据绑定表达式中引用该属性的 Web 组件接收更新。 -
保存
component.json文件。component.json代码的外观应与 component-json.txt 类似。
任务 5:定义属性和属性值
Web 组件元素的属性可以引用您在 Web 组件元数据文件中声明的属性。在 Web 应用程序的 HTML 源中,属性引用显示为带连字符的不区分大小写的 HTML 元素属性名称。
-
导航到
JET_Web_Component_Application/src/ts/views目录并在编辑器中打开dashboard.html文件。 -
在
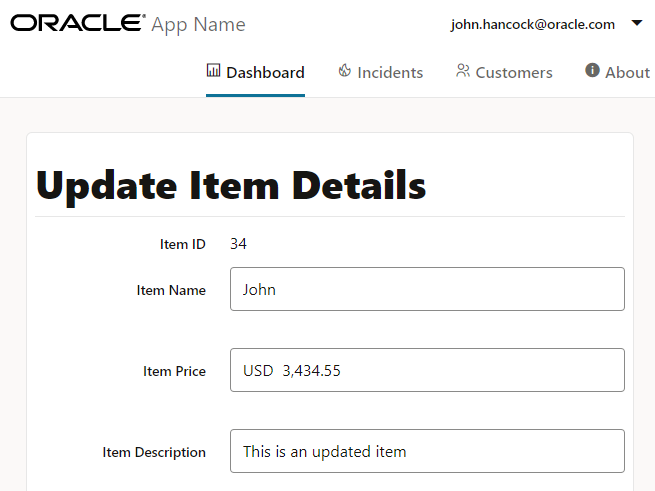
demo-update-item元素中,使用四个输入文本字段的静态值定义属性。<div class="oj-hybrid-padding"> <div class="oj-panel oj-sm-margin-2x demo-mypanel"> <h1 class="oj-header-border">Update Item Details</h1> <div> <demo-update-item item-id="34" item-name="John" item-price="3434.55" item-desc="This is an updated item"> </demo-update-item> </div> </div> </div> -
保存
dashboard.html文件。
任务 6:定义 Web 组件视图
可以使用视图绑定上下文的 $properties 变量访问在 Web 组件的元数据文件中定义的任何属性。
-
导航到
JET_Web_Component_Application/src/ts/jet-composites/demo-update-item目录并在编辑器中打开demo-update-item-view.html文件。 -
在
oj-form-layout元素的定制 HTML 元素中,使用$properties变量将value属性绑定到component.json文件中定义的属性。<oj-form-layout id="form-container" label-edge="[[labelEdge]]"> . . . <div slot="value"> <oj-bind-text value="[[$properties.itemId]]"></oj-bind-text> </div> </oj-label-value> <oj-input-text value="{{$properties.itemName}}" label-hint="Item Name"></oj-input-text> <oj-input-text value="{{$properties.itemPrice}}" help.instruction="enter an amount with or without grouping separator" ...> </oj-input-text> <oj-input-text value="{{$properties.itemDesc}}" . . .> </oj-input-text> </oj-form-layout>要定义属性值,请使用
[[]]语法为双向数据绑定定义单向数据绑定和{{}}语法。 -
保存
demo-update-item-view.html文件。您的
demo-update-item-view.html代码应类似于 final-demo-update-item-view-html.txt。 -
返回浏览器以查看 Web 应用程序中的更改。
浏览器在四个输入文本字段中显示具有静态值的 Web 组件。

-
关闭显示正在运行的 Web 应用程序的浏览器窗口或选项卡。
-
在终端窗口中,按 Ctrl+C,如果出现提示,输入
y以退出 Oracle JET 工具批处理作业。关闭终端窗口。
任务 7:存档 Web 组件
配置 Web 组件后,必须为其他应用程序准备 Web 组件。
打开终端窗口,转到 JET_Web_Component_Application 目录,然后以组件名称 demo-update-item 作为命令参数运行 ojet package component 命令:
$ ojet package component demo-update-item
Oracle JET 将 JET_Web_Component_Application/src/ts/jet-composites/demo-update-item 目录的内容打包到在 JET_Web_Component_Application/dist 目录中创建的 ZIP 文件 (demo-update-item_1-0-0.zip) 中。作为打包任务的一部分,Oracle JET 将 JET_Web_Component_Application/src/ts/jet-composites/demo-update-item 目录中的 TypeScript 代码转发到 JavaScript 代码。例如,如果打开 JET_Web_Component_Application/dist/demo-update-item_1-0-0.zip 文件,您会发现该文件包含 demo-update-item-viewModel.js 文件,Oracle JET 工具已从 JET_Web_Component_Application/src/ts/jet-composites/demo-update-item 目录中的 demo-update-item-viewModel.ts 文件转发。
将 demo-update-item_1-0-0.zip 文件从 JET_Web_Component_Application/dist 目录分发到希望在其 Web 应用程序中重用 Web 组件的用户。要在 Web 应用程序中使用 Web 组件,使用者将 ZIP 文件的内容提取到其 Web 应用程序中的 demo-update-item 目录。我们将在下一个教程中详细介绍后一项任务。
更多学习资源
在 docs.oracle.com/learn 上浏览其他实验室,或者在 Oracle Learning YouTube 渠道上访问更多免费学习内容。此外,访问 education.oracle.com/learning-explorer 以成为 Oracle Learning Explorer。
有关产品文档,请访问 Oracle 帮助中心。
Enhance and archive the Oracle JET web component
F53195-01
February 2022
Copyright © 2022, Oracle and/or its affiliates.