使用虚拟节点在 OCI Kubernetes 引擎上设置 OCI Native Ingress Controller
简介
本教程介绍在具有虚拟节点节点池的 Oracle Cloud Infrastructure Kubernetes Engine (OKE) 上设置 Oracle Cloud Infrastructure (OCI) 本机入站控制器的过程。虚拟节点与基于常规实例的 Worker 节点不同,因为它们是抽象出底层计算实例的无服务器解决方案。与依赖特定虚拟机实例的传统 worker 节点不同,虚拟节点可以根据工作负载需求动态扩展,而无需手动管理底层基础设施。这使得它们非常适合需要自动扩展和减少运营开销的工作负载。
在本教程中,我们将使用虚拟节点在 OKE 上设置 OCI 本机入站控制器。我们将配置工作负载身份策略、启用入站附加项以及使用 Kubernetes 清单部署入站资源。
通过执行以下任务,您可以使用 OCI 负载平衡器功能公开应用并管理入站流量,同时充分利用虚拟节点的简单易用性。此设置可简化流量管理,并以可扩展、经济高效的方式支持生产级工作负载。
目标
- 在 OKE 上设置和配置 OCI 本机入站控制器,以高效管理入站资源。
任务 1:创建工作量身份主用户策略
在启用 OCI 原生入站控制器之前,请先创建工作负载身份主体策略。虚拟节点是无服务器的,不使用 OCI Compute 实例,因此它们需要工作负载身份而不是实例主用户。此策略允许入站控制器管理区间中的资源。
-
转到 OCI 控制台,导航到身份和安全、身份,然后单击策略。
-
创建策略并输入策略名称。有关详细信息,请参阅使用 OCI 控制台创建策略。
-
单击 Show manual editor(显示手动编辑器)并输入以下策略语句,将
location和cluster-ocid替换为您的特定值。注:
<location>应替换为资源所在的区间。<cluster-ocid>应替换为 OKE 群集的 OCID。
Allow any-user to manage load-balancers in <location> where all {request.principal.type = 'workload', request.principal.namespace = 'native-ingress-controller-system', request.principal.service_account = 'oci-native-ingress-controller', request.principal.cluster_id = '<cluster-ocid>'}

Allow any-user to use virtual-network-family in <location> where all {request.principal.type = 'workload', request.principal.namespace = 'native-ingress-controller-system', request.principal.service_account = 'oci-native-ingress-controller', request.principal.cluster_id = '<cluster-ocid>'}

Allow any-user to manage cabundles in <location> where all {request.principal.type = 'workload', request.principal.namespace = 'native-ingress-controller-system', request.principal.service_account = 'oci-native-ingress-controller', request.principal.cluster_id = '<cluster-ocid>'}

Allow any-user to manage cabundle-associations in <location> where all {request.principal.type = 'workload', request.principal.namespace = 'native-ingress-controller-system', request.principal.service_account = 'oci-native-ingress-controller', request.principal.cluster_id = '<cluster-ocid>'}

Allow any-user to manage leaf-certificates in <location> where all {request.principal.type = 'workload', request.principal.namespace = 'native-ingress-controller-system', request.principal.service_account = 'oci-native-ingress-controller', request.principal.cluster_id = '<cluster-ocid>'}

Allow any-user to read leaf-certificate-bundles in <location> where all {request.principal.type = 'workload', request.principal.namespace = 'native-ingress-controller-system', request.principal.service_account = 'oci-native-ingress-controller', request.principal.cluster_id = '<cluster-ocid>'}

Allow any-user to manage leaf-certificate-versions in <location> where all {request.principal.type = 'workload', request.principal.namespace = 'native-ingress-controller-system', request.principal.service_account = 'oci-native-ingress-controller', request.principal.cluster_id = '<cluster-ocid>'}

Allow any-user to manage certificate-associations in <location> where all {request.principal.type = 'workload', request.principal.namespace = 'native-ingress-controller-system', request.principal.service_account = 'oci-native-ingress-controller', request.principal.cluster_id = '<cluster-ocid>'}

Allow any-user to read certificate-authorities in <location> where all {request.principal.type = 'workload', request.principal.namespace = 'native-ingress-controller-system', request.principal.service_account = 'oci-native-ingress-controller', request.principal.cluster_id = '<cluster-ocid>'}

Allow any-user to manage certificate-authority-associations in <location> where all {request.principal.type = 'workload', request.principal.namespace = 'native-ingress-controller-system', request.principal.service_account = 'oci-native-ingress-controller', request.principal.cluster_id = '<cluster-ocid>'}

Allow any-user to read certificate-authority-bundles in <location> where all {request.principal.type = 'workload', request.principal.namespace = 'native-ingress-controller-system', request.principal.service_account = 'oci-native-ingress-controller', request.principal.cluster_id = '<cluster-ocid>'}

Allow any-user to read public-ips in <location> where all {request.principal.type = 'workload', request.principal.namespace = 'native-ingress-controller-system', request.principal.service_account = 'oci-native-ingress-controller', request.principal.cluster_id = '<cluster-ocid>'}

Allow any-user to manage floating-ips in <location> where all {request.principal.type = 'workload', request.principal.namespace = 'native-ingress-controller-system', request.principal.service_account = 'oci-native-ingress-controller', request.principal.cluster_id = '<cluster-ocid>'}

Allow any-user to manage waf-family in <location> where all {request.principal.type = 'workload', request.principal.namespace = 'native-ingress-controller-system', request.principal.service_account = 'oci-native-ingress-controller', request.principal.cluster_id = '<cluster-ocid>'}

Allow any-user to read cluster-family in <location> where all {request.principal.type = 'workload', request.principal.namespace = 'native-ingress-controller-system', request.principal.service_account = 'oci-native-ingress-controller', request.principal.cluster_id = '<cluster-ocid>'}

Allow any-user to use tag-namespaces in <location> where all {request.principal.type = 'workload', request.principal.namespace = 'native-ingress-controller-system', request.principal.service_account = 'oci-native-ingress-controller', request.principal.cluster_id = '<cluster-ocid>'}
任务 2:启用 OCI Native Ingress Controller 附加组件
实施所需的工作负载身份主体策略后,您可以继续为您的 OKE 集群启用 OCI 本机入站控制器附加项。此附加组件允许使用 OCI 负载平衡器高效管理入站流量。
-
在 OCI 控制台中导航到 OKE 集群。
-
向下滚动并单击附加组件。
-
在附加组件页面中,单击本机入站控制器。
-
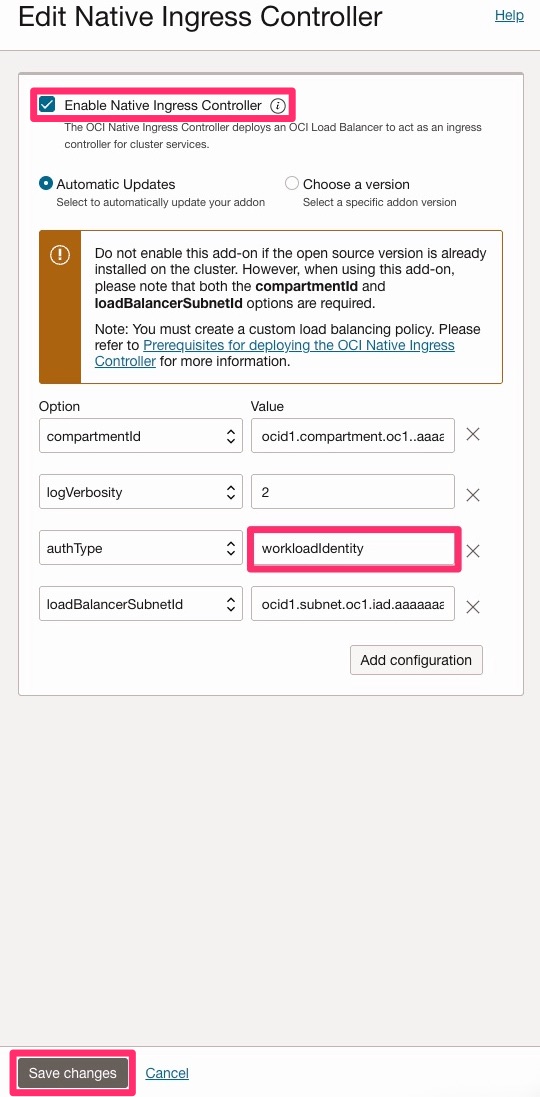
在 Edit Native Ingress Controller(编辑本机入站控制器)页面中,选择 Enable Native Ingress Controller(启用本机入站控制器)并在 Option(选项)下输入以下信息。
compartmentId:输入区间 OCID。loadBalancerSubnetId:输入负载平衡器子网 OCID。authType:输入workloadIdentity。
-
单击保存更改以应用设置。
注:虚拟节点池需要此配置,如前所述,它们是无服务器的,不支持实例主用户验证。在这种情况下,工作负载身份是支持的验证方法。

任务 3:部署入站资源以启用本机入站功能
在此任务中,创建所需的 Kubernetes 资源,以使用 OCI 原生入站控制器启用入站功能。这些对象包括 IngressClassParameters、IngressClass 和实际的 Ingress 对象。
-
查看每种资源的用途。
- IngressClassParameters:指定特定于 OCI 的配置,例如区间 OCID、子网和带宽。
- IngressClass:将 Kubernetes 入站功能链接到 OCI 的入站控制器。
- 入站:定义如何将流量路由到您的服务。
-
替换 YAML 中的占位符值。
- 将
<your compartment ocid>替换为实际的区间 OCID 。 - 将
<your load balancer subnet ocid>替换为 OCID of your Load Balancer subnet 。
- 将
-
应用 YAML 清单。将以下 YAML 代码保存到文件,例如
native-ingress.yaml。apiVersion: apps/v1 kind: Deployment metadata: name: test-web-app namespace: default spec: replicas: 2 selector: matchLabels: app: test-web template: metadata: labels: app: test-web spec: containers: - name: nginx image: nginx:latest ports: - containerPort: 80 readinessProbe: httpGet: path: / port: 80 initialDelaySeconds: 3 periodSeconds: 5 resources: requests: cpu: "100m" memory: "128Mi" limits: cpu: "500m" memory: "256Mi" apiVersion: v1 kind: Service metadata: name: test-web-service namespace: default spec: selector: app: test-web ports: - protocol: TCP port: 80 targetPort: 80 apiVersion: ingress.oraclecloud.com/v1beta1 kind: IngressClassParameters metadata: name: native-ic-params namespace: native-ingress-controller-system spec: compartmentId: "ocid1.compartment.oc1..aaaaaaaa2eimxxxxxxxxxxz4lkcety52hfdg6wdoff6744yn4hrshofla" subnetId: "ocid1.subnet.oc1.iad.aaaaaaaaa72ie4xxxxxxxxxrxxrly6nmkb77qxt6mi2t5pvrdhge32q" loadBalancerName: "test-web-ingress" isPrivate: false maxBandwidthMbps: 400 minBandwidthMbps: 100 apiVersion: networking.k8s.io/v1 kind: IngressClass metadata: name: native-ic-ingress-class annotations: ingressclass.kubernetes.io/is-default-class: "true" spec: controller: oci.oraclecloud.com/native-ingress-controller parameters: apiGroup: ingress.oraclecloud.com kind: IngressClassParameters name: native-ic-params scope: Namespace namespace: native-ingress-controller-system apiVersion: networking.k8s.io/v1 kind: Ingress metadata: name: test-web-ingress-quickstart namespace: default annotations: oci.oraclecloud.com/load-balancer-type: "lb" oci.oraclecloud.com/healthcheck-protocol: "HTTP" oci.oraclecloud.com/healthcheck-port: "80" oci.oraclecloud.com/healthcheck-path: "/" oci.oraclecloud.com/healthcheck-return-code: "200" spec: ingressClassName: native-ic-ingress-class rules: - host: test.example.com http: paths: - path: / pathType: Prefix backend: service: name: test-web-service port: number: 80 - http: paths: - path: / pathType: Prefix backend: service: name: test-web-service port: number: 80 -
运行以下命令以应用清单。
kubectl apply -f native-ingress.yaml -
检验资源创建情况。
kubectl get ingressclassparameters
kubectl get ingressclass
kubectl get ingress
任务 4:测试 OCI Native Ingress Controller Load Balancer
注:在测试 OCI 负载平衡器 IP 地址之前,请确保在 VCN 安全列表和/或网络安全组 (NSG) 中打开了所需的端口(例如
80和/或443)。
要验证 OCI 本机入站控制器是否正常工作,请执行以下步骤:
-
使用
kubectl检索入站资源的 IP 地址。kubectl get ingress -
复制输出中显示的 IP 地址。

-
打开 Web 浏览器,然后将 IP 地址粘贴到地址栏中。

-
如果您的设置正确,则应看到已部署服务的默认响应。
您还可以通过导航菜单、选择网络并单击负载平衡器来验证 OCI 负载平衡器是否已在 OCI 控制台中正确创建。

后续步骤
在本教程中,您已成功使用虚拟节点在 OKE 上配置了本机入站控制器。此设置允许您使用 OCI Load Balancer 服务管理入站流量,同时受益于无服务器 Kubernetes 环境的可扩展性和简单性。现在,您已准备好部署生产级负载,以简化流量管理和减少基础设施开销。
相关链接
确认
- 作者 -JP Santana(主云架构师)
更多学习资源
通过 docs.oracle.com/learn 浏览其他实验室,或者通过 Oracle Learning YouTube 频道访问更多免费学习内容。此外,请访问 education.oracle.com/learning-explorer 以成为 Oracle Learning Explorer。
有关产品文档,请访问 Oracle 帮助中心。
Set Up the OCI Native Ingress Controller on OCI Kubernetes Engine with Virtual Nodes
G34290-03
Copyright ©2025, Oracle and/or its affiliates.