使用 Stargz Store 在 Oracle Cloud Infrastructure Kubernetes Engine (OKE) 中启用延迟容器映像加载
简介
延迟容器映像加载(有时称为延迟拉取或按需加载映像)是一种允许容器在下载完整映像之前开始运行的技术。仅提取运行时所需的部分映像,从而缩短启动时间,特别是对于大型映像。
通常,当您运行容器时:
- 容器运行时(例如,CRI-O、containerd)从注册表中下载整个映像。
- 将解压缩所有图像层。
- 只有在所有层都下载并解压缩后,容器才会启动。
延迟加载:
- 容器立即启动,使用虚拟文件系统(映像尚不存在本地)。
- 应用访问文件时,运行时会按需从远程注册表获取所需内容。
- 仅当实际使用时,才会下载其他文件。
- 完整的容器图像在后台拉取。
需要重新打包容器映像以支持延迟加载。使用 eStargz 格式,图像将重新打包成可独立解压缩的小块。这允许容器运行时在容器启动时仅提取所需的块。
eStargz 图像包含一个称为 TOC (Table of Contents) 的特殊文件,该文件记录 eStargz 层中所有文件条目的元数据(例如,名称、文件类型、所有者、偏移量),但 TOC 本身除外。容器运行时可以使用 TOC 挂载容器的文件系统,而无需下载整个层的内容。
在本教程中,您将学习如何:
- 重新打包现有容器映像以使用 Stargz 格式
- 配置 Oracle Cloud Infrastructure Kubernetes Engine (OKE) CRI-O 以使用 Stargz Store 插件
- 运行示例工作负载以演示容器启动时间的改进
Prerequisites
- 可访问 OKE 的 Oracle Cloud Infrastructure (OCI) 账户
- 一个正常运行的 OKE 集群
- 配置为访问 OKE 集群的
kubectl - 本地安装了 Docker 或 containerd
设置
使用 nerdctl 重新构建容器映像以使用 eStargz 格式
-
在 OCI Registry (OCIR) 中创建映像系统信息库。在本教程中,
tenancy-namespace是idxzjcdxqj,我们将创建一个名为vllm/vllm-openai的repo。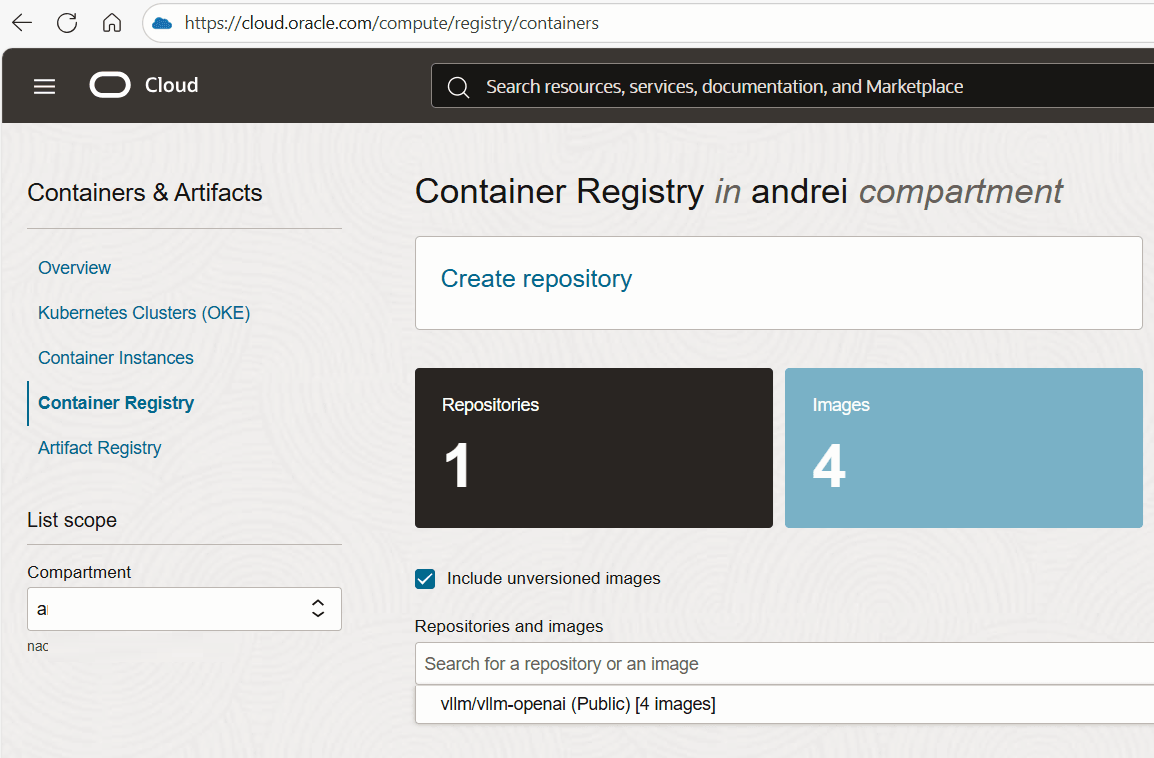
您可以按照以下说明进行 OCIR 验证并创建新资料档案库:使用 Docker CLI 推送映像。
请确保将
iad.ocir.io替换为您正在使用的 OCI 区域中的 OCIR 域。下面是区域密钥的列表。docker login iad.ocir.io -
在安装了 Docker 的计算机上下载最新版本的 nerdctl 。
export NERDCTL_VERSION=2.2.2 wget https://github.com/containerd/nerdctl/releases/download/v${NERDCTL_VERSION}/nerdctl-${NERDCTL_VERSION}-linux-amd64.tar.gz tar -xf nerdctl-${NERDCTL_VERSION}-linux-amd64.tar.gz -
向 OCIR 验证
nerdctl。./nerdctl login iad.ocir.io -
将 vllm 容器映像转换为 eStargz 格式。
./nerdctl image convert --estargz --oci docker.io/vllm/vllm-openai:v0.11.0 iad.ocir.io/idxzjcdxqj/vllm/vllm-openai:v0.11.0-esgz -
将 eStargz vllm 容器映像推送到 OCIR。
./nerdctl image push iad.ocir.io/idxzjcdxqj/vllm/vllm-openai:v0.11.0-esgz -
您可以使用 docker 将常规映像提取/推送到 OCIR。
docker image pull docker.io/vllm/vllm-openai:v0.11.0
docker image tag docker.io/vllm/vllm-openai:v0.11.0 iad.ocir.io/idxzjcdxqj/vllm/vllm-openai:v0.11.0-regular
docker image push iad.ocir.io/idxzjcdxqj/vllm/vllm-openai:v0.11.0-regular
在 OKE 节点上安装 Stargz Store 插件
考虑到 OKE 使用 CRI-O,我们需要设置 Stargz Store 插件。这是 CRI-O/Podman 的附加层存储插件的实现。Stargz Store 为 CRI-O/Podman 提供远程安装的 eStargz 层。
-
通过 SSH 连接到其中一个 worker 节点,然后从 stargz-snapshotter Github 页面下载最新版本。
export STARGZ_SNAPSHOTTER_VERSION=v0.18.2 wget https://github.com/containerd/stargz-snapshotter/releases/download/${STARGZ_SNAPSHOTTER_VERSION}/stargz-snapshotter-${STARGZ_SNAPSHOTTER_VERSION}-linux-amd64.tar.gz -
将
stargz-store提取到/usr/local/bin。tar -C /usr/local/bin -xvf stargz-snapshotter-v0.18.2-linux-amd64.tar.gz stargz-store -
更新
/etc/containers/storage.conf文件以在[storage.options]部分中包含additionallayerstores。[storage] driver = "overlay" graphroot = "/var/lib/containers/storage" runroot = "/run/containers/storage" [storage.options] additionallayerstores = ["/var/lib/stargz-store/store:ref"] -
确保已安装并装入
fuse。apt-get install fuse modprobe fuse -
启用
stargz-store服务。wget -O /etc/systemd/system/stargz-store.service https://raw.githubusercontent.com/containerd/stargz-snapshotter/main/script/config-cri-o/etc/systemd/system/stargz-store.service systemctl daemon-reload systemctl restart stargz-store crio -
确认
crio和stargz-store服务正在运行。systemctl status stargz-store systemctl status crio
评估性能
-
更新以下清单中的
nodeName和image并创建测试部署:kubectl apply -f - <<EOF --- apiVersion: apps/v1 kind: Deployment metadata: name: test-estargz-cpu namespace: default labels: app: test-estargz spec: strategy: type: Recreate replicas: 1 selector: matchLabels: app: test-estargz template: metadata: labels: app: test-estargz spec: containers: ## Update the image to your own container repository - image: iad.ocir.io/idxzjcdxqj/vllm/vllm-openai:v0.11.0-esgz name: test command: ["/bin/bash", "-c", "echo started && sleep infinity"] ## Replace the nodename with the name of the node where stargz-store is configured. nodeName: 10.140.34.52 tolerations: - key: nvidia.com/gpu operator: Exists effect: NoSchedule --- apiVersion: apps/v1 kind: Deployment metadata: name: test-regular-cpu namespace: default labels: app: test-regular spec: strategy: type: Recreate replicas: 1 selector: matchLabels: app: test-regular template: metadata: labels: app: test-regular spec: containers: ## Update the image to your own container repository - image: iad.ocir.io/idxzjcdxqj/vllm/vllm-openai:v0.11.0-regular name: test command: ["/bin/bash", "-c", "echo started && sleep infinity"] env: - name: HF_HOME value: "/workspace" ## Replace the nodename with the name of the node where stargz-store is configured. nodeName: 10.140.34.52 tolerations: - key: nvidia.com/gpu operator: Exists effect: NoSchedule EOF -
监视容器开始时间。
kubectl get pods -w -
清理资源。
kubectl delete deploy test-regular-cpu kubectl delete deploy test-estargz-cpu -
对于使用 GPU 的测试部署,请更新 this yaml manifest 中的
nodeName和image并使用以下命令应用它:kubectl apply -f test-manifest-gpu.yaml
结果
以下结果基于使用 30B 参数大语言模型在 BM.GPU4.8 配置上执行的测试。
-
eStargz 的云池开始时间为
33s,常规映像为4m。$ kubectl get pods -w NAME READY STATUS RESTARTS AGE test-estargz-5699988945-2zxmh 0/1 ContainerCreating 0 8s test-regular-55fbdf64c8-hn6hg 0/1 ContainerCreating 0 7s test-estargz-5699988945-2zxmh 1/1 Running 0 33s test-regular-55fbdf64c8-hn6hg 1/1 Running 0 4m -
应用程序使用
1m27s中的 eStargz 映像在 pod 上启动。INFO 12-11 07:59:02 [__init__.py:216] Automatically detected platform cuda. (APIServer pid=1) INFO 12-11 07:59:26 [api_server.py:1839] vLLM API server version 0.11.0 (APIServer pid=1) INFO 12-11 07:59:26 [utils.py:233] non-default args: {'model_tag': 'cpatonn/Qwen3-30B-A3B-Instruct-2507-AWQ-4bit', 'max_model_len': 8192, 'enforce_eager': True} ... (APIServer pid=1) INFO 12-11 08:00:29 [launcher.py:42] Route: /metrics, Methods: GET (APIServer pid=1) INFO: Started server process [1] (APIServer pid=1) INFO: Waiting for application startup. (APIServer pid=1) INFO: Application startup complete. -
应用程序使用
32s中的常规映像在云池上启动。INFO 12-11 08:01:19 [__init__.py:216] Automatically detected platform cuda. (APIServer pid=1) INFO 12-11 08:01:22 [api_server.py:1839] vLLM API server version 0.11.0 (APIServer pid=1) INFO 12-11 08:01:22 [utils.py:233] non-default args: {'model_tag': 'cpatonn/Qwen3-30B-A3B-Instruct-2507-AWQ-4bit', 'max_model_len': 8192, 'enforce_eager': True} ... (APIServer pid=1) INFO 12-11 08:01:51 [launcher.py:42] Route: /metrics, Methods: GET (APIServer pid=1) INFO: Started server process [1] (APIServer pid=1) INFO: Waiting for application startup. (APIServer pid=1) INFO: Application startup complete. -
使用 eStargz 映像的 pod 已准备好以比常规映像快
1m22s的速度为流量提供服务。
结论
OKE 中使用 eStargz 格式实现延迟图像拉取表明云池初始化时间有显著改进,将容器启动时间从 4 分钟缩短到 33 秒,减少了 87%。虽然 eStargz 容器内的应用程序初始化时间比常规图像 (1m27s vs 32s) 长约 1 分钟,但总体就绪时间仍比常规图像快 1m22s,使 pod 可以更快地用于流量。这种权衡在快速扩展、云池重新调度或冷启动至关重要的生产环境中尤其有价值,因为初始容器拉取时间的大幅减少超过了应用启动开销的适度增加。对于使用大型容器映像(尤其是 AI 工作负载)的工作负载,延迟拉取 eStargz 提供了一个实用的解决方案来加速部署,而无需更改应用代码或进行重大基础设施修改。
相关链接
确认
- 作者:Andrei Ilas(首席云架构师)
更多学习资源
通过 docs.oracle.com/learn 浏览其他实验室,或者通过 Oracle Learning YouTube 频道访问更多免费学习内容。此外,请访问 education.oracle.com/learning-explorer 以成为 Oracle Learning Explorer。
有关产品文档,请访问 Oracle 帮助中心。
Enable Lazy Container Image Loading in Oracle Cloud Infrastructure Kubernetes Engine (OKE) Using Stargz Store
G56891-01