在 Next.js 中使用 Headless Oracle Content Management 建置部落格
簡介
Next.js 是一個開放原始碼 React 前端開發 Web 架構,可啟用伺服器端呈現及產生 React 式 Web 應用程式的靜態網站等功能。但當您需要內容管理系統 (CMS) 為您的所有內容提供服務時,會發生什麼情況?Oracle Content Management 的豐富無頭 (Rich headless) CMS 功能也具有適合內容管理與治理需求的寬限解決方案。
在本教學課程中,我們將利用 Oracle Content Management 作為無頭 (headless) CMS,以及使用其軟體開發套件 (SDK) 在 JavaScript 中傳遞內容,在 Next.js 中建立簡單的部落格。此 Next.js 範例位於 GitHub 上。
此教學課程包含三個工作:
必要條件
繼續本教學課程之前,建議您先閱讀下列資訊:
若要遵循此教學課程,您需要:
- Oracle Content Management 訂閱
- 具備內容管理員角色的 Oracle Content Management 帳戶
- 節點版本 10 或更新版本的 Windows 或 Mac 電腦
我們正在建立什麼
我們的部落格將包含一個三頁網站,可讓訪客探索組織成主題的部落格文章。第一頁 (首頁) 包含商標 (公司名稱和標誌)、某些連結以及部落格主題清單。
為了看看我們正在建置的內容,以下是我們教學課程的結束狀態,這是使用 Oracle Content Management 內容的基本 Next.js 部落格:
https://headless.mycontentdemo.com/samples/oce-nextjs-blog-sample
這是此教學課程結尾的首頁外觀:

第二頁是主題頁面,顯示屬於該主題的每篇部落格文章預覽。以下是如何呈現個別主題頁面:
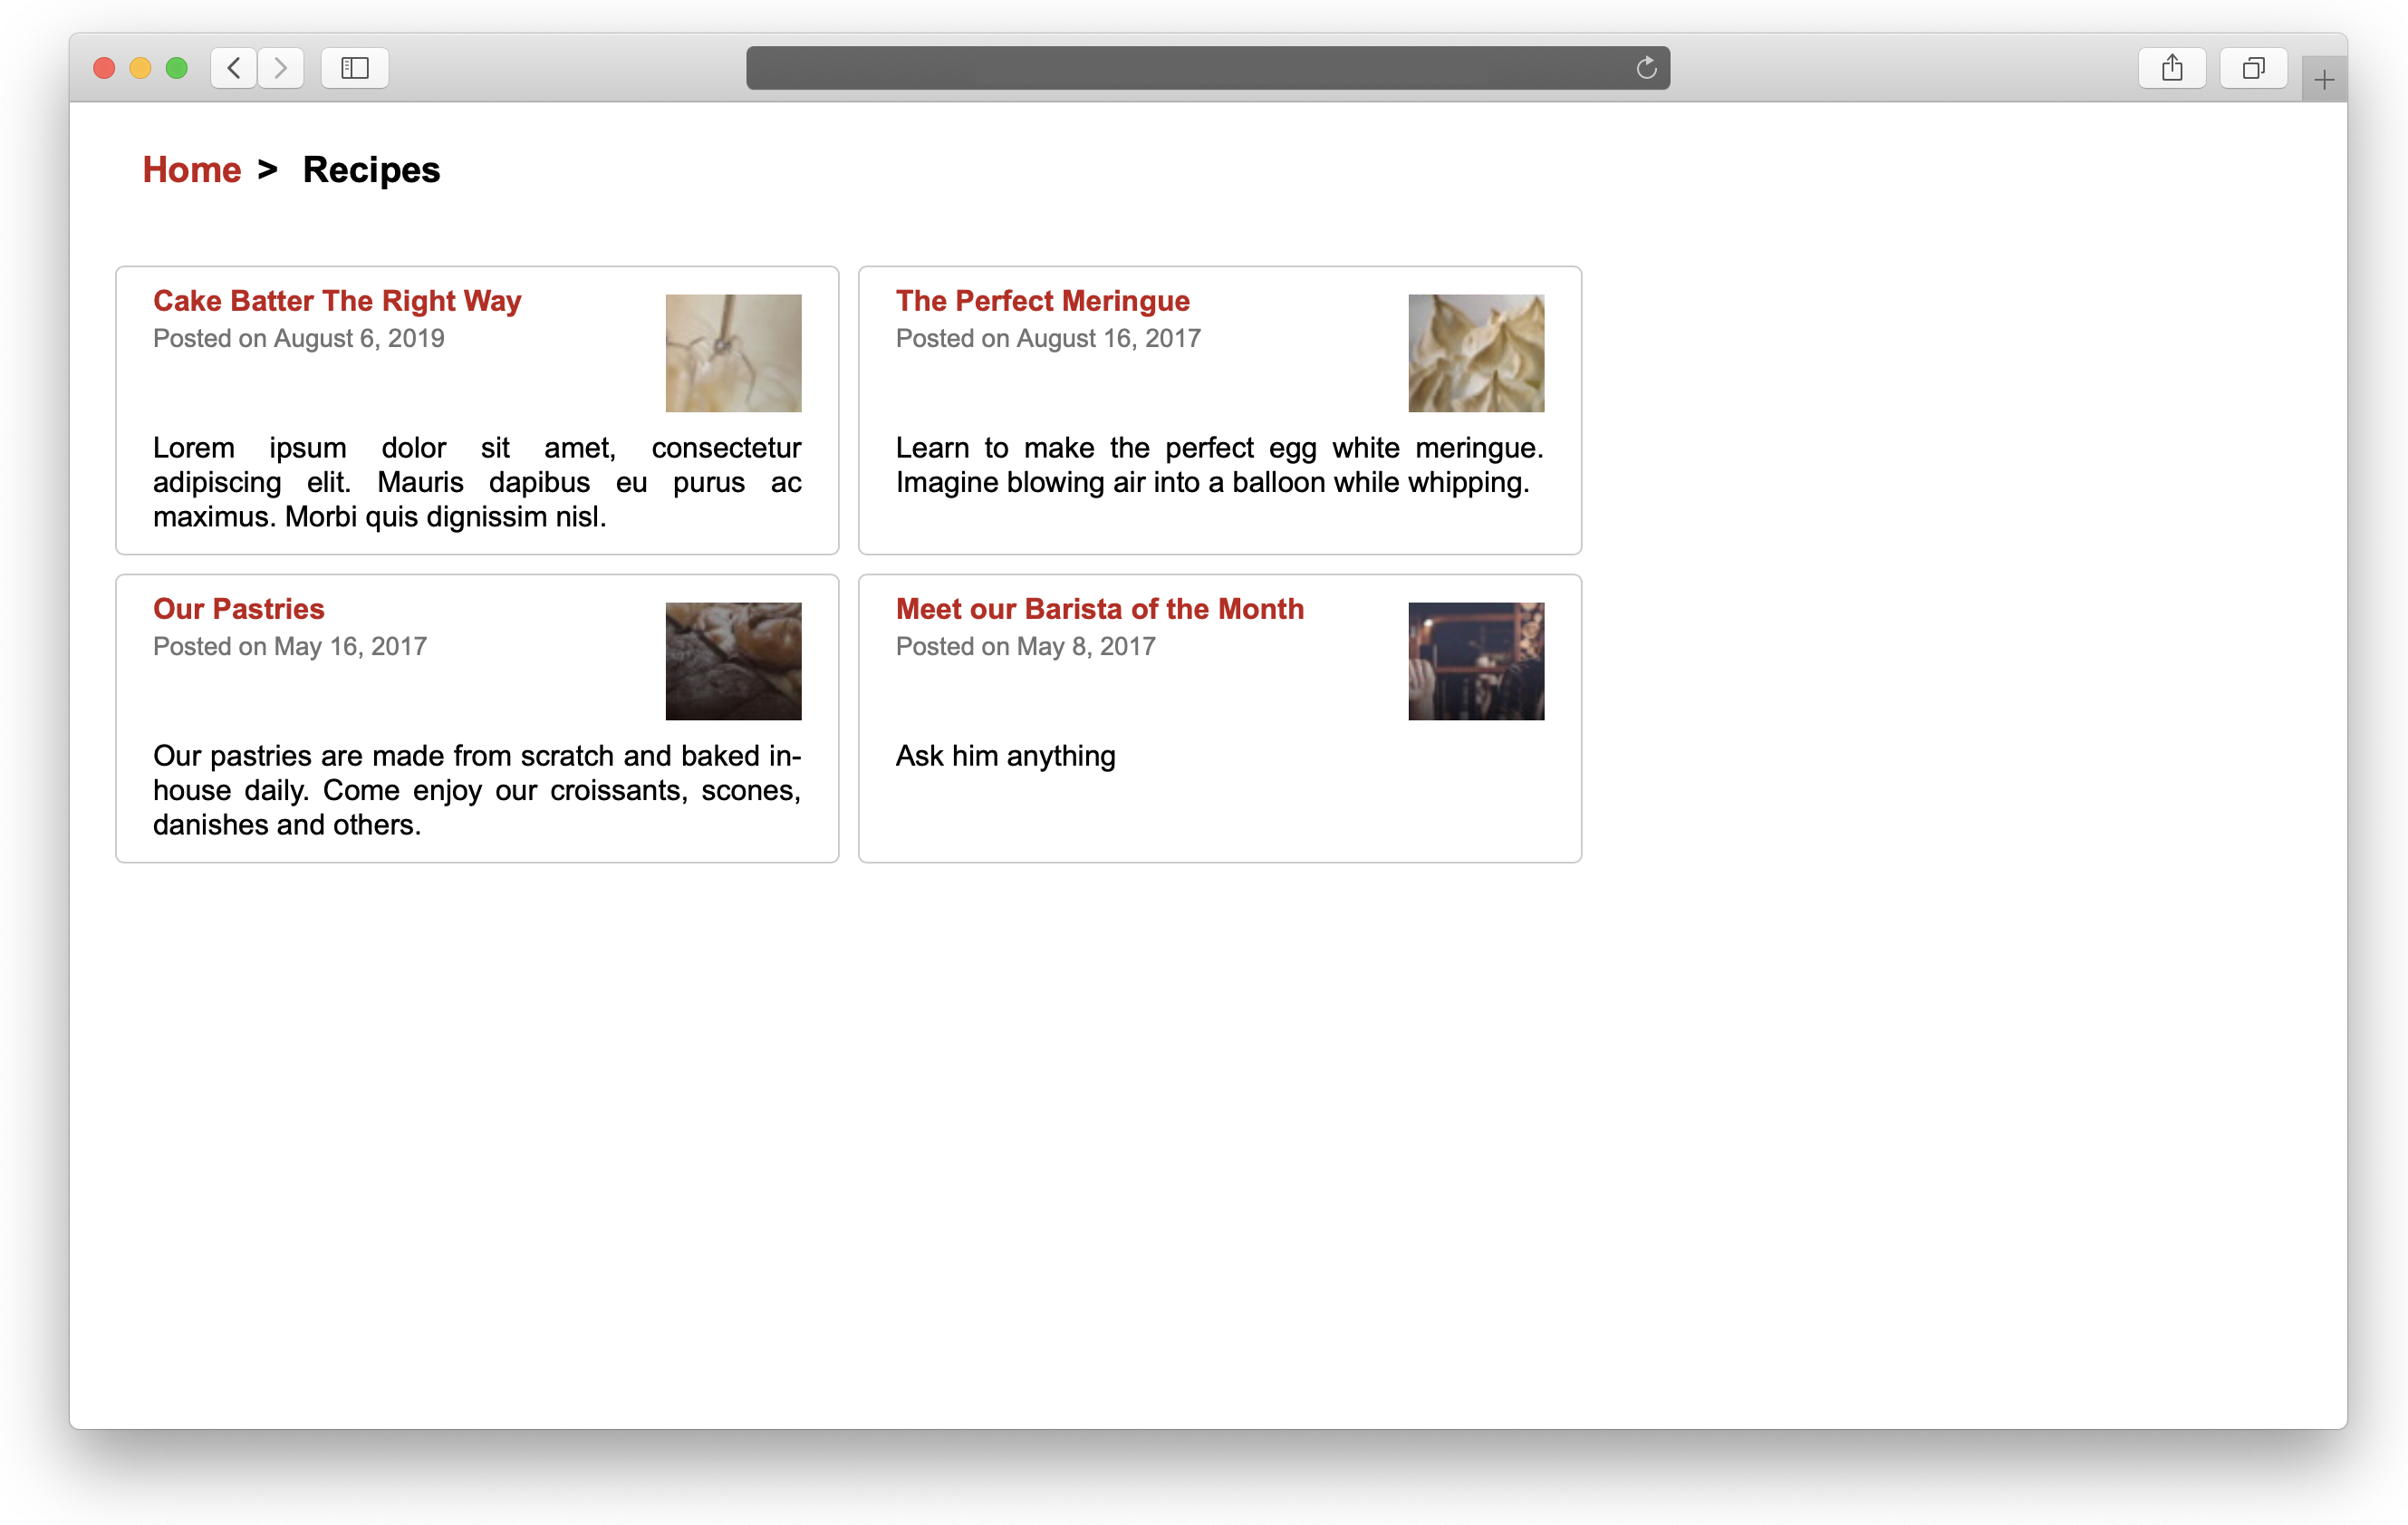
最後,文章頁面會轉譯最終的部落格文章,包括部落格作者的相關資訊。個別文章頁面的外觀如下:
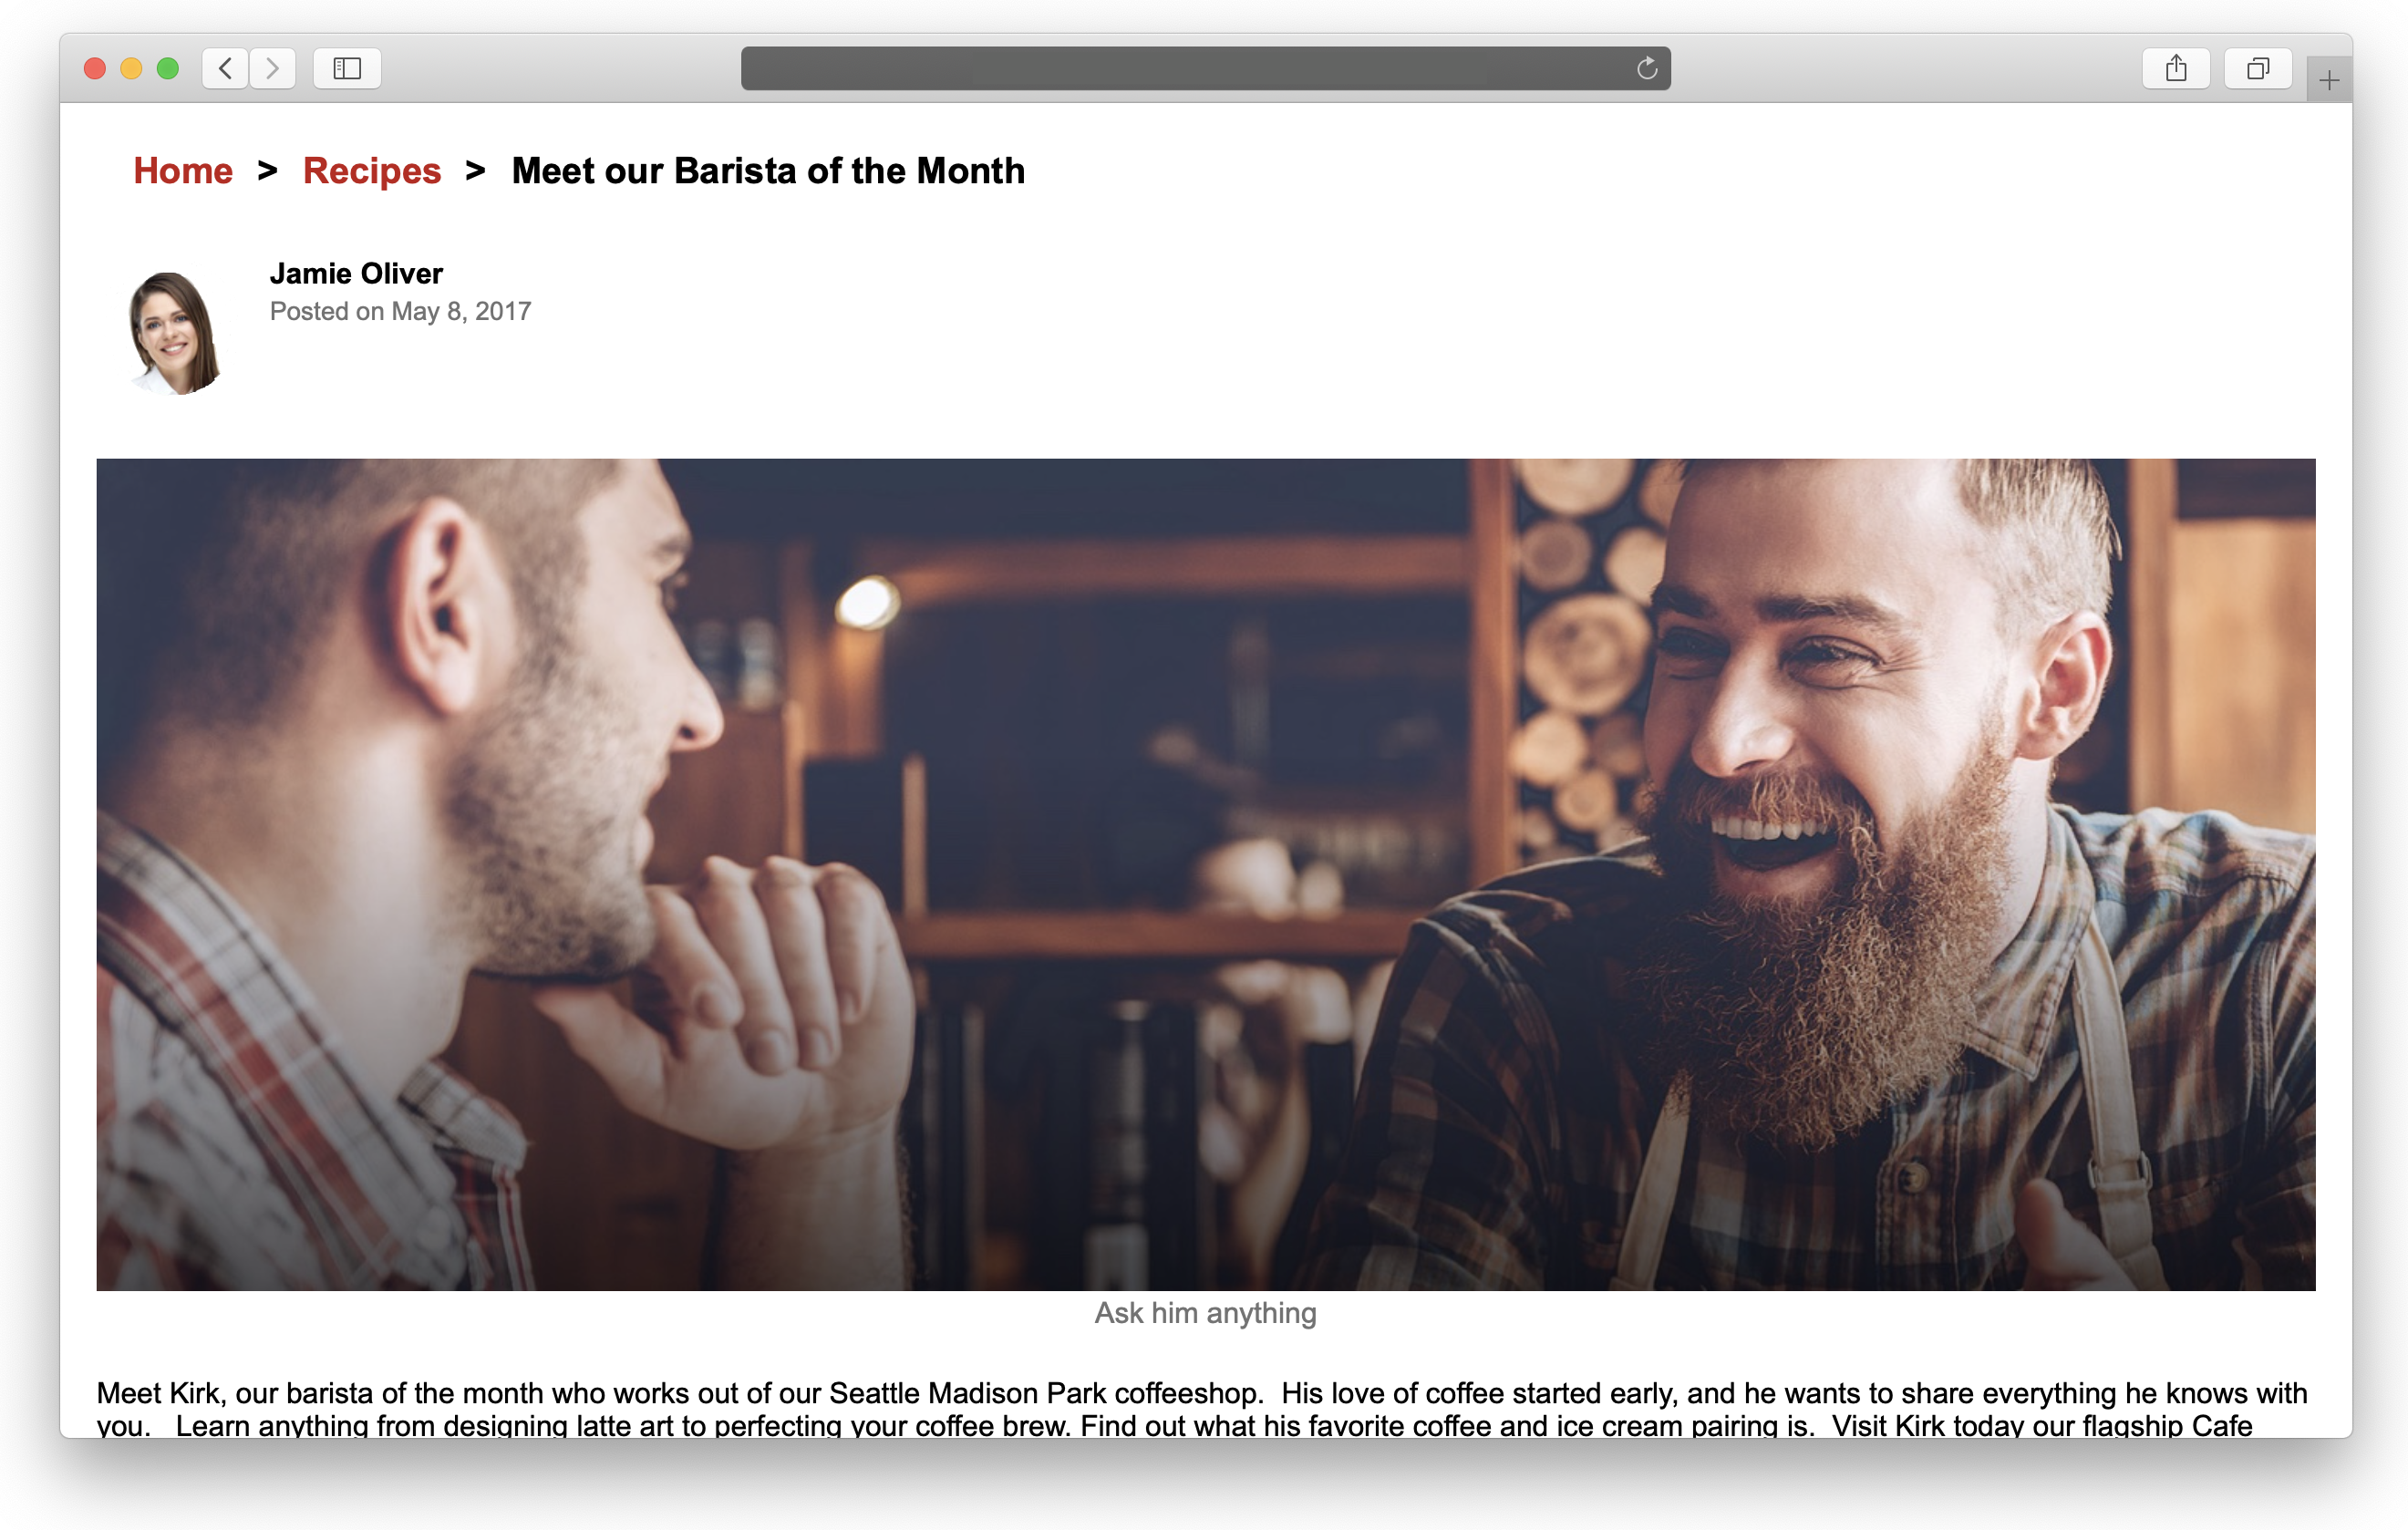
若要繼續,您必須要有 Oracle Content Management 的作用中訂閱,並且必須以「內容管理員」角色登入。
工作 1:準備 Oracle Content Management
如果您還沒有 Oracle Content Management 例項,請參閱快速入門以瞭解如何註冊 Oracle Cloud、佈建 Oracle Content Management 例項,以及將 Oracle Content Management 設定為無頭 (headless) CMS。
在此教學課程中,您需要以下列兩種方式之一來建立內容模型。有一個可下載的資產套件可將內容類型和關聯的內容填入您的空白儲存區域,或者您也可以建立自己的內容模型和內容。
若要準備 Oracle Content Management:
- 建立通道和資產儲存區域。
- 使用下列兩種方法之一來建立內容模型:
- 方法 1:匯入 Oracle Content Management 範例資產套件
- 方法 2:建立您自己的內容模型
建立通道和資產儲存區域
您必須先在 Oracle Content Management 中建立通道和資產儲存區域,才能夠發布內容。
在 Oracle Content Management 中建立通道和資產儲存區域:
以管理員身分登入 Oracle Content Management Web 介面。
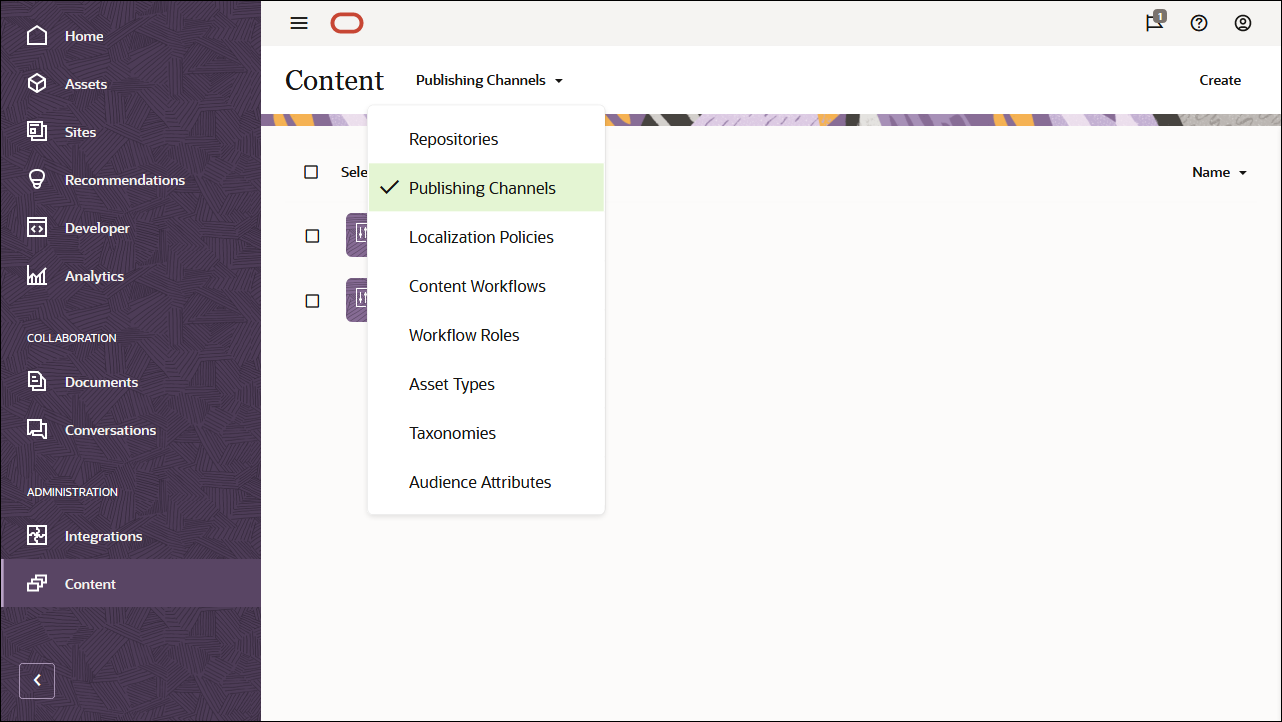
從左邊導覽功能表中選擇內容,然後從頁面標頭的選取清單中選擇發布通道。
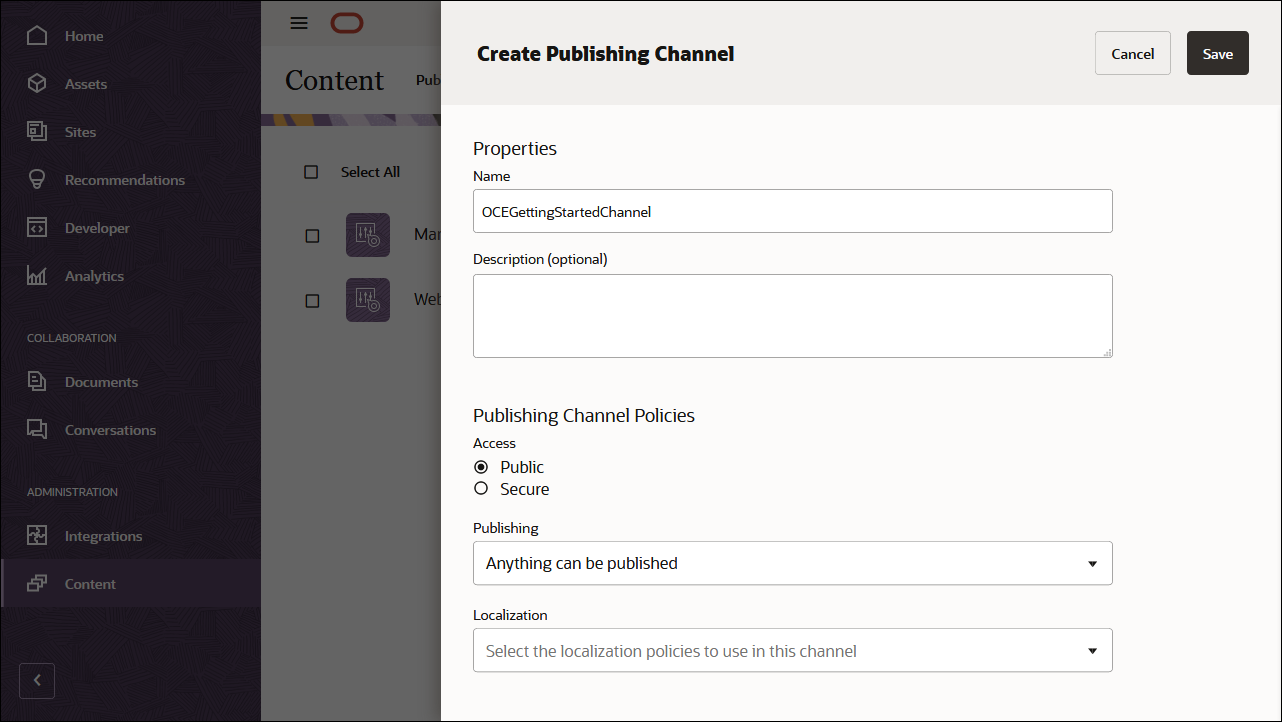
在右上角,按一下建立以建立新的通道。為此教學課程目的命名通道’OCEGettingStartedChannel’,並將存取權保持公開。按一下儲存以建立管道。
從左邊導覽功能表中選擇內容,然後從頁面標頭的選擇清單中選擇儲存區域。
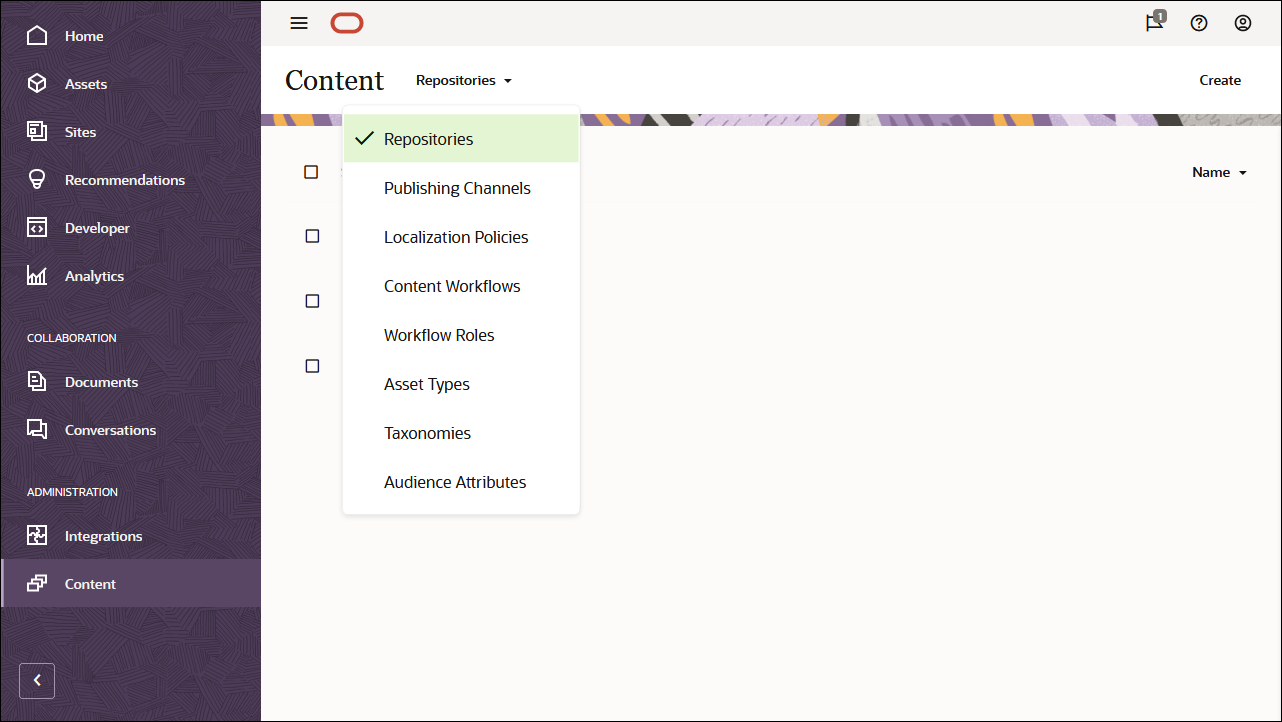
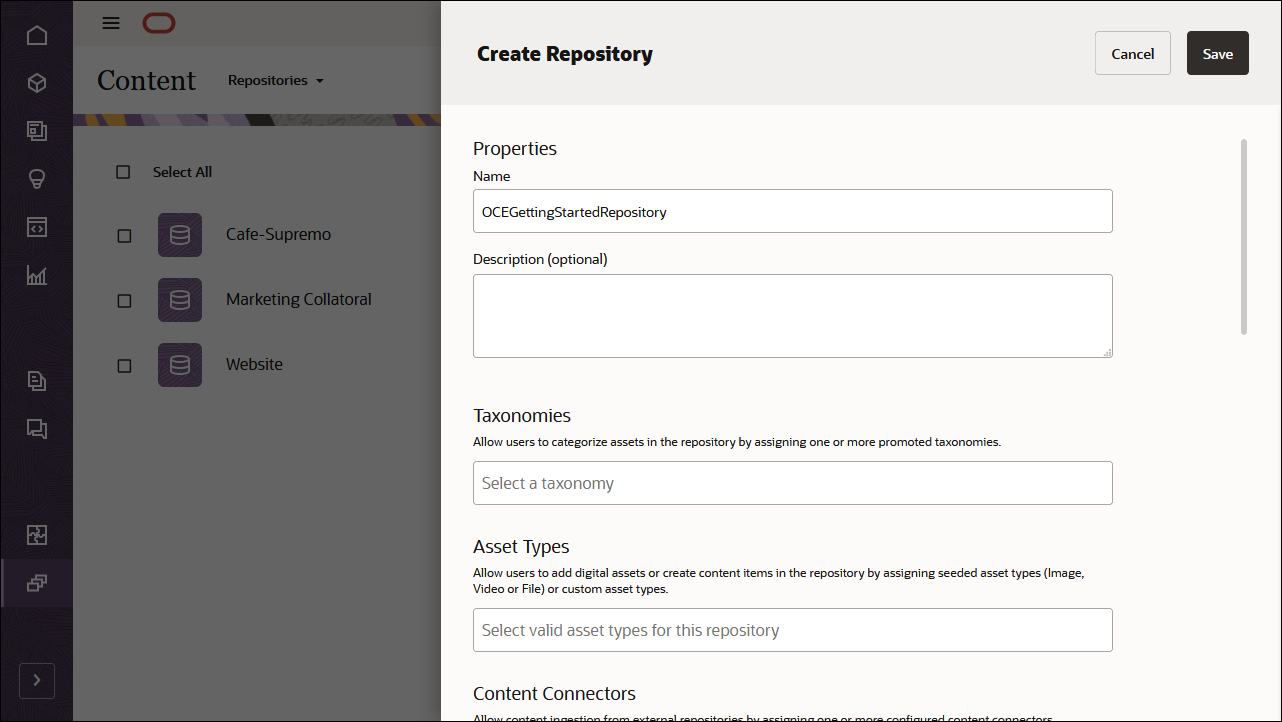
在右上角,按一下建立以建立新的資產儲存區域。為此教學課程目的命名資產儲存區域‘OCEGettingStartedRepository’。
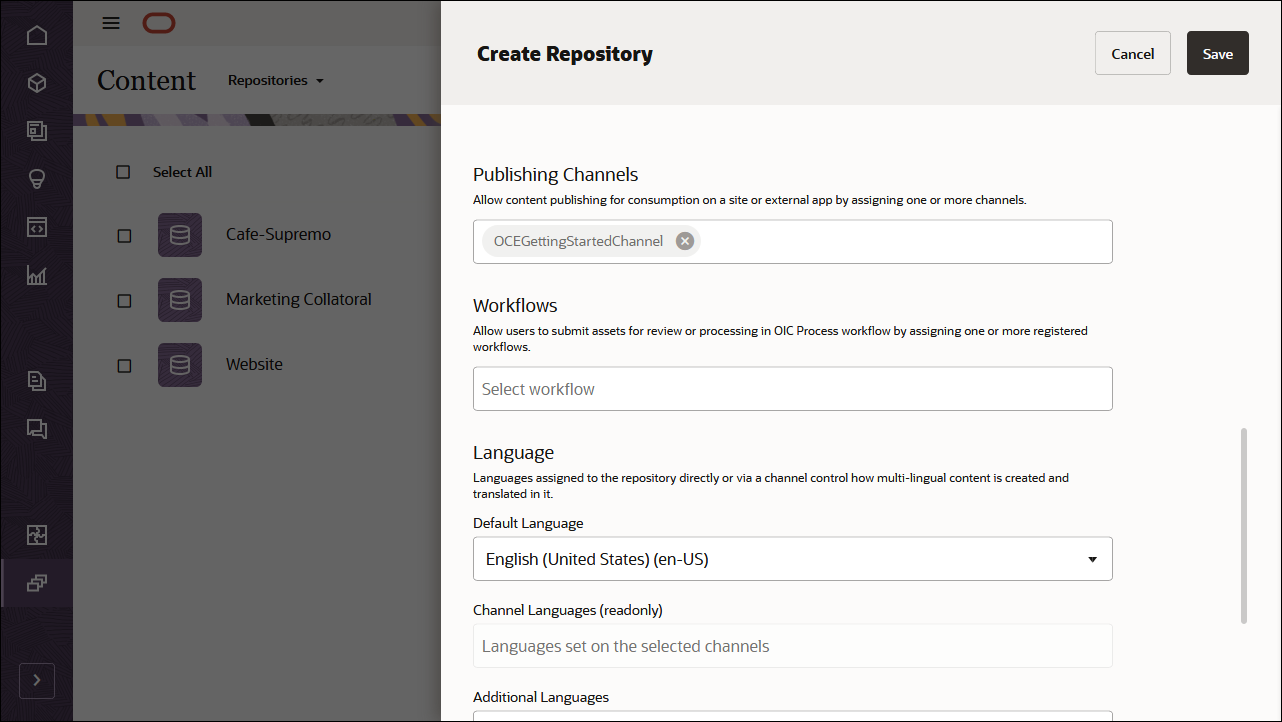
在發布通道欄位中,選取 OCEGettingStartedChannel 通道以指示 Oracle Content Management 能夠將 OCEGettingStartedRepository 儲存區域中的內容發布至 OCEGettingStartedChannel 通道。完成時,按一下儲存。
建立內容模型
下一個工作是建立內容模型。您可以使用兩個方法中的任一個:
- 方法 1:匯入 Oracle Content Management 範例資產套件
- 方法 2:建立您自己的內容模型
匯入 Oracle Content Management 範例資產套件
您可以下載預先設定的 Oracle Content Management 範例資產套件,其中包含此教學課程的所有必要內容類型和資產。如果您願意,您也可以建立自己的內容模型,而不是下載範例資產套件。
您可以從 Oracle Content Management Sample Asset Pack 上傳我們在此教學課程中使用的內容複本。這可讓您實驗內容類型並修改內容。若要匯入 Oracle Content Management Sample Asset Pack,您可以下載 OCESamplesAssetPack.zip 資產套件存檔,然後將它解壓縮至您選擇的目錄:
從 Oracle Content Management 下載頁面下載 Oracle Content Management 範例資產套件 (OCESamplesAssetPack.zip)。將下載的壓縮檔解壓縮至您電腦上的位置。解壓縮之後,此位置會包含一個名為 OCEGettingStarted_data.zip 的檔案。
以管理員身分登入 Oracle Content Management Web 介面。
從左邊導覽功能表中選擇內容,然後從頁面標頭的選擇清單中選擇儲存區域。現在選取 OCEGettingStartedRepository,然後按一下頂端動作列中的匯入內容按鈕。
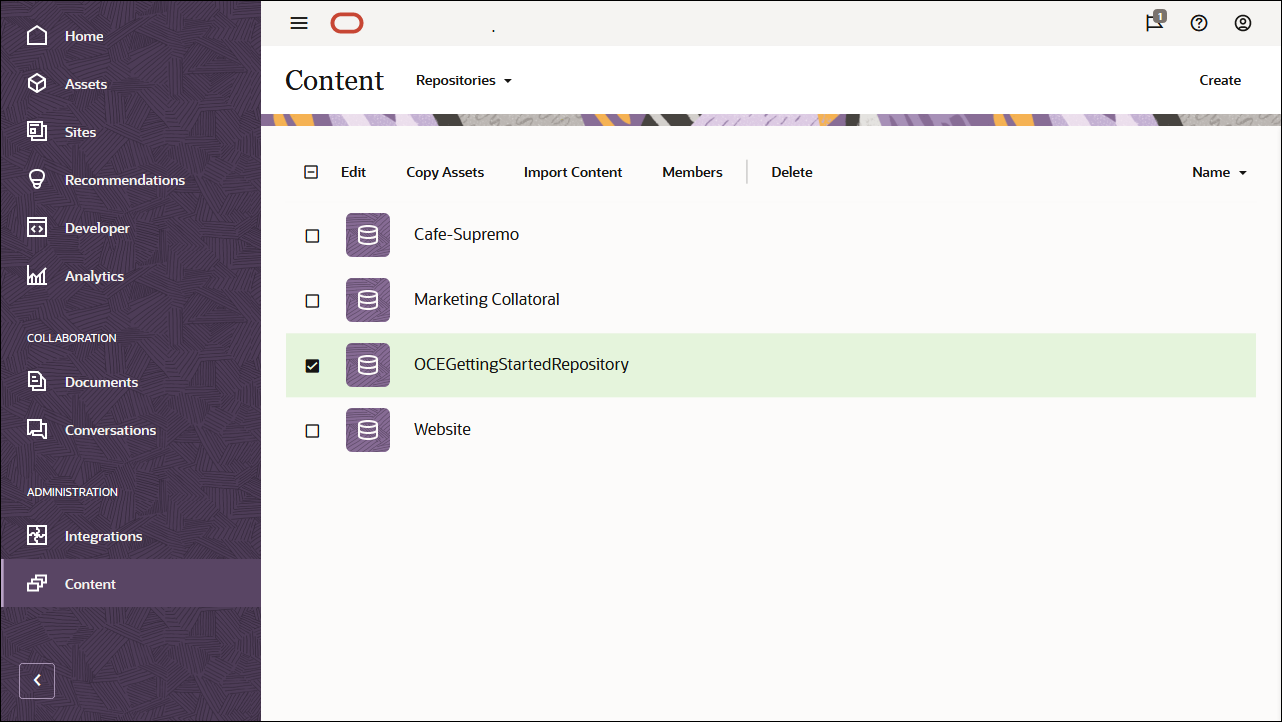
將 OCEGettingStarted_data.zip 從本機電腦上傳至 Documents 資料夾。
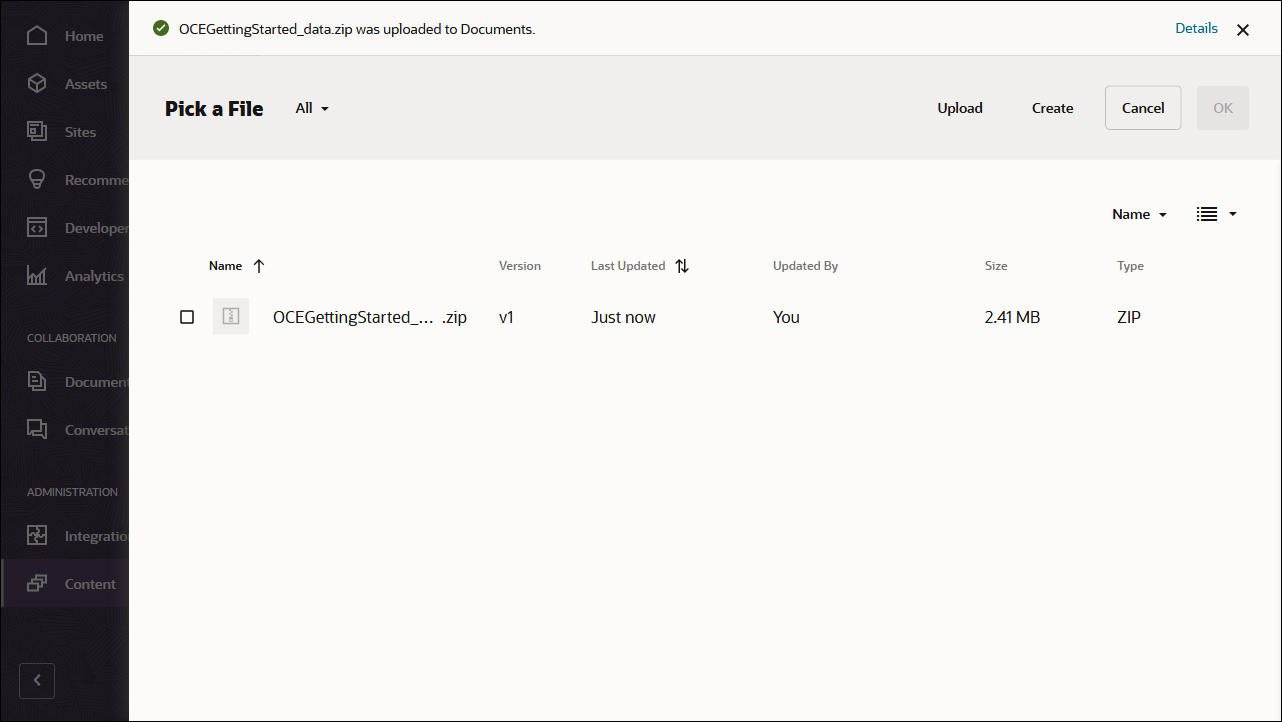
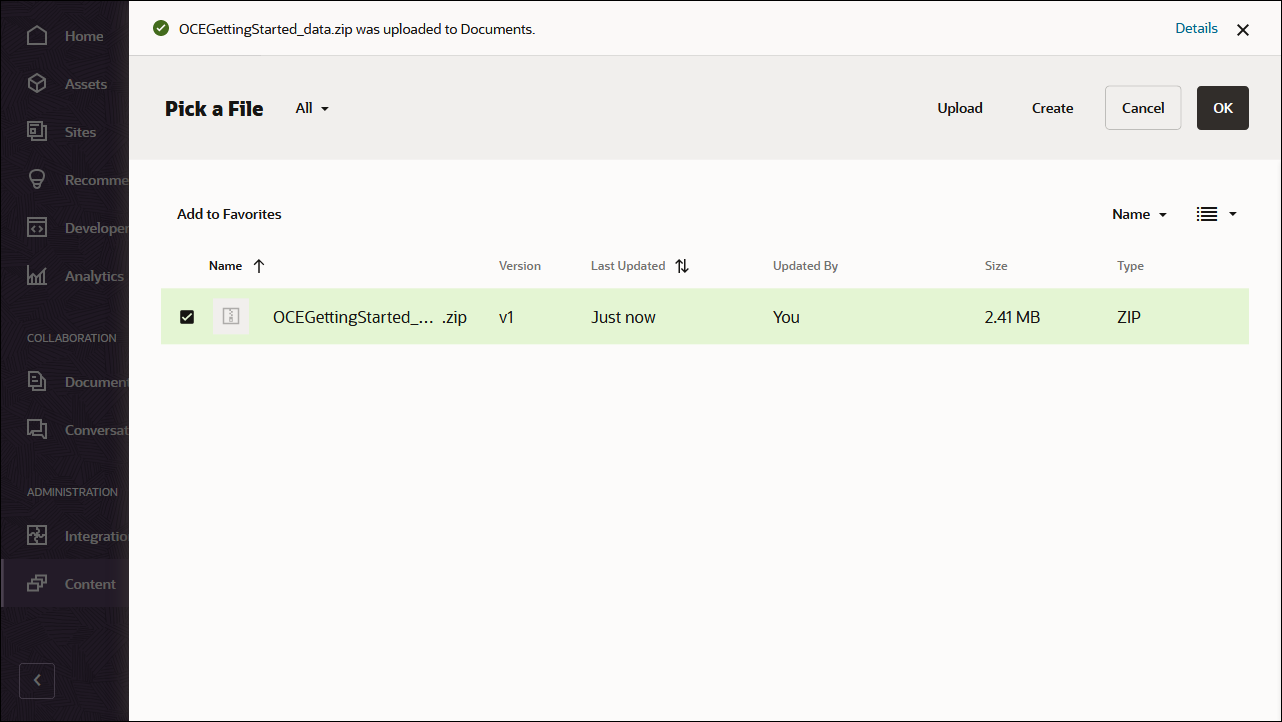
上傳內容之後,請選取 OCEGettingStarted_data.zip,然後按一下確定,將內容匯入您的資產儲存區域中。
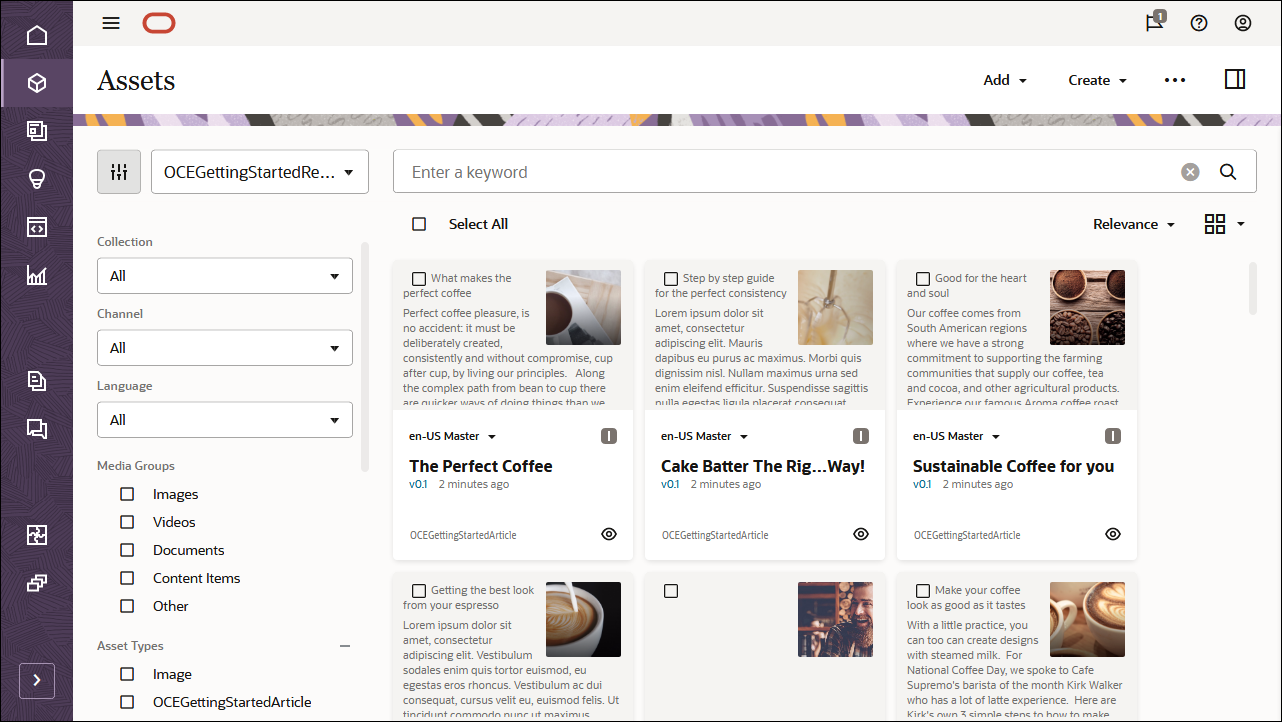
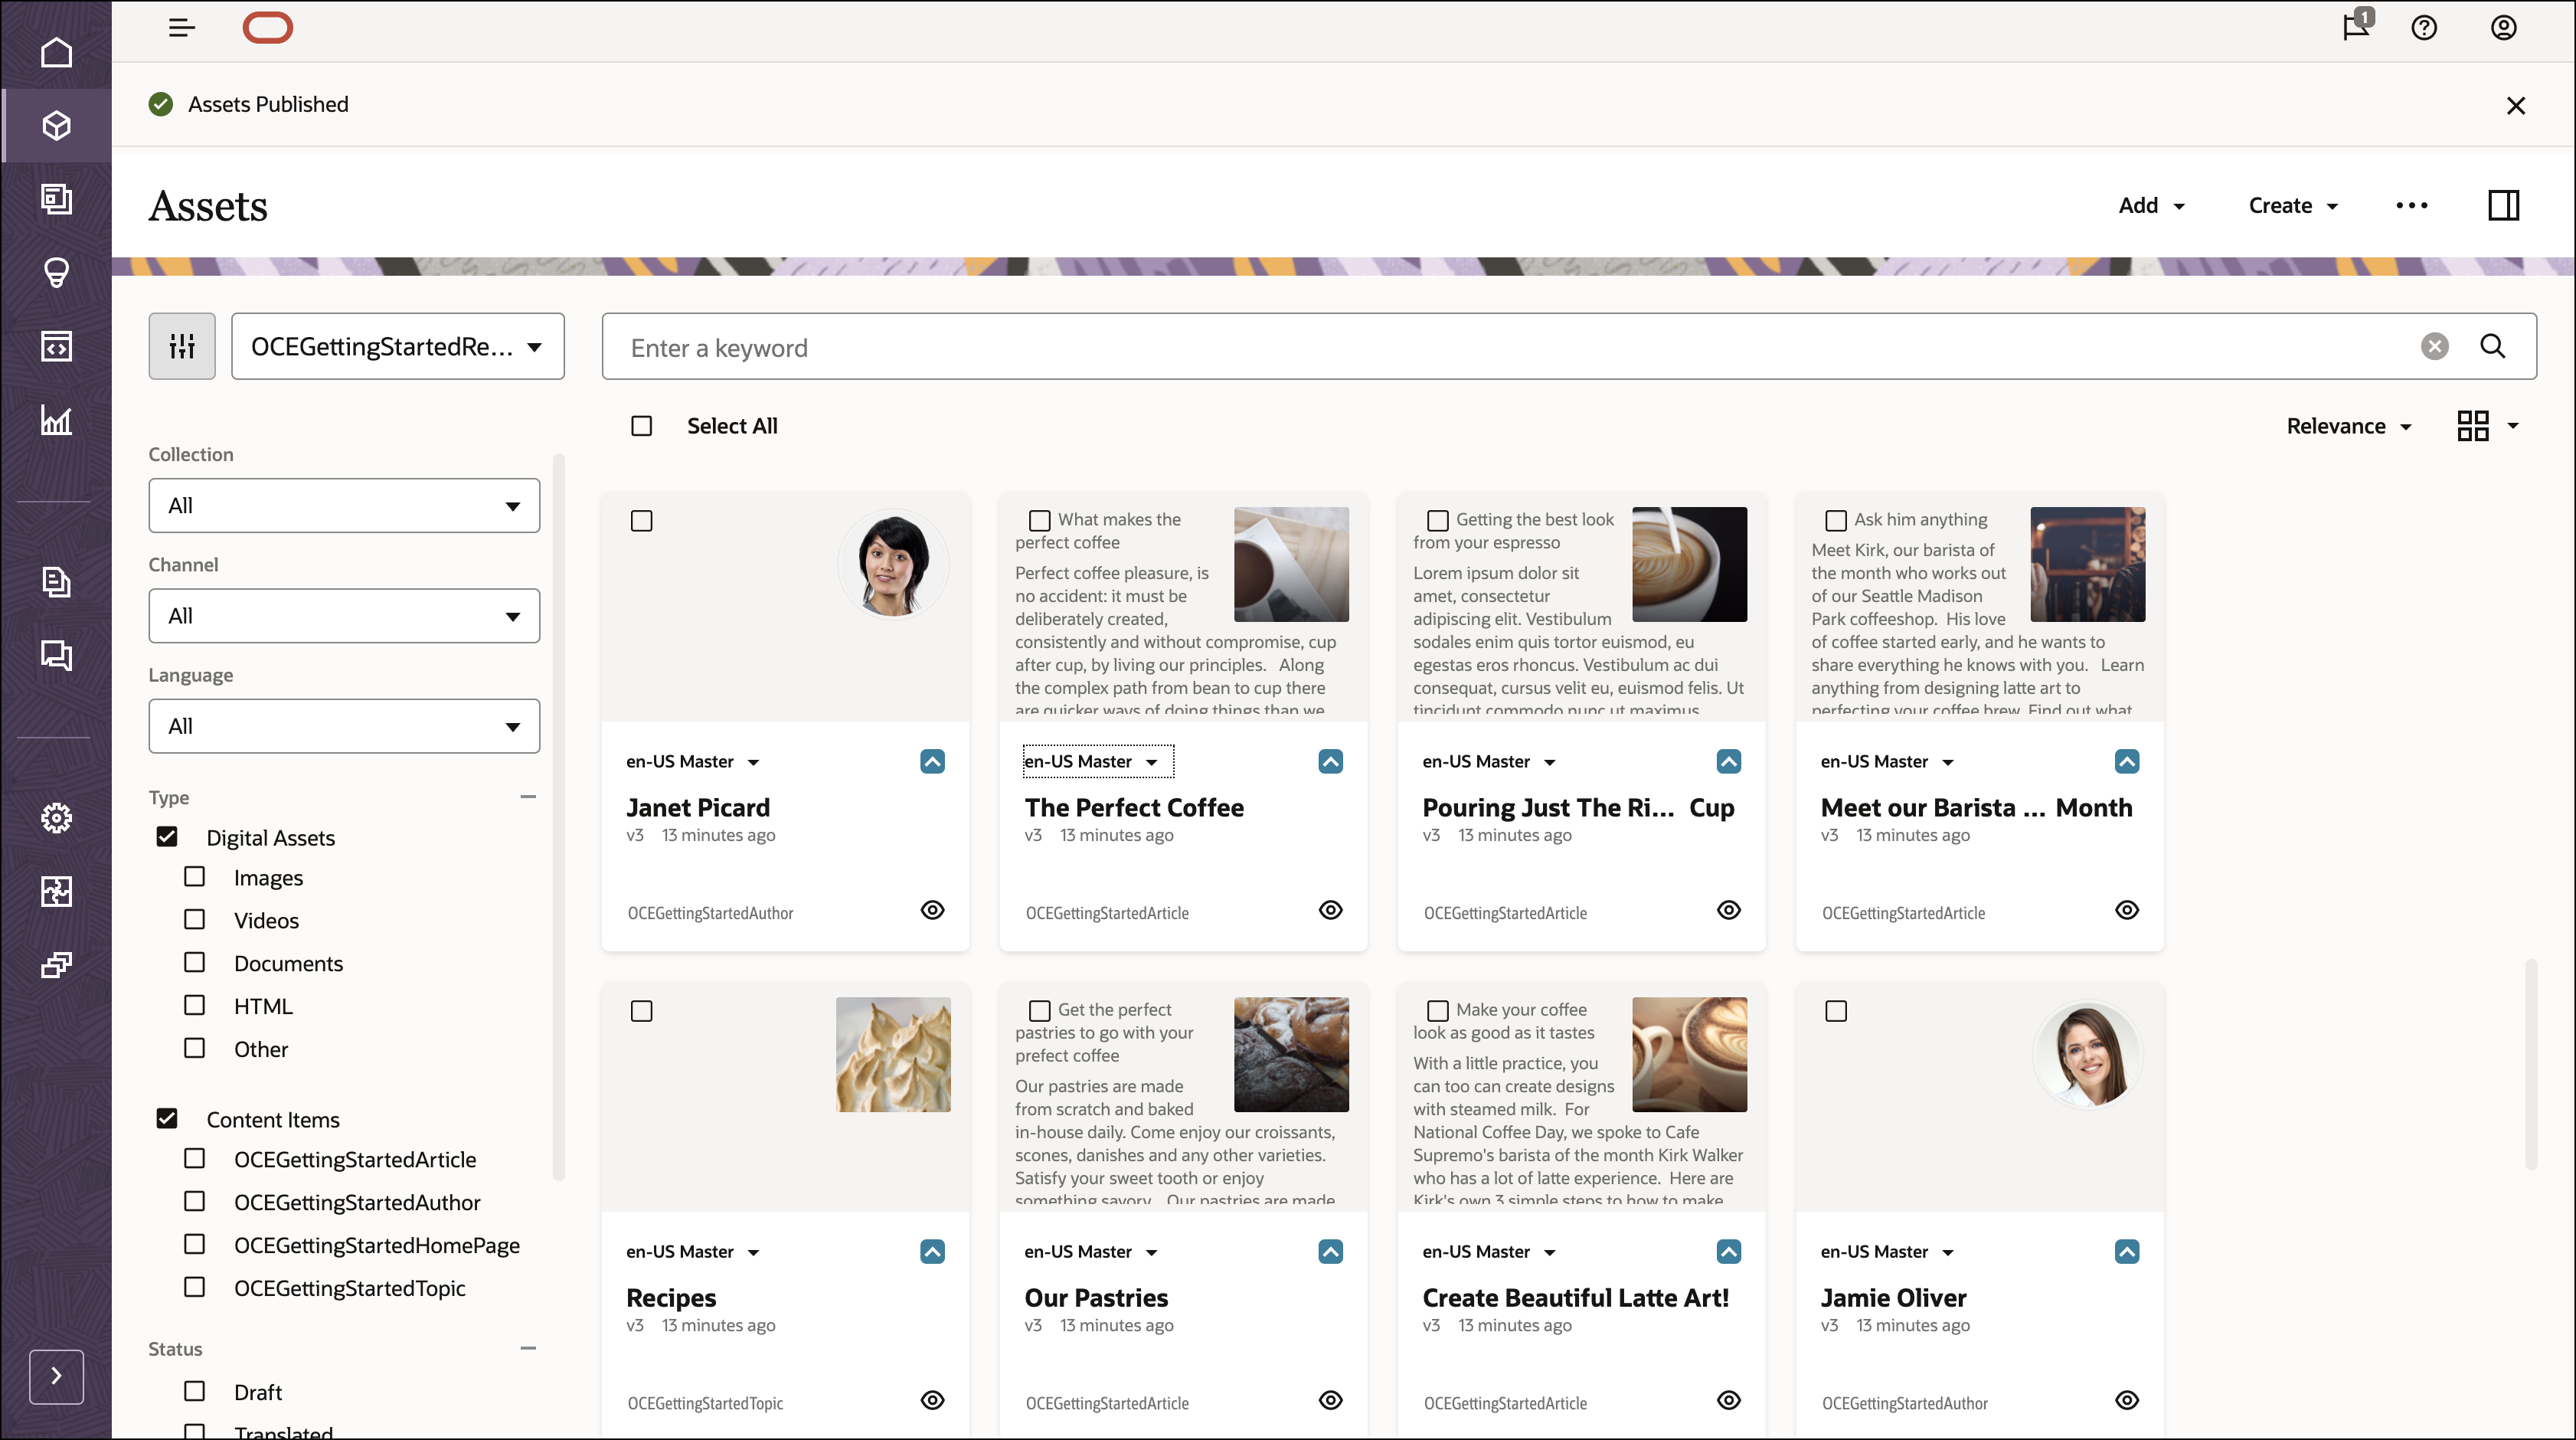
順利匯入內容之後,請瀏覽至資產頁面並開啟 OCEGettingStartedRepository 儲存區域。您將會見到所有相關影像和內容項目現在都已新增至物件儲存區域。
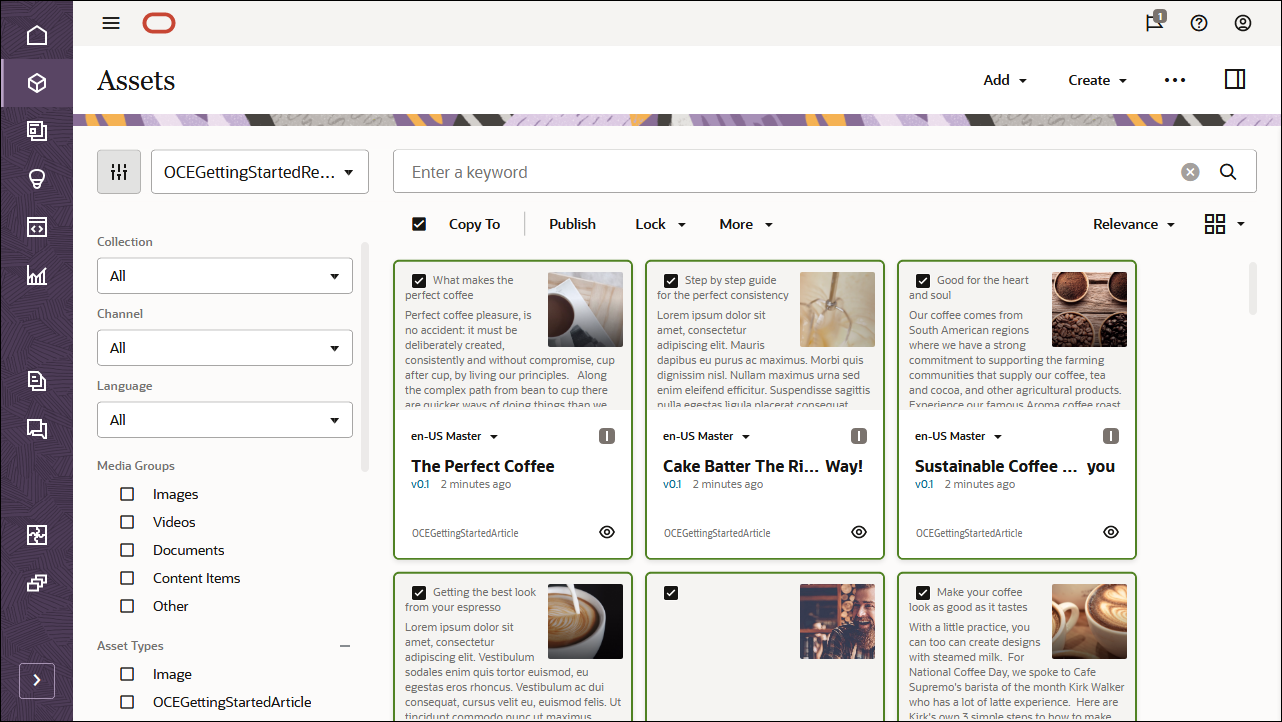
按一下左上方的全選,然後按一下發布,將所有匯入的資產新增至您先前建立的發布通道 OCEGettingStartedChannel。
發布之前,您必須先驗證所有資產。請先將 OCEGettingStartedChannel 新增為選取的管道,然後按一下驗證按鈕。
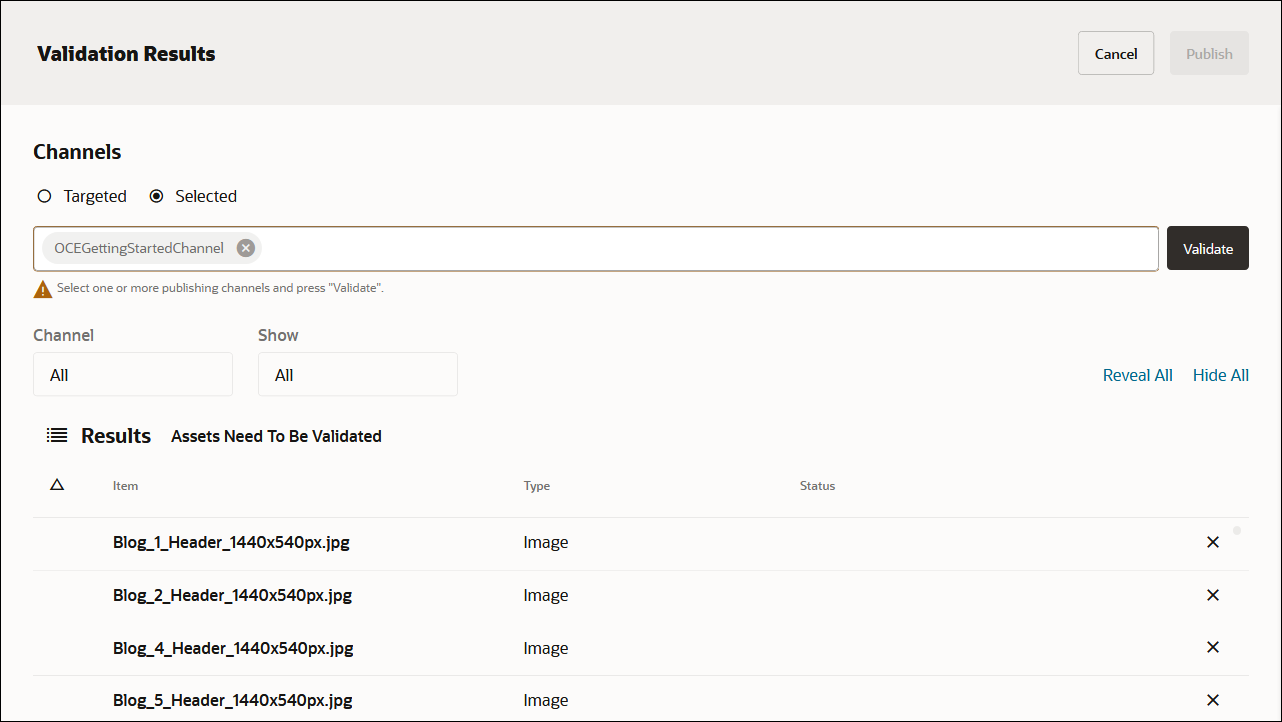
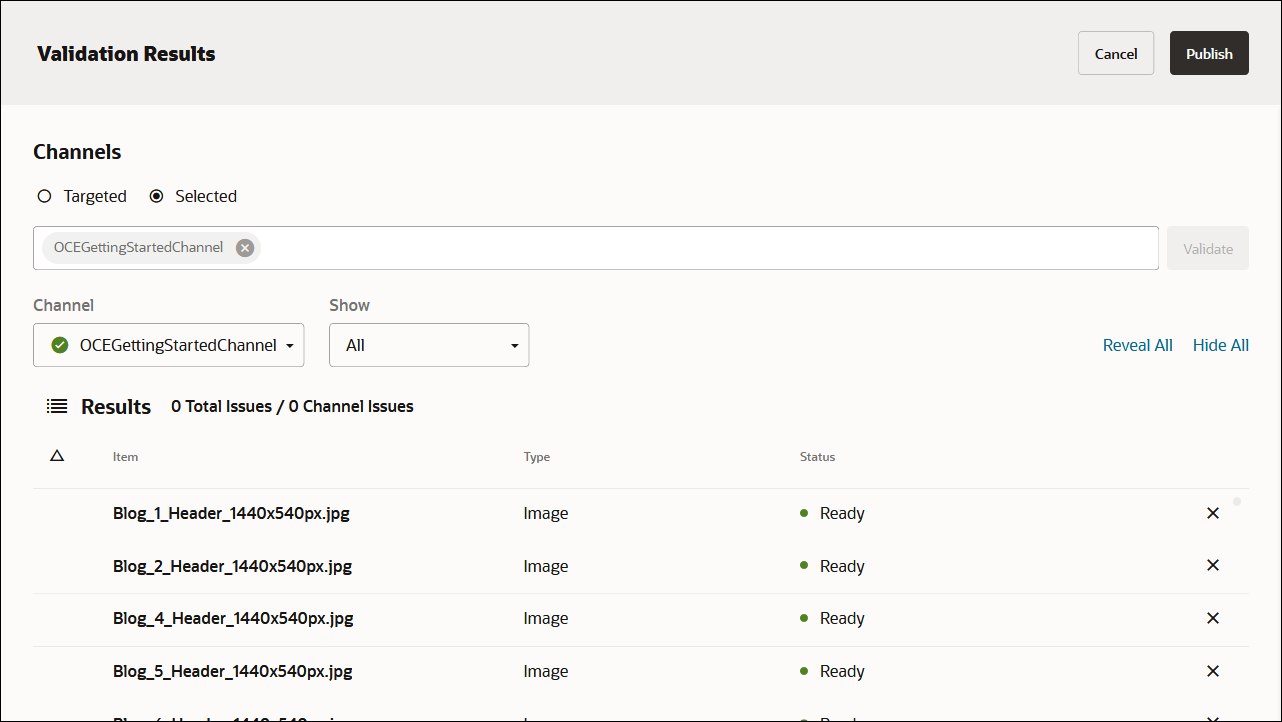
驗證資產之後,您可以按一下右上角的發布按鈕,將所有資產發布至選取的通道。
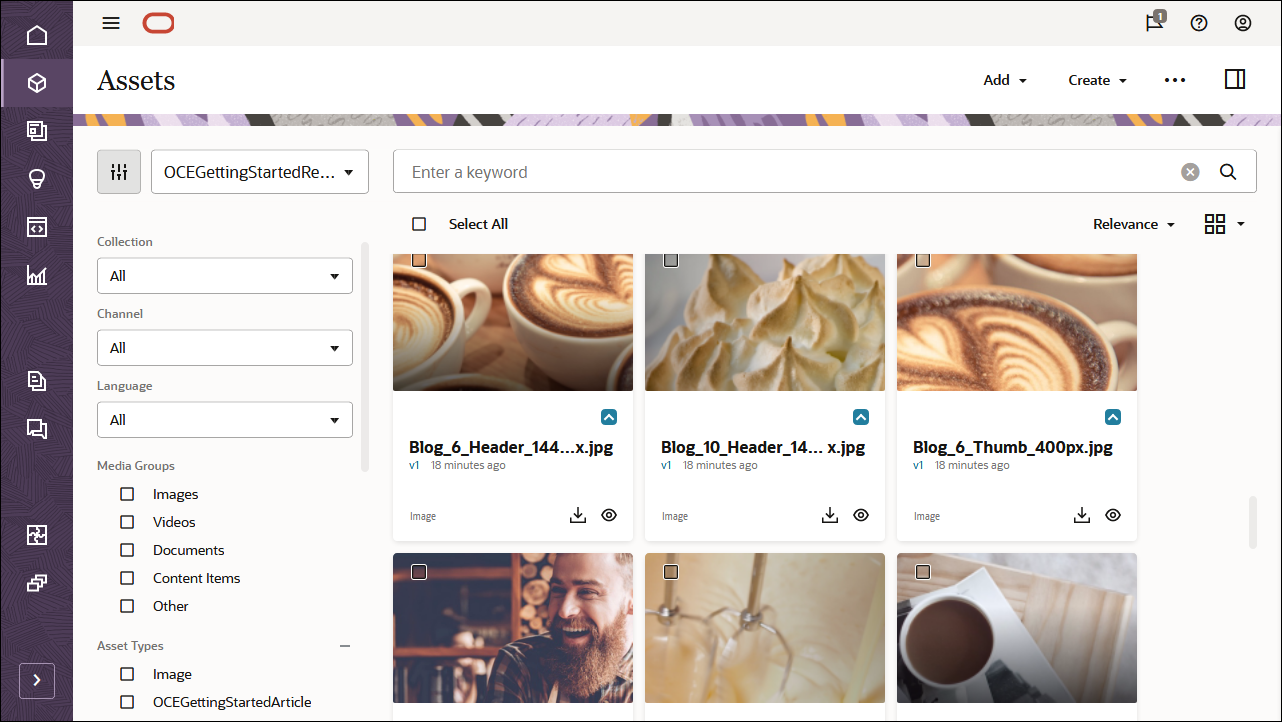
完成之後,您就會在已發布所有資產的資產頁面中見到該頁面。(您可以透過資產名稱上方的圖示來辨識。)
匯入 Oracle Content Management 範例資產套件後,您可以開始在 Next.js 建置部落格。
建立您自己的內容模型
您也可以建立自己的內容模型,而不是匯入 Oracle Content Management Sample Asset Pack。
在此教學課程中,我們使用名為‘OCEGettingStartedHomePage’的內容類型來建立我們部落格的首頁。此首頁包含商標 (公司名稱和標誌)、某些連結 URL,以及應包含在此頁面上的部落格主題清單。

建立內容模型的內容類型:
- 以管理員身分登入 Oracle Content Management Web 介面。
- 從左邊導覽功能表中選擇內容,然後從頁面標頭的選取清單中選擇資產類型。
- 按一下右上角的建立。
- 選擇此選項可建立內容類型 (非數位資產類型)。針對所有必要的內容類型重複此動作。
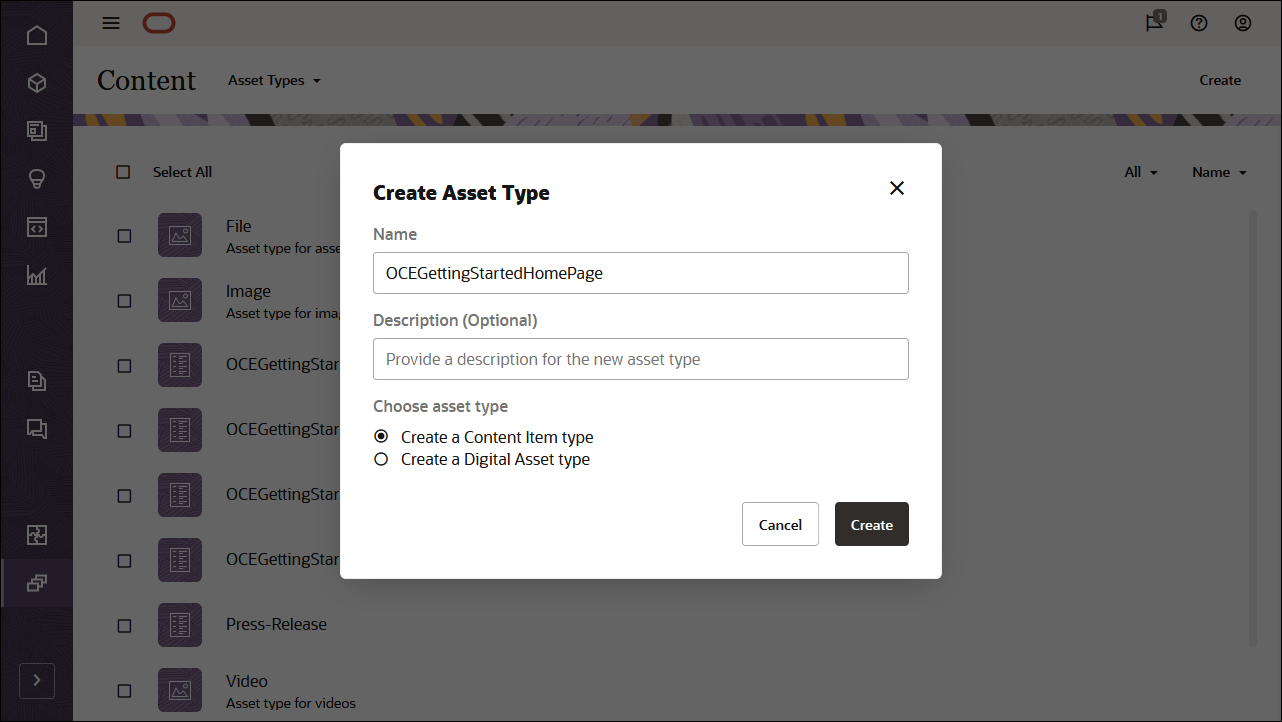
我們將建立四種內容類型,每種內容類型都有自己的欄位集:
- OCEGettingStartedHomePage
- OCEGettingStartedTopic
- OCEGettingStartedAuthor
- OCEGettingStartedArticle
第一個內容類型 (OCEGettingStartedHomePage) 應具有下列欄位:
| 顯示名稱 | 欄位類型 | 必要 | 機器名稱 |
|---|---|---|---|
| 公司名稱 | 單一值文字欄位 | X | company_name |
| 公司標誌 | 單一值文字欄位 | X | company_logo |
| 主題 | 多個值參照欄位 | X | topics - 主題 |
| 連絡 URL | 單一值文字欄位 | X | contact_url |
| 關於 URL | 單一值文字欄位 | X | about_url |
這是您的 OCEGettingStartedHomePage 內容類型定義外觀:
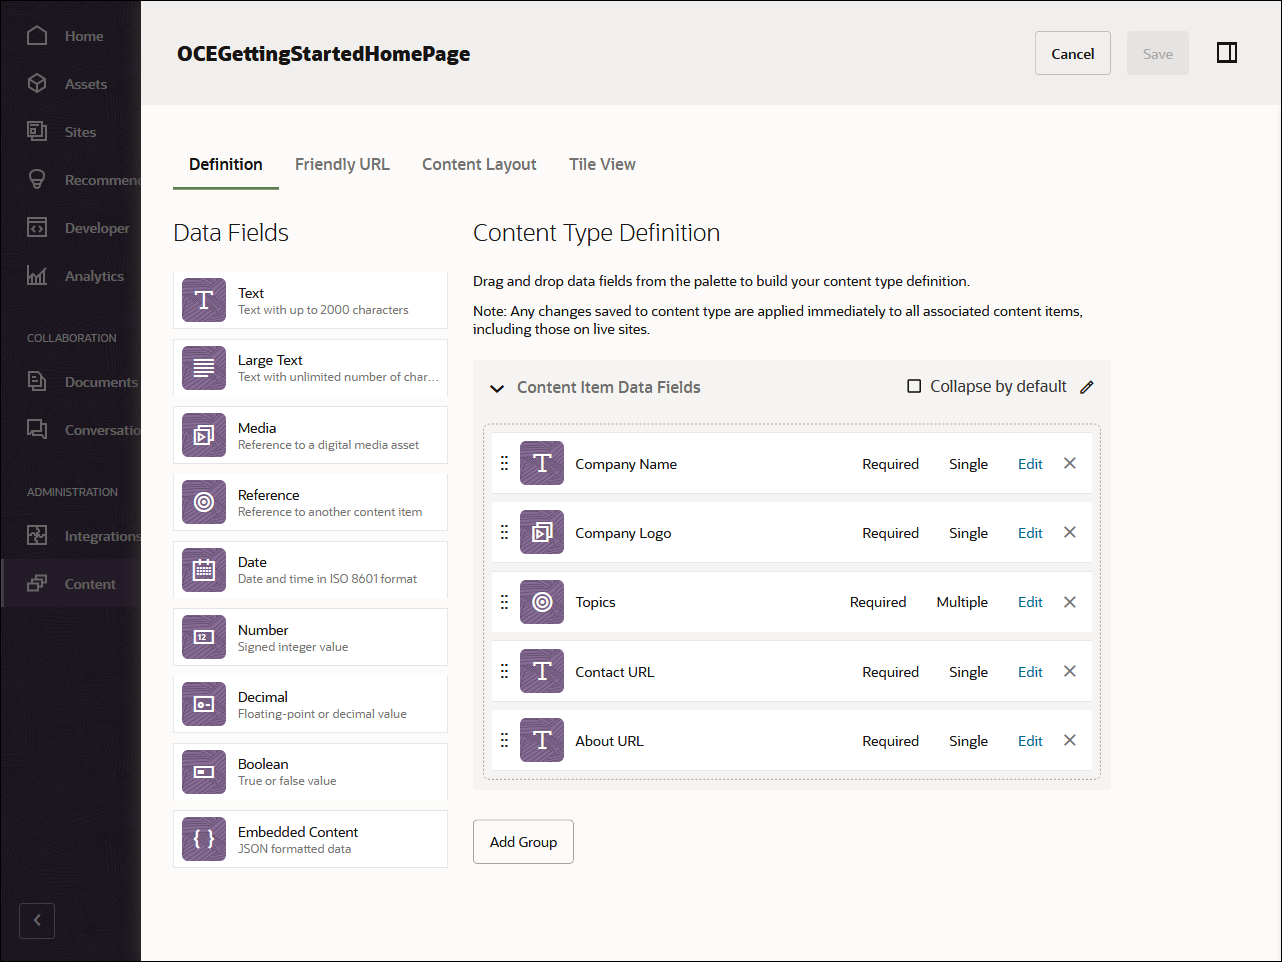
第二個內容類型 OCEGettingStartedTopic 應具有下列欄位:
| 顯示名稱 | 欄位類型 | 必要欄位 | 機器名稱 |
|---|---|---|---|
| 縮圖 | 單一值影像欄位 | X | 縮圖 |
這是您的 OCEGettingStartedTopic 內容類型外觀:
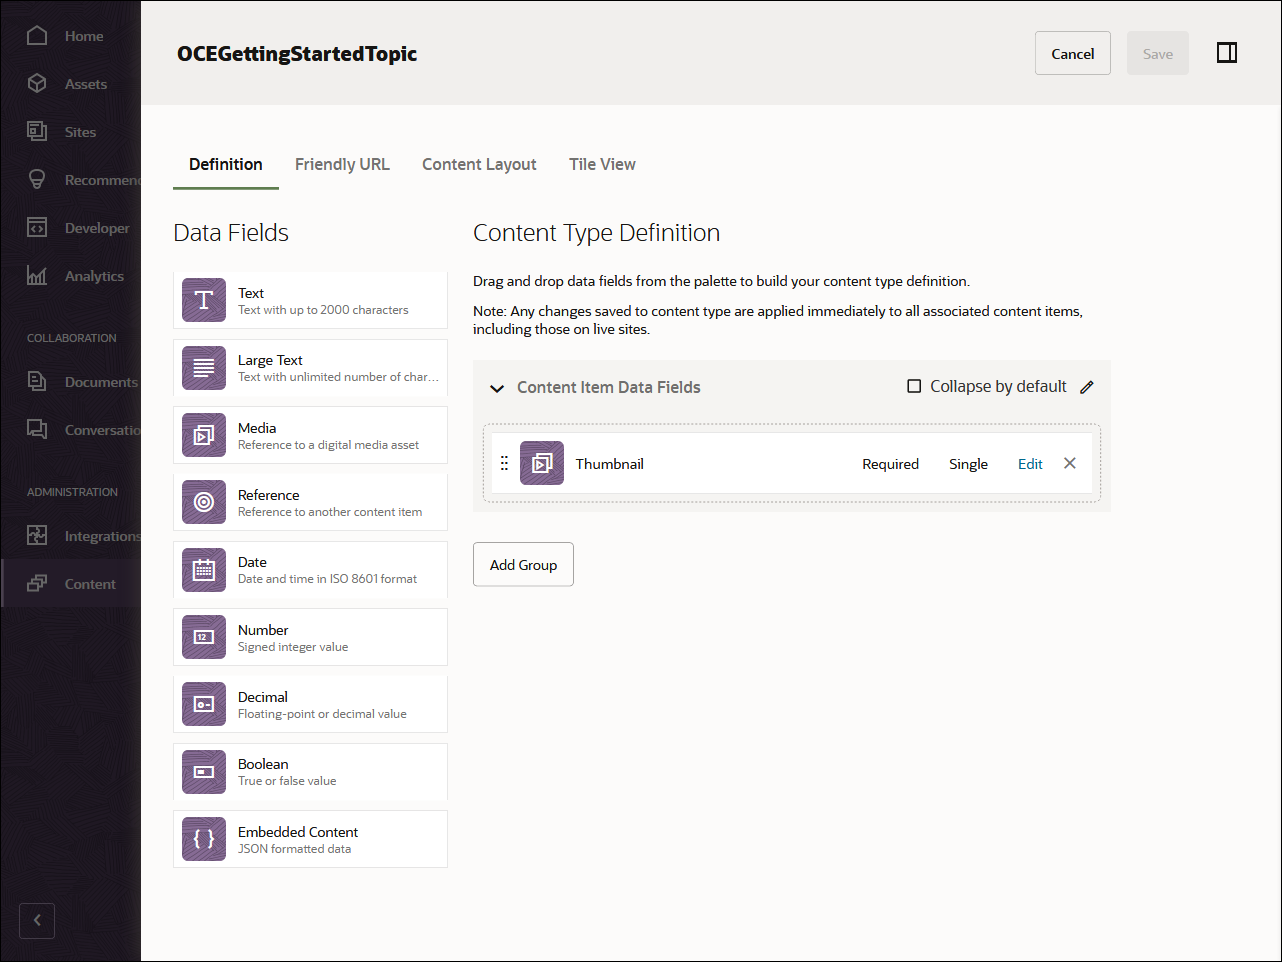
第三種內容類型 OCEGettingStartedAuthor 應具有下列欄位:
| 顯示名稱 | 欄位類型 | 必要 | 機器名稱 |
|---|---|---|---|
| 大頭貼 | 單一值影像欄位 | X | 大頭貼 |
這是您的 OCEGettingStartedAuthor 內容類型外觀:
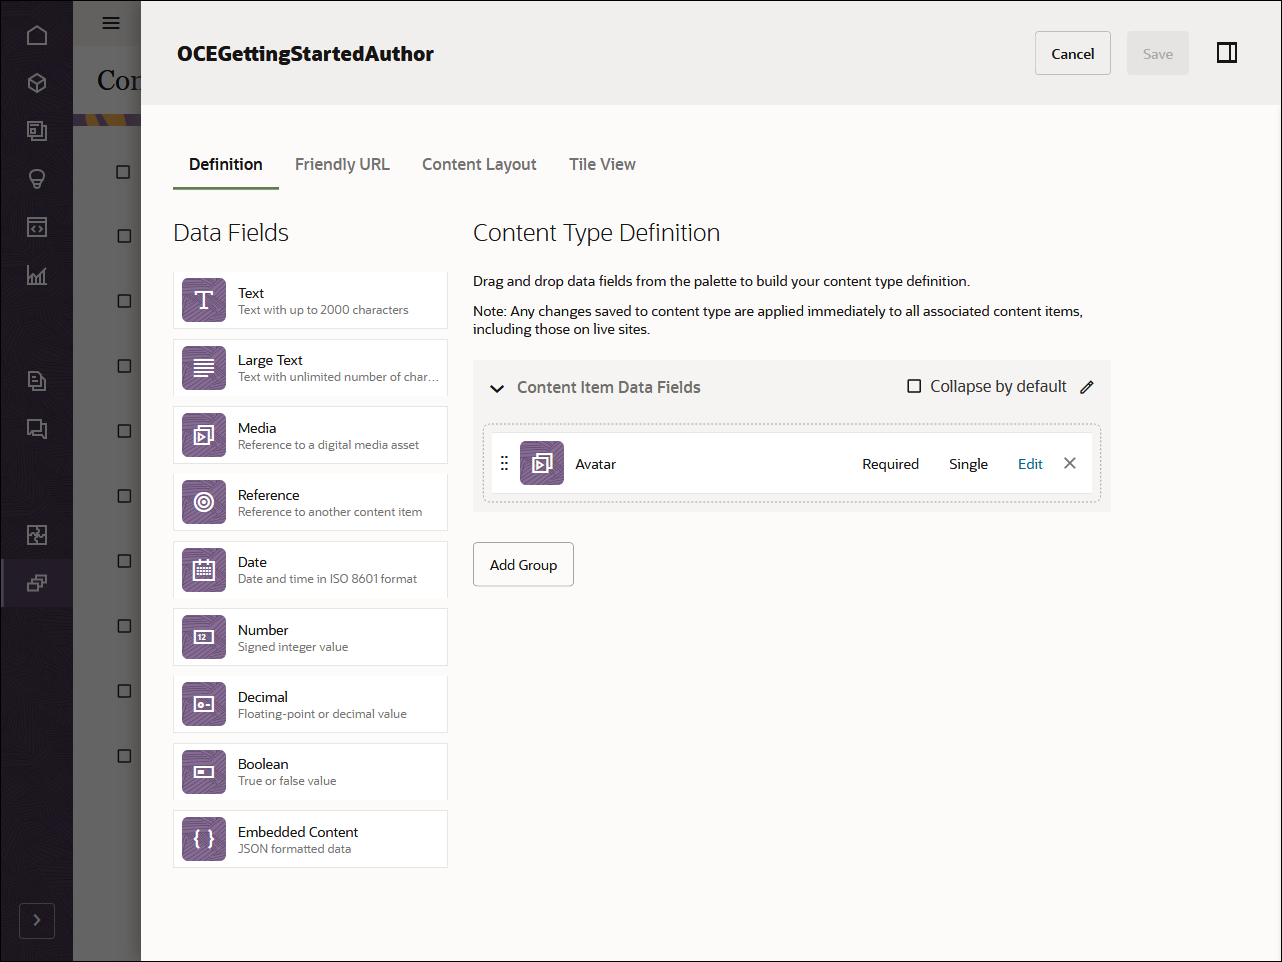
第四和最終內容類型 OCEGettingStartedArticle 應具有下列欄位:
| 顯示名稱 | 欄位類型 | 必要 | 機器名稱 |
|---|---|---|---|
| 公布日期 | 單一值日期欄位 | X | published_name |
| 作者 | 單一值參照欄位 | X | 撰寫 |
| 映像檔 | 單一值影像欄位 | X | 映像檔 |
| 圖像標題 | 單一值文字欄位 | X | image_caption |
| 文章內容 | 單一值大型文字欄位 | X | article_content |
| 主題 | 單一值參照欄位 | X | topic - 主題 |
這是您的 OCEGettingStartedArticle 內容類型外觀:
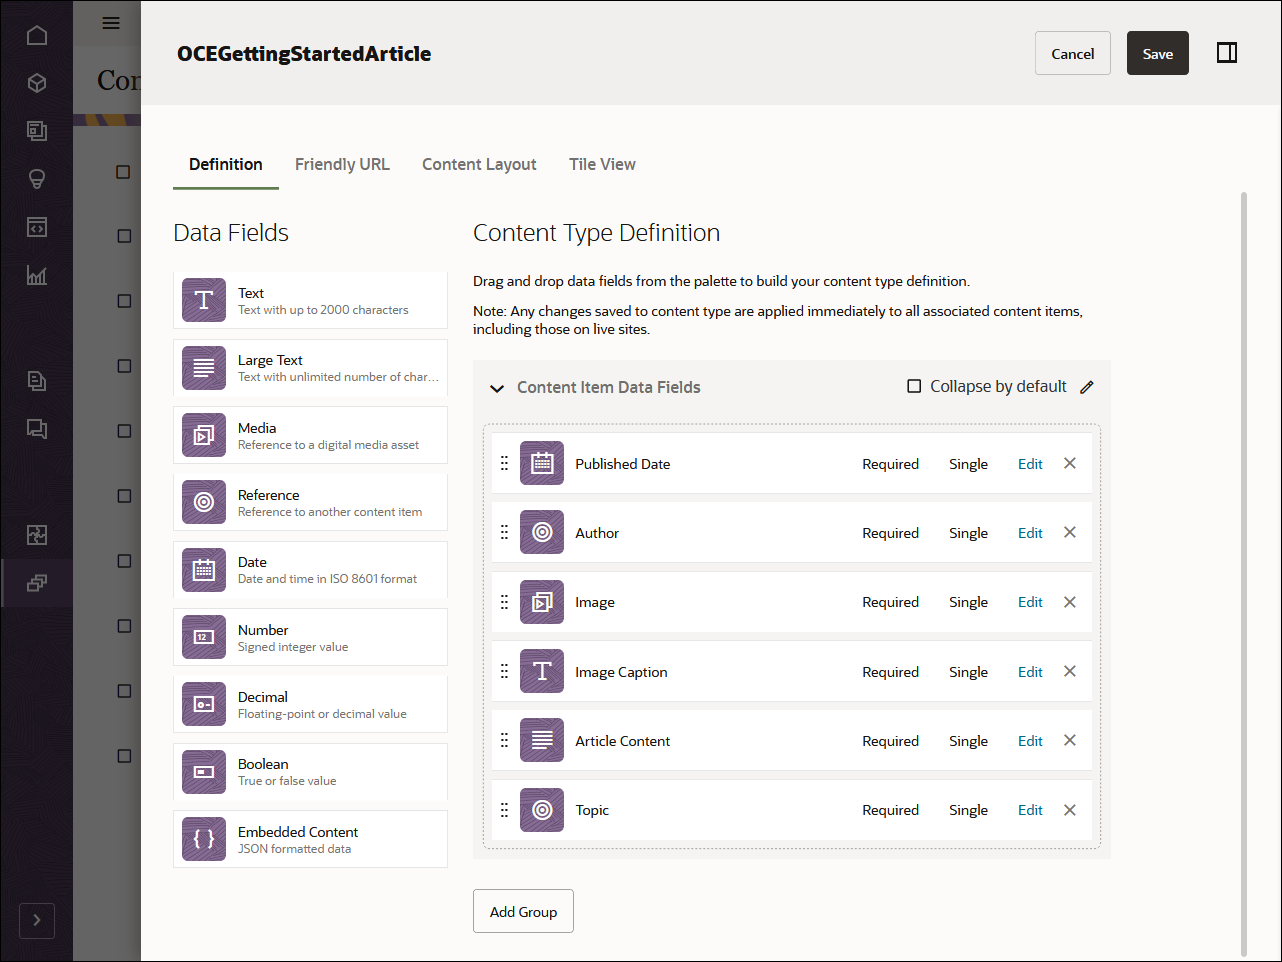
建立內容類型之後,您可以將這些內容類型新增至先前建立的儲存區域 OCEGettingStartedRepository:
- 以管理員身分登入 Oracle Content Management Web 介面。
- 瀏覽至 OCEGettingStartedRepository。
- 編輯儲存區域,然後在資產類型底下,指定所有四種新建立的內容類型。按一下「儲存」按鈕以儲存變更。
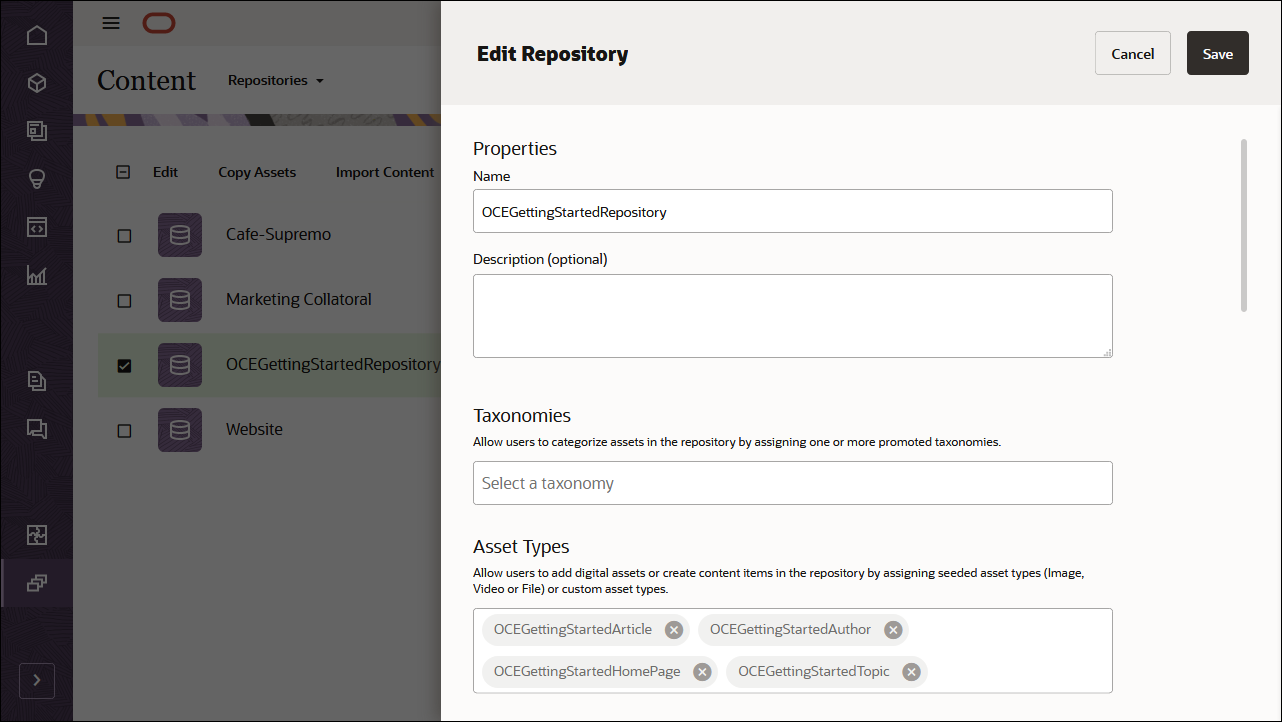
將內容類型新增至儲存區域之後,您可以在資產頁面上開啟 OCEGettingStartedRepository 儲存區域,然後開始建立所有內容類型的內容項目。
工作 2:在 Next.js 建置部落格
為了在轉換的 Next.js 應用程式中使用 Oracle Content Management 內容,我們可以使用 Next.js 部落格範例,此範例可作為 GitHub 上的開放原始碼儲存區域。
注意:請記住,使用 Next.js 範例是選擇性的,我們會在此教學課程中使用它來快速入門。您也可以建置自己的 Next.js 應用程式。
在 Next.js 建置部落格:
複製範例儲存區域並安裝相依性
Next.js 部落格範例可作為 GitHub 的開放原始碼儲存區域。
您必須先將 GitHub 的範例複製到您的本機電腦,然後將您的目錄變更為儲存區域根目錄:
git clone https://github.com/oracle/oce-nextjs-blog-sample.git
    cd oce-nextjs-blog-sample
現在,您的程式碼基礎需要下載應用程式的相依性。從根目錄執行下列命令:
npm install設定 Next.js 應用程式
在此 Next.js 部落格範例中,您需要設定一些資訊,讓您的 Oracle Content Management Content SDK (以及任何其他要求) 能夠以正確的通道記號為正確的執行處理 URL 和 API 版本設定目標。這些值用於命令檔/server-config-utils.js 中,以建立新的傳遞從屬端。
此應用程式使用.env.local 檔案,此檔案由 Next.js 讀取,並可供具有 process.env 的應用程式內的程式碼使用。
在文字編輯器中開啟.env.local 檔案。您會看到下列資訊:
# The connection details for the Oracle Content Management server to be used for this application
    SERVER_URL=https://samples.mycontentdemo.com
    API_VERSION=v1.1
    CHANNEL_TOKEN=47c9fb78774d4485bc7090bf7b955632
變更每個索引鍵-值組以反映您的執行處理 URL、您要定位的 API 版本,以及與您發布通道關聯的通道權杖。此教學課程的管道是 OCEGettingStartedChannel。
使用 Oracle Content Management Content SDK
Oracle Content Management 提供一個 SDK 來協助尋找及使用您應用程式中的內容。SDK 會發佈為 NPM 模組,而專案則是在 GitHub 上代管。
請到這裡瞭解 SDK 的詳細資訊。
SDK 已經在 package.json 檔案中註冊為此專案的程式實際執行相依性。
使用 Content SDK 擷取內容
我們現在可以利用 Content SDK 擷取內容,以便在 Next.js 應用程式中呈現內容。
命令檔資料夾包含使用 Content SDK 從 Oracle Content Management 取得資料的程式碼。
命令檔/server-config-utils.js 檔案會匯入 Content SDK,然後使用.env.local 中指定的組態建立傳遞從屬端。
下列命令會匯入 SDK:
import { createDeliveryClient, createPreviewClient } from '@oracle/content-management-sdk';下列命令會建立傳遞從屬端:
return createDeliveryClient(serverconfig);scripts/services.js 檔案包含用來取得應用程式資料的所有程式碼。應用程式中的每個頁面元件都有一個主要功能,以取得該頁面的所有資料。
對於呈現影像,services.js 提供協助程式方法來擷取從資產轉譯建構之資產的來源集。
function getSourceSet(asset) {
      const urls = {};
      urls.srcset = '';
      urls.jpgSrcset = '';
      if (asset.fields && asset.fields.renditions) {
        asset.fields.renditions.forEach((rendition) => {
          addRendition(urls, rendition, 'jpg');
          addRendition(urls, rendition, 'webp');
        });
      }
      // add the native rendition to the srcset as well
      urls.srcset += `${asset.fields.native.links[0].href} ${asset.fields.metadata.width}w`;
      urls.native = asset.fields.native.links[0].href;
      urls.width = asset.fields.metadata.width;
      urls.height = asset.fields.metadata.height;
      return urls;
    }
首頁資料
首頁需要數個資料呼叫,才能取得其所有資料:
- 首先,查詢.env.local 中指定之通道內的項目。
- 我們會針對每個主題項目擷取其詳細資訊。
開啟 scripts/services.js 並尋找 getTopicsListPageData() 函數,以取得首頁的所有資料。
export function getTopicsListPageData() {
      const client = getDeliveryClient();
      return fetchHomePage(client)
        .then((data) => (
          getRenditionURLs(client, data.logoID)
            .then((renditionUrls) => {
              data.companyThumbnailRenditionUrls = renditionUrls;
              return data;
            })
        ));
    }
由 getTopicsListPageData() 函數呼叫的 fetchHomePage() 函數會取得通路中的所有項目。這會取得標誌 ID、公司名稱、關於和聯絡人 URL,以及主題清單。
function fetchHomePage(client) {
      return client.queryItems({
        q: '(type eq "OCEGettingStartedHomePage" AND name eq "HomePage")',
      }).then((data) => {
        const logoID = data.items[0].fields.company_logo.id;
        const title = data.items[0].fields.company_name;
        const aboutUrl = data.items[0].fields.about_url;
        const contactUrl = data.items[0].fields.contact_url;

        const { topics } = data.items[0].fields;
        const promises = [];

        topics.forEach((origTopic) => {
          // add a promise to the total list of promises to get the full topic details
          promises.push(
            fetchTopic(client, origTopic.id)
              .then((topic) => topic),
          );
        });

        // execute all the promises returning a single dimension array of all
        // of the topics and the other home page data
        return Promise.all(promises)
          .then((allTopics) => (
            {
              logoID,
              companyTitle: title,
              aboutUrl,
              contactUrl,
              topics: flattenArray(allTopics),
            }
          )).catch((error) => logError('Fetching topics failed', error));
      }).catch((error) => logError('Fetching home page data failed', error));
    }
接著會針對每個主題 ID 呼叫 fetchTopic() 函數,以取得完整主題詳細資料。
function fetchTopic(client, topicId) {
      return client.getItem({
        id: topicId,
        expand: 'fields.thumbnail',
      }).then((topic) => {
        topic.renditionUrls = getSourceSet(topic.fields.thumbnail);
        return topic;
      }).catch((error) => logError('Fetching topic failed', error));
    }
getTopicsListPageData() 也會呼叫 getRenditionURLs() 來取得要呈現之影像的 URL。
function getRenditionURLs(client, identifier) {
      return client.getItem({
        id: identifier,
        expand: 'fields.renditions',
      }).then((asset) => getSourceSet(asset))
        .catch((error) => logError('Fetching Rendition URLs failed', error));
    }
主題頁面資料
Next.js 使用靜態網站產生功能來預先呈現應用程式中的每個頁面。每個「主題」頁面的路徑均包含主題 ID。開啟 scripts/services.js 並尋找用來取得所有主題 ID 的 fetchTopicIds() 函數。
export function fetchTopicIds() {
      const client = getDeliveryClient();

      return client.queryItems({
        q: '(type eq "OCEGettingStartedHomePage" AND name eq "HomePage")',
      }).then((data) => {
        const { topics } = data.items[0].fields;
        const topicIds = topics.map(
          (topic) => topic.id,
        );
        return topicIds;
      }).catch((error) => logError('Fetching topic ids failed', error));
    }
主題頁面會接收主題 ID,而且需要數個資料呼叫才能取得其所有資料:
- 取得主題的名稱
- 取得指定主題的所有文章。
- 針對每篇文章,取得其轉譯 URL。
尋找用來取得主題名稱的 fetchTopicName (topicId) 函數。
export function fetchTopicName(topicId) {
      const client = getDeliveryClient();
      return client.getItem({
        id: topicId,
      }).then((topic) => topic.name)
        .catch((error) => logError('Fetcvhing topic name failed', error));
    }
尋找 fetchTopicArticles (topicId) 函數,其會取得主題頁面的文章資料。
export function fetchTopicArticles(topicId) {
      const client = getDeliveryClient();
      return client.queryItems({
        q: `(type eq "OCEGettingStartedArticle" AND fields.topic eq "${topicId}")`,
        orderBy: 'fields.published_date:desc',
      }).then((data) => {
        const promises = [];
        const articles = data.items;

        articles.forEach((article) => {
          // add a promise to the total list of promises to get the article url
          promises.push(
            getRenditionURLs(client, article.fields.image.id)
              .then((renditionUrls) => {
                article.renditionUrls = renditionUrls;
                // Note: the spread operator is used here so that we return a top level
                // object, rather than a value which contains the object
                // i.e we return
                //   {
                //     field1: 'value', field2 : "value", etc
                //   },
                // rather than
                //   {
                //     name: {
                //             field1: 'value', field2 : "value", etc
                //           }
                //    }
                return {
                  ...article,
                };
              }),
          );
        });

        // execute all the promises and return all the data
        return Promise.all(promises)
          .then((allArticles) => ({
            topicId,
            articles: flattenArray(allArticles),
          }));
      }).catch((error) => logError('Fetching topic articles failed', error));
    }
fetchTopicArticles() 方法也會使用先前見到的 getRenditionURLs() 來取得文章的影像。
文章頁面資料
每個「條款」頁面的路徑均包含條款識別碼。開啟 scripts/services.js 並尋找 fetchAllArticlesSimple() 函數,用於取得預先呈現每個文章頁面時使用的所有文章 ID。
export function fetchAllArticlesSimple() {
      const client = getDeliveryClient();
      return fetchTopicIds()
        .then((topicIds) => {
          const promises = [];
          topicIds.forEach((topicId) => {
            // add a promise to the total list of promises to get the article url
            promises.push(
              fetchTopicArticlesSimple(client, topicId)
                .then((data) => {
                  const { items } = data;
                  const articles = items.map((item) => (
                    {
                      id: item.id,
                      name: item.name,
                    }
                  ));
                  return articles;
                }),
            );
          });

          // execute all the promises and return all the data
          return Promise.all(promises)
            .then((allArticles) => flattenArray(allArticles));
        }).catch((error) => logError('Fetching basic information for all articles failed', error));
    }
fetchAllArticlesSimple() 會呼叫 fetchTopicArticlesSimple() 以取得簡化的文章清單。
function fetchTopicArticlesSimple(client, topicId) {
      return client.queryItems({
        q: `(type eq "OCEGettingStartedArticle" AND fields.topic eq "${topicId}")`,
        orderBy: 'fields.published_date:desc',
      }).then((data) => data)
        .catch((error) => logError('Fetching basic information for topic articles failed', error));
    }
文章頁面會收到文章 ID,並且需要數個資料呼叫才能取得其所有資料:
- 取得指定文章的文章詳細資訊。
- 針對每篇文章,取得其轉譯 URL。
尋找可取得文章頁面資料的 fetchArticleDetails (articleId) 函數。此方法使用 getRenditionURL() 函數,該函數會取得文章的影像,並使用 getMediumRenditionURL() 函數來取得作者的影像。
export function fetchArticleDetails(articleId) {
      const client = getDeliveryClient();
      return client.getItem({
        id: articleId,
        expand: 'fields.author,fields.image',
      }).then((article) => {
        const { fields } = article;
        const title = fields.author.name;
        const date = fields.published_date;
        const content = fields.article_content;
        const imageCaption = fields.image_caption;
        const { topic } = fields;
        const { name } = article;
        const renditionUrls = getSourceSet(article.fields.image);
        const avatarID = article.fields.author.fields.avatar.id;
        // Get the author's avatar image
        return getRenditionURLs(client, avatarID)
          .then((authorRenditionUrls) => (
            // return an object with just the data needed
            {
              id: articleId,
              name,
              title,
              date,
              content,
              imageCaption,
              renditionUrls,
              authorRenditionUrls,
              topicId: topic.id,
              topicName: topic.name,
            }
          ));
      }).catch((error) => logError('Fetching article details failed', error));
    }
fetchArticleDetails() 方法也會使用先前見到的 getRenditionURLs() 來取得大頭貼影像。
現在我們有資料查詢,我們可以在我們的 Next.js 元件中轉譯回應。
Next.js 元件
Next.js是以React為基礎, React使用JSX (JavaScript的HTML語法副檔名)來呈現內容。雖然您可以撰寫純 JavaScript 來呈現 Oracle Content Management 的資料,但強烈建議您使用 JSX。
部落格應用程式會將每個頁面細分為數個較小的元件。
以下幾節概述 Next.js 在我們的每個元件中如何呈現應用程式:
- 頁面資料夾
- 索引元件
- 頁首元件
- TopicsListItem 元件
- ArticleListPage 元件
- ArticesListItem 元件
- ArticleDetailsPage 元件
- 導覽路徑和導覽路徑元件
頁面資料夾
我們想要在我們的網站中提供三個路由:
- 首頁,包含主題清單
- 主題頁面:顯示所選主題的所有文章
- 個別文章頁面,顯示選取的文章
頁面目錄 Next.js 中的任何頁面都會被視為應用程式的路由。
索引元件
「首頁」包含由個別主題組成的清單。它是由「索引」元件 (位於 pages/index.jsx) 所呈現。
元件會匯入 API 以從 services.js 檔案取得資料。
import { getTopicsListPageData } from '../scripts/services';在組建期間呼叫的 getStaticProps() 中,元件會取得轉換首頁所需的所有資料。
export async function getStaticProps() {
      const data = await getTopicsListPageData();
      return { props: { data } };
    }
頁首元件
「索引」元件使用「標頭」元件來顯示公司標題、公司標誌,以及「與我們聯絡/關於我們」連結。
它位於 src/components/Header.jsx,並接收其所有資料作為特性。它不會從伺服器取得任何其他資料。
TopicsListItem 元件
「索引」元件使用 TopicsListItem 元件在清單中顯示個別主題。
位於 src/components/TopicsListItem.jsx 的 TopicsListItem 元件會接收其所有資料作為特性。它不會從伺服器取得任何其他資料。
ArticleListPage 元件
「主題」頁面會顯示主題中 ID 傳送至 URL 元件的文章。它是由 ArticleListPage 元件所呈現,位於 pages/article/[id] .jsx。
元件會匯入 API 以從 services.js 檔案取得資料。
import { fetchTopicIds, fetchTopicName, fetchTopicArticles } from '../../scripts/services';「主題」頁面的 URL 是動態 URL,其中以主題 ID 作為路徑,範例 URL 路徑為
- /articles/topicId1
- /articles/topicId2
- /articles/topicId3
Next.js 針對具有動態 URL 的頁面使用靜態網站產生時,會呼叫 getStaticPaths() 來取得該頁面的所有路徑。
export async function getStaticPaths() {
      const topicIds = await fetchTopicIds();

      // Generate the paths we want to pre-render based on posts
      const paths = topicIds.map((topicId) => ({
        params: { id: topicId },
      }));

      return {
        paths,
        fallback: false,
      };
    }
getStaticProps() 函數可用來取得「主題」頁面之單一執行處理的資料。主題 ID 是從傳送至方法的參數取得。然後主題 ID 會用來取得此頁面所需的所有資料。
export async function getStaticProps(context) {
      const { params } = context;
      const { id } = params;
      const [data, topicName] = await Promise.all([fetchTopicArticles(id), fetchTopicName(id)]);

      return {
        props: {
          topicId: id,
          topicName,
          data,
        },
      };
    }
ArticesListItem 元件
ArticleListPage 元件使用 ArticlesListItem 元件來顯示清單中的個別文章。
ArticlesListItem 元件位於 src/components/ArticlesListItem.jsx,並接收其所有資料作為特性。它不會從伺服器取得任何其他資料。
ArticleDetailsPage 元件
文章頁面會顯示其 ID 在 URL 上傳遞的文章詳細資料。它是由 ArticleDetailsPage 元件呈現,位於 pages/article/[id] .jsx。
元件會匯入 API 以從 services.js 檔案取得資料。
import { fetchAllArticlesSimple, fetchArticleDetails } from '../../scripts/services';文章頁面的 URL 是動態 URL,內含文章 ID 作為路徑,範例 URL 路徑為
- /article/articleId1
- /article/articleId2
- /article/articleId3
Next.js 針對具有動態 URL 的頁面使用靜態網站產生時,會呼叫 getStaticPaths() 來取得該頁面的所有路徑。
export async function getStaticPaths() {
      const articles = await fetchAllArticlesSimple();

      // Generate the paths we want to pre-render based on posts
      return {
        paths: articles.map((article) => ({
          params: { id: article.id },
        })),
        fallback: true,
      };
    }
getStaticProps() 函數是用來取得「文章」頁面單一實例的資料。文章 ID 是從傳入方法的參數取得。接著會使用文章 ID 來取得此頁面所需的所有資料。
export async function getStaticProps(context) {
      const { params } = context;
      const { id } = params;
      const data = await fetchArticleDetails(id);
      return {
        props: {
          data,
        },
      };
    }
導覽路徑和導覽路徑元件
「索引」和 ArticleDetailsPage 元件都使用「導覽路徑」和「導覽路徑」元件,在頁面頂端顯示導覽路徑,讓使用者可以返回「主題」頁面或「首頁」。這兩個元件都會將其所有資料當作特性接收;它們不會從伺服器取得任何其他資料。
作業 3:準備應用程式以進行建置
現在我們已建立 Next.js 部落格網站,我們必須在本機開發伺服器中看到此網站,以便為任何問題除錯,並在應用程式上線前預覽該應用程式。
使用兩個步驟準備應用程式以進行部署:
微調本機開發伺服器
您可以執行下列命令,在本機啟動開發伺服器。
npm run dev然後,將您的瀏覽器開啟到http://localhost:3000,即可查看您的網站如何運作。
注意:這不會預先呈現頁面。若要預先呈現頁面,請參閱下一節。
使用命令檔在開發和生產環境中建置及執行應用程式
如果是實際環境執行,會使用組建命令檔以靜態方式產生網站。
npm run build啟動命令檔是用來啟動提供靜態產生之頁面的 Node.js 伺服器。
npm run start在 Next.js 中使用 Headless Oracle Content Management 建置部落格
F49314-01
2021 年 10 月
Copyright © 2021, Oracle and/or its affiliates.
主要作者:Oracle Corporation