增強和歸檔 Oracle JET Web 元件
簡介
Web 元件是可重複使用的使用者介面片段,可讓您在 Web 應用程式中內嵌為自訂 HTML 元素。Web 元件可包含 Oracle JavaScript Extension Toolkit (Oracle JET) 元件、其他 Web 元件、HTML、JavaScript、TypeScript 及階層式樣式表 (CSS)。您可以使用 Oracle JET 工具來建立 Web 元件,而且可以使用 Oracle JET 入門範本來產生您修改以新增並設定 Web 元件的 HTML 和 Typescript 或 JavaScript 檔案。
在先前的教學課程中,您建立一個顯示四個輸入文字欄位的 Web 元件。在本教學課程中,您將學習如何將「項目 ID」欄位變更為唯讀欄位、將幣別轉換器新增至「項目價格」欄位,並在「項目說明」欄位中新增長度驗證程式。若要將值傳送至這些欄位,請在 Web 應用程式的 HTML 來源中定義四個輸入文字欄位的屬性。您使用的屬性必須具有在 Web 元件中繼資料檔案中定義的對應特性。您可以將靜態值傳送至屬性,或在 Web 應用程式與 Web 元件之間使用單向或雙向資料連結的資料繫結運算式語法。
目標
本教學課程將引導您使用 Oracle JET Web App 的額外功能,提升 Web 元件。您也會學到如何封裝 Web 元件,以及準備與其他應用程式共用。
必要條件
- 設定使用 JavaScript 程式實際執行、Node.js 及已安裝最新 Oracle JET 版本命令行介面建立 Oracle JET App 的開發環境
- 在此學習路徑中完成上一個教學課程,因此您在
JET_Web_Component_Application資料夾中建立demo-update-itemWeb 元件
作業 1:將項目 ID 編輯為唯讀
Web 元件中的項目 ID 欄位必須是唯讀欄位。為了方便存取,請將項目 ID 欄位的 oj-input-text 自訂 HTML 元素取代為 oj-label-value 自訂 HTML 元素。oj-label-value 元素定義一個插槽,該時段使用 oj-bind-text 元素將項目 ID 欄位修改為唯讀。
-
瀏覽至
JET_Web_Component_Application/src/ts/jet-composites/demo-update-item目錄,然後在編輯器中開啟demo-update-item-view.html檔案。 -
使用
value="ID number"屬性尋找oj-input-text自訂 HTML 元素,並以oj-label-value元素取代oj-input-text元素。<oj-form-layout id="form-container" label-edge="[[labelEdge]]"> <oj-label-value> <oj-label slot="label">Item ID</oj-label> <div slot="value"> <oj-bind-text value="ID number"></oj-bind-text> </div> </oj-label-value> <oj-input-text value="Name" label-hint="Item Name"></oj-input-text> . . . </oj-form-layout> -
儲存
demo-update-item-view.html檔案。您的
demo-update-item-view.html程式碼看起來應類似 readonly-itemid.txt。 -
瀏覽至
JET_Web_Component_Application/src/ts/jet-composites/demo-update-item目錄,然後在編輯器中開啟demo-update-item-viewModel.ts檔案。 -
在
demo-update-item-viewModel.ts檔案中,於匯入ojs/ojinputtext模組的項目之後匯入ojs/ojlabelvalue載入器模組。"use strict"; import * as ko from "knockout"; import componentStrings = require("ojL10n!./resources/nls/demo-update-item-strings"); import Context = require("ojs/ojcontext"); import Composite = require("ojs/ojcomposite"); import "ojs/ojknockout"; import * as ResponsiveUtils from "ojs/ojresponsiveutils"; import * as ResponsiveKnockoutUtils from "ojs/ojresponsiveknockoututils"; import "ojs/ojformlayout"; import "ojs/ojinputtext"; import "ojs/ojlabelvalue"; -
儲存
demo-update-item-viewModel.ts檔案。 -
在終端機視窗中,變更為
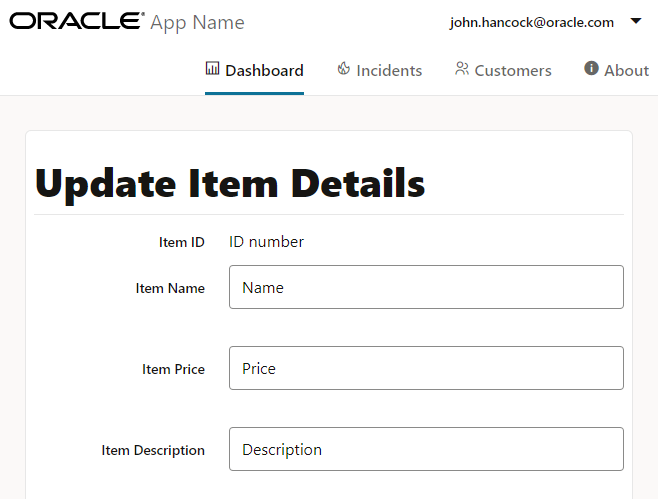
JET_Web_Component_Application目錄,然後執行應用程式。$ ojet serve瀏覽器會在 Web 應用程式的儀表板頁籤中,顯示具有四個輸入文字欄位的 Web 元件。項目 ID 欄位現在是唯讀欄位。

-
離開終端機視窗,以及顯示您 Web 應用程式開啟的瀏覽器視窗或頁標。
ojet serve命令可讓您變更立即反映在瀏覽器中的應用程式程式碼。
作業 2:新增幣別轉換器
使用項目價格欄位的幣別轉換器。
-
瀏覽至
JET_Web_Component_Application/src/ts/jet-composites/demo-update-item目錄,然後在編輯器中開啟demo-update-item-view.html檔案。 -
找出屬性為
value="Price"的oj-input-text自訂 HTML 元素,然後將其更新為使用之後的步驟中定義的貨幣轉換器。我們輸入00而非Price作為value特性的預留位置值,因為轉換器需要有效的數字,而不是字串。<oj-form-layout id="form-container" label-edge="[[labelEdge]]"> ... <oj-input-text value="Name" label-hint="Item Name"></oj-input-text> <oj-input-text value="00" help.instruction="enter an amount with or without grouping separator" converter="[[currency]]" label-hint="Item Price"> </oj-input-text> <oj-input-text value="Description" label-hint="Item Description"></oj-input-text> </oj-form-layout> -
儲存
demo-update-item-view.html檔案。您的demo-update-item-view.html程式碼看起來應類似 currency-code-html.txt。 -
瀏覽至
JET_Web_Component_Application/src/ts/jet-composites/demo-update-item目錄,然後在編輯器中開啟demo-update-item-viewModel.ts檔案。 -
在
demo-update-item-viewModel.ts檔案的頂端,從ojs/ojconverter-number模組匯入IntlNumberConverter:"use strict"; import * as ko from "knockout"; . . . import "ojs/ojinputtext"; import "ojs/ojlabelvalue"; import { IntlNumberConverter } from "ojs/ojconverter-number"; -
在
ViewModel類別中,為將在下一個步驟中初始化的幣別轉換器新增幣別欄位。export default class ViewModel implements Composite.ViewModel<Composite.PropertiesType> { busyResolve: (() => void); . . . currency: IntlNumberConverter; constructor(context: Composite.ViewModelContext<Composite.PropertiesType>) { . . . -
在範例可觀察項目之後的
constructor()方法中,新增貨幣轉換器。constructor(context: Composite.ViewModelContext<Composite.PropertiesType>) { . . . this.res = componentStrings["demo-update-item"]; this.currency = new IntlNumberConverter({ style: "currency", currency: "USD ", currencyDisplay: "code", }); -
儲存
demo-update-item-viewModel.ts檔案。您的
demo-update-item-viewModel.ts程式碼看起來應類似 currency-code-ts.txt。 -
返回瀏覽器以檢視 Web 應用程式中的變更。
-
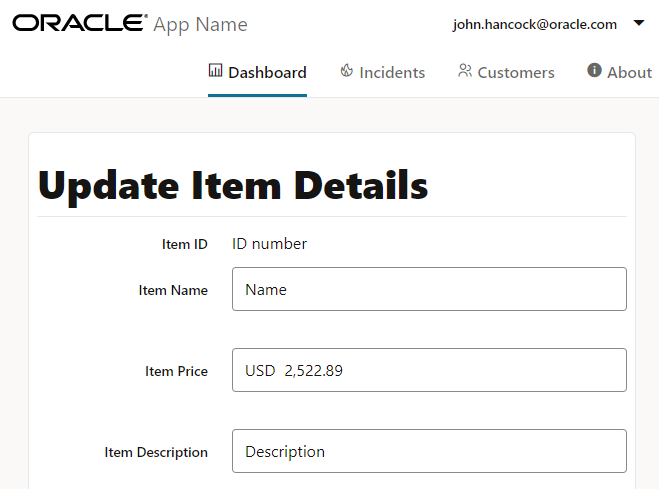
在項目價格欄位中輸入價格,然後按 Enter 以驗證變更。

form-wc-currency-converter.png 圖解的描述
您輸入的價格會顯示 USD 字首。如果您輸入非數值,項目價格欄位會顯示錯誤。
-
離開終端機視窗,以及顯示您 Web 應用程式開啟的瀏覽器視窗或頁標。
ojet serve命令可讓您變更立即反映在瀏覽器中的應用程式程式碼。
工作 3:新增長度驗證程式
請在料號摘要欄位使用長度驗證程式。
-
瀏覽至
JET_Web_Component_Application/src/ts/jet-composites/demo-update-item目錄,然後在編輯器中開啟demo-update-item-view.html檔案。 -
找出屬性為
value="Description"的oj-input-text自訂 HTML 元素,然後更新該元素以使用我們在稍後步驟中定義的長度驗證程式。<oj-form-layout id="form-container"> ... <oj-input-text value="00" help.instruction="enter an amount with or without grouping separator" converter="[[currency]]" label-hint="Item Price"> </oj-input-text> <oj-input-text value="{{lengthValue1}}" validators="[[validators]]" placeholder="Enter a description of 5-50 characters" label-hint="Item Description" ></oj-input-text> </oj-form-layout> -
儲存
demo-update-item-view.html檔案。您的
demo-update-item-view.html程式碼看起來應類似 validator-code-html.txt。 -
瀏覽至
JET_Web_Component_Application/src/ts/jet-composites/demo-update-item目錄,然後在編輯器中開啟demo-update-item-viewModel.ts檔案。 -
在
demo-update-item-viewModel.ts檔案的頂端,從ojs/ojasyncvalidator-length模組匯入AsyncLengthValidator:import * as ko from "knockout"; . . . import { IntlNumberConverter } from "ojs/ojconverter-number"; import AsyncLengthValidator = require("ojs/ojasyncvalidator-length"); -
在
ViewModel類別中,為「剔除」可監測項目新增欄位,您可在下一個步驟中初始化。export default class ViewModel implements Composite.ViewModel<Composite.PropertiesType> { busyResolve: (() => void); . . . currency: IntlNumberConverter; lengthValue1: ko.Observable<string>; validators: ko.ObservableArray<AsyncLengthValidator<string>>; -
在幣別轉換器之後的
constructor方法中,新增長度驗證程式。constructor(context: Composite.ViewModelContext<Composite.PropertiesType>) { . . . this.res = componentStrings["demo-update-item"]; this.currency = new IntlNumberConverter({ style: "currency", currency: "USD ", currencyDisplay: "code", }); this.lengthValue1 = ko.observable(""); this.validators = ko.observableArray([ new AsyncLengthValidator({ min: 5, max: 50 }), ]);長度驗證程式會為料號摘要欄位定義字元長度下限,而字元長度上限為 50 個字元。
-
儲存
demo-update-item-viewModel.ts檔案。您的
demo-update-item-viewModel.ts程式碼看起來應該像 final-demo-update-item-viewModel-ts.txt。 -
返回瀏覽器以檢視 Web 應用程式中的變更。
-
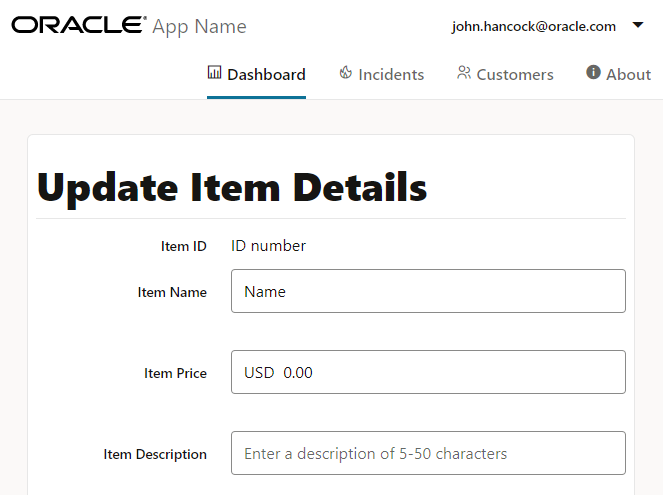
在項目說明欄位中輸入描述,然後按 Enter 鍵,然後按 Tab 清除工具提示。

form-wc-length-validator.png 圖解的描述
如果描述超過設定的範圍,則項目說明欄位會顯示錯誤。
-
離開終端機視窗,以及顯示您 Web 應用程式開啟的瀏覽器視窗或頁標。
ojet serve命令可讓您變更立即反映在瀏覽器中的應用程式程式碼。
作業 4:定義 Web 元件中繼資料
Web 元件中繼資料檔案定義 Web 元件的必要特性。Web 元件的每一個輸入文字欄位都必須有關聯特性,該特性將從 Web 元件寫回更新。
-
瀏覽至
JET_Web_Component_Application/src/ts/jet-composites/demo-update-item目錄,然後在編輯器中開啟component.json檔案。 -
定義
displayName和description描述資料特性。{ "name": "demo-update-item", "version": "1.0.0", "jetVersion": "^12.0.0", "displayName": "demo-update-item", "description": "A Web Component with form layout", ... } -
在
description描述資料特性下方,使用駝峰式命名慣例定義連結至 Web 元件檢視中欄位的特性。"description": "A Web Component with form layout", "properties": { "itemId": { "type": "number" }, "itemName": { "type": "string", "description": "Description for the item-name attribute", "writeback": true }, "itemPrice": { "type": "number", "writeback": true }, "itemDesc": { "type": "string", "writeback": true } },writeback特性設為true可確保這些特性會從參照雙向資料連結表示式中特性的 Web 元件接收更新。 -
儲存
component.json檔案。您的
component.json程式碼看起來應類似 component-json.txt。
作業 5:定義屬性與屬性值
Web 元件元素的屬性可以參考您在 Web 元件中繼資料檔案中宣告的屬性。在 Web 應用程式的 HTML 來源中,特性參照會顯示為不區分大小寫的 HTML 元素屬性名稱連字號。
-
瀏覽至
JET_Web_Component_Application/src/ts/views目錄,然後在編輯器中開啟dashboard.html檔案。 -
在
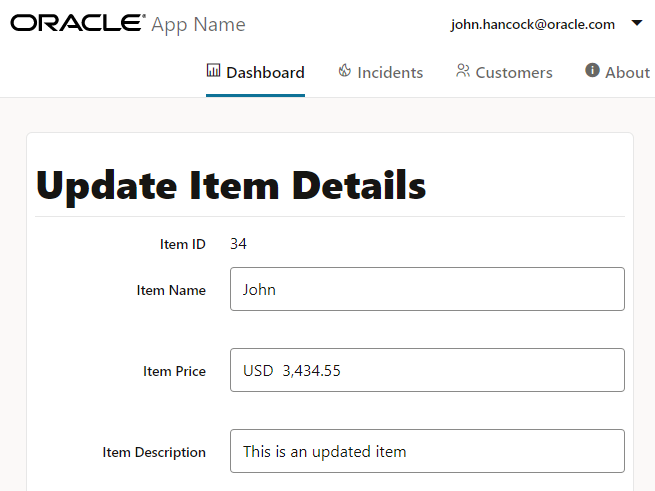
demo-update-item元素中,為四個輸入文字欄位定義具有靜態值的屬性。<div class="oj-hybrid-padding"> <div class="oj-panel oj-sm-margin-2x demo-mypanel"> <h1 class="oj-header-border">Update Item Details</h1> <div> <demo-update-item item-id="34" item-name="John" item-price="3434.55" item-desc="This is an updated item"> </demo-update-item> </div> </div> </div> -
儲存
dashboard.html檔案。
作業 6:定義 Web 元件檢視
您可以使用檢視連結相關資訊環境的 $properties 變數,來存取 Web 元件之描述資料檔中定義的任何特性。
-
瀏覽至
JET_Web_Component_Application/src/ts/jet-composites/demo-update-item目錄,然後在編輯器中開啟demo-update-item-view.html檔案。 -
在
oj-form-layout元素的自訂 HTML 元素中,使用$properties變數,將value屬性繫結至component.json檔案中定義的特性。<oj-form-layout id="form-container" label-edge="[[labelEdge]]"> . . . <div slot="value"> <oj-bind-text value="[[$properties.itemId]]"></oj-bind-text> </div> </oj-label-value> <oj-input-text value="{{$properties.itemName}}" label-hint="Item Name"></oj-input-text> <oj-input-text value="{{$properties.itemPrice}}" help.instruction="enter an amount with or without grouping separator" ...> </oj-input-text> <oj-input-text value="{{$properties.itemDesc}}" . . .> </oj-input-text> </oj-form-layout>若要定義屬性值,請使用
[[]]語法來定義單向資料連結,使用{{}}語法來定義雙向資料連結。 -
儲存
demo-update-item-view.html檔案。您的
demo-update-item-view.html程式碼看起來應該像 final-demo-update-item-view-html.txt。 -
返回瀏覽器以檢視 Web 應用程式中的變更。
瀏覽器會在四個輸入文字欄位中顯示具有靜態值的 Web 元件。

-
關閉顯示您執行中 Web App 的瀏覽器視窗或頁籤。
-
在終端機視窗中,按 Ctrl+C,如果出現提示,請輸入
y以結束 Oracle JET 工具批次工作。關閉終端機視窗。
作業 7:存檔 Web 元件
設定 Web 元件之後,您必須準備其他應用程式的 Web 元件。
開啟終端機視窗,變更為 JET_Web_Component_Application 目錄,然後以 demo-update-item 元件的名稱執行 ojet package component 指令作為指令參數:
$ ojet package component demo-update-item
Oracle JET 會將 JET_Web_Component_Application/src/ts/jet-composites/demo-update-item 目錄的內容封裝到 JET_Web_Component_Application/dist 目錄中建立的 ZIP 檔案 (demo-update-item_1-0-0.zip)。Oracle JET 會將 JET_Web_Component_Application/src/ts/jet-composites/demo-update-item 目錄中的 TypeScript 程式碼傳輸到 JavaScript 程式碼。例如,如果開啟 JET_Web_Component_Application/dist/demo-update-item_1-0-0.zip 檔案,您會注意到其中包含 demo-update-item-viewModel.js 檔案,Oracle JET 工具已從 JET_Web_Component_Application/src/ts/jet-composites/demo-update-item 目錄中的 demo-update-item-viewModel.ts 檔案傳輸。
您可以將 demo-update-item_1-0-0.zip 檔案從 JET_Web_Component_Application/dist 目錄分送給想要在其 Web 應用程式中重複使用您 Web 元件的用戶。若要在 Web 應用程式中使用 Web 元件,消費者可將 ZIP 檔案的內容擷取到其 Web 應用程式中的 demo-update-item 目錄。我們將在下一個教學課程中詳細介紹此後者的任務。
其他學習資源
探索 docs.oracle.com/learn 上的其他實驗室,或是存取更多免費學習內容至 Oracle Learning YouTube 通道。此外,瀏覽 education.oracle.com/learning-explorer 以成為 Oracle Learning Explorer。
如需產品文件,請瀏覽 Oracle Help Center。
Enhance and archive the Oracle JET web component
F53196-01
February 2022
Copyright © 2022, Oracle and/or its affiliates.