在具有虛擬節點的 OCI Kubernetes 引擎上設定 OCI 原生傳入控制器
簡介
本教學課程逐步介紹使用虛擬節點節點集區在 Oracle Cloud Infrastructure Kubernetes Engine (OKE) 上設定 Oracle Cloud Infrastructure (OCI) 原生輸入控制器。虛擬節點與一般執行處理型工作者節點不同,因為它們是抽象化基礎運算執行處理的無伺服器解決方案。不同於依賴特定虛擬機器執行處理的傳統工作節點,虛擬節點會根據工作負載需求動態調整規模,而不需要手動管理基礎基礎架構。這使它們適用於需要自動擴展並降低營運負荷的工作負載。
在本教學課程中,我們將使用虛擬節點在 OKE 上設定 OCI 原生輸入控制器。我們將設定工作負載身分識別原則、啟用傳入附加元件,以及使用 Kubernetes 清單部署傳入資源。
透過遵循這些任務,您可以公開應用程式並使用 OCI Load Balancer 功能管理輸入流量,同時運用虛擬節點的操作簡易性。此設定可簡化流量管理,並以可擴展且符合成本效益的方式支援生產級工作負載。
目標
- 在 OKE 上設定並設定 OCI 原生傳入控制器,以有效率地管理傳入資源。
工作 1:建立工作負載識別主要項目原則
在啟用 OCI 原生傳入控制器之前,請先建立工作負載識別主體原則。虛擬節點是無伺服器節點,且不使用 OCI Compute 執行處理,因此需要工作負載識別,而非執行處理主體。此原則可讓傳入控制器管理您區間中的資源。
-
前往 OCI 主控台,瀏覽至 Identity & Security Identity ,然後按一下原則。
-
請建立原則並輸入原則名稱。如需詳細資訊,請參閱使用 OCI 主控台建立原則。
-
按一下顯示手動編輯器,然後輸入下列原則敘述句,將
location和cluster-ocid取代為您的特定值。注意:
<location>應取代為您資源所在的區間。<cluster-ocid>應取代為 OKE 叢集的 OCID。
Allow any-user to manage load-balancers in <location> where all {request.principal.type = 'workload', request.principal.namespace = 'native-ingress-controller-system', request.principal.service_account = 'oci-native-ingress-controller', request.principal.cluster_id = '<cluster-ocid>'}

Allow any-user to use virtual-network-family in <location> where all {request.principal.type = 'workload', request.principal.namespace = 'native-ingress-controller-system', request.principal.service_account = 'oci-native-ingress-controller', request.principal.cluster_id = '<cluster-ocid>'}

Allow any-user to manage cabundles in <location> where all {request.principal.type = 'workload', request.principal.namespace = 'native-ingress-controller-system', request.principal.service_account = 'oci-native-ingress-controller', request.principal.cluster_id = '<cluster-ocid>'}

Allow any-user to manage cabundle-associations in <location> where all {request.principal.type = 'workload', request.principal.namespace = 'native-ingress-controller-system', request.principal.service_account = 'oci-native-ingress-controller', request.principal.cluster_id = '<cluster-ocid>'}

Allow any-user to manage leaf-certificates in <location> where all {request.principal.type = 'workload', request.principal.namespace = 'native-ingress-controller-system', request.principal.service_account = 'oci-native-ingress-controller', request.principal.cluster_id = '<cluster-ocid>'}

Allow any-user to read leaf-certificate-bundles in <location> where all {request.principal.type = 'workload', request.principal.namespace = 'native-ingress-controller-system', request.principal.service_account = 'oci-native-ingress-controller', request.principal.cluster_id = '<cluster-ocid>'}

Allow any-user to manage leaf-certificate-versions in <location> where all {request.principal.type = 'workload', request.principal.namespace = 'native-ingress-controller-system', request.principal.service_account = 'oci-native-ingress-controller', request.principal.cluster_id = '<cluster-ocid>'}

Allow any-user to manage certificate-associations in <location> where all {request.principal.type = 'workload', request.principal.namespace = 'native-ingress-controller-system', request.principal.service_account = 'oci-native-ingress-controller', request.principal.cluster_id = '<cluster-ocid>'}

Allow any-user to read certificate-authorities in <location> where all {request.principal.type = 'workload', request.principal.namespace = 'native-ingress-controller-system', request.principal.service_account = 'oci-native-ingress-controller', request.principal.cluster_id = '<cluster-ocid>'}

Allow any-user to manage certificate-authority-associations in <location> where all {request.principal.type = 'workload', request.principal.namespace = 'native-ingress-controller-system', request.principal.service_account = 'oci-native-ingress-controller', request.principal.cluster_id = '<cluster-ocid>'}

Allow any-user to read certificate-authority-bundles in <location> where all {request.principal.type = 'workload', request.principal.namespace = 'native-ingress-controller-system', request.principal.service_account = 'oci-native-ingress-controller', request.principal.cluster_id = '<cluster-ocid>'}

Allow any-user to read public-ips in <location> where all {request.principal.type = 'workload', request.principal.namespace = 'native-ingress-controller-system', request.principal.service_account = 'oci-native-ingress-controller', request.principal.cluster_id = '<cluster-ocid>'}

Allow any-user to manage floating-ips in <location> where all {request.principal.type = 'workload', request.principal.namespace = 'native-ingress-controller-system', request.principal.service_account = 'oci-native-ingress-controller', request.principal.cluster_id = '<cluster-ocid>'}

Allow any-user to manage waf-family in <location> where all {request.principal.type = 'workload', request.principal.namespace = 'native-ingress-controller-system', request.principal.service_account = 'oci-native-ingress-controller', request.principal.cluster_id = '<cluster-ocid>'}

Allow any-user to read cluster-family in <location> where all {request.principal.type = 'workload', request.principal.namespace = 'native-ingress-controller-system', request.principal.service_account = 'oci-native-ingress-controller', request.principal.cluster_id = '<cluster-ocid>'}

Allow any-user to use tag-namespaces in <location> where all {request.principal.type = 'workload', request.principal.namespace = 'native-ingress-controller-system', request.principal.service_account = 'oci-native-ingress-controller', request.principal.cluster_id = '<cluster-ocid>'}
作業 2:啟用 OCI 原生傳入控制器附加項目
備妥必要的工作負載識別主體原則之後,您便可以繼續為 OKE 叢集啟用 OCI 原生輸入控制器附加元件。此附加元件允許使用 OCI 負載平衡器有效管理傳入流量。
-
在 OCI 主控台中瀏覽至您的 OKE 叢集。
-
向下捲動並按一下附加元件。
-
在附加元件頁面中,按一下原生傳入控制器。
-
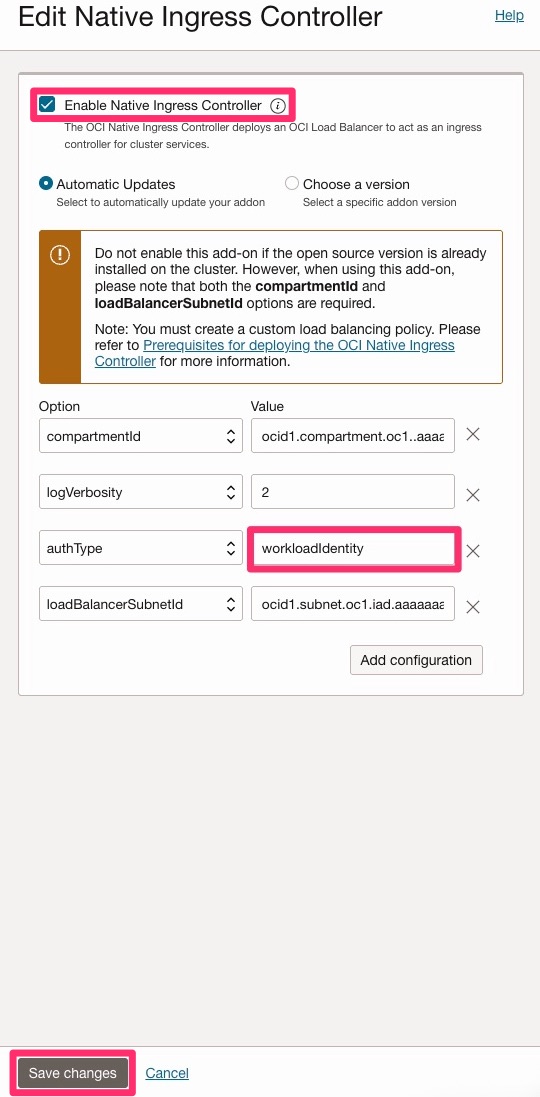
在編輯原生傳入控制器頁面中,選取啟用原生傳入控制器,然後在選項下輸入下列資訊。
compartmentId:輸入您的區間 OCID。loadBalancerSubnetId:輸入您的負載平衡器子網路 OCID。authType:輸入workloadIdentity。
-
按一下儲存變更以套用設定值。
注意:虛擬節點集區需要此組態,如先前所述,虛擬節點集區為無伺服器,不支援執行處理主體認證。在此情況下,工作負載識別是支援的認證方法。

作業 3:部署傳入資源以啟用原生傳入功能
在這項任務中,建立所需的 Kubernetes 資源,以使用 OCI 原生傳入控制器啟用傳入功能。包括 IngressClassParameters、IngressClass 以及實際的 Ingress 物件。
-
複查每個資源的用途。
- IngressClassParameters:指定 OCI 特定組態,例如區間 OCID、子網路和頻寬。
- IngressClass:將 Kubernetes 傳入功能連結至 OCI 的傳入控制器。
- 傳入:定義如何將流量遞送至您的服務。
-
取代 YAML 中的預留位置值。
- 將
<your compartment ocid>取代為實際的區間 OCID 。 - 將
<your load balancer subnet ocid>取代為負載平衡器子網路的 OCID 。
- 將
-
套用 YAML 清單。將下列 YAML 程式碼儲存至檔案,例如
native-ingress.yaml。apiVersion: apps/v1 kind: Deployment metadata: name: test-web-app namespace: default spec: replicas: 2 selector: matchLabels: app: test-web template: metadata: labels: app: test-web spec: containers: - name: nginx image: nginx:latest ports: - containerPort: 80 readinessProbe: httpGet: path: / port: 80 initialDelaySeconds: 3 periodSeconds: 5 resources: requests: cpu: "100m" memory: "128Mi" limits: cpu: "500m" memory: "256Mi" apiVersion: v1 kind: Service metadata: name: test-web-service namespace: default spec: selector: app: test-web ports: - protocol: TCP port: 80 targetPort: 80 apiVersion: ingress.oraclecloud.com/v1beta1 kind: IngressClassParameters metadata: name: native-ic-params namespace: native-ingress-controller-system spec: compartmentId: "ocid1.compartment.oc1..aaaaaaaa2eimxxxxxxxxxxz4lkcety52hfdg6wdoff6744yn4hrshofla" subnetId: "ocid1.subnet.oc1.iad.aaaaaaaaa72ie4xxxxxxxxxrxxrly6nmkb77qxt6mi2t5pvrdhge32q" loadBalancerName: "test-web-ingress" isPrivate: false maxBandwidthMbps: 400 minBandwidthMbps: 100 apiVersion: networking.k8s.io/v1 kind: IngressClass metadata: name: native-ic-ingress-class annotations: ingressclass.kubernetes.io/is-default-class: "true" spec: controller: oci.oraclecloud.com/native-ingress-controller parameters: apiGroup: ingress.oraclecloud.com kind: IngressClassParameters name: native-ic-params scope: Namespace namespace: native-ingress-controller-system apiVersion: networking.k8s.io/v1 kind: Ingress metadata: name: test-web-ingress-quickstart namespace: default annotations: oci.oraclecloud.com/load-balancer-type: "lb" oci.oraclecloud.com/healthcheck-protocol: "HTTP" oci.oraclecloud.com/healthcheck-port: "80" oci.oraclecloud.com/healthcheck-path: "/" oci.oraclecloud.com/healthcheck-return-code: "200" spec: ingressClassName: native-ic-ingress-class rules: - host: test.example.com http: paths: - path: / pathType: Prefix backend: service: name: test-web-service port: number: 80 - http: paths: - path: / pathType: Prefix backend: service: name: test-web-service port: number: 80 -
執行下列指令以套用清單。
kubectl apply -f native-ingress.yaml -
檢查資源的建立。
kubectl get ingressclassparameters
kubectl get ingressclass
kubectl get ingress
作業 4:測試 OCI 原生傳入控制器負載平衡器
注意:測試 OCI 負載平衡器 IP 位址之前,請先確定 VCN 的安全清單和 (或)
443中已開啟必要的連接埠 (例如80和 (或) 網路安全群組 (NSG) 。
若要確認您的 OCI 原生傳入控制器是否正常運作,請執行下列步驟:
-
使用
kubectl來擷取傳入資源的 IP 位址。kubectl get ingress -
複製輸出中顯示的 IP 位址。

-
開啟您的網頁瀏覽器,並將 IP 位址貼到網址列。

-
如果您的設定正確,您應該會看到已部署服務的預設回應。
您也可以瀏覽至導覽功能表,選取網路,然後按一下負載平衡器,驗證 OCI 負載平衡器是否已在 OCI 主控台中正確建立。

接下來的步驟
透過此教學課程,您已順利使用虛擬節點在 OKE 上設定原生傳入控制器。此設定可讓您使用 OCI Load Balancer 服務管理傳入流量,同時受惠於無伺服器 Kubernetes 環境的可擴展性和簡單性。您現在已準備好使用簡化的流量管理和最低的基礎架構開銷來部署生產級工作負載。
相關連結
確認
- 作者 – JP Santana (主要雲端架構師)
其他學習資源
在 docs.oracle.com/learn 上探索其他實驗室,或在 Oracle Learning YouTube 頻道上存取更多免費學習內容。此外,請造訪 education.oracle.com/learning-explorer 以成為 Oracle Learning Explorer。
如需產品文件,請造訪 Oracle Help Center 。
Set Up the OCI Native Ingress Controller on OCI Kubernetes Engine with Virtual Nodes
G34291-03
Copyright ©2025, Oracle and/or its affiliates.