使用 Stargz Store 啟用 Lazy Container Image Loadingin Oracle Cloud Infrastructure Kubernetes Engine (OKE)
簡介
遲緩容器映像檔載入 (有時稱為遲緩提取或隨選映像檔載入) 是一種技術,可讓容器在下載完整映像檔之前開始執行。只會擷取程式實際執行時所需的影像部分,以縮短啟動時間 (特別是大型影像)。
一般而言,當您執行容器時:
- 容器程式實際執行 (例如 CRI-O、容器) 會從登錄檔下載整個映像檔。
- 它會解除封裝所有影像圖層 。
- 只有在下載並解壓縮所有圖層後,容器才會啟動。
使用遲緩載入:
- 容器會使用虛擬檔案系統立即啟動 (此映像檔尚未在本機啟動)。
- 當應用程式存取檔案時,執行時期只會依需求從遠端登錄擷取所需的內容。
- 只有在實際使用時,才會下載其他檔案。
- 完整容器映像檔會在背景中提取。
容器映像檔必須重新封裝,以支援遲緩載入。使用 eStargz 格式,影像會重新封裝成小型且獨立可解壓縮的區塊。這可讓容器程式實際執行只在容器啟動時擷取必要的區塊。
eStargz 影像包含一個稱為 TOC (目錄) 的特殊檔案,該檔案會記錄 eStargz 圖層中所有檔案項目的中繼資料 (例如,名稱、檔案類型、擁有者、位移),除了 TOC 本身之外。容器程式實際執行可以使用 TOC 來掛載容器的檔案系統,而不需要下載整個層內容。
在本自學課程中,您將學習如何:
- 重新包裝現有的容器映像檔以使用 Stargz 格式
- 設定讓 Oracle Cloud Infrastructure Kubernetes Engine (OKE) CRI-O 使用 Stargz Store Plugin
- 執行範例工作負載以示範容器啟動時間的改進
必備條件
- 可存取 OKE 的 Oracle Cloud Infrastructure (OCI) 帳戶
- 運作中的 OKE 叢集
kubectl設定為存取您的 OKE 叢集- 本機安裝 Docker 或 containerd
設定
使用 nerdctl 重新建立容器映像檔以使用 eStargz 格式
-
在 OCI Registry (OCIR) 中建立映像檔儲存區域。在本教學課程中,
tenancy-namespace為idxzjcdxqj,我們將建立一個名為vllm/vllm-openai的repo。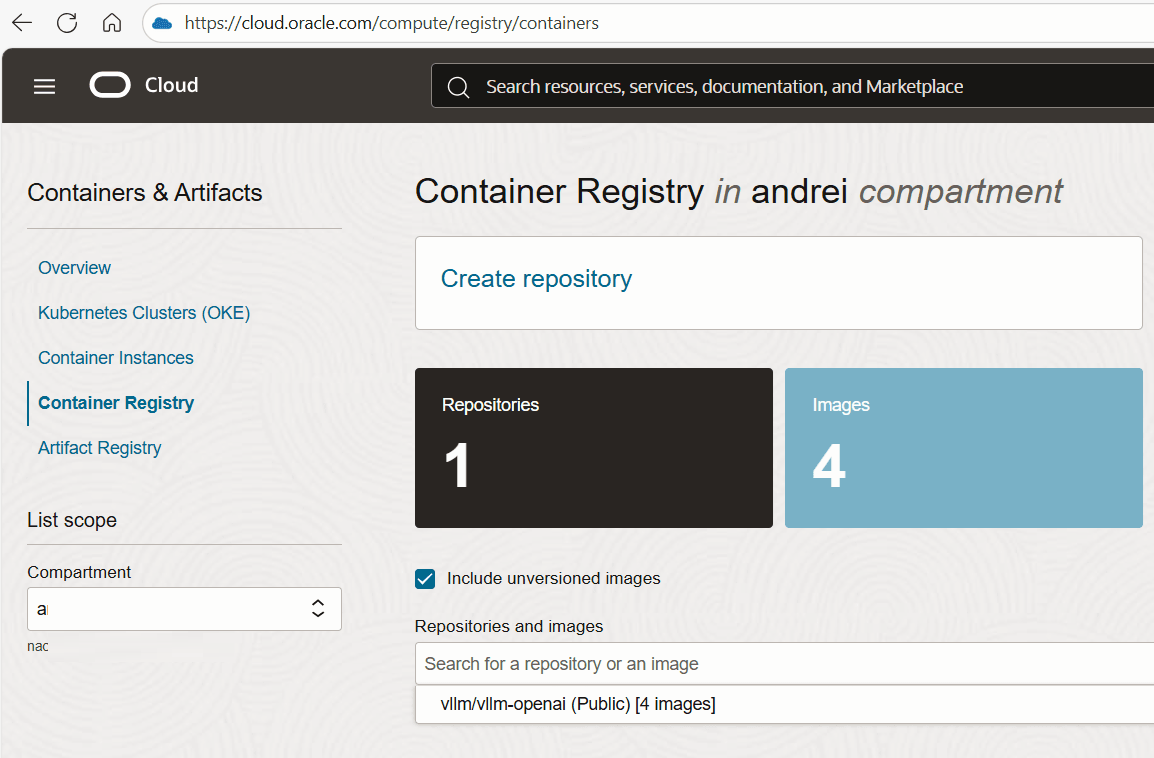
您可以依照下列指示向 OCIR 進行認證,然後建立新的儲存區域:使用 Docker CLI 推送映像檔。
請務必將
iad.ocir.io取代為您目前使用之 OCI 區域的 OCIR 網域。以下是區域索引鍵清單。docker login iad.ocir.io -
在已安裝 Docker 的機器上下載最新版本的 nerdctl 。
export NERDCTL_VERSION=2.2.2 wget https://github.com/containerd/nerdctl/releases/download/v${NERDCTL_VERSION}/nerdctl-${NERDCTL_VERSION}-linux-amd64.tar.gz tar -xf nerdctl-${NERDCTL_VERSION}-linux-amd64.tar.gz -
將
nerdctl認證為 OCIR。./nerdctl login iad.ocir.io -
將 vllm 容器影像轉換成 eStargz 格式。
./nerdctl image convert --estargz --oci docker.io/vllm/vllm-openai:v0.11.0 iad.ocir.io/idxzjcdxqj/vllm/vllm-openai:v0.11.0-esgz -
將 eStargz vllm 容器影像推送至 OCIR。
./nerdctl image push iad.ocir.io/idxzjcdxqj/vllm/vllm-openai:v0.11.0-esgz -
您可以使用 docker 將一般映像檔提取或推送至 OCIR (使用 docker)。
docker image pull docker.io/vllm/vllm-openai:v0.11.0
docker image tag docker.io/vllm/vllm-openai:v0.11.0 iad.ocir.io/idxzjcdxqj/vllm/vllm-openai:v0.11.0-regular
docker image push iad.ocir.io/idxzjcdxqj/vllm/vllm-openai:v0.11.0-regular
在 OKE 節點上安裝 Stargz Store Plugin
假設 OKE 使用 CRI-O,則需要設定 Stargz Store 外掛程式。這是 CRI-O/Podman 其他圖層儲存 Plugin 的實行。Stargz Store 為 CRI-O/Podman 提供遠端裝載的 eStargz 層。
-
SSH 至其中一個工作節點,並從 stargz-snapshotter Github 頁面下載最新版本。
export STARGZ_SNAPSHOTTER_VERSION=v0.18.2 wget https://github.com/containerd/stargz-snapshotter/releases/download/${STARGZ_SNAPSHOTTER_VERSION}/stargz-snapshotter-${STARGZ_SNAPSHOTTER_VERSION}-linux-amd64.tar.gz -
將
stargz-store擷取至/usr/local/bin。tar -C /usr/local/bin -xvf stargz-snapshotter-v0.18.2-linux-amd64.tar.gz stargz-store -
更新
/etc/containers/storage.conf檔案以在[storage.options]區段中包含additionallayerstores。[storage] driver = "overlay" graphroot = "/var/lib/containers/storage" runroot = "/run/containers/storage" [storage.options] additionallayerstores = ["/var/lib/stargz-store/store:ref"] -
確定已安裝並載入
fuse。apt-get install fuse modprobe fuse -
啟用
stargz-store服務。wget -O /etc/systemd/system/stargz-store.service https://raw.githubusercontent.com/containerd/stargz-snapshotter/main/script/config-cri-o/etc/systemd/system/stargz-store.service systemctl daemon-reload systemctl restart stargz-store crio -
確認
crio和stargz-store服務正在執行中。systemctl status stargz-store systemctl status crio
評估效能
-
更新下方資訊清單中的
nodeName和image,並建立測試部署:kubectl apply -f - <<EOF --- apiVersion: apps/v1 kind: Deployment metadata: name: test-estargz-cpu namespace: default labels: app: test-estargz spec: strategy: type: Recreate replicas: 1 selector: matchLabels: app: test-estargz template: metadata: labels: app: test-estargz spec: containers: ## Update the image to your own container repository - image: iad.ocir.io/idxzjcdxqj/vllm/vllm-openai:v0.11.0-esgz name: test command: ["/bin/bash", "-c", "echo started && sleep infinity"] ## Replace the nodename with the name of the node where stargz-store is configured. nodeName: 10.140.34.52 tolerations: - key: nvidia.com/gpu operator: Exists effect: NoSchedule --- apiVersion: apps/v1 kind: Deployment metadata: name: test-regular-cpu namespace: default labels: app: test-regular spec: strategy: type: Recreate replicas: 1 selector: matchLabels: app: test-regular template: metadata: labels: app: test-regular spec: containers: ## Update the image to your own container repository - image: iad.ocir.io/idxzjcdxqj/vllm/vllm-openai:v0.11.0-regular name: test command: ["/bin/bash", "-c", "echo started && sleep infinity"] env: - name: HF_HOME value: "/workspace" ## Replace the nodename with the name of the node where stargz-store is configured. nodeName: 10.140.34.52 tolerations: - key: nvidia.com/gpu operator: Exists effect: NoSchedule EOF -
監督容器開始時間。
kubectl get pods -w -
清除資源。
kubectl delete deploy test-regular-cpu kubectl delete deploy test-estargz-cpu -
對於使用 GPU 的測試部署,請更新此 yaml 清單中的
nodeName和image,然後使用下列命令加以套用:kubectl apply -f test-manifest-gpu.yaml
結果
下列結果是以使用 30B 參數大型語言模型在 BM.GPU4.8 資源配置上執行的測試為基礎。
-
eStargz 的 Pod 開始時間為
33s,一般影像的 Pod 開始時間為4m。$ kubectl get pods -w NAME READY STATUS RESTARTS AGE test-estargz-5699988945-2zxmh 0/1 ContainerCreating 0 8s test-regular-55fbdf64c8-hn6hg 0/1 ContainerCreating 0 7s test-estargz-5699988945-2zxmh 1/1 Running 0 33s test-regular-55fbdf64c8-hn6hg 1/1 Running 0 4m -
應用程式會使用
1m27s中的 eStargz 影像從 Pod 開始。INFO 12-11 07:59:02 [__init__.py:216] Automatically detected platform cuda. (APIServer pid=1) INFO 12-11 07:59:26 [api_server.py:1839] vLLM API server version 0.11.0 (APIServer pid=1) INFO 12-11 07:59:26 [utils.py:233] non-default args: {'model_tag': 'cpatonn/Qwen3-30B-A3B-Instruct-2507-AWQ-4bit', 'max_model_len': 8192, 'enforce_eager': True} ... (APIServer pid=1) INFO 12-11 08:00:29 [launcher.py:42] Route: /metrics, Methods: GET (APIServer pid=1) INFO: Started server process [1] (APIServer pid=1) INFO: Waiting for application startup. (APIServer pid=1) INFO: Application startup complete. -
應用程式會使用
32s中的一般影像在 Pod 上啟動。INFO 12-11 08:01:19 [__init__.py:216] Automatically detected platform cuda. (APIServer pid=1) INFO 12-11 08:01:22 [api_server.py:1839] vLLM API server version 0.11.0 (APIServer pid=1) INFO 12-11 08:01:22 [utils.py:233] non-default args: {'model_tag': 'cpatonn/Qwen3-30B-A3B-Instruct-2507-AWQ-4bit', 'max_model_len': 8192, 'enforce_eager': True} ... (APIServer pid=1) INFO 12-11 08:01:51 [launcher.py:42] Route: /metrics, Methods: GET (APIServer pid=1) INFO: Started server process [1] (APIServer pid=1) INFO: Waiting for application startup. (APIServer pid=1) INFO: Application startup complete. -
使用 eStargz 影像的 Pod 可提供服務速度比一般流量快
1m22s。
結論
在 OKE 中使用 eStargz 格式導入遲緩映像檔可顯著改善 Pod 初始化時間,將容器啟動時間從 4 分鐘縮短為 33 秒,減少 87%。雖然 eStargz 容器內的應用程式初始化時間比一般影像長約 1 分鐘 (1m27s vs 32s),但準備就緒狀態的整體時間仍會加快 1m22s,讓 Pod 可供流量更快。由於初始容器提取時間大幅縮短超過應用程式啟動負荷的最低需求,因此在快速調整規模、Pod 重新排定或冷啟動的生產環境中,這項權衡非常有價值。對於使用大型容器映像 (尤其是 AI 工作負載) 的工作負載,使用 eStargz 進行遲緩提取,提供了可加速部署的實用解決方案,無需變更應用程式程式碼或重大基礎架構修改。
相關連結
確認
- Authors :Andrei Ilas (首席雲端架構師)
其他學習資源
您可以在 docs.oracle.com/learn 上探索其他實驗室,或在 Oracle Learning YouTube 頻道上存取更多免費學習內容。此外,請造訪 education.oracle.com/learning-explorer 以成為 Oracle Learning Explorer。
如需產品文件,請造訪 Oracle Help Center 。
Enable Lazy Container Image Loading in Oracle Cloud Infrastructure Kubernetes Engine (OKE) Using Stargz Store
G56892-01