將 Office 365 與 OAM 和 IdP 整合
這是我們使用 SAML 2.0 通訊協定將 OAM (11.1.2.2.0 或更新版本) 設定為 IdP 與 Office 365 的文章。
請務必閱讀關於先決條件的文章。
整合涵蓋:
-
瀏覽器聯合 SSO 整合:這是使用者透過瀏覽器存取
www.office365.com資源時所行使的流程 -
www.office365.com會提示使用者輸入電子郵件地址 -
伺服器偵測到該網域應使用聯合 SSO,並啟動 IdP 的聯合 SSO 流程
-
IdP 會挑戰使用者、建立「SAML 宣告」並將使用者重新導向至
www.office365.com -
www.office365.com授予使用者存取權 -
ActiveSync 郵件整合:在此流程中,使用者會使用為 Office 365 設定的郵件應用程式
-
啟動郵件應用程式時,會將使用者的證明資料 (電子郵件地址和 IdP 密碼) 傳送至 Office 365。
www.office365.com會透過 SSL 直接連線到 IdP,並使用 SAML 2.0 ECP 協定透過 HTTP 基本認證傳送 SAML AuthnRequest 和使用者的證明資料 -
IdP 會驗證這些證明資料,並透過 ECP 協定傳回 SAML 宣告
-
Office 365 授予郵件應用程式的存取權
請務必注意,與非 SAML 2.0 元件的 Office 365 整合將無法運作,例如:
-
Lync 客戶端程式
-
OWA 行動應用程式
本文的基礎為:
-
從 Oracle 團隊執行的測試
-
關於 SAML 2.0 對 Office 365 支援的 Microsoft 文章,更明確地說是設定 Office 365 所需的技術文件清單步驟 (使用者管理與聯合信任機構)
-
Microsoft 部落格
-
說明如何設定 Office 365 的技術文件
測試環境
針對此測試整合,請使用下列方法:
-
使用者在 OAM:
-
使用者名稱 (uid 屬性) :alice.appleton
-
電子郵件地址 (郵件屬性) :alice.appleton@acme.com
-
名字 (名字屬性) :愛麗絲
-
姓氏 (sn 屬性) :Appleton
-
-
Office 365 使用者別名 (請參閱 Microsoft 技術文件,瞭解如何在 Azure AD 中建立使用者的詳細資訊):
-
UserPrincipalName:alice.appleton@acme.com
-
ImmutableId:alice.appleton
-
DisplayName:Alice Appleton
-
FirstName :愛麗絲
-
LastName:Appleton
-
UsageLocation :我們
-
-
同盟協議:
-
SAML 2.0 NameID 格式:
urn:oasis:names:tc:SAML:2.0:nameid-format:persistent -
用來填入 SAML 2.0
NameID值的 LDAP 屬性:uid(因為NameID必須符合ImmutableId)
-
-
SAML 宣告中包含的 SAML 屬性
-
名稱:IDPEmail
-
用於填入此屬性值的 LDAP 屬性:郵件 (因為屬性值必須符合
UserPrincipalName)
-
-
Office 365 細節:
-
網域名稱為
acme.com -
將使用的協定為 SAMLP
-
ActiveSync 郵件應用程式將支援 OAM 組態
-
在 IdP 中將 Office 365 設定為 SP 包含:
-
建立 SP 屬性設定檔以傳送包含郵件屬性的
IDPEmail屬性 -
為 Office 365 建立服務點合作夥伴,並將其連結至新的服務點屬性設定檔
-
更新 Office 365 SP 合作夥伴組態
-
簽章中的 SHA-1 雜湊演算法
-
在外送 SAML 訊息中包含 OAM 的簽署憑證
-
ActiveSync 郵件整合的 HTTP 基本認證
Office 365 組態
閱讀本節時,請參考下列 Microsoft 資訊:
-
Microsoft 部落格
-
說明如何設定 Office 365 的技術文件
Windows Powershell
確保 Windows Powershell 工具已安裝在您連接 Office 365 的電腦上,以供管理之用。
在 Office 365 中將 IdP 佈建為合作夥伴
若要建立 OAM 作為 Office 365 中 acme.com 網域的 IdP 合作夥伴,請執行下列步驟:
-
以 acme.com 的管理員身分連線至 Office 365
-
連線 -MsolService
-
設定下列環境變數 (使用的資料是從先決條件段落擷取的資料;請注意,
$idpSigningCert的字串與$idpSigningCert =位於同一行,而且是單行): -
$domainName= "acme.com" -
$BrandName- "ACME IdP" -
$browserSSOLoginURL= "https://acme.com/oamfed/idp/samlv20 -
$ecpSSOURL= "https://acme.com/oamfed/idp/soap" -
$logoutURL= "https://acme.com/oamfed/idp/samlv20 -
$issuerProviderID= "https://acme.com/oam/fed" -
$idpSigningCert= "MIIB+DCCAWGgAwIBAgIBCjANB......oInVUbGTBDMfqmW5iZ/wjpzItg==" $ssoProtocol = "SAMLP" -
使用上述變數執行下列命令:
Set-MsolDomainAuthentication -DomainName $domainName-FederationBrandName $BrandName -Authentication Federated -PassiveLogOnUri$browserSSOLoginURL -ActiveLogOnUri $ecpSSOURL -SigningCertificate$idpSigningCert -IssuerUri $issuerProviderID -LogOffUri $logoutURL-PreferredAuthenticationProtocol $ssoProtocol
OAM 組態
SP 屬性設定檔
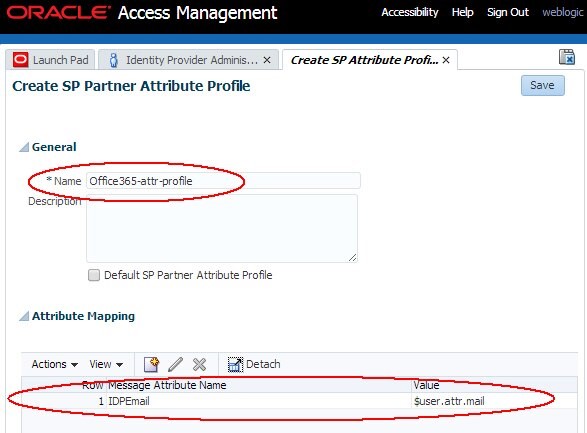
若要建立新的「SP 屬性設定檔」,而此設定檔將設定為傳送包含使用者 UPN 值的「SAML IDPEmail 屬性」,請執行下列作業:
-
前往「OAM 管理主控台」:
http(s)://oam-admin-host:oam-admin port/oamconsole。 -
瀏覽至 Identity Federation 、 Identity Provider Administration 。
-
按一下服務提供者屬性設定檔頁籤。
-
按一下建立 SP 屬性設定檔按鈕。
-
輸入新設定檔的名稱 (例如
Office365-attr-profile)。 -
在「屬性對應」區段中,按一下新增。
-
輸入下列資訊:
-
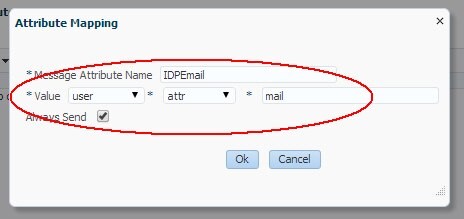
訊息屬性名稱:
IDPEmail -
值:在 OAM 所使用的目錄中,輸入包含使用者 UPN 的 LDAP 使用者屬性 (在此範例中: user 、 attr 、 mail)
-
一律傳送:已勾選
-
-
按一下確定。
- 按一下儲存。
將會顯示「屬性設定檔」:
Office 365 SP 合作夥伴
若要將 Office 365 新增為 OAM 中的 SP 合作夥伴,請執行下列步驟:
-
移至「OAM 管理主控台」:
http(s)://oam-admin-host:oam-admin port/oamconsole -
瀏覽至 Identity Federation , Identity Provider Administration
-
按一下建立服務提供者夥伴按鈕
-
在「建立」畫面中:
-
輸入夥伴的名稱 (例如 Office365)
-
選取 SAML 2.0 作為協定
-
按一下載入描述資料,然後上傳 Office 365 的 SAML 2.0 描述資料 =le
-
選取「永久」作為
NameID格式 -
輸入包含使用者之
ImmutableId值的 LDAP 使用者屬性 (在此範例中為uid) -
選取先前建立的「SP 屬性設定檔」(在本例中為
Office365-attr-profile)
-
-
按一下儲存 (Save)
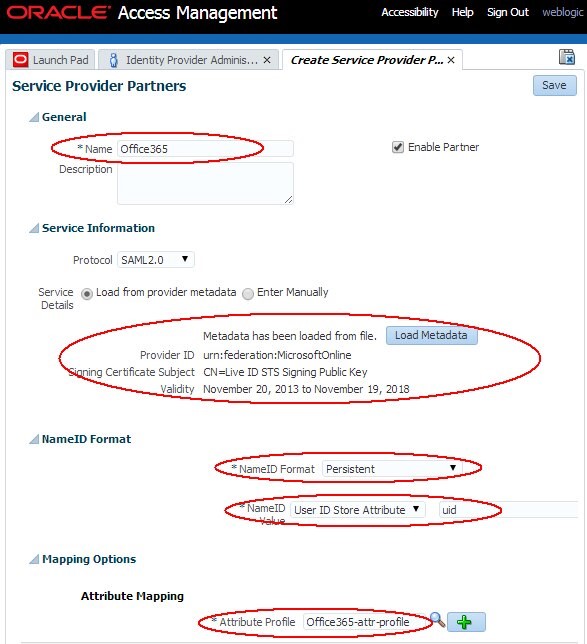
Service_Provider_Partner.jpg 圖解說明
SHA-1 數位簽章的雜湊演算法
若要將 OAM 設定為使用 SHA-1 作為 Office 365 SP 合作夥伴的簽名,請執行下列步驟:
-
執行下列動作以輸入 WLST 環境:
$IAM_ORACLE_HOME/common/bin/wlst.sh -
連線「WLS 管理」伺服器:
connect() -
瀏覽至「網域程式實際執行」分支:
domainRuntime() -
執行
configureFedDigitalSignature()指令: -
以新增的夥伴名稱取代
PARTNER_NAME- 範例:
configureFedDigitalSignature(partner="Office365", partnerType="sp”, algorithm="SHA-1")
- 範例:
-
結束 WLST 環境:
exit()
configureFedDigitalSignature(partner="PARTNER_NAME", partnerType="sp",algorithm="SHA-256/SHA-1")
OAM 在 XML 數位簽章中的簽署憑證
若要設定 OAM,讓 Federation 伺服器在 Office 365 SP 夥伴的所有外送簽署 SAML 訊息中包含其 X.509 簽署憑證,請執行下列步驟:
-
執行下列動作以輸入 WLST 環境:
$IAM_ORACLE_HOME/common/bin/wlst.sh -
連線「WLS 管理」伺服器:
connect() -
瀏覽至「網域程式實際執行」分支:
domainRuntime() -
執行
updatePartnerProperty()指令:updatePartnerProperty("PARTNER_NAME", "sp", "includecertinsignature", "true""boolean") -
以新增的夥伴名稱取代 PARTNER_NAME。範例為:
- 結束 WLST 環境:
exit()
updatePartnerProperty("Office365", "sp", "includecertinsignature", "true", "boolean")
ActiveSync 郵件整合的 HTTP 基本認證
在 SAML 2.0 ECP 流程中,Office 365 伺服器透過 HTTPS 透過 SOAP 直接連線 IdP,並張貼 SAML AuthnRequest 訊息。除了 SOAP 要求之外,HTTP 要求會在「HTTP 基本認證」標頭中包含使用者的證明資料。
必須設定 IdP,才能使用「OAM HTTP 基本認證」配置來驗證這些證明資料。此外,這項作業也不得導致建立 OAM 階段作業,因為這是由 Office 365 伺服器起始的證明資料驗證作業,而不是與 OAM 有關的使用者。基於這些原因,必須將 IdP 設定為根據下列項目使用配置:
-
BASIC 模式
-
包含
CookieLessMode=true項目的安全提示參數
BasicSessionlessScheme 可用於此流程。
此外,當用戶端透過 BasicSessionlessScheme 進行驗證時,OAM 必須設定為傳送 urn:oasis:names:tc:SAML:2.0:ac:classes:PasswordProtectedTransport 作為 SAML 2.0 驗證方法。
若要設定讓 OAM 在 SAML 2.0 ECP 流程中使用 HTTP 基本認證,請執行下列步驟:
-
執行下列動作以輸入 WLST 環境:
$IAM_ORACLE_HOME/common/bin/wlst.sh -
連線「WLS 管理」伺服器:
connect() -
瀏覽至「網域程式實際執行」分支:
domainRuntime() -
執行
setSPPartnerAlternateScheme()命令以指示 OAM 使用BasicSessionlessScheme:setSPPartnerAlternateScheme(PARTNER_NAME, "true", httpHeaderName="X-MSClient-Application", httpHeaderExpression=".\*Microsoft.Exchange..\*" authnScheme="BasicSessionlessScheme") -
以新增的夥伴名稱取代 PARTNER_NAME
- 擷取 OAM 中 Office 365 SP 合作夥伴所使用的 OAM Fed 合作夥伴設定檔:
- 以新增的夥伴名稱取代
PARTNER_NAME -
執行
addSPPartnerProfileAuthnMethod()命令,指示當從屬端透過BasicSessionlessScheme認證時,OAM 傳送 "urn:oasis:names:tc:SAML:2.0:ac:classes:PasswordProtectedTransport" 作為 SAML 2.0 認證方法:addSPPartnerProfileAuthnMethod(PARTNER_PROFILE,"urn:oasis:names:tc:SAML:2.0:ac:classes:PasswordProtectedTransport","BasicSessionlessScheme") -
以先前步驟中擷取的值取代 PARTNER_PROFILE
- 結束 WLST 環境:
exit()
範例:setSPPartnerAlternateScheme("Office365", "true", httpHeaderName="X-MS-Client-Application", httpHeaderExpression=".\*Microsoft.Exchange..\*" authnScheme="BasicSessionlessScheme")
getFedPartnerProfile(PARTNER_NAME "sp")
範例:getFedPartnerProfile("Office365", "sp") 寫下傳回的值
範例:addSPPartnerProfileAuthnMethod("saml20-sp-partner-profile", "urn:oasis:names:tc:SAML:2.0:ac:classes:PasswordProtectedTransport", "BasicSessionlessScheme")
測試
瀏覽器 SSO
測試瀏覽器 SSO 流程:
-
開啟瀏覽器
-
前往
http://office365.com -
按一下登入
-
輸入使用者的電子郵件地址
- 按一下下一步
-
在 IdP 輸入使用者名稱 / 密碼 (視用於認證聯合使用者的認證配置而定,此範例中的
LDAPScheme) -
按一下登入
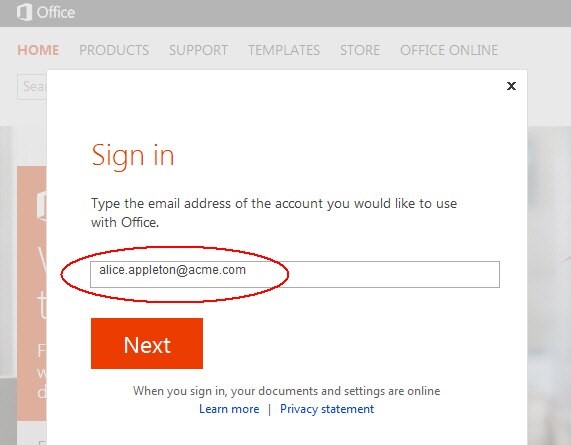
Office 365 會根據電子郵件地址的尾碼嘗試尋找您的 Office 365 網域
找到網域之後,Office 365 會觸發「聯合 SSO」流程,將您重新導向至 OAM / IdP 以進行認證
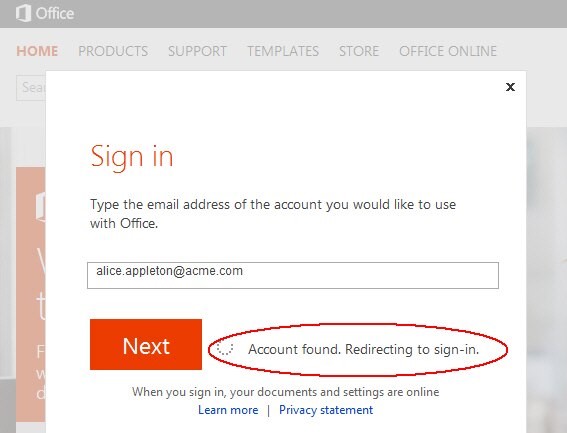
[Description of the illustration Account_Found_Page.jpg](files/Account_Found_Page.txt)
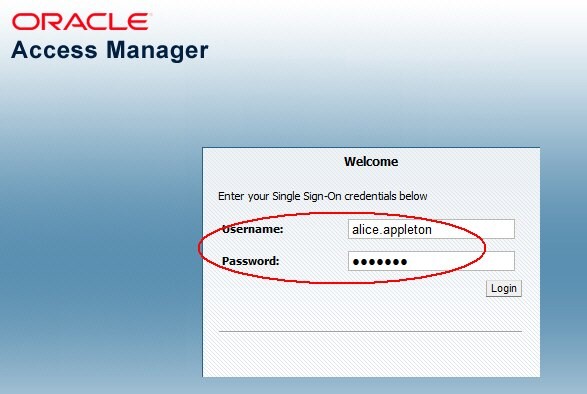
Access_Manager_Screen.jpg 圖解說明
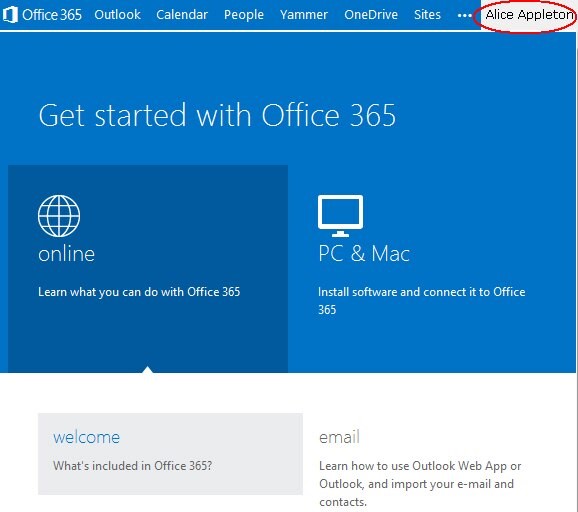
IdP 會驗證證明資料、建立「SAML 2.0 宣告」,並將使用者重新導向回 Office 365,讓使用者獲得存取權:
OAM / IdP 傳送給 Office 365 的範例 SAML 2.0 宣告如下:
<samlp:Response ... Destination="https://login.microsoftonline.com/login.srf" ID="ideBpq-cnpGfrWXMpBIjxN7QPQKa6WTVtnuZZr0Qe" InResponseTo="_d111d2a7-3475-4bc2-928f-34b83a4a0f64"IssueInstant="2014-01-18T16:58:05Z" Version="2.0"> <saml:Issuer Format="urn:oasis:names:tc:SAML:2.0:nameidformat:entity">https://acme.com/oam/fed</saml:Issuer <samlp:Status><samlp:StatusCodeValue="urn:oasis:names:tc:SAML:2.0:status:Success"/></samlp:Status>

<saml:Assertion ID="id-nTZcRuTaECKj2X9wzUTn7e-CknyECbGljTSo1T70"

IssueInstant="2014-01-18T16:58:05Z" Version="2.0"> <saml:Issuer Format="urn:oasis:names:tc:SAML:2.0:nameidformat:entity">https://acme.com/oam/fed</saml:Issuer

<dsig:Signature>

<dsig:SignedInfo>

<dsig:CanonicalizationMethod Algorithm="http://www.w3.org/2001/10/xml-ex c14n#"/>

<dsig:SignatureMethod Algorithm="http://www.w3.org/2000/09/xmldsig#rs sha1"/>

<dsig:Reference URI="#id-nTZcRuTaECKj2X9wzUTn7e-CknyECbGljTSo1T70">

<dsig:Transforms>

<dsig:Transform Algorithm="http://www.w3.org/2000/09/xmldsig#envelope signature"/>

<dsig:Transform Algorithm="http://www.w3.org/2001/10/xml-exc-c14n#"/>

</dsig:Transforms>

<dsig:DigestMethod Algorithm="http://www.w3.org/2000/09/xmldsig#sha1"

<dsig:DigestValue>6iKaxdO74Xi5eRnv0X7nsmN/y10=</dsig:DigestValue>

</dsig:Reference>

</dsig:SignedInfo>

<dsig:SignatureValue>WYCBhIgPLafDeXroMSME80/QM...K/sNsI=

</dsig:SignatureValue>

<dsig:KeyInfo>

<dsig:X509Data>

<dsig:X509Certi=cate>MIIB+DCCAWGgA...plaoMZLcRoInVUbGTBDMfqmW5iZ/wjpzItg==

</dsig:X509Certi=cate>

</dsig:X509Data>

</dsig:KeyInfo>

</dsig:Signature>

<saml:Subject>

<saml:NameID Format="urn:oasis:names:tc:SAML:2.0:nameid-format:persistent"NameQuali=er="https://acme.com/oam/fed"SPNameQuali=er="urn:federation:MicrosoftOnline">alice.appleton</saml:NameID>

<saml:SubjectConfirmation Method="urn:oasis:names:tc:SAML:2.0:cm:bearer">

<saml:SubjectConfirmationData InResponseTo="_d111d2a7-3475-4bc2-928f-

34b83a4a0f64" NotOnOrAfter="2014-01-18T17:03:05Z"

Recipient="https://login.microsoftonline.com/login.srf"/></saml:SubjectCon=rmatio

</saml:Subject>

<saml:Conditions NotBefore="2014-01-18T16:58:05Z"

NotOnOrAfter="2014-01-18T17:03:05Z">

<saml:AudienceRestriction>

<saml:Audience>urn:federation:MicrosoftOnline</saml:Audience>

</saml:AudienceRestriction>

</saml:Conditions>

<saml:AuthnStatement AuthnInstant="2014-01-18T16:58:05Z" SessionIndex="id-IMSvfoQa8uVVtSmN-lrdOfgEVKFJHF8AhmIDzj-"

SessionNotOnOrAfter="2014-01-18T17:58:05Z">

<saml:AuthnContext>

<saml:AuthnContextClassRef>urn:oasis:names:tc:SAML:2.0:ac:classes:PasswordProtectedTransport</saml:AuthnCon </saml:AuthnContext>

</saml:AuthnStatement>

<saml:AttributeStatement>

<saml:Attribute Name="IDPEmail"

NameFormat="urn:oasis:names:tc:SAML:2.0:attrname-format:basic"> <saml:AttributeValue xmlns:xs="http://www.w3.org/2001/XMLSchema xsi:type="xs:string">alice.appleton@acme.com</saml:AttributeValue>

</saml:Attribute>

</saml:AttributeStatement>

</saml:Assertion>

</samlp:Response>
ActiveSync 郵件應用程式
針對此測試,請在 iPhone 上新增 Exchange 電子郵件帳戶。在設定期間,iPhone 郵件應用程式會將電子郵件地址和密碼傳送至 Office 365 郵件伺服器,從電子郵件地址擷取使用者識別碼,並使用「HTTP 基本認證」執行 SAML 2.0 ECP 通訊協定。
注意:如果設定涉及 Outlook Desktop 應用程式,而非 iPhone 郵件原生應用程式,則會行使類似的流程。
執行下列步驟以使用 Office 365 設定 iPhone:
-
前往設定
-
移至郵件
-
新增帳戶
-
選取交換
-
輸入電子郵件地址 (在此範例中為 alice.appleton@acme.com)
-
使用者在 OAM 的密碼 (alice.appleton 使用者的密碼;請記住,此 ID 將作為 HTTP 基本認證使用者名稱,此範例中的 alice.appleton)
- 按一下下一步
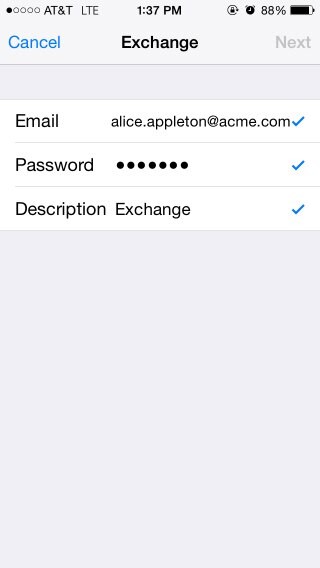
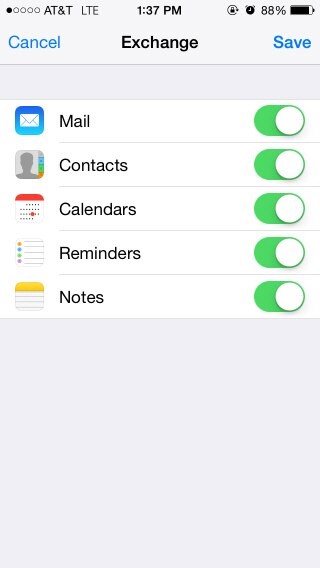
- 顯示成功驗證之後,iPhone 會顯示畫面,讓使用者選取要啟用的功能。選取功能之後,請儲存。已立即設定帳戶。
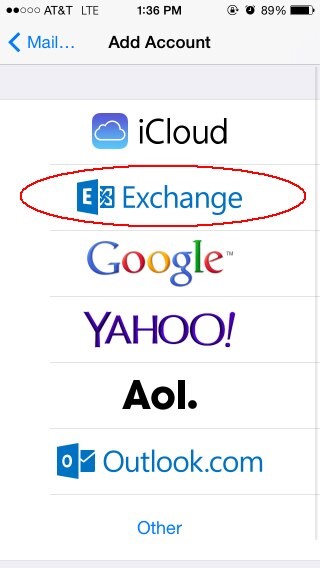
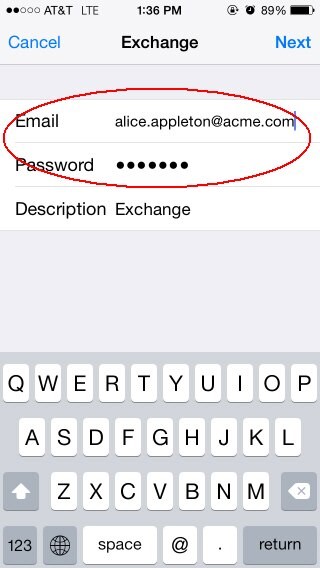
郵件應用程式會將使用者帳戶資訊傳送至 Office 365 郵件伺服器 Office 365 郵件伺服器,透過 SAML 2.0 ECP 協定與 OAM / IdP 進行互動,以透過 HTTP 基本認證傳送至 OAM / IdP 的使用者 ID 與密碼驗證資料
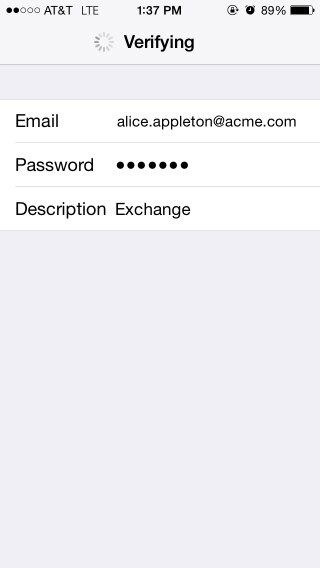
驗證成功後,iPhone 會顯示:
其他學習資源
探索 docs.oracle.com/learn 上的其他實驗室,或存取 Oracle Learning YouTube 頻道上的更多免費學習內容。此外,瀏覽 education.oracle.com/learning-explorer 成為 Oracle Learning Explorer。
如需產品文件,請造訪 Oracle Help Center 。
Integrating Office 365 with OAM and IdP
F60938-01
September 2022
Copyright © 2022, Oracle and/or its affiliates.