建立並部署 NFT 智慧型合約
在本節中,您將瞭解如何建立與部署設定「NFT 市集」所需的 NFT 智慧型合約。
使用區塊鏈 App 產生智能合約,以管理礦業、擁有及傳輸 NFT。此解決方案的核心啟用者就是使用 Oracle Blockchain Platform 進行 NFT 進行 mint 與傳輸的功能。
首先,建立一個 NFT 規格檔案,然後將智能合約部署到 Oracle Blockchain Platform 執行處理。接著,您可以測試智能合約。
安裝區塊鏈 App 產生器
佈建 Oracle Blockchain Platform 執行處理之後,請完成下列步驟:
- 在 Oracle Blockchain Platform 主控台中,開啟開發人員工具頁籤,然後選取區塊鏈 App 產生器窗格。
- 在下載區段中,下載命令行介面 (CLI) 工具存檔或 Visual Studio (VS) 程式碼擴充功能,然後在本機設定。
自訂範例 NFT 規格檔案
區塊鏈 App Builder 包含了範例 NFT 規格檔案。您可以使用它並根據您的需求加以修改,如下列範例所示:
 assets:
    - name: ArtCollection
      type: token
      symbol: ART      #mandatory
      standard: erc721+
      anatomy:
        type: nonfungible
        unit: whole
      behavior:
        - indivisible      # mandatory
        - singleton        # mandatory
        - mintable:        # mandatory
            max_min_quantity: 20000
        - transferable
        - burnable
        - roles:
            minter_role_name: minter
      properties:
        - name: price
          type: number
        - name: on_sale_flag
          type: boolean
      metadata:
        - name: painting_name
          type: string
        - name: description
          type: string
        - name: image
          type: string
        - name: painter_name
          type: string
 customMethods:
    - executeQuery
    - "createAccountByConsumers(org_id: string, user_id: string, token_type: string)" # Create accounts for consumers while signing up
    - "sell(token_id: string, selling_price: number)" # Post the token for selling in the marketplace
    - "buyWithTokens(from_org_id: string, from_user_id: string, to_org_id: string, to_user_id: string, nonfungible_token_id: string, fungible_token_id: string, amount_paid: number)"  # Buy the NFT after paying the using FT Tokens
    - "buyWithDirectPayment(from_org_id: string, from_user_id: string, to_org_id: string, to_user_id: string, nonfungible_token_id: string, amount_paid: number)"  # Buy the NFT after paying the amount using payment gateway
您可以新增自訂特性和方法,以擴充 NFT 鏈碼的這項設定。區塊鏈 App 產生器產生的 NFT 鏈碼是以 ERC-721 標準為基礎。
若要使用 Visual Studio Code 擴充功能產生鏈碼 (智能合約),請完成下列步驟:
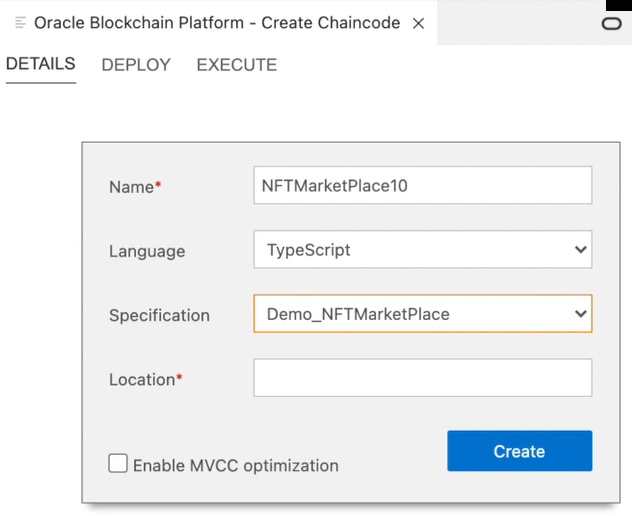
- 在編碼區段中,按一下 + 圖示。密碼詳細資訊窗格便會開啟。
- 完成產生鏈碼專案所需的欄位:
- 輸入鏈碼專案的名稱。
- 選取
TypeScript或Go作為產生鏈碼方法的語言。 - 選取您先前建立的輸入規格檔案。
- 輸入您要產生專案的地點。
- 按一下建立。
UI 的下列螢幕擷取畫面顯示建立鏈碼視窗。

blockchain_chaincode_details.png 圖解說明
src 目錄下的檔案,複查模型與控制器實作。
- 模型檔案包含所有產生的資料結構,代表記號、帳戶等等。
- 控制器檔案包含所有產生的 NFT 生命週期方法,並根據規格以必要的驗證邏輯支援函數。
/**
*
* BDB sql rich queries can be executed in OBP CS/EE.
* This method can be invoked only when connected to remote OBP CS/EE network.
*
*/
@Validator(yup.string())
    public async executeQuery(query: string) {
        const result = await this.query(query);
        return result;
    }
@Validator(yup.string(), yup.string(), yup.string())
          public async createAccountByConsumers(org_id: string, user_id: string, token_type: string) {
          //await this.Ctx.ERC721Auth.checkAuthorization('ERC721ACCOUNT.createAccount', 'TOKEN');
          return await this.Ctx.ERC721Account.createAccount(org_id, user_id, token_type);
    }
@Validator(yup.string(), yup.number())
public async sell (token_id: string, selling_price: number) {
          try {
            const token = await this.Ctx.ERC721Token.get(token_id);
            const t = new ArtCollection(token)
            t.price =  selling_price;
            t.on_sale_flag = true;
            //console.log(token);
            await this.Ctx.ERC721Token.update(t);
            return `Token ID : '${token_id}' has been posted for selling in the marketplace'`;
          } catch(error) {
                throw new Error(error.message);
        }
}
@Validator(yup.string(), yup.string(), yup.string(), yup.string(), yup.string(), yup.string(), yup.number())
public async buyWithTokens(from_org_id: string, from_user_id: string, to_org_id: string, to_user_id: string, nonfungible_token_id: string, fungible_token_id: string, amount_paid: number) {
        try {
            const token = await this.Ctx.ERC721Token.get(nonfungible_token_id);
            const t = new ArtCollection(token);
            const oChainUtil = new OChainUtils(this.Ctx.Stub);
            var msg = `Token ID : '${nonfungible_token_id}' had not been transferred'`;
            if (t.on_sale_flag==true) {
                if(t.price == amount_paid) {
                     // @ts-ignore
                    await oChainUtil.invokeChaincode("LoyaltyToken7", "transferTokens", [fungible_token_id, from_org_id, from_user_id, amount_paid], "marketplace");
                    const from_account_id = await this.Ctx.ERC721Account.generateAccountId(from_org_id, from_user_id);
                    const to_account_id = await this.Ctx.ERC721Account.generateAccountId(to_org_id, to_user_id);
                    await this.Ctx.ERC721Token.transferFrom(from_account_id, to_account_id, t);

                    msg = `Token ID : '${nonfungible_token_id}' has been successfully transferred to UserID : '${to_user_id}'`;
              }
            }
            else {
                msg = `Token ID : '${nonfungible_token_id}' has not been transferred to UserID : '${to_user_id}' as the amount was not fully paid'`;
            }
            return msg;
       } catch(error)
          {
            throw new Error(error.message);
         }
}
@Validator(yup.string(), yup.string(), yup.string(), yup.string(), yup.string(), yup.number())
    public async buyWithDirectPayment(from_org_id: string, from_user_id: string, to_org_id: string, to_user_id: string, nonfungible_token_id: string, amount_paid: number) {
         try {
             const token = await this.Ctx.ERC721Token.get(nonfungible_token_id);
             const t = new ArtCollection(token);
             var msg = `Token ID : '${nonfungible_token_id}' had not been transferred'`;
           if (t.on_sale_flag==true) {
                 if(t.price == amount_paid) {
                 const from_account_id = await this.Ctx.ERC721Account.generateAccountId(from_org_id, from_user_id);
                 const to_account_id = await this.Ctx.ERC721Account.generateAccountId(to_org_id, to_user_id);
                 await this.Ctx.ERC721Token.transferFrom(from_account_id, to_account_id, t);

                 msg = `Token ID : '${nonfungible_token_id}' has been successfully transferred to UserID : '${to_user_id}'`;
                 }
             }
             else {
                 msg = `Token ID : '${nonfungible_token_id}' has not been transferred to UserID : '${to_user_id}' as the amount was not fully paid'`;
             }
             return msg;
         } catch(error) {
             throw new Error(error.message);
         }
      }
}
部署智能合約
建立鏈碼專案之後,您就可以在本機部署。
在鏈碼詳細資訊窗格中,選取部署以開啟部署精靈。區塊鏈 App Builder 包含在 Docker 容器中執行的本機區塊鏈網路,可用於測試。
您也可以從目標環境清單中選取連線設定檔,將鏈碼部署到 Oracle Blockchain Platform 執行處理。您也必須完成並儲存初始化參數,因為產生的 NFT 鏈碼需要 orgId 和 userId 參數才能進行初始化。orgId 和 userId 參數可用來指定哪些使用者擁有記號管理員權限。
測試智能合約
部署鏈碼時,Oracle Blockchain Platform 會自動公開 REST API 以進行記號初始化、帳戶和角色管理,以及 NFT 生命週期方法 (建立、傳輸、燒錄)。
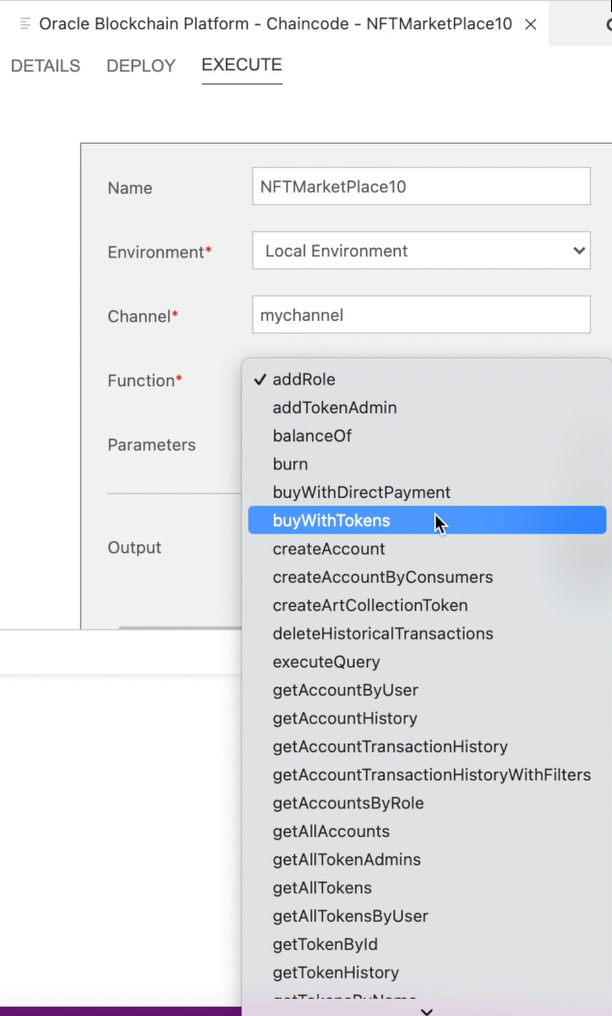
您可以藉由選取區塊鏈 App 產生器中鏈碼詳細資訊窗格上的執行,或使用 REST API 從屬端 (例如 Postman) 來測試。
UI 的下列螢幕擷取畫面顯示建立鏈碼視窗的執行頁籤。

blockchain_chaincode_execute.png 圖解說明
若要使用 REST API 呼叫 Oracle Blockchain Platform 智慧型合約方法,請使用 POST 方法並指定 URL,此 URL 由兩個部分一起串連。第一個部分是 Oracle Blockchain Platform 的 REST 代理主機端點,您可以從 Oracle Blockchain Platform 主控台的節點頁籤取得此端點。
第二部分是使用 Transaction API 呼叫交易的特定 URI。請參閱文件以傳送 POST 要求。這兩個部分會形成一個類似於此處的完整 URL。
https://oabcs1-iad.blockchain.ocp.oraclecloud.com:7443/restproxy/api/v2/channels/{channelName}/transactions將 {channelName} 取代為部署鏈碼時所指定的通道名稱,例如 marketplace。建構 API 要求時,請完成下列步驟:
- 將授權設為將
Basic Auth與指定給REST_Client角色的userid and password搭配使用。您也可以使用OAuth2記號。如需詳細資訊,請參閱 REST API 指南中的使用 OAuth 2.0 存取權杖型驗證。 - 將
Content-Type標頭設為application/json。 - 在要求的內文中,包含交易呼叫所需的參數,包括鏈碼名稱和
create<TokenName>Token方法,以及必要的引數。
根據從 yaml 樣板產生的鏈碼,下列文字顯示範例要求主體和關聯的回應。
要求
{
    "chaincode": "{{NFTChaincode}}",
    "args": [
        "createArtCollectionToken",
        "{\"token_id\":\"{{NFTTokenID}}\",\"token_uri\":\"https://ipfs.io/ipfs/QmV68aiT7xw2WX8pmDbeTWpGP2or35NUFan9RagymsLpgV?filename=ArtCollection_NFT1.json\",\"metadata\":{\"painting_name\":\"Oracle - Red Bull Partnership\",\"image\":\"https://ipfs.io/ipfs/QmVap6Gkh3Cp9DiLLWvkvJHpuXpFmYB2GzU1caM57gNcAa?filename=Oracle_RedBull_NFT1.jpeg\",\"painter\":\"Alex\"},\"price\":200,\"on_sale_flag\":false}"
    ],
    "timeout": 0,
    "sync": true
}
回應
{
    "returnCode": "Success",
    "error": "",
    "result": {
        "txid": "c999922f04c3011bf25ca43624e4bb23e8900634f8e23a1648170a90274a9733",
        "payload": {
            "metadata": {
                "painter": "Alex",
                "painting_name": "Oracle - Red Bull Partnership",
                "image": "https://ipfs.io/ipfs/QmVap6Gkh3Cp9DiLLWvkvJHpuXpFmYB2GzU1caM57gNcAa?filename=Oracle_RedBull_NFT1.jpeg"
            },
            "assetType": "otoken",
            "created_by": "oaccount~eadf1b0ae857164f8681d1742b6328089a7d33ebec76d8248cb909da7a84f42a",
            "creation_date": "2022-04-28T12:08:38.000Z",
            "owner": "oaccount~eadf1b0ae857164f8681d1742b6328089a7d33ebec76d8248cb909da7a84f42a",
            "uri": "https://ipfs.io/ipfs/QmV68aiT7xw2WX8pmDbeTWpGP2or35NUFan9RagymsLpgV?filename=ArtCollection_NFT1.json",
            "is_burned": false,
            "token_id": "NFT17",
            "token_name": "artcollection",
            "symbol": "ART",
            "token_standard": "erc721+",
            "token_type": "nonfungible",
            "token_unit": "whole",
            "behaviors": [
                "indivisible",
                "singleton",
                "mintable",
                "transferable",
                "burnable",
                "roles"
            ],
            "roles": {
                "minter_role_name": "minter"
            },
            "mintable": {
                "max_mint_quantity": 20000
            },
            "token_uri": "https://ipfs.io/ipfs/QmV68aiT7xw2WX8pmDbeTWpGP2or35NUFan9RagymsLpgV?filename=ArtCollection_NFT1.json",
            "price": 200,
            "on_sale_flag": false
        },
如需有關管理 NFT 鏈碼可用方法的詳細資訊,請參閱瀏覽更多小節,包括 Golang 或 TypeScript 方法和 Platform REST API。
您可以直接從 Oracle Content Management Webhook 和視覺化產生器 Cloud Service (VBCS) 建置的 Web 應用程式呼叫 API,或者重新對應並包裝 API 閘道,供外部代管的市集 Web 應用程式使用。請注意,當您建立 (mint) NFT 時,必須提供的其中一個參數是 token_uri,這可以是指向代表數位物件的 JSON 檔案的 IPFS URI。
https://ipfs.io/ipfs/QmV68aiT7xw2WX8pmDbeTWpGP2or35NUFan9RagymsLpgV?filename=ArtCollection_NFT1.json下列步驟說明使用 IPFS 桌面產生權杖 URI 的範例:
- 在
IPFS上上傳影像檔,並儲存影像的 URI。 - 建立並上傳包含影像 URI 以及相關描述資料欄位的
JSON檔案。 - 共用與複製 ... 底下
JSON檔案的連結。更多清單。
{
    "painting_name": "Oracle - Red Bull Partnership",
    "description": "Cloud Partnership",
    "image": "https://ipfs.io/ipfs/QmVap6Gkh3Cp9DiLLWvkvJHpuXpFmYB2GzU1caM57gNcAa?filename=Oracle_RedBull.jpeg",
    "painter_name": "Alex"
}
請使用指向 JSON 檔案的 URI 作為 token_uri 參數。
您也可以將相關描述資料納入傳送到 create<Token-Name>Token 方法的屬性中,此方法會在 Oracle Blockchain Platform 分類帳中維護描述資料以輕鬆擷取。
對於使用 Oracle Content Management (OCM) 建立的 NFT,請使用 OCM Webhook 使用 API 閘道呼叫 Oracle Functions,並將 REST API 呼叫放置在 Oracle Functions 中,如架構圖所示。您也可以從市集 Web 應用程式直接呼叫區塊鏈 REST API,或使用 API 閘道對應來支援使用者產生的內容。市集交易功能可叫用自訂方法來處理付款,然後觸發 NFT 所有權的轉移,例如 buyWithTokens 和 buyWithDirectPayment 範例方法。