Using JavaFX UI Controls
16 Slider
In this chapter, you learn how to use sliders in your JavaFX applications to display and interact with a range of numeric values.
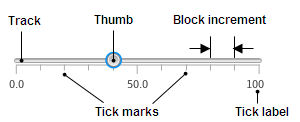
The Slider control consists of a track and a draggable thumb. It can also include tick marks and tick labels that indicate numeric values of the range. Figure 16-1 shows a typical slider and indicates its main elements.
Creating a Slider
Take a moment to review the code fragment in Example 16-1 that produces a slider shown in Figure 16-1.
Example 16-1 Creating a Slider
Slider slider = new Slider();
slider.setMin(0);
slider.setMax(100);
slider.setValue(40);
slider.setShowTickLabels(true);
slider.setShowTickMarks(true);
slider.setMajorTickUnit(50);
slider.setMinorTickCount(5);
slider.setBlockIncrement(10);
The setMin and setMax methods define, respectively, the minimum and the maximum numeric values represented by the slider. The setValue method specifies the current value of the slider, which is always less than the maximum value and more than the minimum value. Use this method to define the position of the thumb when the application starts.
Two Boolean methods, setShowTickMarks and setShowTickLabels, define the visual appearance of the slider. In Example 16-1, the marks and labels are enabled. Additionally, the unit distance between major tick marks is set to 50, and the number of minor ticks between any two major ticks is specified as 5. You can assign the setSnapToTicks method to true to keep the slider's value aligned with the tick marks.
The setBlockIncrement method defines the distance that the thumb moves when a user clicks on the track. In Example 16-1, this value is 10, which means that each time a user clicks on the track, the thumb moves 10 units toward the click location.
Using Sliders in Graphical Applications
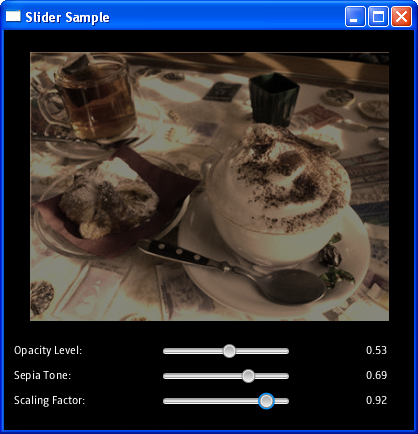
Now examine Figure 16-2. This application uses three sliders to edit rendering characteristics of a picture. Each slider adjusts a particular visual characteristic: opacity level, sepia tone value, or scaling factor.
Example 16-2 shows the source code of this application.
Example 16-2 Slider Sample
import javafx.application.Application;
import javafx.beans.value.ChangeListener;
import javafx.beans.value.ObservableValue;
import javafx.geometry.Insets;
import javafx.scene.Group;
import javafx.scene.Scene;
import javafx.scene.control.Label;
import javafx.scene.control.Slider;
import javafx.scene.effect.SepiaTone;
import javafx.scene.image.Image;
import javafx.scene.image.ImageView;
import javafx.scene.layout.GridPane;
import javafx.scene.paint.Color;
import javafx.stage.Stage;

public class Main extends Application {

    final Slider opacityLevel = new Slider(0, 1, 1);
    final Slider sepiaTone = new Slider(0, 1, 1);
    final Slider scaling = new Slider (0.5, 1, 1);
    final Image image  = new Image(getClass().getResourceAsStream(
        "cappuccino.jpg")
    );

    final Label opacityCaption = new Label("Opacity Level:");
    final Label sepiaCaption = new Label("Sepia Tone:");
    final Label scalingCaption = new Label("Scaling Factor:");

    final Label opacityValue = new Label(
        Double.toString(opacityLevel.getValue()));
    final Label sepiaValue = new Label(
        Double.toString(sepiaTone.getValue()));
    final Label scalingValue = new Label(
        Double.toString(scaling.getValue()));

    final static Color textColor = Color.WHITE;
    final static SepiaTone sepiaEffect = new SepiaTone();

    @Override
    public void start(Stage stage) {
        Group root = new Group();
        Scene scene = new Scene(root, 600, 400);
        stage.setScene(scene);
        stage.setTitle("Slider Sample");
        scene.setFill(Color.BLACK);

        GridPane grid = new GridPane();
        grid.setPadding(new Insets(10, 10, 10, 10));
        grid.setVgap(10);
        grid.setHgap(70);

        final ImageView cappuccino = new ImageView (image);
        cappuccino.setEffect(sepiaEffect);
        GridPane.setConstraints(cappuccino, 0, 0);
        GridPane.setColumnSpan(cappuccino, 3);
        grid.getChildren().add(cappuccino);
        scene.setRoot(grid);

        opacityCaption.setTextFill(textColor);
        GridPane.setConstraints(opacityCaption, 0, 1);
        grid.getChildren().add(opacityCaption);


        opacityLevel.valueProperty().addListener(new ChangeListener<Number>() {
            public void changed(ObservableValue<? extends Number> ov,
                Number old_val, Number new_val) {
                    cappuccino.setOpacity(new_val.doubleValue());
                    opacityValue.setText(String.format("%.2f", new_val));
            }
        });

        GridPane.setConstraints(opacityLevel, 1, 1);
        grid.getChildren().add(opacityLevel);

        opacityValue.setTextFill(textColor);
        GridPane.setConstraints(opacityValue, 2, 1);
        grid.getChildren().add(opacityValue);

        sepiaCaption.setTextFill(textColor);
        GridPane.setConstraints(sepiaCaption, 0, 2);
        grid.getChildren().add(sepiaCaption);

        sepiaTone.valueProperty().addListener(new ChangeListener<Number>() {
            public void changed(ObservableValue<? extends Number> ov,
                Number old_val, Number new_val) {
                    sepiaEffect.setLevel(new_val.doubleValue());
                    sepiaValue.setText(String.format("%.2f", new_val));
            }
        });
        GridPane.setConstraints(sepiaTone, 1, 2);
        grid.getChildren().add(sepiaTone);

        sepiaValue.setTextFill(textColor);
        GridPane.setConstraints(sepiaValue, 2, 2);
        grid.getChildren().add(sepiaValue);

        scalingCaption.setTextFill(textColor);
        GridPane.setConstraints(scalingCaption, 0, 3);
        grid.getChildren().add(scalingCaption);

        scaling.valueProperty().addListener(new ChangeListener<Number>() {
            public void changed(ObservableValue<? extends Number> ov,
                Number old_val, Number new_val) {
                    cappuccino.setScaleX(new_val.doubleValue());
                    cappuccino.setScaleY(new_val.doubleValue());
                    scalingValue.setText(String.format("%.2f", new_val));
            }
        });
        GridPane.setConstraints(scaling, 1, 3);
        grid.getChildren().add(scaling);

        scalingValue.setTextFill(textColor);
        GridPane.setConstraints(scalingValue, 2, 3);
        grid.getChildren().add(scalingValue);

        stage.show();
    }

    public static void main(String[] args) {
        launch(args);
    }
}
The opacity property of the ImageView object changes in accordance with the value of the first slider, named opacityLevel. The level of the SepiaTone effect changes when the value of the sepiaTone slider changes. The third slider defines the scaling factor for the picture by passing to the setScaleX and setScaleY methods the current value of the slider.
The code fragment in Example 16-3 demonstrates the methods that convert the double value returned by the getValue method of the Slider class into String. It also applies formatting to render the slider's value as a float number with two digits after the point.
Example 16-3 Formatting the Rendered Slider's Value
scalingValue.setText((Double.toString(value)).format("%.2f", value));
The next step to enhance the look and feel of a slider is to apply visual effects or CSS styles to it.
Related API Documentation
 Alla is a technical writer for Oracle. She lives in St. Petersburg, Russia, and develops tutorials and technical articles for Java and JavaFX technologies. Prior to her assignment at Oracle, she worked as a technical writer in different IT companies.


