Oracle Internet File System Setup and Administration Guide
Release 1.1

Part Number A81197-05

Home

Book List

Contents

Index

Master Index

Feedback

Go to previous page Go to next page

10
Using Oracle iFS Manager for Development Tasks

The second section of the Oracle iFS Manager Navigator contains a setting that controls objects within Oracle iFS. As a system administrator, developers may ask you to perform simple development tasks involving these objects. Many of these tasks can be performed using XML. For more information, see the Oracle Internet File System Developer's Guide.

Topics include:

Class Objects: An Overview

Using Oracle iFS Manager, you can create, modify, and delete class objects. A class object represents a class whose instances are persistently stored and managed by the Oracle iFS repository. During installation, Oracle iFS creates a number of class objects. Some of these are used internally; others are for commonly encountered data types in content management applications. An application can use the class objects provided, or create its own by subclassing them. Each class object may define one or more attributes for its data. In addition to these, a class object inherits the attributes of its superclass.

You can subclass an existing class by creating a new class object and specifying the parent class for the new class object. The new class object inherits all the attributes of the parent class and allows you to define additional attributes. These activities will be commonplace as they are the easiest way to customize Oracle iFS without writing Java or XML code.

For example, to create a custom document type, you would create a new class object, such as purchase order, with a parent class of document and specify any additional attributes you want associated with the purchase order (Due Date, Customer Number, etc.). You can subclass object types using Oracle iFS Manager by creating new class objects.

The Complete Class Hierarchy

The Oracle iFS class hierarchy is presented below. Note that the classes are subdivided into three groups under each abstract superclass: public object, system object, and schema object. The class hierarchy shows which child classes inherit from which parent classes. For example, Primary User Profile is a child class of User Profile and inherits all the attributes of User Profile. You can add or create new classes through subclassing.


Note:

The JavaDoc does not expose all classes listed in this class hierarchy, although those not exposed are still listed. 


PublicObject
	AccessControlList
	SystemAccessControlList
	ClassAccessControlList
	ApplicationObject
			ContentQuota
	PropertyBundle
			PolicyPropertyBundle
			ValueDefaultPropertyBundle
			ValueDomainPropertyBundle
			ServerDetail
			ServerRequest
	ServerSubClass
Category
	MountPoint
	DirectoryObject
		DirectoryGroup
			AdministrationGroup
		DirectoryUser
	Document
	MailDocument
	Family
	Folder
	Mailbox
	Message
	MailFolder
		SearchObject
	SelectorObject
	Template
	UserProfile
		PrimaryUserProfile
		ExtendedUserProfile
		EmailExtendedUserProfile
	VersionSeries
	VersionDescription

SystemObject
	AccessControlEntry
	AuditEntry
	AuditRule
	ContentObject
	ExtendedPermission
	Format
	Media
		MediaFile
		MediaLob
			MediaBlob
		MediaReference
	PermissionBundle
	Policy
	Property
	Relationship
		BranchRelationship
		FolderRelationship
	FolderPathRelationship
	BodyPartPathRelationship
		GroupMemberRelationship
		NamedRelationship

SchemaObject
	Attribute
	ClassDomain
	ClassObject 
	ValueDomain
	ValueDefault

Creating Class Objects

Creating a new class object involves the following tasks:

  1. Define the class object information, including the class object name, superclass, and server classpath.

  2. Add extended attributes to the class object. Extended attributes are attributes particularly defined for this class object. Inherited attributes are attributes of the parent class object or superclass and cannot be modified.

To create a new class object:

  1. Click Create on the toolbar.

  2. Select class object from the Select Object Type dialog. You can also use the Create Like option.

  3. Click Create. The Create Class Object window displays.

  1. Enter information in the following fields:

    • Name (required)--The name of the new class object. Each class object must have a unique name

    • Superclass--The superclass of the new class object. Every class object must have a superclass. The superclass can be any class object that is not "final".

    • Bean Classpath--The fully-qualified name of the Java class that is instantiated to represent the instances of the new class object in the development ("beans") API. Defaults to the bean classpath of the superclass class object. It is recommended that you accept this default. If the default is accepted, you can access the extended attributes of an instance of the new class object by calling the getAttribute and setAttribute methods inherited oracle.ifs.beans.LibraryObject. If you specify a value other than the default, you must manually create a new Java class whose name is the value specified. You must compile this new class and ensure it is in the Java classpath before instances of the new class object can be instantiated. This is an advanced topic.

    • Server Classpath--The fully-qualified name of the Java class that is instantiated to represent the instances of the new class object in the extensibility ("server") API. Defaults to the server classpath of the superclass class object. It is recommended that you accept this default. If you accept the default, you can access the extended attributes of an instance of the new class object by calling the getAttribute and setAttribute methods inherited from oracle.ifs.server.S_LibraryObject. If you specify a value other than the default, you must manually create a new Java class whose name is the value specified. You must compile this new class and ensure it is in the Java classpath before instances of the new class object can be instantiated. This is an advanced topic.

    • Selector Classpath--Defaults to the superclass selector classpath. Always accept this default. Changing this value is not supported for this release

    • Description (optional)--A description of the new class object.

    • Access Control--The class ACL for the new class object. Class ACLs control who can perform certain operations on instances of the class object, such as creating new instances of a class object or selecting existing instances of a class object.

    • Is Abstract--Check this box to make the new class object "abstract". Abstract class objects cannot be instantiated. Making a class object abstract is only useful if you intend to further subclass it (with those subclasses being non-abstract).

    • Is Final--Check this box to make the new class object "final". Final class objects cannot be subclassed.

  2. If extended attributes are not needed for this class object, click Create. If you intend to create extended objects, see "Add Extended Attributes".

Add Extended Attributes

  1. Click the Attribute tab to add extended attributes. The Attribute tab property sheet displays:

  1. To view an existing attribute, select the attribute and click View. A new window displays with the attribute information.

  2. To add an extended attribute, click Add. The Class Object Attribute Definition window displays:

  1. Enter information in the following fields:

    • Name (required)--The name of the attribute. Each attribute must have a name that is unique across both the other attributes of the new class object as well as all the attributes it inherits from its superclasses.

    • Description--A description for the new attribute.

    • Referential Integrity--Allows the referential integrity behavior of the new attribute to be defined. Referential integrity rules apply only to attributes of the following datatypes: PUBLICOBJECT, DIRECTORYOBJECT, PUBLICOBJECT_ARRAY, and DIRECTORYOBJECT_ARRAY. The referential integrity rule value is ignored for all other datatypes. For these four datatypes, a referential integrity rule value of RESTRICT prevents a PUBLICOBJECT or DIRECTORYOBJECT (or subclass) referenced by instances of this attribute from being freed. This is analogous to a "DELETE RESTRICT" database constraint. A referential integrity rule value of CLEAR allows a PUBLICOBJECT or DIRECTORYOBJECT (or subclass) referenced by instances of this attribute to be freed, causing the value of the referencing attribute (or attribute element, for array-type attributes) becomes null.

    • Is Required--If checked, instances of the attribute must have a non-null value. Oracle iFS treats zero-length, i.e. "empty", STRING attributes as null.

    • Is Unique--If checked, each non-null instance of the attribute must have a unique value.

    • Is Indexed--If checked, the attribute is indexed. This allows searches and selectors that are qualified by the attribute to perform more quickly.

    • Datatype--Select a data type from the drop-down list.

    • Length--For a data type of string, the maximum length of instances of the attribute, in bytes. The number of characters to which this corresponds depends upon both the database character set and the value stored.

    • Scale--Unused for this release.

    • Is Settable--In creating a new instance of this class object, whether a value for this attribute can be explicitly set in the definition class for this class object. If unchecked, the attribute is "system-set", meaning that its value can be only be set in the extensibility ("server") API.

    • Read Only--Whether the value of this attribute in an existing instance of this class object can be updated. If checked, the attribute is "non-updateable," and can only be changed in the extensibility API. Making an attribute read only is useful for enforcing business rules that prevent data from changing over time.

    • Class Domain--Applies only to attribute of the following data types: PUBLICOBJECT, DIRECTORYOBJECT, SYSTEMOBJECT, SCHEMAOBJECT, PUBLICOBJECT_ARRAY, DIRECTORYOBJECT_ARRAY, and SYSTEMOBJECT_ARRAY, SCHEMAOBJECT_ARRAY. Specifies an optional class domain on attributes of these datatypes. A class domain performs basic data validation upon creating an instance of a class object or updating the attributes of an existing instance of a class object. For example, without a class domain, a PUBLICOBJECT attribute could be set to any PUBLICOBJECT -- a DOCUMENT, a FOLDER, etc. You could use a class domain to restrict this to, for example, only DOCUMENTs, or only DOCUMENTs and any subclasses of DOCUMENTs. See "Creating Class Domains" for more information on class domains.

    • Value Domain--Specifies an optional value domain for the new attribute. A value domain performs basic data validation upon creating an instance of a class object or updating the attributes of an existing class object. For example, a value domain could ensure a STRING attribute is a valid color-- "red", "green", "blue"--or a INTEGER attribute lies within a certain range-- 0 to 10 inclusive. See "Creating Class Domains" for more information on value domains.

    • Value Default--Specifies an optional default value the new attribute. In creating a new instance of a class object, Oracle iFS sets this value for this attribute if no value is otherwise provided. See the "Creating Value Domains" for more information on value domains.

    • Is Value Domain Validated--Specifies whether the value domain applied to this attribute is enforced; in other words, in creating a new instance of this class object or updating an existing instance of this class object, whether Oracle iFS ensures the value of this attribute (if set or changed) lies within the specified value domain.

  2. When all the information has been entered, click OK.

  3. On the Create Class Object window, click Create.

Modifying Class Objects

The only modification allowed for class objects is adding or editing an extended attribute. To add an extended attribute, see "Add Extended Attributes".

To edit an extended attribute:

  1. Select the class object to edit in the Navigator.

  2. On the property sheet, click the Attribute tab.

  3. Select the extended attribute to edit and click Edit.

  4. On the Class Object Attribute Definition window, edit the appropriate fields and click OK.

  5. Click Apply on the property sheet.

Deleting Class Objects

To delete a class object:

  1. Select the class object you want to delete in the Navigator and click the Delete button on the toolbar. System class objects cannot be deleted.

  2. Click Yes at the prompt.

Class Domains: An Overview

Using Oracle iFS Manager, you can create and modify class domains. A class domain is used in conjunction with class objects. For attributes that point to objects, you can limit values to specific classes by using class domains. For example, the AccessControlList attribute for public objects has a class domain which restricts the value to objects of the AccessControlList class.

Why Use a Class Domain?

Each attribute has a datatype, such as int or String. As you would expect, Oracle iFS supports:

In addition, Oracle iFS supports four top-level object datatypes unique to Oracle iFS:

You could use a value domain to validate any of these four datatypes. But, if you want to be more specific and limit an attribute's value to a single class, you need a validation technique to ensure that the value entered is not, for example, just any Public Object, but specifically, a Document object. In this case, you would use a class domain to specify the single class that the attribute's datatype must match.

If an attribute's datatype is a subclass of one of the four unique Oracle iFS top-level datatypes listed above, you can specify a class domain on that attribute. Oracle iFS will throw an exception if the attribute is of any other class.

Creating Class Domains

To create and maintain class domain using Oracle iFS Manager:

  1. Click Create on the toolbar.

  2. Select Class Domain from the Select Object Type dialog. You can also use the Create Like option.

  3. Click Create. The Create Class Domain window displays.

  1. Enter information on the following fields:

    • Name (required)--The name of the new class domain. Each class domain must have a unique name.

    • Type--Choose Enumerated Classes to include only the classes listed in the Classes field in the new class domain. Choose Enumerated Classes and Subclasses to include the classes listed in the Classes field and any of their subclasses.

    • Description (optional)--A description of the class domain.

    • Classes--The classes in the class domain. In creating a new instance of a class object or updating an existing instance of a class object, the values of any attributes to which this class domain has been applied, if set or changed, must be instances of one of these classes (or their subclasses, if Type is Enumerated Classes and Subclasses).

  2. Click Create.

Modifying Class Domains

When modifying a class domain, the Description field is the only field that can be updated. To modify a selected class domain:

  1. Select the class domain to be modified in the Navigator.

  2. Enter a new description on the property sheet.

  3. Click Apply.

Deleting Class Domains

If a class domain is deleted, the data validation performed by that class domain no longer occurs. To delete a class domain:

  1. Select the class domain to be deleted in the Navigator.

  2. Click Delete on the toolbar.

  3. Click Yes at the prompt.

Value Domains: An Overview

A value domain is a separate class which can contain a list of values used by developers for custom applications. You can limit attribute values to specific values of a class domain by using value domains. Limiting the possible values helps with data validation. User input is checked against the list, and if the input value is not on the list, Oracle iFS throws an exception.

Why Use a Value Domain?

In many cases, the number of possible valid values for an attribute is limited. A frequently used form of data validation takes the value entered and checks it against a list of valid values, returning an error message if the value entered is not valid.

Creating Value Domains

To create a new value domain with Oracle iFS Manager:

  1. Click the Create button on the toolbar.

  2. Select Value Domain from the Select Object Type dialog. You can also use the Create Like option.

  3. Click Create. The Create Value Domain dialog displays.

  1. Enter information in the following fields:

    • Name (required)--The name of the new value domain. Each value domain must have a unique name.

    • Datatype--The datatype of the value domain. This determines to which attributes the new value domain may be applied. For example, an INTEGER_ARRAY value domain may be applied to attributes whose datatypes are either INTEGER or INTEGER_ARRAY.

    • Type--The type of the value domain.

      • Enumerated values: the acceptable values in the value domain are defined by a set. For example, the integer values 1, 2, 3, 5, 7.

      • An inclusive range, defined by a minimum and maximum. For example, the integer values 0 to 10, inclusive.

      • An inclusive minimum. For example, the integers greater-than-or-equal-to 3.

      • An inclusive maximum. For example, the integer values less-than-or-equal-to 14.

      • An exclusive range, defined by a minimum and maximum. For example, the integer values 14 to 69, not including either 14 or 69.

      • An exclusive minimum. For example, the integers greater-than 3 (but not including 3 itself).

      • An exclusive maximum. For example the integers less-than 14 (but not including 14 itself).

    • Enumerated values--Applies only if Type is Enumerated Values. The values in the set, one per line.

    • Enumerated Values--Applies only for certain Types. The minimum value.

    • Minimum/Maximum--Applies only for certain Types. The maximum value.

  2. Click Create.

    Modifying Value Domains

    The Description field is the only field that can be updated.

    1. Select the value domain to be modified in the Navigator.

    2. Enter a new description using the property sheet.

    3. Click Apply.

    Deleting Value Domains

    To delete a value domain:

    1. Select the value domain to be deleted in the Navigator.

    2. Click Delete on the toolbar.

    3. Click Yes at the prompt.

    Value Defaults: An Overview

    By using value defaults, you can specify an initial value for an attribute. If no value is set, the repository sets the default value for the attribute. Should the default value be outside the value domain when the value domain validation is on, the Oracle iFS server throws an exception upon setting the attribute with the invalid default value.

    Why Use a Value Default?

    Value defaults are particularly useful if you need to apply the same default value to a large number of attributes. Using a value default lets you specify the default value once, and apply it to many attributes. If the default value needs to be changed, you can then change the value default in one place, and all attributes that use the value default will now have access to the new value.

    Example

    Assume that ExpenseReport has an attribute called ApproverName. You could use a value default on ApproverName to specify the name of your department's vice president, Chris Stevens. When an ExpenseReport object is created, "Chris Stevens" would be the default Approver Name. This same ApproverName attribute might be used for approving hiring requests, as well as approving expense reports. If there was a reorganization and Kim Naser became the new vice president, you could change the value default object, and the new name would become the default approver for both expense reports and hiring requests.


    Note:

    changing the value default in this way would not affect any earlier expense reports or hiring requests, which would continue to indicate "Chris Stevens."  


    Only expense reports or hiring requests created after the ValueDefault was updated to "Kim Naser" would have the new name.

    Creating Value Defaults

    To create a new value default with Oracle iFS Manager:

    1. Click the Create button on the toolbar.

    2. Select Value Default from the Select Object Type dialog. You can also use the Create Like option.

    3. Click Create. The Create Value Default window displays.

    1. Enter information in the following fields:

      • Name (required)--The name of the new value default. Each value default must have a unique name.

      • Datatype--The datatype of the new value default. This determines to which attributes the new value default may be applied. For example, an INTEGER value default may be applied to attributes whose data type is either INTEGER or INTEGER_ARRAY. However an INTEGER_ARRAY value default may only be applied to attributes whose data type is INTEGER_ARRAY.

      • Description (optional)--A description for the value domain.

      • Values--The value of the new value default.

    2. Click Create.

    Modifying Value Defaults

    The Description field is the only field that can be updated.

    1. Select the value default to be modified in the Navigator.

    2. Enter a new description using the property sheet.

    3. Click Apply.

    Deleting Value Defaults

    To delete a value default:

    1. Select the value default to be deleted in the Navigator.

    2. Click Delete on the toolbar.

    3. Click Yes at the prompt.

    Agents and Overrides: An Overview

    Agents automate tasks in Oracle iFS. An agent is on option for customizing Oracle iFS. A developer writes a custom agent using Java. To run the agent, you will need to add it to a Server Manager .def file.

    An override is another option for customizing Oracle iFS. A developer creates an overrides using Java. Overrides extend or replace methods in the Oracle iFS API to perform tasks specific to your business needs.

    What Is an Agent?

    An agent is a Java program used to automate a task. More specifically, an agent lets an application respond to specific actions taken within the Oracle iFS environment. An agent may respond when a certain type of document is inserted, updated, or deleted in the repository. Agents are written against the Java API. They can be triggered by a specific event, such as when a document is created, or by time, every 24 hours. Agents are especially useful for cleanup or background tasks when the machine is not heavily loaded, or for notification, such as sending e-mail notifications.

    What is an Override?

    An override is a Java program that overrides default server-side behavior. The difference between agents and overrides is that agents are run asynchronously, as separate activities at timed intervals, or as a response to a completed transaction. An override is processed during the transaction, and should be used when the behavior needs to occur immediately or if Oracle iFS needs to complete the behavior and react to it before finishing the transaction.

    See Also
    • For more information on agents and using the agent template, see the Oracle Internet File System Developer's Guide.

    • For more information on the Server Manager .def files, see Chapter 8, "Using Server Manager to Start and Stop Servers".

    • For more information on overrides, see the Oracle Internet File System Developer's Guide.

    Using Java Server Pages to Display Documents in Oracle iFS

    Java Server Pages (JSPs) are the recommended manner of creating Web-based applications based on Oracle iFS. (In fact, the Oracle iFS Web interface uses JSPs.) JSPs use Java Beans to extract data from the repository and display information on the Web by generating HTML documents. Although JSPs provide a way for users to view and manipulate documents, providing functionality parallel to that of renderers, using a JSP is not technically "rendering" because it does not involve a specific renderer class. The JSP lookup is created with Oracle iFS Manager.

    JSP Execution

    The ifs/jsp-bin folder is provided for developers to place JSPs to be executed. The list of these JSP executable directories is configurable. This is set in the property ifs.http.jsp.alloweddirs which is located in the IfsHttpServletParameters.properties file.

    To add more directories where JSPs to be created can be placed, this parameter needs to be modified. This parameter is located in the IfsHttpServletParameters.properties file, which is located in the following directory:

    $ORACLE_HOME/ifs/settings/oracle/ifs<version>/protocols/http/properties


    For example, the value is set to /ifs/webui/jsps|/ifs/jsp-bin, the directory /home/myhome/jsps can be used to host JSPs that need to be executed. Please note that the | is used as a delimiter between directories.


    Note:

    You cannot remove either of the two default directories. 


    See AlsoFor more information on JSPs, see the Oracle Internet File System Developer's Guide.

    Registering JSPs

    You can view, register, and edit JSPs. When a JSP is added, it is added to the JSP registry. To register a renderer:

    1. From the Object menu, select Register.

    2. Select Java Server Page (JSP) Lookup from the Select Object Type dialog.

    3. Click Register. The Java Server Page (JSP) Lookup Register Window displays with the existing registered JSPs listed.

    1. Click Add. The Java Server Page (JSP) Lookup Entry window displays.

    1. Enter information in the following fields:

      • Classname--Select a classname for the JSP.

      • Mimetype--Select a mimetype for the JSP.

      • Java Server Page--Enter the JSP information. This is the complete path of the JSP inside of the Oracle iFS repository.

    2. Click OK.

    3. Click OK on the Java Server Page (JSP) Lookup Registry Window to return to the Oracle iFS Manager Navigator.

    Modifying JSPs

    To edit an existing JSP:

    1. Access the Java Server Page (JSP) Lookup Registry Window as described in "Registering JSPs".

    2. Select the JSP to be edited and click Edit. The Edit JSP window displays.

    3. Edit the appropriate fields and click OK.

    4. Click OK on the Java Server Page (JSP) Lookup Registry Window to return to the Oracle iFS Manager Navigator.

    Deleting JSPs

    To remove an existing JSP:

    1. Access the Java Server Page (JSP) Lookup Registry Window as described in "Registering JSPs".

    2. Select the JSP to be removed and click Remove.

    3. Click Yes at the prompt.

    4. Click OK on the Java Server Page (JSP) Lookup Registry Window to return to the Oracle iFS Manager Navigator.

    Parsers: An Overview

    A parser is a Java class that extracts attributes from a file as it is loaded into Oracle iFS and stores the information in the repository. The parser class creates one or more database objects, such as:

    • a Document object

    • a Folder object

    When you want to create objects in Oracle iFS, you can either use the standard parsers provided, or, if your application requires special treatment, you can create a custom parser.

    The IfsXmlParser is the standard parser class that can be registered using Oracle iFS Manager. The IfsXmlParser creates an object in the Oracle iFS repository from an XML document body and is used as the default parser for all XML documents stored in Oracle iFS.

    There are three XML parsers that the dispatcher parser (IfsXmlParser) recognizes:

    • IfsSimpleXmlParser--Used for parsing Oracle iFS objects.

    • LiteralDocumentParser--Performs DTD validation (optional), and stores the XML document.

    • CustomXmlParser--Used for parsing custom objects.

    See Also
    • For more information on parsers and creating custom parsers, see the Oracle Internet File System Developer's Guide.

    Registering Parsers

    Using Oracle iFS Manager, you can register custom parsers created for special applications, and edit or delete parsers. When a parser is added, it is added to the parser registry. To register a custom parser:

    1. From the Object menu, select Register.

    2. Select Parser Lookup from the Select Object Type dialog and click Register.

      The Parser Lookup Registry Window displays with the existing parsers by extension and XML parsers listed. This dialog provides two functions: registering a parser by extension and registering an XML parser.

      Also select the DTD validation by default checkbox to perform a DTD validation.

    Registering a Parser by Extension

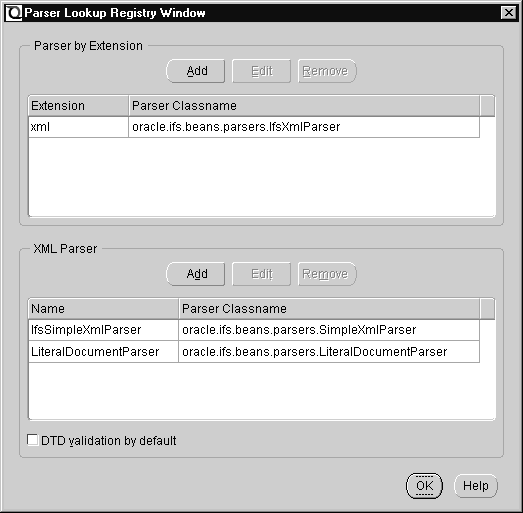
    To register a parser by extension, do the following:

    1. Click Add in the Parser by Extension box. The Parser Lookup Entry dialog displays.

    1. Select an extension for the custom parser.

    2. Enter the parser classname and click OK.

    3. Click OK on the Parser Lookup Registry Window to return to the Oracle iFS Manager Navigator.

    Registering an XML Parser

    In the XML Parser box, you can select the Do DTD validation by default box to have DTD validation as the default.

    To register an XML parser, do the following:

    1. Click Add in the XML Parser box. The Parser Lookup Entry dialog displays.

    1. Enter a name for the XML Parser.

    2. Enter a parser classname and click OK.

    See Also
    • For more information on parsers and creating custom parsers, see the Oracle Internet File System Developer's Guide.

    Modifying Parsers

    To modify an existing parser:

    1. Access the Parser Lookup Registry Window as discussed in "Registering Parsers".

    2. Select the parser to be edited and click Edit. The Parser Lookup Entry dialog displays.

    3. Edit the appropriate fields and click OK.

    4. Click OK on the Parser Lookup Registry Window to return to the Oracle iFS Manager Navigator.

    Deleting Parsers

    To delete an existing parser:

    1. Access the Parser Lookup Registry Window as discussed in "Registering Parsers".

    2. Select the parser to be removed and click Remove.

    3. Click Yes at the prompt.

    4. Click OK on the Parser Lookup Registry Window to return to the Oracle iFS Manager Navigator.

    Renderers: An Overview

    A renderer accesses information stored in Oracle iFS and outputs the information in a certain format. In a sense, it is the opposite of a parser. While the information output by a renderer may be identical to the document as it was input, it doesn't have to be. Once information has been stored in Oracle iFS, it can be rendered in any format the developer defines. For example, an XML renderer can perform the following task:

    • Take a document that was input as HTML (using an HTML parser).

    • Render it in an XML format.

    Data can be combined from several documents and displayed as a single, new document. For example, information that is collected from e-mail messages may be displayed dynamically in a Web browser window.

    The rendered representation is typically some combination of the following:

    • Object attributes

    • Static content (bytes or characters)

    • Content (for Document objects)

    The following table lists the Oracle iFS standard renderer classes provided out-of-the-box.

    Class  Description 

    MFC822 Renderer 

    Renders a message object into a stream of bytes comprising the message in RFC822 format. 

    Octet Stream Renderer 

    Renders a document into a stream of bytes corresponding to the bytes in the document's content object. 

    See Also
    • For more information on renderers, see the Oracle Internet File System Developer's Guide.

    Registering Renderers

    Using Oracle iFS Manager, you can register and edit custom renderers. When a renderer is added, it is added to the renderer registry. To add and register a renderer:

    1. From the Object menu, select Register.

    2. Select Renderer Lookup from the Select Object Type dialog.

    3. Click Register. The Renderer Lookup Registry Window displays.

    1. Click Add to add an entry for a custom renderer in the registry. The Register Renderer dialog displays.

    1. Enter information in the following fields:

      • Name (required)--The name of the renderer.

      • Operation--The renderer policy key.

      • Implementation Name--The renderer implementation class name.

    2. Select from the Available Classes the classes to be associated with this renderer. Press the Add button to include the selected classes.

    3. Click OK.

    4. Click OK on the Renderer Lookup Registry Window to return to the Oracle iFS Manager Navigator.

    Modifying Renderers

    To modify an existing renderer:

    1. Access the Renderer Lookup Registry Window as described in "Registering Renderers".

    2. Select the renderer to be edited and click Edit. The Edit Renderer dialog displays. The fields that cannot be edited display as grayed-out.

    3. Edit the appropriate fields and click OK.

    4. Click OK on the Renderer Lookup Registry Window to return to the Oracle iFS Manager Navigator.

    Deleting Renderers

    To delete an existing renderer:

    1. Access the Renderer Lookup Registry Window as described in "Registering Renderers".

    2. Select the renderer to be removed and click Remove.

    3. Click Yes at the prompt.

    4. Click OK on the Renderer Lookup Registry Window to return to the Oracle iFS Manager Navigator.

    Formats/Mimetypes: An Overview

    Oracle iFS associates a format (mimetype) with each document. The format of a document specifies the way the document information is encoded. Internet browsers need to know the format of documents to determine how to store content and index their contents. The format determines:

    • MIME type--Specifies the type of content stored in Oracle iFS.

    • Extension type--Specifies the default extension to use for storing Oracle iFS content as a file.

    • Binary setting--Determines whether the content stored in Oracle iFS is of binary type.

    • Index setting--Determines whether the content of this format should be indexed in Oracle iFS.

    You can either:

    • Use the default system formats--Using these requires no administration.

    • Supplement the default system formats--This is usually necessary only if you use custom applications or have special content requirements.

    See Also

    For more information on formats/mimetypes, see the Oracle Internet File System Developer's Guide.

    Creating Formats/Mimetypes

    1. Click the Create button on the toolbar.

    2. Select Format/Mimetype from the Select Object Type dialog. You can also use the Create Like option.

    3. Click Create. The Create Format dialog displays.

    1. Enter information in the following fields:

      • Name (required)--The name of the format/mimetype.

      • Mimetype--Specifies the type of content stored in Oracle iFS.

      • Extension--Specifies the default extension to use for storing Oracle iFS content as a file.

      • Is Binary--Determines whether the content stored in Oracle iFS is of binary type.

      • Is Indexed--Determines whether the content of this format should be indexed in Oracle iFS.

    2. Click Create.

    Modifying a Format/Mimetype

    To modify a format:

    1. Select the format/mimtype to be modified in the Navigator.

    2. On the property sheet, modify the following fields:

      • Mimetype

      • Extension

      • Is Binary

      • Is Indexed

    3. Click Apply.

    Deleting a Format/Mimetype

    To delete a format/mimetype:

    1. Select the format/mimetype to be deleted in the Navigator.

    2. Click Delete on the toolbar.

    3. Click Yes at the prompt.


Go to previous page Go to next page
Oracle
Copyright © 1996-2001, Oracle Corporation.

All Rights Reserved.

Home

Book List

Contents

Index

Master Index

Feedback