Release 9.0.1 for Windows NT and Windows 2000
Part Number A90174-01
Home |
Book List |
Contents |
Index | Master Index | Feedback |
| Legato Storage Manager Administrator's Guide Release 9.0.1 for Windows NT and Windows 2000 Part Number A90174-01 |
|
![]()
![]()
This chapter gives a more detailed description of the internal components of Legato Storage Manager (LSM) and their organization as a set of resources and attributes. It describes how LSM uses these components and how you can configure them in preparation for Oracle backup and restore operations. This chapter also provides information about using the LSM Administrator GUI program.
The information presented in this chapter assumes that you have already installed the LSM software on your Oracle Server. For information about installing LSM, refer to the Oracle installation guide for your particular system, as shipped with your LSM product.
This chapter contains these topics:
As explained in Chapter 1, "Introduction", LSM has a set of features configured for Oracle data storage management service. The process of installing LSM on the Oracle Server preconfigures LSM's features to default settings that enable you to start using LSM for Oracle data storage operations with a minimum of additional configuration.
The LSM Server can use its programs for Oracle data storage operations only if all the required LSM configurations are in place--most of the required configurations are already in place immediately after LSM installation. The LSM software technology uses a Resource Allocation Protocol (RAP) whereby the LSM Server maintains its configurations as a set of internal resources. There are several different types of internal LSM resources (for example, client, server, device, and pool types of resources).
LSM configuration is a process of creating, modifying, or removing LSM resources by using the LSM Administrator GUI or available LSM commands. Each LSM resource also has its own components known as attributes, to which you assign values.
For example, the value of the Name attribute of an LSM resource defines the name of that particular resource. When you create a new LSM resource, you often need to assign a unique name to that resource by assigning a unique value to its Name attribute.
On Windows systems, an LSM resource is represented by a dialog box in the LSM Administrator GUI. The resource attributes are represented by the various text boxes, drop-down lists, and similar components in the dialog box.
The remainder of this chapter describes LSM configuration in more detail. Before you can use a device attached to the LSM Server for Oracle backups, you must have a device type of resource for it in the LSM Server. An important step in LSM configuration for Oracle operations is creating the required resource in the LSM Server for each attached storage device. By modifying the set of resources maintained by LSM, you can modify LSM performance and functionality.
The LSM Server maintains all the information about its configured resources in an online resource database file, as shown in Figure 1-1.
Table 2-1 lists the main types of resources that LSM uses for Oracle data storage management.
The resource types listed in Table 2-1 are the only ones you need to configure to enable full LSM functionality for Oracle data storage. LSM does not use or support all the resource types available with Legato NetWorker. For example, LSM does not support the autochanger, registration, and schedule types of resources.
Some of the resources described in Table 2-1 exist as attributes of the other resources. These interdependent relationships affect the order in which you implement the configuration of the LSM resources because LSM requires component resources to be defined before they can be listed as attributes of other resources.
Figure 2-1 shows the dependencies between the LSM resources. The resources with outgoing arrows are both independent resources themselves and attributes of the resources where the arrows end.
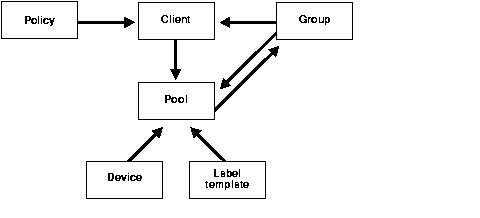
You must first define resources that are attributes of other resources. For example, you must define a policy type of resource before you can assign it as an attribute in a client type of resource. Also, you cannot assign a custom label template named "file" to a pool resource until you have created that custom label template.
After LSM installation on the Oracle Server, the LSM Server has a set of preconfigured resources of the types listed in Table 2-1 that are available for immediate use. These preconfigured resources and their default attribute values are described in the section "Configuring LSM Resources". That section also explains the additional resource configuration you need before you can start to use LSM for Oracle backups and restores.
Figure 2-2 illustrates a simplified model for the Oracle backup operation using LSM. As explained in the section "Overview of Oracle Backup and Recovery System", Oracle Server processes create the Oracle data backup sets during the backup operation. These backup sets are passed to the LSM Server, which writes the Oracle data to backup volumes in the storage devices. The LSM Server also tracks the location and status of the backup data on the storage volumes.
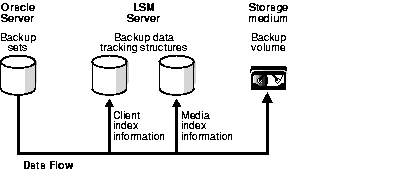
The LSM Server tracks the location and status of the Oracle backup data by means of two special online index files that it maintains--the client index and media index. The client index file contains a database of information with entries for each Oracle data object backed up. The media index file contains a database of indexed entries tracking the location and content of each storage volume managed by LSM. The media index includes information about the life cycle status of all the data on each Oracle backup volume.
At the end of an Oracle backup, the LSM Server adds entries for that particular backup to the client index and media index files. To the client index, it adds information about the specific Oracle data that was backed up. To the media index, it writes entries specifying the location of the backup volume and the Oracle data written to that volume.
The LSM Server is also preconfigured to perform the LSM Server bootstrap backup, every day at 3:33 a.m. The bootstrap is a special backup set essential for disaster recovery procedures on the LSM Server. The bootstrap contains the information needed to restore the following three components to the point just before the bootstrap was created:
As mentioned in the section "LSM Architecture", the LSM Server can only perform the Oracle backup operations after you have properly configured the required LSM resources. A client type of resource must exist identifying the Oracle Server as the LSM backup client.
You must configure a server resource, identifying the LSM Server and specifying the parallelism or maximum number of concurrent data streams. The server resource also specifies the users who belong to the LSM Administrator list--those users having sufficient privilege to modify the LSM configuration.
You must have a separate device type of resource configured for each Oracle backup device used by the LSM Server. And, you must have a storage volume labeled and mounted in each device to be used for backup. When labeling a volume, LSM assigns the volume to a volume pool, for which a pool type of resource must exist.
The section "Configuring LSM Resources" provides more information about the preconfigured and recommended attribute settings of these required LSM resources.
Two important attributes of the client resource are the browse policy and retention policy. The LSM Server uses the browse policy and retention policy for managing the Oracle backup data life cycle. These policies specify how long the backed up Oracle data is available for recovery. After LSM installation, the LSM Server contains a preconfigured client resource for the Oracle Server that has the browse policy attribute set to a year and the retention policy set to ten years. Legato recommends that you do not modify either of these policy attributes in the client resource.
The browse policy determines how long the client index file on the LSM Server maintains the information about an Oracle backup. As long as the browse policy period for a particular backup set has not expired, the entry for that backup remains in the client index. And, as long as there is an entry for the backup in the client index (and in the Oracle Recovery Catalog or control file), you can use RMAN to restore the backup set from the volumes managed by LSM. Using the Oracle utility, you can restore individual Oracle data objects or an entire database and reconstruct an Oracle database during a recover session.
After the browse policy period for an Oracle backup set has been exceeded, LSM automatically removes the entry for that backup from the online client index. When the entry has been removed from the client index, you cannot restore the backup using RMAN. However, you can use the scanner program to re-create the backup's entries in the client index and media index to enable recovery using RMAN.
The retention policy determines the minimum period of time that the media index file maintains information about Oracle backup data. The media index tracks the Oracle backup sets on the storage volumes. The retention policy is different from the browse policy in that its expiration does not trigger the automatic removal of entries from the media index.
After the retention policy period for an Oracle backup save set has been exceeded, LSM marks the status of the backup save set "recyclable," but retains its entry in the media index. When all the backup sets on a volume are marked "recyclable," LSM changes the volume's mode to "recyclable." The volume is then eligible for automatic relabeling by LSM. LSM removes the entries for a volume from the media index only when either the volume is relabeled or you manually remove the volume's entries using the Volumes window of the LSM Administrator GUI.
If a backup set has passed its browse policy and retention policy and has become "recyclable," you can still use the scanner program to rebuild the client index and media index entries for the backup set and then use RMAN to recover the backup set.
If you mount a "recyclable" volume in a tape device, for example, and enable the "auto media management" attribute in the device resource, LSM can automatically relabel the volume to satisfy a volume mount request. When LSM relabels a volume, all entries for the volume's backup sets are removed from the media index. When a volume is relabeled, you can no longer recover the data on the volume. For more information about the auto media management feature, see the section "Auto Media Management for Tape Devices".
All entries for a volume's backup save sets are also removed from the media index when you manually remove the volume from the LSM volume inventory. You can perform this type of manual removal within the Volumes window of the LSM Administrator GUI. For more information about using the Volumes window, see "Using the Volumes Window".
Note that you can still use the scanner program to enable data recovery from a manually removed volume. The scanner program can retrieve the information needed to re-create entries in the client index and media index. When the scanner program has re-created the index entries, a user with the proper permissions can restore data using RMAN.
For more information about using the scanner program with LSM, refer to scanner in the Legato Storage Manager Command Reference Guide for Windows 2000 and Windows NT provided with LSM on Windows. For more information about using the Legato Storage Manager Command Reference Guide for Windows 2000 and Windows NT, see "Legato Command Reference Guide" .
For more information on scanner, see Appendix A, "Scanner".
In its system of tracking the status of Oracle storage volumes and the backup save sets on them, LSM assigns a "status" value to each backup save set (or "save set") and a "mode" value to each storage volume.
Table 2-2 shows the possible values that LSM can assign for save set status.
As long as a save set remains in the client index, its status is "browsable." After LSM removes the save set from the client index, its status changes from "browsable" to "recoverable," and recovery of the save set cannot be performed directly with the available Oracle utility.
The status of a save set remains "recoverable" until its retention policy expires. Then, the save set's status changes from "recoverable" to "recyclable." When all the save sets on a volume change status to "recyclable," the mode of the storage volume itself changes to "recyclable." See Table 2-3 for the meanings of storage volume modes.
Although the status of a save set is either "recoverable" or "recyclable," you can restore the save set from its storage volume by using the scanner program. Alternatively, you can use the scanner program to re-create a save set's entries in the client file index and enable file recovery using the Oracle utility.
Table 2-3 lists the possible modes for a storage volume tracked by LSM and their definitions within LSM.
When you run the LSM Administrator GUI and select the Volumes window, you can see the list of all the Oracle backup volumes and their modes, as well as the save sets on each volume and their status. For details about how to run the LSM Administrator GUI, see the next section, "Using the LSM Administrator GUI". For more information about using the Volumes window, see "Using the Volumes Window".
Chapter 3, "Media Management" also contains more information about how LSM manages storage volumes for Oracle backups.
As explained in the "Overview of LSM Features" , the LSM Administrator GUI is the graphical user interface for connecting to and configuring the LSM Server and its attached Oracle storage devices and volumes. You can also use the LSM Administrator GUI to monitor the status of Oracle backup and restore operations as well as the status of Oracle backup volumes and the backup sets stored on them.
In the installation process, the LSM Administrator GUI and LSM Server are installed on the Oracle Server. You can install and run the LSM Administrator GUI on a separate Windows 2000 or Windows NT platform on the same network as the Oracle Server.
To ensure that you can successfully start the LSM Administrator GUI on a Windows system, fulfill the following TCP/IP network requirements:
%SystemDrive%\system32\drivers\etc or the Domain Name Server (DNS) file that contains the names and aliases of the servers (hosts) on your network. If you are using DNS, you must correctly configure reverse lookup.
To run the LSM Administrator GUI on the Windows system, perform one of the following steps:
C:\win32app\nsr\bin by default) is in your system path, run the nwadmin command at the command line prompt.
nwadmin command at the command line prompt, for example, C:\win32app\nsr\bin\nwadmin.
If you installed LSM in a nondefault directory, be sure to set the system path as described in "Postinstallation Procedures".
Note:
The nwadmin entry in the Legato Storage Manager Command Reference Guide for Windows 2000 and Windows NT provides details on running the nwadmin program. For information on how to access the Legato Storage Manager Command Reference Guide for Windows 2000 and Windows NT, see "Legato Command Reference Guide".
The nwadmin program is an X Window System application that provides a graphical user interface to administer and monitor LSM Servers. To start the nwadmin program, you can also enter the following command at the command line prompt:
nwadmin [ -s server-name ]
If you do not specify a server-name with the -s command option, the nwadmin command uses the server selection rules described in the nsr entry in the Legato Storage Manager Command Reference Guide for Windows 2000 and Windows NT. When multiple LSM Servers are accessible, you can select them from within the graphical user interface. Click the Change Servers speedbar button and enter the host ID of the server you want to access.
The main window of the nwadmin GUI display provides status information similar to that provided by the nsrwatch program for character-based displays.
Only users who have administrative privileges can create or apply configurations. Only Administrators@server-name have LSM Administrator privileges by default. You must be a member of the Administrators group on the LSM Server computer before you start any LSM administration programs or tasks. You can later add other users to the list of LSM Administrators using the procedure in "Specifying LSM Administrators".
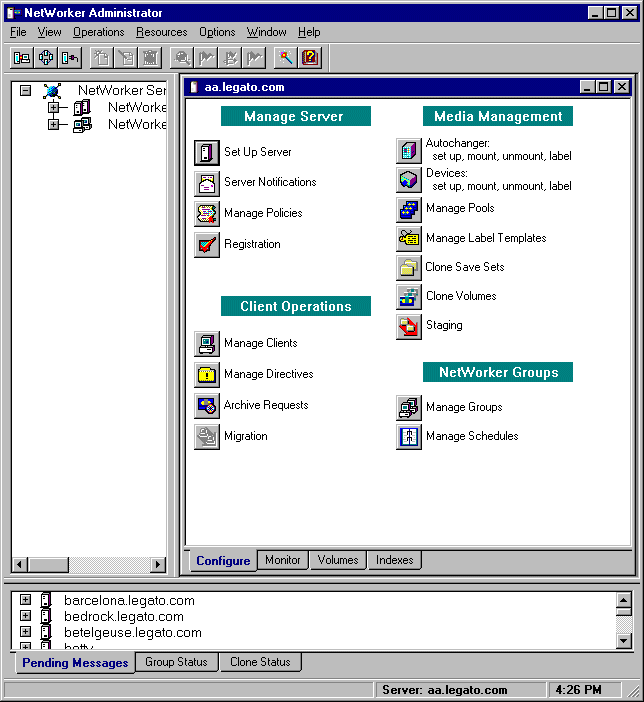
The main LSM Administrator window is displayed as shown in Figure 2-3.
If the LSM Server is on a different platform from the Windows system running the LSM Administrator GUI, connect to the LSM Server by means of one of the following methods:
When the connection is successful, the LSM Administrator program displays a Server window for the LSM Server.
If you have any difficulty starting the LSM Administrator GUI on your Windows system, consider the following possibilities:
If you have problems running the LSM Administrator GUI or establishing the connection to the remote LSM Server, see the troubleshooting information in Appendix B, "Client Server Communications".
For more information about using the LSM Administrator GUI, you can access its extensive online help component, as described in "Online Help".
Now, proceed to "Configuration Roadmap".
Before performing LSM configuration procedures, be sure that you have properly installed LSM according to the instructions in the Oracle installation guide for your Windows system. You can install LSM during the process of installing your Oracle Server.
You must properly configure the LSM Server before you can use LSM for Oracle data storage management. To configure the LSM Server, perform the following steps:
After you have finished installing LSM, see the following section, "Postinstallation Procedures", for important information on additional procedures required on your Windows system.
After installing LSM, verify that the system path includes the correct LSM installation directory. If you installed LSM in a location other than the default directory C:\win32app\nsr\bin, you must set the system path to enable proper Oracle backup and restore operations.
After installing LSM in a nondefault directory, add the LSM installation directory to the system search path by following these steps:
\legato\nsr\bin directory on the D: drive, add D:\legato\nsr\bin to the path value.
After you have verified the correct setting of the system path, proceed to the following section, "Configuring LSM Resources".
The LSM Server contains a number of preconfigured resources after installation on the Oracle Server computer; the two main ones are the client resource and server resource. The section "LSM Architecture" contains general information about how LSM uses its system of internal resources and attributes. The attribute values set in the client resource and server resource determine how the LSM Server and Oracle Server communicate during Oracle operations.
You can view and configure LSM resources and their attribute settings by means of the LSM Administrator GUI. For more information on running the GUI, see "Using the LSM Administrator GUI". If the LSM Administrator GUI is on a Windows system separate from the Oracle Server, remember to connect to the LSM Server in the GUI by one of the methods outlined in "Using the LSM Administrator GUI".
Use the information in the remainder of this chapter to properly configure your LSM Server for Oracle backup and restore operations.
The client resource is a set of attributes assigned to the Oracle Server and stored on the LSM Server. The client resource provides the LSM Server with information about items such as:
After initial installation of the LSM Server software, the LSM Server contains a preconfigured client resource for the Oracle Server. You cannot modify any of the attribute settings for this preconfigured client resource.
To view the client resource configuration in the LSM Administrator GUI on Windows, perform the following steps:
The Edit Client dialog box on a Windows system, listing all the attributes of the client resource, appears as shown in Figure 2-4.

The Name field shows that the Name attribute is set to the hostname of the Oracle Server. The Browse policy attribute is set to a Year, and the Retention policy is set to a Decade. Use of these policies for management of the Oracle backup data is described in the "Overview of LSM Operations".
The Group attribute must be set to Default for proper configuration of the automatic daily LSM Server bootstrap backup. For more information on the bootstrap backup configuration, see "Automatic Bootstrap Backup" .
As mentioned in the section "LSM Architecture", the LSM Server does not use all of the attributes represented by the fields in the Edit Client dialog box for the client resource.
After initial installation of the LSM Server software, the LSM Server contains a preconfigured server resource with attribute settings that influence the performance and security of the Oracle backups. Unlike the preconfigured client resource, you can modify some of the attribute settings of this server resource, including the Administrator attribute setting.
To view the server resource configuration in the LSM Administrator GUI on Windows, perform the following steps:
The Set Up Server dialog box on a Windows system appears as shown in Figure 2-5.
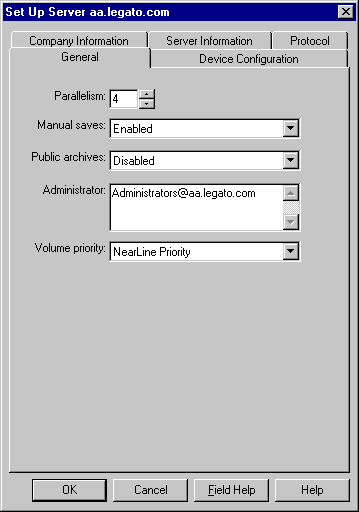
The Set Up Server dialog box on Windows lists the attribute settings of the server resource. The basic attributes of the server resource are as follows:
This attribute (in the Server Information tab) lists the hostname of the LSM Server.
This attribute (in the General tab) sets the maximum number of backup data streams that the LSM Server sends to the attached backup devices at any one time. The LSM Server can write up to four simultaneous data streams. Backing up multiple data streams simultaneously increases the efficiency of the storage device operations.
Although any user can view the LSM Server resource settings, only users specified in the Administrator attribute (in the General tab) have sufficient privilege to modify the LSM Server resource configurations. The initial default setting of this attribute is Administrators@hostname on Windows.
To customize the server resource attribute settings in the Set Up Server dialog box, see the appropriate sections:
The only users with sufficient privilege to modify the LSM Server resource configurations are LSM Administrators--those users specified in the Administrator attribute of the server resource. LSM on Windows initially sets the Administrator attribute to Administrators@hostname, where hostname is the LSM Server computer name. As a result, members of the Administrators group are set up as LSM Administrators by default.
If you receive the following error message while attempting to make LSM configuration changes, your username is not included in the Administrator attribute:
user user_name needs to be on administrator's list
By definition, only an LSM Administrator can change the attributes of the LSM Server resources. Only an LSM Administrator can grant LSM Administrator privileges to other users or user groups on Windows and change or delete entries in the LSM Administrator list.
Table 2-4 lists the types of names that are acceptable in the Administrator attribute of the server resource. To grant LSM Administrator privileges to a user or user group, add one of the following types of names to the Administrator list using the procedure in "Modifying the LSM Administrator List".
Note that LSM recognizes domain names and Windows groups, both local and global, as acceptable entries in the Administrator attribute. If you are logged into an individual Windows computer, only the local group is recognized, since there is no "global" group. If you are logged into a domain, only the global group is recognized. You can find out the name of your group by running the Windows utility findgrp.exe, provided with the Windows Resource Kit.
If a hostname is used, LSM must be able to resolve the hostname to the right of the @ sign as a valid TCP/IP address.
If you need to restrict the LSM Administrator list so that it does not include Administrators@hostname, make sure that the list includes at least the user that starts the LSM services. Typically, this is the system user. For example, system@hostname allows the proper access to LSM resources and allows the services to start.
To modify the list of LSM Administrators in the Administrator attribute of the server resource on Windows, perform the following steps:
Before you can use LSM for Oracle backup and restore operations, you need to create a device resource for each device to be used by the LSM Server. In addition, you must label and mount a storage volume in each backup device. You can also use the LSM Administrator GUI for these volume operations. For details about configuration and management tasks involving the Oracle backup devices and volumes, see Chapter 3, "Media Management".
Finally, you need to verify that the LSM client and Default group resources are properly configured for the automatic daily LSM Server bootstrap backup. For more information on configuring and running bootstrap backups, see "LSM Server Bootstrap Backups".
|
|
 Copyright © 1996-2001 Oracle Corporation. All Rights Reserved. |
|