Release 2 (9.0.2)
Part Number A92171-02
Home |
Solution Area |
Contents |
Index |
| Oracle9i Application Server Administrator's Guide Release 2 (9.0.2) Part Number A92171-02 |
|
This chapter describes tasks for reconfiguring an application server enterprise.
It contains the following topics:
You can add functionality to your application server by configuring components that were not configured during installation.
|
Note: If you intend to configure JServ, refer to "Enabling JServ" before following the steps in this section. |
You can configure components as follows using the Enterprise Manager Web site:
ias_admin password, and click OK.
If you configure any of the following components, you may need to take additional steps to setup the component to use a customer database:
"Task 3: Complete Component Configuration" for more details
See Also:
Once you configure a component, it cannot be deconfigured, but you can remove its functionality by not starting it when you start the rest of the components in your installation.
You can extend an application server installation by installing a higher install type in the same Oracle home. For example, you can extend a Portal and Wireless installation to a Business Intelligence and Forms installation or a Unified Messaging installation. To extend an application server installation, run Oracle Universal Installer using the Oracle home you would like to extend.
Most application server enterprises have one infrastructure that contains Oracle9iAS Single Sign-On, Oracle Internet Directory, a metadata repository, and, optionally, Oracle Management Server. If the load on your metadata repository is at full capacity, you can add a second infrastructure to your enterprise. This infrastructure should contain a metadata repository and, optionally, Oracle Management Server. It should be configured to use the Single Sign-On server and Oracle Internet Directory from the original infrastructure. The second Oracle Management Server should be configured to use the metadata repository from the primary infrastructure, so there is no load balancing or failover of Oracle Enterprise Manager at the repository level.
To add an infrastructure, use the Oracle Universal Installer to install the infrastructure. Choose a custom configuration that only configures the metadata repository, and, if desired, Oracle Management Server. Supply the Single Sign-On and Oracle Internet Directory information from your original infrastructure.
After the installation, the metadata repository in the new infrastructure is registered in your enterprise. During subsequent middle-tier application server installations, you should specify the Single Sign-On server and Oracle Internet Directory in your original (or primary) infrastructure. You will be given a choice of which metadata repository to use. Note that you cannot change any pre-existing middle-tier installations to use the metadata repository in the new infrastructure.
If you have a J2EE and Web Cache instance that is not associated with an infrastructure and you would like to use Oracle9iAS Single Sign-On or clustering, you can associate the instance with an existing infrastructure using the Enterprise Manager Web site. This operation also causes the instance to join the farm.
You can associate an instance with an infrastructure using the Enterprise Manager Web site:
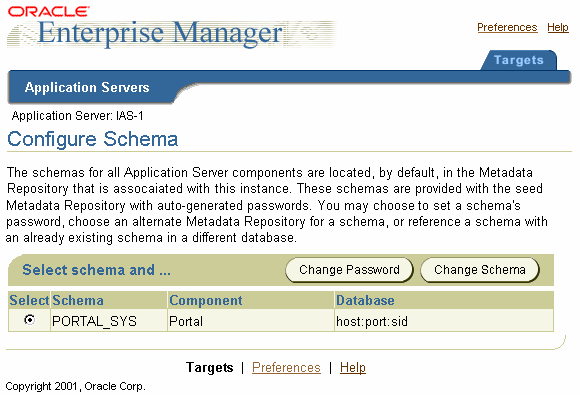
You can change the database schema used by an individual component. This operation changes the schema a component points to, but does not create the schema or load any data into it. It is primarily used for migration purposes. For example, you may want to point a component to a schema used by a pre-9.0.2 Oracle application server that has been upgraded to work with Oracle9iAS version 9.0.2.
To change the database used by a component with Enterprise Manager Web site:
Some application server components use schemas in the metadata repository or customer databases. The schema passwords are generated and maintained automatically by the application server, and are not usually known by administrators.
You can reset a schema password if you need direct access to the schema. You must reset most component schema passwords using Enterprise Manager Web site, because the change must be registered with the component and the database.
|
See Also:
Appendix C, "Metadata Repository Schemas" for a table showing which schemas must be changed using Enterprise Manager Web site, and which must be change directory in the database |
To change a schema password using Enterprise Manager Web site:
To change the password using SQL*Plus, login to the customer database as a user with SYSDBA privileges and run the following command:
sql> alter user schema identified by new_password
|
|
 Copyright © 2002 Oracle Corporation. All Rights Reserved. |
|