Library |
Solution Area |
Contents |
Index |
|
|
|
|
One of the most important aspects of application development is managing the modules that make up an application. Large applications can consist of literally thousands of modules, and millions of lines of code. In addition, modules which are important to the project as a whole but which are not compiled into the application itself (such as design specifications, test scripts, and documentation) must also be tracked and maintained.
This chapter explains how to use Forms Developer and Reports Developer to help you manage the application development process.
| Section | Description |
|---|---|
|
Section 1.1, "The Software Development Lifecycle: An Overview" |
Briefly covers the major milestones of application development and discusses Project Builder within that framework. |
|
Section 1.2, "Managing Project Documents During Design and Development" |
Discusses how to manage documents during development of an application. |
|
Section 1.3, "Managing Project Documents During the Test Phase" |
Discusses how to ensure that your QA group tests the correct configuration of project documents during the test phase. |
|
Section 1.4, "Managing Project Documents During the Release Phase" |
Discusses how to ensure that an installable version of your application is delivered to your customers. |
|
Discusses how to turn your own application into one that is installable by the Oracle Installer. |
Application development typically occurs in four phases:
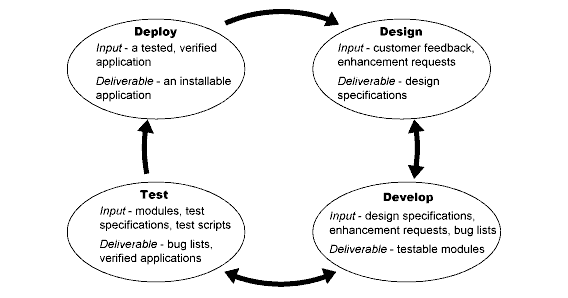

As the application grows in size and complexity, the four phases are repeated iteratively, and the amount of information produced (actual code, bug reports, enhancement requests, etc.) grows. Yet all input and deliverables for all phases must be tracked and maintained to ensure the integrity of the final deliverable: the application your customer installs.
This chapter discusses how to use Forms Developer or Reports Developer to manage your application's code base and maintain version integrity.
In any development project, management tasks can be split roughly into two categories:
Project Builder, a component of both Forms Developer and Reports Developer, enables you to simplify your software configuration management tasks so you and your team can focus on your primary objectives: designing, coding, and testing applications.
To help simplify your software management tasks, Project Builder provides the means for you to:
These features are described in detail in Section 1.1.3, "Exploring Project Builder benefits". If you're unfamiliar with Project Builder terminology, however, it's a good idea to read through Section 1.1.2.1, "Understanding Project Builder terminology" before proceeding. This section defines some basic terms which provide the context for a discussion of Project Builder's features.
Project Builder is based upon the concepts of projects and subprojects:
In addition to projects and subprojects, these terms are also central to a solid understanding of Project Builder:
It is important to remember that an item is not the file itself; rather, it is a description of the file. So, when you delete an item from a project, you are simply telling Project Builder that the file is no longer part of the project. The file itself is not deleted.
Just as you might use environment variable in scripts or batch files to conveniently modify a script's actions without editing the script itself, so you can use macros to customize actions without having to edit the action themselves. For example, you might define a macro to determine whether to compile your application in Debug mode or Optimized mode. In preparation for building the deployment version of the application, you would simply change one macro definition to switch off Debug, rather than having to find and modify every type whose Build command made use of the Debug flag.
The Project Builder interface provides three tools for manipulating the items that make up a project:
Figure 1-2 depicts all three of these tools.

Certain roles must be filled to keep the application development effort going smoothly. Some, such as project manager, development manager, and team leader, are common roles within development groups and require no definition. However, with Project Builder one new role exists--that of project administrator.
A project administrator is charged with creating projects and making them available to developers. The project administrator maintains the Global Registry and modifies it as necessary, exporting the changes to the developers on the team. He or she may also export the project information to different environments, such as test environments, or other platforms for cross-platform development.
The work the project administrator does when managing projects may affect the roles of the following team members:
Of course, the precise duties of each team member vary from development group to development group. A team member may also take on more than one role; for example, a team leader may also be a project administrator, or a developer may be in charge of source control.
Now that you are familiar with basic Project Builder terminology (see Section 1.1.2.1, "Understanding Project Builder terminology"), let's examine the benefits Project Builder provides.
You can associate all of the modules in an application with the application itself simply by adding the modules to the same project. This allows you to track a large application as a single entity, determine the dependencies between modules, and so on.
Project Builder ships with an extensive list of types, to which are assigned default actions (such as Open, Edit, or Print). When you select a module, then click the right mouse button, a pop-up menu displays the actions associated with that type. By default, the actions included in a type definition apply to all modules of that type in a project. You can also modify and add to these actions.
Actions are simply command strings. One benefit to defining actions with the actual command strings (besides simplicity, of course) is that an action can be associated conceptually with several different types. For example, editing a Word document requires a different tool than editing a text document, yet conceptually the two edits are very similar. Project Builder can associate an Edit command with many different types, using a different command string for each. In this way, a single command executes an appropriate action no matter what type of module you're working with.
Knowing which modules depend on which other modules is necessary to determine when modules need to be recompiled as a result of a change. It's also the key to managing the impact of changes; for example, if a library changes, which forms are now out-of-date?
Project Builder includes the dependencies for module types in their type definitions. Thus, it can recognize dependencies between existing modules in a project. Since it can also track modifications to modules, it automatically recompiles changed modules and the modules dependent on them.
In fact, Project Builder can recognize dependencies that do not yet exist within the project and create markers for them. These markers are called implied items. For example, suppose your project contains an .FMB file, defined by the Project Builder type "Form Builder document." The "Form Builder executable," or .FMX file, may not exist--you may not have generated it yet. But Project Builder knows the existence of this .FMX file is implied by the existence of the .FMB file, and creates an implied item to mark it.
To determine the existence of an implied item, Project Builder correlates the value of the property Deliverable Type for each defined type with the input items, or source, required for the Build From <type> action for each defined type. In our example above, the Deliverable Type property for the "Form Builder document" type is defined as "Form Builder executable," or .FMX.The Build From <type> action defined for a Form Builder executable is "Build From FMB". This means .FMB files are the input items for creating .FMX files, and, conversely, .FMX files are targets for .FMB source.
The chain of implied items can consist of multiple files. For example, suppose you add a C source file to a library file. In this case, Project Builder adds modules of whatever other types are necessary to get a complete path of Build From <type> actions from one file type to the other (like an object file).
While Project Builder detects dependencies only between compilable modules and their resultant executables, you can set dependencies manually by adding modules to a project below the item dependent on them. For example, if an .FMB is dependent on a PL/SQL library, you can add the .PLL to the project below the .FMB, and Project Builder will recognize the dependency.
With Project Builder, you can define all of your most-used connection strings and store their definitions under the Connections node. You can then assign a connection to a module by dragging the connection from the Connections node and dropping it on the module. When you need to edit that module--for instance, a form--you can select the form in the Project Navigator and choose Edit from the pop-up menu. Project Builder automatically opens Form Builder and connects to your database for you.
Project Builder makes it easy to determine and track the modules that will be included in your final install package (for example, .EXE files, .DLL files, and .HLP files).To earmark a file for delivery, set the Deliver File property to Yes. When you're ready to create an install package, you can use the Delivery Wizard to package all modules for which the Deliver File property is set to Yes into a single unit.
Note: You can set the Deliver File property for a type or for individual project items.
Project Builder enables you to export the information about a project to other team members and to other platforms. Information about types, actions, macros, and project registry files--including all the customizations you've made--can be written to a text-based export file which you can then import to other environments and other platforms. This enables cross-platform development and testing.
You can access other tools from the Project Builder user interface through several means:
Both Forms Developer and Reports Developer provide interfaces to these source control packages:
You can also use other source control tools by modifying the source control actions provided with Project Builder to point to them.
Since a variety of source control packages are available and can be used with Forms Developer and Reports Developer, specific instructions for source-controlling your projects are beyond the scope of this chapter.However, general guidelines will be provided where applicable.
Much has been written about the importance of design in the success of an application.Deliverables during the design phase can include design documents and specifications, meeting minutes, UI prototypes, results from customer surveys (if the application is new), user tests and lists of enhancement requests (if the application is to be revised)--all documents that can be added to and tracked within a project.
This means the project administrator for the development effort should be identified early in the design process and begin creating the project immediately. (See Section 1.1.2.2, "How Project Builder affects existing development roles" for information on the role of the project administrator.) This section describes the role of the project administrator and the members of the development team in setting up Project Builder to manage a project during the design and development phase.Specifically, this section addresses:
Note: The steps involved in accomplishing simple tasks with Project Builder are in the Project Builder online help and are not included in this chapter.
Project Builder is automatically installed to ORACLE_HOME\PJ10.Noteworthy files found in this directory are:
Perhaps the most important issue to address during Project Builder installation is how you want to make these various files available to team members. Section 1.2.1.1, "Installing the project and user registries" discusses your options.
Project Builder depends on native file sharing protocols for its security. This can make project files vulnerable to accidental changes, which is something to keep in mind as you decide how to configure the Global Registry and user registries. Table 1-1 lists the available options.
This section focuses on the creation of a single project for distribution to a team of developers. However, this may not be the best option for your group. If the application being developed is very large or if components are to be split up among team members, you may choose to create several separate, smaller projects, the contents of each determined by the responsibilities of each developer or group of developers.
If you decide to distribute a single project, note that Project Builder projects will accept pointers to modules that do not exist in the specified location. (You can determine whether a module exists by examining its information in the Property Palette; Time created/modified and File size (bytes) are blank if the module does not exist). This means you can distribute a single large project without requiring all team members to have all modules available.
Creating a project is an ongoing task that requires the participation of both the project administrator as well as each member of the development team. This section describes the responsibilities unique to each role.
As project administrator, your role goes beyond creating a project registry file and deciding what to include in the project. Whether you use the Project Wizard provided by Project Builder to create the project, or create a project registry file and manually edit the various properties, prior planning is highly recommended before you complete the following tasks:
The next few topics provide recommendations for completing each of these tasks.
The Project Wizard provides an easy-to-use interface for creating a project. You can also create a new project without the Project Wizard (using the New Project tool on the toolbar) and set project properties in the Property Palette.
At its simplest, a new project is a default project registry file primed with information about the Global Registry, but little else. Project Builder needs a bit more information before it can keep track of your project, as discussed in the next few topics.
Step 1a: Set up the project's directory structure
The directory structure of a project can have far-reaching consequences. For example, suppose a project contains modules that are located in a directory that's not a child of the project directory. Now suppose you create actions that search for and modify project modules. How will you find the "orphan" modules? Create alternate actions with hardcoded paths? Not portable. Search from the root? Not efficient.
Recommendations:
The standard methods for adding modules to a project are the Add Files to Project and Add Directory dialogs. Note that the dialogs always insert the full path unless the module you want to add is in the project directory; then a relative path name is used.
Step 1b: Add modules
Once you have planned the directory structure, you can add modules to the project.
Recommendation: Use subprojects whenever possible to help organize your project. But don't simply group together all forms or all reports. Group the modules into components; for example, you might create a subproject for all the modules in a large form, including .FMB files, .FMX files, PL/SQL libraries, menus, bitmaps, icons, etc. This enables you to more easily create some necessary dependencies not detected by Project Builder.
Step 1c: Establish default actions, macros, and connection strings
This step involves making site-specific edits to actions and macros; for example, changing build actions to use the compilers and compiler options that are standard at your site. If you have not already done so, you can also create connection strings for commonly used databases containing test data or necessary tables.
Step 1d: Set necessary dependencies manually
Project Builder can recognize some dependencies between modules (it knows that .FMX files are built from .FMB files, which are built from .FMT files), but only the dependencies it can deduce by cross-referencing the Deliverable Type and the Build From <type> actions.
Other dependencies may exist as well: dependencies on PL/SQL libraries, menus, icons, and so on. You can tell Project Builder about these dependencies by creating entries for the modules on which a module is dependent below the item for the dependent module, as shown in Figure 1-3, "Manually added dependencies".

This figure illustrates NAVWIZ.FMB's dependency upon WIZARD.PLL, NAVIGATE.PLL, and NAVWIZ.MMB.
After you create your project, you're ready to introduce a source control package. Many third-party source control packages also implement the concept of projects.
Recommendation: Work with your source control administrator to set up a source control project that mirrors your development project in Project Builder.
When setting up a project to source control a complex application, remember to include the non-obvious modules as well. For example, when checking in a form, don't forget menus, PL/SQL libraries, user exits, icons, or special fonts you use. Applications running on Windows may use OCX or ActiveX controls that should be source-controlled as well.
Once you've done the preliminary work of creating the project and establishing source control, it's a good idea to export all project information to a project export file and notify team members of its location. They can then import the project.
It is possible to notify team members of the location of the actual project registry file, but remember that Project Builder uses your operating system's own security features to protect your project modules from being deleted or overwritten. Simple deletes and overwrites are possible. To maintain the integrity of your projects, follow Project Builder's own process for updating projects, and always import and export modifications to the project instead of simply distributing changed registry files.
When you notify your team members of the location of the project export file, you should also notify them of the directory structure you've set up so they can mirror that structure on their development machines. The easiest course for setting up the project is to have all team members map the project location to the same project directory on their machines, since mappings to different project locations would require separate copies of the project registry file with different values for the Project Location: Q:\myproj, R:\, etc.
Team members can then check out the modules they have been assigned.
After the project administrator has completed the tasks described in Section 1.2.2.1, "Creating a project: Project Administrator", project team members can fine-tune the work. If you are a project team member, you can expect to:
When your project administrator informs you that the project is available, it's time to import the project information and set up your working directories with the modules you've been assigned.
Recommendation: File management is easier if you set up your directory structure to mirror what your project administrator has already created for the project.
One of the first things to do when setting up a project is to customize your user registry.
Step 2a: Define new types and edit existing ones
If you want to add modules to your project that are of a type not represented in the Global Registry, you can use the Type Wizard to define your own type in your user registry and assign actions, macros, and so on to it.
In addition, you may want to override a default command or macro for a particular type in the Global Registry. An easy way to accomplish this is to copy the type in the Global Registry, paste it into your user registry, and edit it. Now, all modules of that type in your project will inherit the modifications from the type in the user registry.
Recommendation: Notify your project administrator when you modify a global type by copying it into your user registry and editing it. Such a modification might be useful to the whole team.
Step 2b: Customize actions and macros
While you can customize the actions and macros associated with the types you add to your user registry, it's important to remember that you can modify actions and macros at other points in the Project Builder hierarchy as well. Where you edit the item depends on the extent of the influence you want your change to have.
The following table lists all the locations you might find an action or macro, the scope of that action or macro, and what can override it.
Step 2c: Create reusable connections
If you have your own set of tables with data you've created for testing purposes, you can add your own connections to the list provided by the project administrator. Once you've created the connections, you can assign a connection to a module by selecting the connection's item in the Project Navigator, dragging it to the project file entries, and dropping it on the item for the module you've chosen. Now, when you select an action that opens a tool requiring a database connection, Project Builder logs on for you.
Once you have your directory structure in place and the project imported, you can populate your workspace with the modules you've been assigned. The source control commands Check In, Check Out, and Source Control Options, accessible from the File'AdministrationFile->Administration menu, are associated with actions defined for each type. This means you can modify the actions, if necessary, to affect the results of the commands--though this is not recommended for source control.
When the project enters the development phase, maintaining the integrity of the project becomes increasingly important.
Recommendation: Only the project administrator should make changes to the project that affects multiple team members (such as modifying the Global Registry or adding new subprojects containing new modules).
While the application is in development, as project administrator your role is to maintain and support the project. In addition, you might be in charge of managing development deliverables, or working with a development manager to do so. You might need to:
Sometimes new modules must be added to a project after its initial creation, and dependencies added manually. The process for doing so is the same as when creating the initial project. For more information, see Section 1.2.2.1.1, "Step 1: Creating the project".
Once you've added the new modules and made the necessary changes, you can export the changes and make them available to members of your team. The process for doing so is the same as when exporting the initial project. For more information, see Section 1.2.2.1.1, "Step 1: Creating the project".
Although you can try to keep various revisions synchronized with each other (for example, through a nightly check-in), often development on one module will be completed while another needs bugs fixed or headers changed. Synchronous revisions are generally impractical.
A better method is to synchronize versions by applying a symbolic version label to the group of revisions that mark the achievement of a significant milestone. Most major source control tools enable you to apply a symbolic label to a source control project.
When your project is set up and your modules have been assigned, you can use Project Builder to:
Recommendation: The most efficient way to use Project Builder to edit modules is to customize the actions associated with the types of modules you'll be editing so they invoke the tools you want to use with the options you need. In addition, be sure to associate a connection string with either the individual module or the project. Then you can drag the connection from its location in your user registry and drop it on the module or project item. Once your modules are prepared in this fashion, choosing a pop-up menu item or double-clicking on a project item opens your module in the correct application. If necessary, you'll already be logged on.
You can also use the Launcher to access development tools. The Launcher is shipped with toolbar buttons already set for the Forms Developer or Reports Developer tools, but you can add a third-party tool by creating a button and associating it with an executable.
Note: If you invoke a tool via the Launcher and then open a module, the tool will not be aware of any associated connection strings. You will need to log on to the database manually.
See Section 1.2.2.1.1, "Step 1: Creating the project", or contact your project administrator.
The Build commands--Build Selection, Build Incremental, and Build All--are available from the Project menu. They are also associated with an action--in this case, the Build From <type> action.
This means you can select a single command for any different module type and the module will be compiled according to the definition of the Build From <type> action--not for that particular type, but for the target you actually want to build.
For example, the Build From <type> action for an .FMX file invokes the Form Generator and creates the .FMX file from the corresponding .FMB.What the Build command compiles is the .FMB, but how it compiles the .FMB is determined by the action associated with the .FMX that results.
You can modify the results of the Build commands by modifying the definition of the Build From <type> action for the corresponding target.
Choose Build Selection to compile selected modules, or force a compile of all compilable modules by choosing Build All. Because Project Builder can detect when modules are out-of-date and need to be recompiled, you can compile only out-of-date modules by selecting the item for the project containing them, then choosing Build Incremental.
Note: The Build commands are also available from the pop-up menu.
If modules need conversion for source control (for instance, the source control only works on text and your modules are binary), you can edit the Check file into RCS action to automate the conversion to text before check-in.
You can also edit the Check file out of RCS action in a similar fashion to convert the text-based source controlled version of the module back to binary.
Many applications today run on multiple platforms, with development taking place on a variety of platforms as well. Chapter 5, "Designing Portable Applications" can help you ensure that the application underlying your project is portable.
To ensure that your project is portable, too, Project Builder supports development on several major platforms. To do so, it must ship with a Global Registry that reflects the platform; in other words, the types defined must be found on that platform, and the actions and macros must be written according to the syntax rules of that platform. This means the Global Registry, and, by extension, all user registries and project registry files, are not portable.
However, you can export information about a project to a text file and import the text file to another platform, as discussed in Section 1.1.3.6, "Sharing and porting project and subproject registry files".
If you are the administrator of a project undergoing development on multiple platforms, you can expect to:
Work with your source control administrator to create a branching source control project that enables your team members to isolate the code for the new platform.
Creating an export file for the purpose of distributing a project to another platform is no different from creating an export file to distribute to team members on the same platform. The export file created by Project Builder is a text file, easily transferred to the alternate platform.
The role of a team member working on development on an alternate or secondary platform is actually quite similar to the role of a team member developing on the base platform. However, there is one major difference: when you receive a project already created on a different platform, you can expect to:
Equivalent versions of pre-defined actions and macros, where they exist, are provided by Project Builder for all supported platforms. However, if some actions have been customized or new actions created, you will either need to edit the actions to make them work on the new platform or create equivalent new actions.
Though the test phase is often thought of as separate and distinct from the development effort--first you develop, then you test--testing is a concurrent process that provides valuable information for the development team.
There are at least three options for integrating Project Builder into the test phase:
Recommendation: A combination of the second and third options works best. Associating your application with a project can be useful during the testing phase, as well. You can create actions to automatically run test scripts or add script types and make them dependent on the modules they are to test.
During unit test, testers can use the same project or projects as the developers, if the project is organized by functional units, or separate projects have been created for functional units.The project or projects can also be exported, so unit test can take place in a variety of environments and on a variety of platforms.
System test might require a new, stripped-down version of the development projects that includes only the modules being tested, especially if you need to concatenate several smaller projects.
The goal of the development group in this phase of the process is to provide the test group with the modules to be tested in as smooth a manner as possible.
The tasks involved in creating and exporting a project for testing purposes are the same as the tasks required when creating and exporting a project to a development team:
Although members of the test team generally are not responsible for any modifications to the modules of an application, they do have input (modules to test) and deliverables (fully-tested modules and lists of bugs uncovered during the testing phase).
Project Builder can help the test team keep track of its input and deliverables in the same way it helps development team members.Testers can add scripts and logs to a project, modify actions to include debugging options, and add subprojects containing testing information.
If you have decided to use Project Builder to help test your application, you'll need to do some preparatory work that is very similar to that of the developers when they are first setting up their projects.You may need to:
The process of importing a test project and setting up a testing environment is the same as the process for importing a project and setting up the environment for development.See Section 1.2.2, "Creating a project", for more information.
You may need to add some items, such as test scripts, to the project.In addition, you may need to add connection strings to database accounts containing test data.
Remember that you can automate the running of test scripts just as you can automate actions associated with the modules in your application.
If actions specifying "run with debugging" have not already been provided, you can either modify existing actions to include a debug flag, or create new actions.
When your application has been thoroughly tested and is ready to release, Project Builder can help you simplify the process of delivering the application to customers.
During the release phase, the development group passes the tested and verified versions of all modules necessary for installation to the releaser.Because Project Builder marks all modules to be included in the final application and associates special commands with them, this hand-off can be automated in the same fashion as other processes, such as compiling your project and source controlling it.
Once your project has been thoroughly tested and is ready for release, you have one remaining task: package the project.
Project Builder provides the Delivery Wizard to help you package your applications as installable components, as well as to:
The modules actually packaged by the Delivery Wizard are determined by the value of the Deliver file property associated with each item (Yes to include the module in the package, No to leave it out).
After you have packaged your application, you're ready to make it available to your customers.In addition to installing your application, your customers will also need to use the Oracle Installer to install the Runtime environment on which your application depends.To simplify the installation process for your customers, both Forms Developer and Reports Developer provide the Oracle File Packager, with which you can make your own application installable with the Oracle Installer on Windows NT and Windows 95.When you've completed the steps in this section, your customers can install everything they need--your application, plus the required Runtime environment(s)--using a single mechanism.
Before discussing how to package your application, it's a good idea to familiarize yourself with the terminology and background information relevant to the installation/packaging process:
This table defines some important terms for the installation/packaging process:
The Oracle Installer files control how and where an application is installed (and de-installed) on a user's machine.While the Oracle File Packager creates the Oracle Installer files for you, you may have to make some slight modifications manually. If you just want to look at some sample installer files, take a look at:
\TEMPLATES\RELEASE\YOURAPP
\FORMSAPP
FORMSAPP.MAP
FORMSAPP.VRF
FORMSAPP.INS
FORMSAPP.DEI
\DEV2KAPP
DEV2KAPP.MAP
DEV2KAPP.VRF
DEV2KAPP.INS
DEV2KAPP.DEI
All of these files are text files and should be viewable and editable in a text editor.
The PRD file lists all the installable components in a given staging area. It also identifies the base filename and location for the Oracle Installer files of each component.In other words, the PRD lists all the files that appear in the Available Products pane of the Oracle Installer. Its name reflects the platform it describes; e.g., WIN95.PRD and NT.PRD.There is one PRD file per staging area, per platform.
The MAP file is a table that lists all the files that make up your application.
Note: Group, Item, and Command are required only for applications that appear in the Start menu.To see an example of how these fields are filled in, use your OS search capabilities to locate DEVDEM60.MAP, the map file for the Forms and Reports Developer demos. (If you can't find it, you may have to install "Forms Developer [or Reports Developer] Demos and Add-ons" from your Oracle distribution media.)
The VRF file VeRiFies that all the correct dependencies are identified and installed. For example, by specifying that your application depends on Forms Runtime, your application's installation process will automatically detect whether Forms Runtime is already present on a user's machine.If it is not, Forms Runtime will be installed.
The VRF file also prompts the user for information, such as where the product should be installed.In addition, the VRF file sets up the user's environment, defining such things as environment variables in the Windows registry.
The INS file INStalls the files that make up an installable component, sets any needed environment variables, and registers the product with the Oracle Installer.It works in coordination with the MAP file and the VRF file.
The DEI file DEInstalls the files that make up an installable component.It also removes environment variables and unregisters the component after successful deinstallation.It works in coordination with the MAP file.
The TEMPLATES directory provides everything you need to set up and customize your own staging area. Available on your Oracle distribution media, the TEMPLATES directory contains:
This section contains instructions for creating a one-step or a multi-step installation process for your customers:
Whichever process you choose, to make your application installable with the Oracle Installer, you will:
The rest of this chapter contains specific instructions for completing these tasks.
If your application is installable on Windows 95 and NT, you can use the Oracle File Packager to create the Oracle Installer files and to copy your files from your development area to the staging area. The following steps address both one-step and multi-step installations.
Step 1: Install the Oracle File Packager
Step 2: Prepare your staging area
Step 3: Move your files to the staging area and create the Oracle Installer files.
Repeat this step for each staging area you established in Step 2.
Notes:
Step 4: Merge your PRD file with NT.PRD and WIN95.PRD
This step creates a one-step installation process.If you're creating a multi-step installation, go to Step 5.
Step 5: Modify the Oracle Installer files
For example, if you establish Forms Runtime as a dependency for your application, the installation process will automatically detect whether Forms Runtime is already present on a user's machine. If it is not, Forms Runtime will be installed.
Step 6: Test your installation
Test your installation on a "clean" machine (a machine with no previously-installed products) that is representative of the projected end-user environment. Do not rely on tests conducted on a developer's machine--that machine may already have files such as icons or libraries that you inadvertently omitted from your map file, or registry settings that were not included in your INS file. This is one of the most common causes of installation problems.
Step 7: Copy the staging area to your distribution media
When you are ready to copy your application to CD, tape, diskette, or another medium--or simply to a LAN or other networked machine--be sure you include the entire staging area--that is, TEMPLATES\RELEASE in its entirety. If you include only your subdirectory, the required runtime environment(s) will not be accessible.
|
|
 Copyright © 2000 Oracle Corporation. All Rights Reserved. |
|