Release 6i
A73172-01
Library |
Solution Area |
Contents |
Index |
| Oracle Reports Building Reports Release 6i A73172-01 |
|
![]()
![]()
The report described in this chapter is designed to help you learn more about the Report Builder features for building and applying templates.
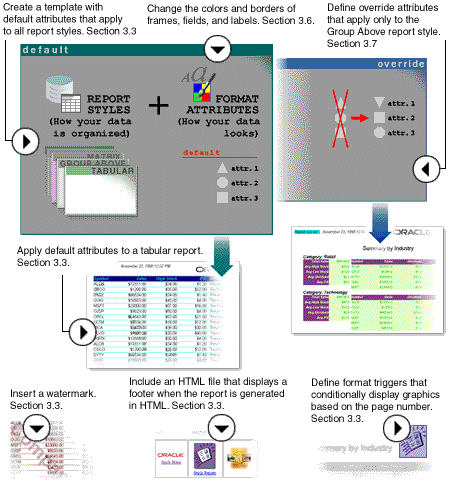
About templates Templates define common characteristics and objects that you want to apply to multiple reports. For example, you can define a template that includes the company logo and sets fonts and colors for selected areas of a report.
In this report example, you will build a multi-query report that summarizes stock information by company symbol using the Tabular report style. You will create a new template and apply the template to the report. Then you will enhance the template by changing several default attributes in the template margin and body. You will enhance the template further by overriding some of the default attributes of the Group Above style. Finally, you will create an additional layout using the Group Above style, and re-apply the template to the report.
The following figure illustrates the concept of templates and the various features you will add to your template. A template defines the common look (the default attributes) of a report that can be applied globally across all report styles.
With the same template, you will change the look of a particular report style. In this example, you will override the default attributes of Group Above style.
When you create a report, you can use this template to apply a common look across many report styles (Tabular, Group Left, Matrix, and so on) or apply a unique look to a report with the Group Above report style.
Table 3-1, "Features demonstrated in this Templates sample report", describes the steps you will take to create a template and apply it to a report.
The following supporting files are used to help you complete the exercises in this chapter. They are located in your ORACLE _HOME\TOOLS\DOC60\US\RBBR60 directory:
temp_hdrftr.htm
oreplogo.gif
osuplogo.jpg
ostore.gif
oracle.gif
cconft.bmp
cconfa.bmp
t_image1.bmp
t_image2.bmp
temp.tdf
temp.rdf
You also will work with the following templates (located in your ORACLE_HOME\REPORT60\ADMIN\TEMPLATE\US directory):
You will work with the global preferences file, cagprefs.ora (located in your ORACLE_HOME directory.) The temp.rdf file contains the report you will create after finishing the tasks in this chapter. You may want to refer to this file while you are working. This file is located in your ORACLE_HOME\TOOLS\DOC60\US\RBBR60 directory.
| Feature | Location |
|---|---|
|
Create a multi-query data model and data links in the Data Model view. |
|
|
Create a report using a pre-defined layout, and modify the layout in the Live Previewer. |
|
|
Create a new template, which will modify the appearance of your report, using the Layout Model view for templates. |
|
|
Add your new template to the pre-defined templates list in the Report Wizard so that you can apply it to your report. |
Section 3.4, "Adding the new template to the predefined templates list" |
|
Apply your new template to the report, and view the changes in the Live Previewer. |
Section 3.5, "Applying the customized template to the report" |
|
Change default attributes of the template that are applied globally to the body of the report. |
Section 3.6, "Enhancing the default attributes of the template" |
|
Override default attributes in the Group Above style of the template. |
Section 3.7, "Overriding the default attributes of the template" |
|
Create an additional default layout to illustrate the override attribute changes made to the template. |
|
|
Make final format changes to the report. |
To get started, open Report Builder. If the Welcome dialog box appears, click Build a new report manually and click OK. If not, choose File->New->Report. Click Build a new report manually and click OK. The Data Model appears.
At some point before you generate the report, you will need to log into the database. Choose File->Connect to connect to the database. Enter the appropriate log on information. See Section 1.3, "Obtaining database access before you start" for details.
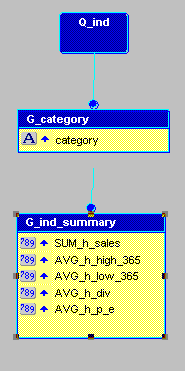
The steps in this section will help you create a multi-query data model. First, you will create two queries. Then you will create a break group for the first query. Finally, you will link the two queries.
SELECT ic.category, SUM (h.sales), AVG (h.high_365), AVG (h.low_365), AVG (h.div), AVG (h.p_e) FROM stock_history h,indcat ic
WHERE h.symbol=ic.symbolGROUP BY ic.category
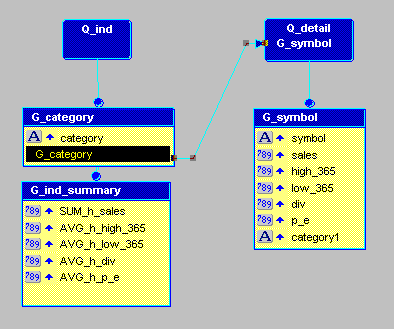
SELECT h.symbol,
h.sales,
h.high_365,h.low_365,h.div,h.p_e,
ic.category
FROM stock_history h, indcat icWHERE ic.symbol=h.symbol
temp_311.rdf.
Tip: It is good practice when you are designing your report to save it frequently under a different file name. If you generate an error or if you don't like some of the changes you made, you easily can go back to the previously saved file and make revisions from that point.
In the Data Model view, make the following changes:
| Old Name | New Name |
|---|---|
|
G_category |
G_ind_summary |
|
Q_2 |
Q_detail |
temp_312.rdf.
In this section, you will create a break group using the category column in the query Q_ind:
|
|
temp_313.rdf.
In this section you will create a data link between G_category and Q_detail.
|
|
The steps in this section will help you create a default layout using the Report Wizard. You will create the default layout using the Tabular style. Finally, you will format several objects in the report using the Live Previewer view.
|
|
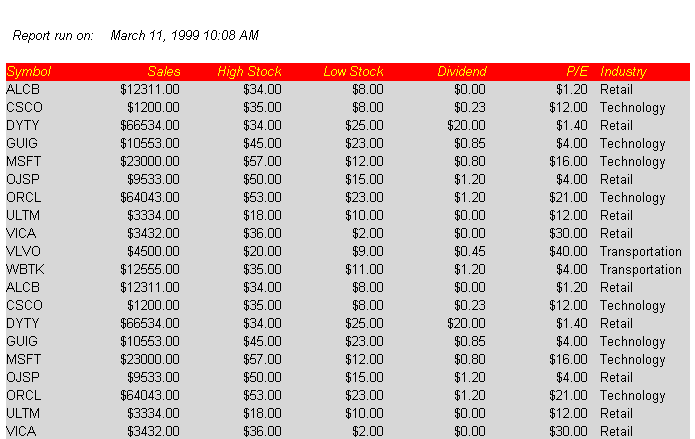
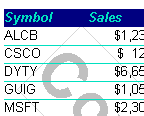
| Column | Label | Width |
|---|---|---|
|
symbol |
Symbol |
5 |
|
sales |
Sales |
6 |
|
high_365 |
High Stock |
6 |
|
low_365 |
Low Stock |
6 |
|
div |
Dividend |
6 |
|
p_e |
P/E |
6 |
|
category1 |
Industry |
6 |
temp_321.rdf.
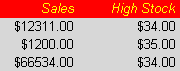
You will format several objects in the report by changing the format mask to display numeric values as currency. Finally, you will right justify several objects.
Tip: You can change several columns at one time: shift-click on all columns and choose Tools->Property Palette.
The result will look similar to the following figure:
temp_322.rdf , and close the Live Previewer.
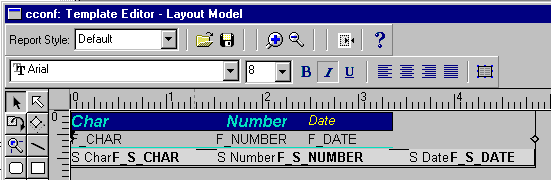
The steps in this section will help you create a new template using the Template Editor Layout Model while in Edit Margin mode. First, you will open two templates, copy the Confidential watermark from one template and paste it into the other. Next, you will change the color of the Date label and add an HTML page footer to the template. Finally you will create a format trigger that will conditionally display graphics based on the page number of a report.
corp2.tdf (located in your ORACLE_HOME\REPORT60\ADMIN\TEMPLATE\US directory). This is the Corporate 2 template that is currently applied to your report.
conf2.tdf. This template contains a Confidential watermark.
Tip: If you do not see the watermark, the Layout Model view might be displaying the Body.
Click ![]() to switch between the Margin and Body. Alternatively, choose View->Layout Section. A check mark next to Edit Margin indicates the Layout Model view is in Margin mode.
to switch between the Margin and Body. Alternatively, choose View->Layout Section. A check mark next to Edit Margin indicates the Layout Model view is in Margin mode.
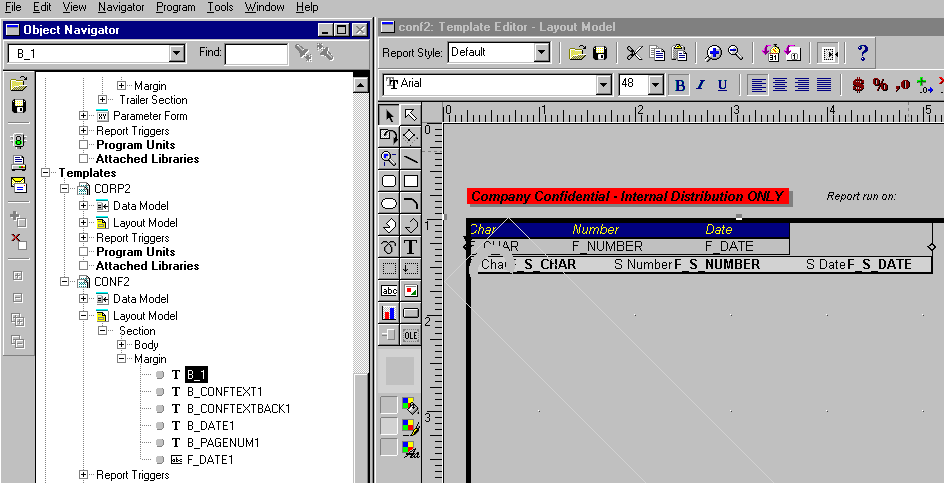
Tip: Every object in the Layout Model view is also represented in the Object Navigator. The watermark in the Layout Model view is represented as B_1 in the Object Navigator. To ensure that you have selected the watermark, arrange your workspace to display the Object Navigator and the Layout Model view side-by-side. Expand the CONF2, Layout Model, Section, and Margin nodes in the Object Navigator. When you click the watermark object in the Layout Model view, B_1 under the Margin node in the Object Navigator is highlighted. Your workspace should look similar to the following figure:
cconf.tdf in your ORACLE_HOME\REPORT60\ADMIN\TEMPLATE\US directory.
cconf.tdf.
cconf_b1.tdf, as a backup file.
Tip: Backup files are useful when you are making significant changes to your template. If you don't like some of your changes, you always can go back to a previously saved template and make changes from that point.
cconf.tdf template.
You will add an HTML footer to the template using the After Page Type and After Page Value properties.
|
|
For your convenience, this HTML footer file and its associated graphics have been provided for this exercise. These files are located in your ORACLE_HOME\TOOLS\DOC60\US\RBBR60 directory. They are:
CCONF template to display the Property Palette. Under the Report Escapes node, set the following:
| Property | Setting |
|---|---|
|
After Page Type |
File |
|
After Page Value |
|
cconf.tdf.
In this exercise, you will insert two boilerplate images in the margin of the template. Then, you will create a format trigger that will conditionally hide or show each of these images based on the page number.
|
|
Two images are provided for this exercise and are located in your ORACLE_HOME\TOOLS\DOC60\US\RBBR60 directory. They are:
| Property | Setting |
|---|---|
|
Source File Format |
Image |
|
Source Filename |
|
function B_Image1FormatTrigger return boolean isF_pge number;beginsrw.get_page_num (F_pge);If F_pge=1 thenreturn (TRUE);Elsereturn (FALSE);End if;end;
Under the General Information node, set the Name property to B_Image2.
Under the Link File node:
| Property | Setting |
|---|---|
|
Source File Format |
Image |
|
Source Filename |
|
Under the Advanced Layout node, type the following code in the editor. New code is displayed in bold:
function B_Image2FormatTrigger return boolean isF_pge number;beginsrw.get_page_num (F_pge);If F_pge=2 thenreturn (TRUE);Elsereturn (FALSE);End if;end;
Tip: Place the second image directly over the first image.
cconf.tdf.
The steps in this section will help you add the new template to the predefined template list in the Report Wizard. First you will look at the Style and Template pages of the Report Wizard to gain a better understanding of how templates are applied to different report styles, such as Tabular and Group Above.
You will add template definitions to a global preference file, which defines the preferences for Report Builder.
Finally, you will apply the new template to your report.
|
|
The following steps are an exercise to illustrate how templates are used in the Report Wizard. You will not make changes to your report in this section.
temp_322.rdf), and choose Tools->Report Wizard.
This is because, by default, a single template contains layout attributes for several report styles. You will learn more about the layout attributes of templates in a later step.
In the previous exercise, you learned that one template contains layout attributes for several report styles. To make the template available for a particular report style, you must add a template description and file name to Report Builder's global preference file. In the global preference file, you will define the template for the Tabular style and Group Above style so that they will be available in the Predefined template list in the Report Wizard.
cagprefs.ora (located in your ORACLE_HOME directory).
Tip: Most global preference changes can be made from Report Builder by selecting Tools->Preferences. For templates, however, you must add template definitions to the Predefined list using a text editor.
Reports.Tabular_Template_Desc.
Reports.Tabular_Template_Desc =("Corporate 1","Corporate 2","Confidential Heading","Confidential Background","Custom Confidential","Cyan Grid",
Reports.Tabular_Template_File.
cconf, to identify the file name of the template. See the bold text in the example that follows.
Tip: Be sure to place the file name in the same position as the description. For example, if you insert the template description in the fifth line under Reports.Tabular_Template_Desc, you must insert the template file name in the fifth line under Reports.Tabular_Template_File.
Reports.Tabular_Template_File =(corp1,corp2,conf1,conf2,cconf,gngd1,
Reports.BreakAbove_Template_Desc.
Reports.BreakAbove_Template_Desc =("Corporate 1","Corporate 2","Confidential Heading","Confidential Background","Custom Confidential","Cyan Grid",
Reports.BreakAbove_Template_File.
Reports.BreakAbove_File =(corp1,corp2,conf1,conf2,cconf,gngd1,
In addition to adding new templates to the predefined templates list, you can display a sample image when you select the template for a particular report style in the Templates page of the Report Wizard.
For your convenience, two bitmaps are provided for this exercise. These bitmaps must be located in the same directory as the template files.
ORACLE_HOME\TOOLS\DOC60\US\RBBR60 directory):
ORACLE_HOME\REPORT60\ADMIN\TEMPLATE\US directory.
These bitmaps will display in the Templates page of the Report Wizard when you select the Custom Confidential template for the Tabular and Group Above styles. You will have an opportunity to view these bitmaps in a later step.
The steps in this section will help you apply the new template to the report using the Report Wizard.
|
|
temp_322.rdf).
Tip: If the template does not appear in the predefined list, ensure that the template is in the correct directory (located in your ORACLE_HOME\REPORT60\ADMIN\TEMPLATE\US directory), and that the template description and file are correctly placed in the preferences file. If the sample graphics do not appear, ensure that cconfa.bmp and cconft.bmp are also located in the ORACLE_HOME\REPORT60\ADMIN\TEMPLATE\US directory.
Notice that the graphics are missing from the header. This occurred because Report Builder generates a temporary HTML file to your ORACLE_HOME\REPORT60\TMP directory. If you would like to preview this report with the header graphics, copy the following graphic files (located in your ORACLE_HOME\TOOLS\DOC60\US\RBBR60 directory) to your ORACLE_HOME\REPORT60\TMP directory:
Tip: When you are making a lot of little changes to your report, it is sometimes better to turn off the Web preview. Otherwise, the browser is constantly updating for each change that you make.
The steps in this section will help you enhance the Custom Confidential (CCONF) template even further. You will change some of the default attributes of the template, such as making objects transparent and changing the font style and color. These changes will be applied globally across all report styles in the template.
The changes you have made to the template so far have affected objects in the margin. The changes you will make to the default attributes will be applied to the objects in the body of the report such as frames, field labels, and fields.
Tip: When you select an object in the Object Navigator, it is selected in the Layout Model, and vice versa. Select the object you want to change in the Object Navigator and see the changes in the Layout Model view. You can work easily between these views by arranging your workspace to display the Object Navigator and the Layout Model view side-by-side. This technique is especially useful if you are new to editing in the Layout Model view.
Tip: Click ![]() to display list of values. Click the value, then click OK to accept it.
to display list of values. Click the value, then click OK to accept it.
Tip: You can make these changes using the Property Palette. You can also change some properties (i.e., font and color) directly from the Layout Model view using the toolbar or tool palette.
Under the Frames node, set the following:
Under the Field/Labels Headings node, set the following:
Under the Fields node, set the following:
| Object | Property Palette node | Property name | Set to: |
|---|---|---|---|
|
|
Fields |
Number Justification |
End |
The steps in this section are designed to help you understand a template's Inheritance feature. Inheritance determines the source from which property values are set. Default attribute properties inherit values preset by Report Builder until you change them. When you change properties, their values become localized (or contained within that template).
You can return a property back to its inherited value when you click ![]() (the Inheritance button) in the Property Palette. When a property value is inherited by its preset value, the icon next to the property in the Property Palette is a circle.
(the Inheritance button) in the Property Palette. When a property value is inherited by its preset value, the icon next to the property in the Property Palette is a circle.
Default template property with an inherited value:

A property value becomes localized when you click ![]() (the Localize button) or change the value in the Property Palette. When a property value is localized, the icon next to the property in the Property Palette becomes a square.
(the Localize button) or change the value in the Property Palette. When a property value is localized, the icon next to the property in the Property Palette becomes a square.
Default template property with a localized value:

Under the Style node, notice that icon next to the Borders property is a circle, indicating that All is an inherited value.
Tip: When you are designing your template and want to continuously preview changes in a sample report, you can:
cconf.tdf (located in your ORACLE_HOME\REPORT60\ADMIN\TEMPLATE\US directory).
..

The steps in this section will help you override the default attributes in the template. You will override some of the settings for the Group Above style.
|
|
Tip: With the Property Palette open, click ![]() to return the selected property back to its inherited value, or click
to return the selected property back to its inherited value, or click ![]() to localize the value.
to localize the value.
Override attribute properties inherit their values from the template's default attributes. When a property inherits a value from the default attribute, the icon next to the property in the Property Palette is an arrow.
Override attribute property with an inherited value:

When a property is localized, the icon next to the property in the Property Palette becomes an arrow with a red cross through it.
Override attribute property with a localized value:

See Section 3.6.2, "Inheriting and localizing property values" for more information on inheritance for the template's default attributes.
If necessary, click ![]() to switch to the Body of the template. Notice in the toolbar that the report style is Default. This layout defines the default attributes for the template.
to switch to the Body of the template. Notice in the toolbar that the report style is Default. This layout defines the default attributes for the template.
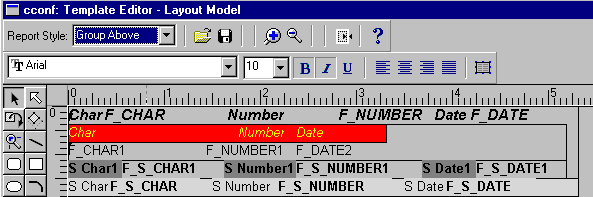
Notice that two sections (Level 1 and Level 2) are available. With these section nodes, you can override the default settings at the group level.
Tip: If necessary, you can add more levels using the ![]() tool. For this exercise, however, you will maintain these two section levels.
tool. For this exercise, however, you will maintain these two section levels.
| Property | Setting |
|---|---|
|
Inter-Frame (Horizontal) |
0.4 |
|
Inter-Frame (Vertical) |
0.4 |
Tip: Reviewing the changes in the Layout Model view might be more difficult when you are working with multiple sections. Some of the objects in the Layout Model view may be hidden behind other objects. The best way to review the changes made to the template is to apply it to your report and preview the report in the Live Previewer. For this exercise, however, you will make all the necessary changes first, then review the changes in a later step.
Tip: You can make these changes using the Property Palette. You can also change some properties directly from the Layout Model view, such as the font and color of an object using the toolbar or tool palette.
In the Frames node, set the following:
| Object | Property Palette node | Property name | set to: |
|---|---|---|---|
|
Headings Frame |
Style |
Fill Pattern |
transparent |
|
Fields Frame |
Style |
Edge Pattern |
transparent |
| Property | Setting |
|---|---|
|
Between Sibling Frames (Horizontal) |
0.1 |
|
Between Sibiling Frames (Vertical) |
0.1 |
In the Field Labels/Headings node, set the following
In the Fields node, set the following:
cconf.tdf.
The steps in this section will help you create an additional layout using the Layout Model view. You will add the Group Above style to the main section of the report. Finally, you will apply the changes made to the template to your report and preview the results in the Live Previewer.
temp_360.rdf).
Tip: Click and drag the width of the logical page to ensure you have enough room to insert all the selected fields. The logical page is delimited by a solid black line in the Layout Model view. If you make the layout bigger than the logical page, you will get an error when you run the report.
| Column | Label | Width |
|---|---|---|
|
category |
Category: |
10 |
|
SUM_h_sales |
Total Sales |
6 |
|
AVG_h_high_365 |
Avg High Stock |
6 |
|
AVG_h_low_365 |
Avg Low Stock |
6 |
|
AVG_h_div |
Avg Dividend |
6 |
|
AVG_h_p_e |
Avg P/E |
6 |
Tip: If the default layout region that you defined is too small, a message will appear asking if you want to extend the layout to the page boundaries. Click Yes.
temp_380.rdf.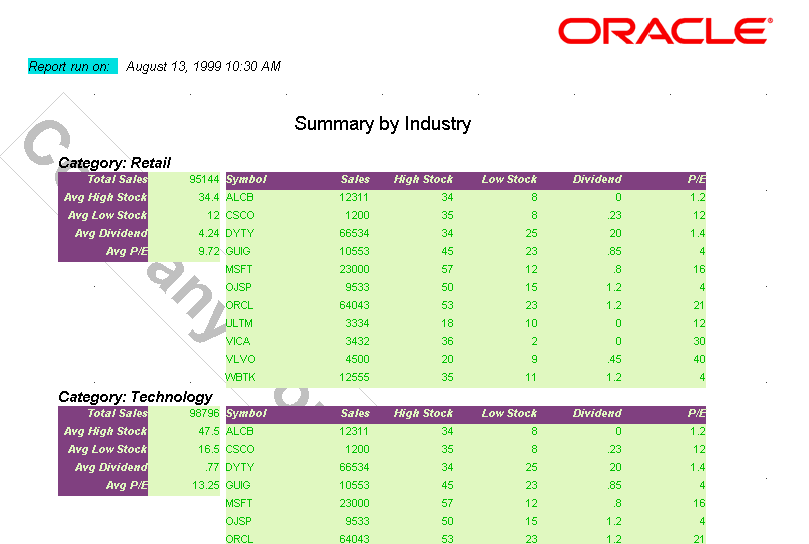
The steps in this section are optional. They will help you enhance the look of the Group Above report. You will format the numeric values as currency.
Tip: If you re-enter the Report Wizard after making manual refinements in the Live Previewer, you will lose some of your changes when you click Apply or Finish in the wizard, and your layout will default back to the state defined by the wizard.
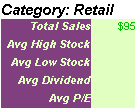
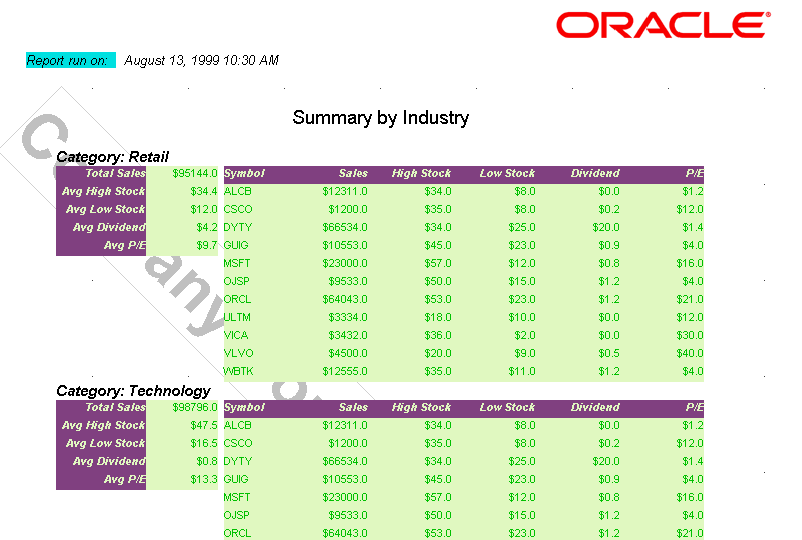
The report will look similar to the following figure:
temp_390.rdf.
Congratulations! You have finished the Templates sample report. You now know how to:
For more information about templates, see the online help:
|
|
|
|
 Copyright © 1999 Oracle Corporation. All Rights Reserved. |
|