Release 1.0.2 for Windows NT and UNIX
Part Number A86784-02
Library |
Solution Area |
Contents |
Index |
| Oracle Reports Services Publishing Reports to the Web with Oracle9i Application Server Release 1.0.2 for Windows NT and UNIX Part Number A86784-02 |
|
Oracle Reports Services uses Oracle Portal to perform a security check that ensures that users have the necessary privileges (access control) to run reports on restricted Oracle Reports Services servers and printers. Access control determines the following:
Oracle Portal stores information about the RDF (that is, how to run the report) as a packaged procedure. In order to run a report, Oracle Portal also needs to store access control information about the restricted Oracle Reports Services server that accepts the request, and any printers that are used to print report output. These access controls are added using Oracle Reports Services security wizards in Oracle Portal.
You can make report requests available to users on the Web by doing the following:
There are two levels of security that need to be managed:
Database-level security defines the users or roles that can access data within the database. The DBA grants this security. This database-level security must be established and in place when configuring your reports environment.
To further define your reporting environment, application-level security can be put in place to specify which report requests the users or groups can generate. This application-level security is very important to ensure only those authorized users or groups can generate a specific report.
Oracle Reports Services 6i introduces an open infrastructure for report administration and security with an out-of-the-box implementation using Oracle Portal release 3.0 (previously known as Oracle WebDB). All Oracle Portal content is stored in a repository in an Oracle database, making the access control data easy to enter, backup, and retrieve. This chapter discusses configuring and establishing your security policies for deploying Oracle Reports Services 6i via Oracle Portal release 3.0. All Oracle Portal users are lightweight users and have application-level security privileges. They do not have database-level security privileges.
With the Oracle Reports Services out-of-the-box implementation, Oracle Portal stores the application-level access control data that can be utilized by any existing Oracle Reports Services server. The deployment model is open to allow for access to report generation via an Oracle Portal content area or a custom portal. In either scenario, the security access control data stored within the Oracle Portal repository is used for authorizing an end user. Both Oracle Reports Services and Oracle Portal are part of your license for Oracle9i Application Server.
When deploying your Oracle Reports Services outside of an Oracle Portal content area, you might utilize the security access control data stored in Oracle Portal by passing report requests through a registered, secured Oracle Reports Services server. You can do this by using either of the following:
If you choose another security model other than Oracle Portal, an open C API is provided so you can write a custom link to your own access control server. The API can be rewritten to talk to another security server. (for example, to look at a custom security schema written in an Oracle database). Doing this requires that you write a C interface as detailed in the following steps. The instructions assume that your security implementation has already been created; if it has not, then this must be done first. There are separate instructions for Windows and UNIX environments.
The following steps are necessary to create a security DLL for Oracle Reports Services 6i security in a Windows environment:
%ORACLE_HOME%\report60\server\security directory.
%ORACLE_HOME%\report60\server\security directory. Give the DLL the file name 'rwk60.dll'.
%ORACLE_HOME%\bin directory, and copy your DLL to this location.
The following steps are necessary to create a security library for Oracle Reports Services 6i security in a UNIX environment:
$ORACLE_HOME/reports60/pub directory.
cc -c rwkss.c
ld -dy -G -o rwk60.so rwkss.o
file rwk60.so
Ensure the response says that the library is dynamic.
$ORACLE_HOME/bin directory, and then put your new dynamic library in this location.
Database-level security is what determines if you have access to the data within a specified database. You can store a user name and password in the key mapping file (cgicmd.dat) or you can be prompted for the specific user ID and password.
Unless the user name and password are hard coded into the key map file (or supplied as part of the URL), any user accessing Oracle Reports Services is required to identify themselves for authentication purposes. As the HTTP release 1.0 protocol is stateless (that is, each call to the server is effectively independent of all others), it would result in the user needing to authenticate themselves for each report request.
To solve this issue and to allow you to authenticate only once, the report makes use of client-side cookies to store the required authentication information within the browser for the current session. Once you are authenticated, an encrypted cookie is created in the browser, allowing for multiple report jobs to be submitted without the need to re-authenticate at each request.
Within a given Web application, you frequently access reports that run against multiple instances of an Oracle database (or ODBC data sources). To minimize the number of times a you must be authenticated (once to each different server), an encrypted cookie is created. The cookie contains database authentication information for many database instances, allowing connections to multiple instanced of an Oracle database.
Database connection information is supported by specifying the USERID parameter. For example, when a report is submitted using USERID=<$username> in conjunction with a Net8 database alias, then connections are created in the browser for each referenced database instance. For example, the following key map file entries would result in you being authenticated against two different database instances through one encrypted cookie created in the browser (this cookie is for both ORCL and for PROD):
Rep1: report=Rep1.rdf userid=$username@ORCL destype=CACHE desformat=HTML

Rep2: report=Rep1.ref userid=$username@PROD destype=CACHE desformat=HTML
With any subsequent request, the user name and password are retrieved from the appropriate cookie and used to authenticate you against that database. If no connect string is defined in the command line (that is, a user ID is not specified in the command line), then the Oracle Reports Services CGI executable uses the last database connect string that achieved a successful connection.
The cookie is removed when you close the browser session, but it might also be important to limit the lifetime of the cookie within a given session. For example, you might have logged in and then gone to lunch, leaving the browser session open for an extended period of time. To control this type of security breach, the administrator can define the REPORTS60_COOKIE_EXPIRE environment variable for the CGI or servlet. When the Oracle Reports Services executable receives a job request from the client, it compares the time saved in the cookie with the current system time. If the time is longer than the number of minutes defined in the environment variable (for example, 30 minutes), then the cookie is rejected and you are again required to identify yourself for authentication. The following table shows the environment variables that affect database user authentication:
Table 5-1 Environment Variables for User Authentication
Application-level security is a requirement to ensure that you have the appropriate access to the resources needed to run particular reports. This does not mean that you have access to the data in the database (that is, database-level security privileges). The authorization scheme for application-level security necessitates the following criteria:
Oracle Portal is a browser-based, Web content publishing and developing solution that allows end users and developers to instantly publish information and build data-driven departmental portals.
Oracle Portal release 3.0 is tightly integrated with Oracle Reports Services to create a robust and secure reporting environment. New wizards have been added to Oracle Portal for Oracle Reports Services security, permitting an authorized user to define access controls to reports, Oracle Reports Services servers, printers, output formats, and report parameters.
The content area building capabilities of Oracle Portal provide an easy mechanism with which to publish reports for end user access via the Web, though this is not a requirement for publishing your reports via the Web.
Once the access control information is defined within Oracle Portal, it is stored in the Oracle Portal repository. As an Oracle Portal user, you can then, optionally, add the registered RDF to be accessed from an Oracle Portal content area. As an Oracle Portal user, you can make a request to run a given report, the Oracle Portal repository is used to verify the Oracle Portal your access privileges to run a particular report using the specified Oracle Reports Services server. If you are not utilizing Oracle Portal to publish your reports, you can still take advantage of the security model to secure all of your reports. You can easily accomplish this by following the steps outlined in Section 5.16, "Publishing Report Outside of Oracle Portal".
Oracle Reports Services leverages the Oracle Login Server Single-Signon feature and the concept of lightweight users. Each Oracle Portal page can include data from any different portlet providers, each of which can have their own login procedures. To prevent you from being constantly confronted with user ID requests for each portlet provider, Oracle Portal provides a single-signon feature. When you log in, Oracle Portal automatically logs you into all registered portlet providers and subsystems. Refer to the Oracle Portal documentation for more information about Login Server Single-Signon.
In Oracle Portal release 2.2, users were synonymous with the database user accounts. By default, an Oracle Portal release 2.2 developer could create a component or object in his own database schema. In Oracle Portal release 3.0, users are typically mapped to a database schema for administrative purposes only. The ability to create a component in Oracle Portal release 3.0 no longer depends on whether the developer has privileges to build components in a schema, but instead on whether the developer has privileges to build a component in an application.
Groups replace roles in Oracle Portal release 3.0. A group is a collection of users or other groups that share a common interest or responsibility, and, therefore, have common privileges. Anyone who is logged into Oracle Portal can create a group, not just the Oracle Portal administrator.
How the Oracle Portal users or groups are defined within Oracle Portal defines the accessibility of a particular function or object either from within an Oracle Portal content area or your own custom portal. Since Oracle Reports Services security borrows Oracle Portal users and groups to implement authentication and authorization (meaning Oracle Reports Services security defines who can access what), Oracle Reports Services security can still answer Access Control List (ACL) check questions if you are using your own custom portal.
Refer to the Oracle Portal release 3.0 documentation for more information about users and groups.
Before configuring your security environment, you need to be familiar with the AUTHID command line argument. You use the AUTHID command line argument to authenticate an application user. The AUTHID command line argument is not an Oracle Portal-specific parameter. If you want to run a report against a secure Oracle Reports Services server, then this authentication information is required.
Oracle Portal integration uses the information that was entered when you logged into Oracle Portal. The Oracle Reports Services CGI uses the Oracle Portal user name and session ID as a replacement for the AUTHID command line argument when running the report from within Oracle Portal or outside of Oracle Portal. This works for both Oracle Portal and the content area builder.
The Oracle Reports Services Web configuration and components remain the same as in previous releases, with the ability to execute reports through the CGI or servlet interfaces. The communication between Oracle Reports Services and the Oracle Portal repository is accomplished via a C API, which by default communicates with the Oracle database, where the Oracle Portal repository resides. The Oracle Portal repository is examined to validate Oracle Portal users and to check for accessibility of the report requests.
Because this architecture employs the use of an open API, you can choose to re-implement the security checks against your own security system. This openness permits you to authenticate users against your Lightweight Directory Access Protocol (LDAP) server or any other custom security server set in place. Refer to the Oracle Portal documentation for more information.
This section describes how to install Oracle Reports Services security and Oracle Portal on one machine. Oracle Reports Services security and Oracle Portal can also be installed on separate machines. They do not have to reside on the same machine to take advantage of the functional security model in place via Oracle Portal. Refer to Chapter 6, "Configuring Oracle Reports Services Server Clusters" for information about configuring Oracle Reports Services servers and Oracle Portal on multiple servers.
Following are the steps to install Oracle Reports Services 6i security and Oracle Portal.
Refer to the Oracle9i Application Server Installation Guide for more information about installation.
Install Oracle Portal release 3.0 into a separate ORACLE_HOME with an Oracle database release 8.1.6 or higher. Oracle Portal is an option to the Oracle database that can only be accessed via a Web browser. Oracle Portal release 3.0 is installed though the Oracle9i Application Server. Refer to the Oracle9i Application Server Installation Guide for more information.
Install the Oracle Reports Services component. The installer automatically analyzes the dependencies for your machine and then configures the Oracle Reports Services based on the options you choose. Oracle Reports Services is installed through the Oracle9i Application Server.
If you need to use the Oracle Reports Services Builder, then you need to installed it through the Oracle9i Developer Suite.
To configure your security environment for Oracle Reports Services 6i, perform the following steps:
You can manually enable Oracle Reports Services security within Oracle Portal by running the RWWWVINS.SQL script found in the following directory for Windows NT:
%ORACLE_HOME%\REPORT60\SERVER\SECURITY\3.0
You can manually enable Oracle Reports Services security within Oracle Portal by running the RWWWVINS.SQL script found in the following directory for UNIX:
$ORACLE_HOME/reports60/server/security
Run the following script as the Oracle Portal administrator:
sqlplus> @rwwwvins.sql <portal30 schema owner>
When installing, you are prompted to enter the following for your Oracle Portal schema owner (for example, portal30/portal30@orcl):
username/password@connectstring
This script creates the appropriate object definitions, menu entries, and groups. The following groups are created:
These four group are created when enabling Oracle Portal and Oracle Reports Services security. Each Oracle Portal user, for which the security authentication is checked, must be assigned to one of these groups.
An Oracle Portal user assigned to this group (for example, an Oracle Reports Services administrator, an Oracle Portal administrator, or a Login Server administrator) can CREATE, UPDATE, and DELETE the registered report definition files, servers, and printer objects in Oracle Portal. The Oracle Reports Services administrator can assign security privileges for other people and receive full error messages from Oracle Reports Services. Refer to the Oracle Portal documentation for information about how to create and manage a user.
This user also has access to the administrator's functionality in Oracle Reports Services Queue Manager, which means they can manage the server queue, including rescheduling, deleting, reordering jobs in the server, and shutting down a server.
In addition to the privileges of the RW_POWE_USER and RW_BASIC_USER groups, an RW_DEVELOPER can run all of the CGI commands, such as SHOWENV and SHOWMAP, which show the system environment. This group might be assigned to a developer who needs to do testing and needs to retrieve detailed error messages.
In addition to the privileges of the RW_BASIC_USER group, an Oracle Portal user with RW_POWER_USER group privileges can see more detailed error messages if the security check fails. For example, the message received if they try to run to HTML and this is not permitted might be:
Cannot run report to HTML
When Oracle Portal creates an Oracle Portal user, they automatically become part of the RW_BASIC_USER group. An Oracle Portal with these privileges can only run a report if they have been given the privilege to run it. This Oracle Portal user can see very simple error messages should the security check fail. The message received is:
Security Check Error
This step is done by a user with database-level security privileges.
You must first shut down the Oracle Reports Services server if it is running. Then add the SECURITYTNSNAMES=<"tnsname"> parameter and the PORTALUSERID=<portal_username>/<portal_password> in the Oracle Reports Services server configuration file (for example, rep60_<machinename>.ora) found in the following directory for Windows NT:
%ORACLE_HOME%\REPORT60\SERVER
For UNIX, this configuration file is found in the following directory:
$ORACLE_HOME/reports60/server
where:
Ensure you have the correct alias in the tnsnames.ora file on the machine where Oracle Reports Services is located.
Oracle Reports Services server requires the SECURITYTNSNAMES and PORTALUSERID entries to know where to look for the access control information when a user submits a job request. The server must be told the name of the database instance in which Oracle Portal and the Oracle Reports Services security framework are installed. Once the SECURITYTNSNAMES and PORTALUSERID entries have been added to the Oracle Reports Services server configuration file, the access control information in the Oracle Portal repository is enforced. Oracle Portal users who request to run a report against this Oracle Reports Services server are now required to identify themselves.
As an Oracle Portal, when you successfully log into an Oracle Portal content area to run your reports, this login information (user name and session ID) is used as the alternative to the AUTHID command line parameter and verified by the Oracle Reports Services server via Oracle Portal.
Start Oracle Portal through your Web browser and log into Oracle Portal as the user you identified during the installation. This user has application-level security privileges.
In your environment, you can have many networked or local printers accessible to your Oracle Portal users. However, you might want to confine Oracle Portal users to a subset of those printers, constraining the use of the printer for certain periods of time, or identify a particular printer to be used for printing output of certain reports. For example, you can have a monthly report that is very lengthy and for which you want output generated to only a fast, high-volume printer in the information technology (IT) department.
Printer access stores information about the following:
As with availability calendars, it is not a requirement to register a printer within the security framework of Oracle Portal.
Once printers are registered within Oracle Portal, you can choose to associate them with an Oracle Reports Services server. Many printers can be registered. However, only printers associated with a particular Oracle Reports Services server are available to print when you register an RDF file and choose to print to a printer.
When defining access to an RDF, you can choose to restrict even further the registered subset of printers to which the report output can be sent. For example, an Oracle Reports Services server might be connected to the printer in the office of the CEO, but it should not be a selection by employees running the general ledger report unless it is the CEO who is running the report. This subset of printers can then be listed to the Oracle Portal user running a report request to select where output should be sent.
Oracle Portal provides a creation wizard to step you through the automatic creation of a Web content area, which is contained entirely within the Oracle Portal repository. To create a content page, log into Oracle Portal and click on the Oracle Portal Navigator icon, click on the Content Area tab, and click on the Create button. When creating the content area, a content owner or DBA can add items or links to the Oracle Portal content area. An item could be a URL, a text item, an image map, a file, a PL/SQL call, a link to a folder, or any other Oracle Portal component. Once registered within Oracle Portal, an RDF is treated as any other Oracle Portal component and can be added in the same way to your Web content area.
You can choose to have this link run the report immediately, where the user is authenticated via Oracle Portal and output is generated in the authorized or chosen format. Alternatively, you can choose to schedule the report and push the output to an existing Oracle Portal content area. Refer to Appendix A, "Controlling User Access to Reports by Defining Calendars" for more information about scheduling reports.
Once you have installed Oracle Reports Services security and Oracle Portal, and set up an Oracle Portal content area, you can begin setting up a user and deploying a report through Oracle Portal. The following sections take you through the steps necessary to set up an Oracle Portal user and how to deploy a report:
The following assumptions are made:
http://mycomputer.domain/cgi-bin/rwcgi60.exe
tnsname"> parameter has been added to the Oracle Reports Services server configuration file. The tnsname references the instance where Oracle Portal is installed.
portal_username>/<portal_password> parameter has been added to the Oracle Reports Services server configuration file, where <portal_username>/<portal_password> is a valid user name and password of the database where Oracle Portal is installed.
This step needs to be performed for any Oracle Portal user that can register reports, servers, or printers, and authorize or grant other Oracle Portal users access to these objects.
This example covers giving an Oracle Portal user the ability to administer Oracle Reports Services security by granting privileges, assigning the DBA group, and assigning the RW_ADMINISTRATOR group.
The following assumptions are made for this example:
The following steps must be performed:
REPORTSDEV has now been created and can administer security for Oracle Reports.
The integration of Oracle Reports Services and Oracle Portal provides an out-of-the-box administrative interface to restrict access to reports that are run through Oracle Reports Services. The security checks performed ensure that Oracle Portal users have the necessary access control.
Keep in mind that the access control data stored in the Oracle Portal repository refers to the functional or application-level security, that is the ability of an Oracle Portal user to access a particular report. The data security can be handled through the USERID parameter, can be passed at runtime, or the Oracle Portal user can be prompted.
All of the utilities employ wizards for creating, editing, or deleting access control information. Once entered, the Oracle Portal repository stores the access control information as metadata. Only those Oracle Portal users who have Oracle Reports Services system administrator privileges (the DBA and RW_ADMINISTRATOR group) can access this security information in Oracle Portal.
Now that REPORTSDEV has been created with the ability to administer security, he can do the following:
This example walks you through the following:
The following assumptions have been made for this example:
Oracle Reports Services server access stores information about the following:
The actual Oracle Reports Services server within the Oracle Portal framework already exists and must be configured to run report requests.
Do the following to define server access:
http://mycompany.docmain/cgi-bin/rwcgi60.exe
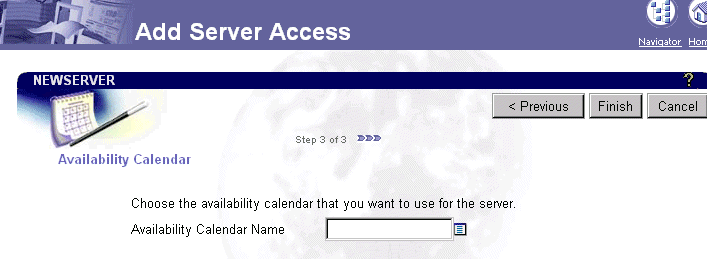
Text description of the illustration server2.gif
Leave this screen blank for this example. Refer to Appendix A, "Controlling User Access to Reports by Defining Calendars" for more information about availability calendars.
You have now registered an Oracle Reports Services server. Now you need to register a report.
Report Definition File (RDF) access stores information about the following:
Once an RDF is registered within Oracle Portal it creates an Oracle Portal component. Oracle Corporation does not recommend registering multiple instances of the same RDF file.
Besides designating the Oracle Portal users that have access to specific reports, you might want to specify how Oracle Portal users are to interact with the reports. In addition to the parameters you might have specified in the report, you can also create a parameter form when registering your report in Oracle Portal.
The Oracle Portal parameter form is used to set security restrictions, such as having only limited report output formats that are valid for a given report and having the parameter form only display with these valid formats. The security information is stored in the Oracle Portal repository.
The parameter form for Oracle Reports Services allows you to add additional restrictions, such as attaching a PL/SQL trigger. Oracle Corporation recommends that you use only one of the parameter forms, the Oracle Portal parameter form or the Oracle Reports Services parameter form, to avoid conflicts.
This optional parameter form can be used to restrict the values to which users have access or for any additional parameters needed to run this report. For example, forcing page streaming for an HTML report, displaying data based on specific values, or a defined LOV. Furthermore, you might want to specify which parameters are exposed to a user during job submission, which allows different users to apply different options to the same report. For example, you might want the user to specify whether the report output is HTML, HTMLCSS, or PDF.
In the Parameter Entry Form, you can specify whether a parameter is visible along with the values for selection. To do this, you select the Customize link from the Manage Component screen. You then check those parameters that you would like to make visible to the end user.
You do the following to create RDF access and register your report:
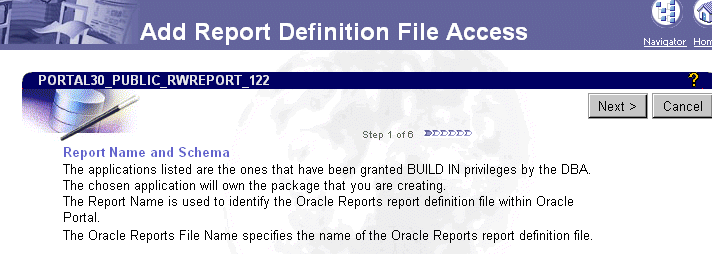
Text description of the illustration rdf.gif
The Application, Report Name, and Reports Server fields are already filled in for you.
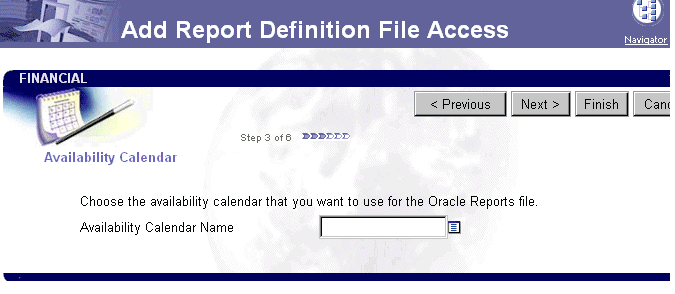
Text description of the illustration rdf2.gif
Since we do not wish to specify availability, you leave this screen blank.
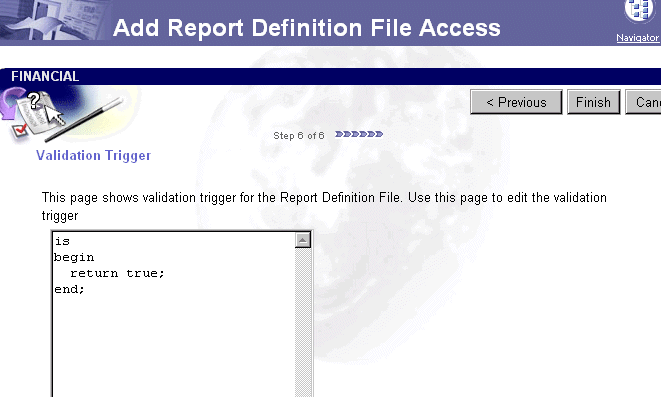
Text description of the illustration rdf5.gif
A validation trigger is used to create conditional restrictions that cannot be defined on either the Required Parameters page or the Optional Parameters page. Validation triggers are PL/SQL functions. A validation trigger is run when users accept the Runtime Parameter Form.
You have successfully registered a report and given privileges to REPORTSDEV (this happens automatically), SCOTT, and BJ.
You are now ready to deploy a report.
This example walks you through deploying a report in an Oracle Portal content area.
For this example, the following assumptions have been made:
Do the following steps to deploy a report to an Oracle Portal content area:
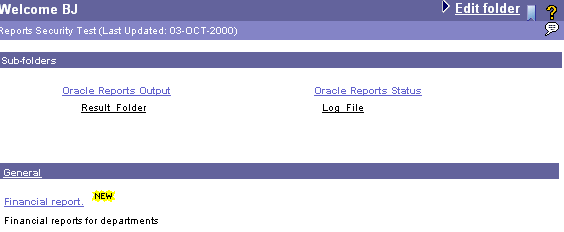
Your report, FINANCIAL, has now been successfully deployed to the Reports Security Test content area in Oracle Portal.
Now that REPORTSDEV has registered a report, given SCOTT and BJ permission to run the report, and deployed the report to the Reports Security Test content area, the report is ready to be run by the Oracle Portal users.
This example walks you through the following:
For this example, the following assumptions have been made:
To run the report do the following steps:
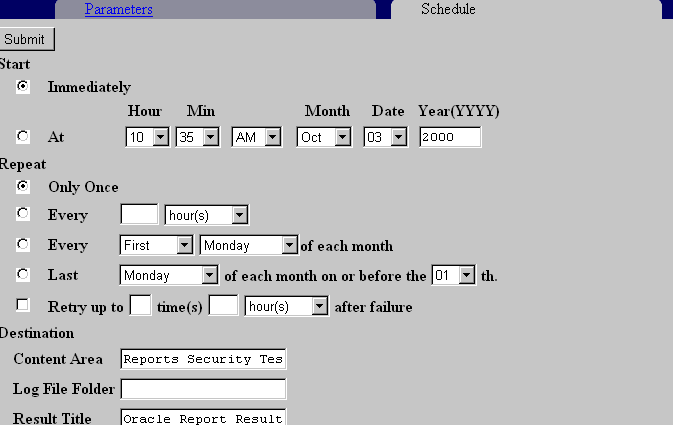
Text description of the illustration run2.gif
Scroll through this screen and fill in the following information:
Return to the Welcome BJ folder page and you see that the Result Folder has been created. Every hour the report results appear in this folder and BJ can see them each time he clicks on the folder.
To publish the reports you have registered within the Oracle Portal repository, you are not forced to use Oracle Portal as the deployment mechanism. You can create links on any Web content area or Oracle Portal content area from which users can invoke report requests.
The following steps describe how to implement application-level security outside of the Oracle Portal content area:
rep60_<machinename>.ora file pointing to the instance where the access control information exists (that is, PORTALUSERID=<portal_username>/<portal_password> and SECURITYTNSNAME=<tnsnames>). Without this entry, the Oracle Reports Services server does not authenticate the users against the access control information that exists in the Oracle Portal repository.
cgicmd.dat) can utilize the AUTHID command line parameter. You can add the AUTHID parameter to the report request command lines. AUTHID identifies the application user that has been created in Oracle Portal. The AUTHID=username/password can be added to any report entry in the key map file to hard code a user name and password. In this case, the user is prompted for application-level security.
If you want the users to be prompted to authenticate every time they run report requests, then add the SHOWAUTH and AUTHTYPE=S entry into the URL, or include the %S argument in the key mapping report entry. For example, an entry in the key map file might look like the following:
emp: server=repserver report=emp.rdf userid=scott/tiger@orcl destype=CACHE
desformat=HTMLCSS %S
In the above example, the database user name, password, and connect string (scott/tiger@orcl) are hard coded so the user is only required to enter their user name and password for the application-level security. Meaning the user name and password stored in Oracle Portal are used to identify if they have access to run the selected report. You only see the User Name and Password fields for the system authentication dialog as shown in the following:
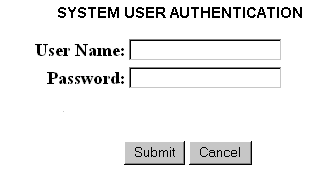
You only see the User Name and Password fields for the system authentication dialog box as in the above. If you omit the USERID parameter from the key mapping entry, then you are also prompted for the database authentication as shown in the following screen:
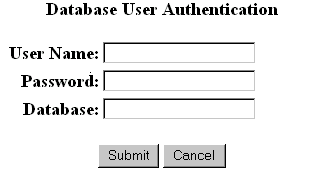
Another way to enforce database authentication is to add the %D argument to the report key mapping entry. For example:
emp: server=repserver report=emp.rdf destype=CACHE desformat=HTMLCSS %S %D
You can edit the authentication template file as long as the authentication HTML file contains all comment tags that are marked as Please do not edit this line.
The cookie is automatically removed when the client browser is closed. However, in the case where a browser can remain open for an extended period of time, this environment variable helps to control the length of a session. When the Oracle Reports Services CGI executable receives a job request, the amount of time saved in the cookie is compared with the current system time. If the time is longer than the number of minutes defined in the environment variable (by default, 30 minutes), then the cookie is rejected and the user is again requested to identify themselves for authentication.
Refer to Table 5-1, "Environment Variables for User Authentication" for a list of environment variables that apply to user authentication.
If you want users to authenticate and remain authenticated until the cookie expires, then omit the AUTHID parameter or the %S argument from the key mapping file.
|
|
 Copyright © 2000 Oracle Corporation. All Rights Reserved. |
|