Oracle9i Application Server Portal Building Advanced Portals
Release 3.0.9

Part Number A90098-01
Go To Documentation Library
Library
Go To Product List
Solution Area
Go To Table Of Contents
Contents
Go To Index
Index

Go to previous page Go to next page

4
Creating a Human Resources portal with security

This chapter describes how to use Oracle Portal to build a portal for a Human Resources department in a company called Healthy Living Wholesalers), then customize the pages of the portal for different types of users. To do this, you first create pages and components, then implement different levels of security and access privileges for them. If you are unfamiliar with creating basic pages and components, try building the samples in Chapter 2, "Creating an intranet portal and adding simple portlets" and Chapter 3, "Creating a line of business page for your intranet portal".

You will also use information from an existing content area to enable users to access existing department information via the portal. You can either use the content area we've provided, called the Inside Healthy Living Repository, or create a new one by following the steps in Chapter 5, "Creating an information repository".

You will combine simple components to create complex applications that provide each type of user with a customized workplace. For example, you will create forms, a report, and a calendar that display related information. On the Human Resources tab, an employee can use a public form to submit a vacation request, a report on the Managers' tab displays how much vacation time the employee has left, as well as a calendar displays the duration of the requested vacation on the manager's page. A link on the calendar takes the manager to an approval form for accepting or rejecting the vacation request.

The following figure illustrates the various parts of the Inside Healthy Living portal, which contains the three tabs of the Human Resources portal.
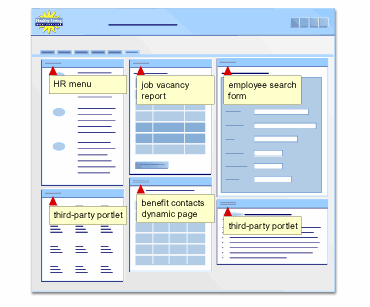
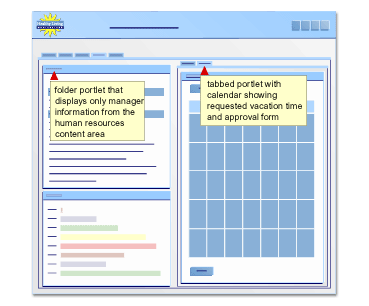
To build the Inside Healthy Living Human Resources portal, you will use:

You need Edit or higher access privileges on the <DEMO_SCHEMA> schema to complete this chapter. You also need Edit or higher application privileges to build the components in this chapter. If you do not have these privileges, contact your portal administrator.

The completed portal is available in the installation package that contains the
<DEMO_SCHEMA> schema. For more information, contact your portal administrator.

This chapter contains the following sections:

Feature  Location 

Create tabs for a portal and apply security to each. 

Section 4.1, "Create three tabs for your intranet portal" 

Use the Hierarchy wizard to build a team organization chart, then link to it from an employee lookup form. 

Section 4.2, "Create an employee search form that links to an organization chart" 

Use the From based on Tables or Views wizard to create a job vacancy lookup form and a job posting form, create dynamic and static lists of values. Use the Report from SQL Query wizard to create a job vacancies report. 

Section 4.3, "Create components to display and post job vacancies" 

Create a database sequence, then create two forms: one to request and one to approve a vacation. Use the Calendar wizard to build a calendar that displays requested vacation time, and a report that display remaining vacation time for each employee. 

Section 4.4, "Create a vacation request and approval system" 

Use the Grant Access tab of the Manage Component dialog to apply security at the component level. 

Section 4.5, "Implement security to control display of components" 

Use the Customize Page wizard to design the three tabs of the portal and leverage information from an existing content area in the portal. 

Section 4.6, "Design the tabs of the HR portal" 

4.1 Create three tabs for your intranet portal

In this section, you will add three tabs to the Inside Healthy Living Human Resources portal that pertain only to the Human Resources department: one each for public users, managers within the company, and HR representatives. If you did not follow the steps in Chapter 3, "Creating a line of business page for your intranet portal", you must first create a page called "<YourName> Inside Healthy Living," then add three tabs to the page. For more information on creating pages, refer to Section 2.1, "Create a page".

After you create the tabs, you specify access privileges for each tab. Any user can view the Human Resources tab, only company managers can view the Managers tab, and only HR representatives can view the HR Representatives tab. This way, when a user logs onto Oracle Portal, only one or two of these tabs will display, depending on the type of user.

To implement these access privileges, you need access to the two groups we have provided: HR_MANAGERS and HR_REPRESENTATIVES. If you do not have access to these groups, contact your portal administrator.

Note: All portal administrator tasks are detailed in Appendix A, "Oracle Portal Administrator Tasks".

For more information: Visit the Oracle Portal Online Help. From the Categories list, choose Page Tasks and click Go. In the right pane, click Creating a page.

  1. In the Oracle Portal Navigator, click the Pages tab.

  2. Click My Pages and find the page called <YourName> Inside Healthy Living.

    Note: You will only see this page if you have followed the steps in Chapter 3, "Creating a line of business page for your intranet portal". If you have not completed Chapter 4, create a page called "<YourName> Inside Healthy Living", then continue with this section. Unlike the illustrations in this chapter, you will not have a Main and Sales page in your portal.

  3. Next to <YourName> Inside Healthy Living, click Edit.

  4. On the Portlets tab, next to the Sales tab, click .

  5. Next to the new tab, click again.

  6. Repeat step 5.

  7. Name the first tab you created Human Resources.

    Note: If you're not sure how to edit the tabs, see Section 3.1, "Create a tabbed page and add a page as a portlet".

  8. Click the Advanced Options tab.

  9. Choose the Specify Access Settings radio button.

  10. Make sure the Display Tab to Public Users check box is selected.

  11. Click Apply.

  12. Click Close.

  13. Name the second tab Managers.

  14. Click the Advanced Options tab.

  15. Choose the Specify Access Settings radio button.

  16. Make sure the Display Tab to Public Users check box is clear.

  17. In the Grantee field, enter HR_MANAGERS.

    Note: The name you enter here is the group name for the Managers of the Healthy Living Wholesalers company. If you do not see the HR_MANAGERS group, see your portal administrator. Your portal administrator can either import the groups necessary for this chapter, or create them himself. For more information, see Section A.5, "Create three groups for the Human Resources portal" in Appendix A.

  18. From the Privileges list, choose Manage.

    The MANAGE privilege enables all members of the HR_MANAGERS group to modify or delete the page, as well as to grant other groups privileges to the page.

    For more information: Visit the Oracle Portal Online Help. From the Categories list, choose Concepts and click Go. In the right pane, click Who can access a page.

  19. Click Add.

    Note: By granting access to a specific group of users, only members of the specified group can view the page.

  20. Click Apply.

  21. Click Close.

  22. Name the third tab HR Representatives.

  23. Click the Advanced Options tab.

  24. Choose the Specify Access Settings radio button.

  25. Make sure the Display Tab to Public Users check box is clear.

  26. In the Grantee field, enter HR_REPRESENTATIVES.

  27. From the Privileges list, choose Manage.

  28. Click Add.

  29. Click Apply.

  30. Click Close.

  31. Click Close.

You have now added three more tabs to the Inside Healthy Living portal you created in Chapter 3, "Creating a line of business page for your intranet portal". The Human Resources tab displays to all users who are logged into Oracle Portal; the Managers tab only displays to users who have been added to the HR_Managers group; the HR Representatives tab only displays to users who have been added to the HR_Representatives group.

Note: Your portal administrator can create a user for each group. To test whether your pages display properly for each type of user, contact your portal administrator.

The tabs of the portal should now look something like this:

4.2 Create an employee search form that links to an organization chart

The steps in this section show you how to use the Create Hierarchy wizard to build a company organization chart. You will then create a form that enables users to look up a specific employee within the company database, by employee number, employee name, job title, or department. Then, you will create a link from the form to the team organization chart.

4.2.1 Create a team organization chart

In this section, you will create a hierarchy that displays the structure of the Healthy Living Wholesalers departments. The form you create in Section 4.2.2, "Create an employee search form that links to the team organization chart" will link to this hierarchy, so that when users access the form on the portal, they can click the link to display the hierarchy.

For more information: Visit the Oracle Portal Online Help. From the Categories list, choose Concepts and click Go. In the right pane, under Component Types, click What are hierarchies?

  1. In the Oracle Portal Navigator, navigate to the Applications tab, then find Casebook30_Application.

    Note: If you do not see this application, contact your portal administrator. If you are not sure how to use the Navigator, try going through the steps in Chapter 2, "Creating an intranet portal and adding simple portlets".

  2. On the Applications tab, next to Create New, click Hierarchy.

  3. In the Name field, enter <YourName>_GROUPLIST

  4. In the Display Name field, enter <YourName> Group List.

  5. Make sure Casebook30_Application is chosen from the Application list.

  6. Click Next.

  7. In the Table or View field, enter <DEMO_SCHEMA>.HLW_STAFF table.

    Note: DEMO_SCHEMA is where the objects for the demos in this book are installed.

  8. Click Next.

  9. From the Primary Key Column list, choose HLW_STAFF.EMPLOYEE_ID.

  10. From the Parent Key Column list, choose HLW_STAFF.MANAGER_ID.

  11. From the Start With Column list, choose HLW_STAFF.MANAGER_ID.

  12. In the Display Column Expression field, enter HLW_STAFF.NAME.

  13. In the Default Start With Value field, enter 1140.

  14. Click Next.

  15. Click Next.

  16. Under Drill Up/Down Options, next to Drill Up, from the Type list, choose Text.

  17. From the Value Type list, choose Column.

  18. In the Value field, enter nvl(job, '(No Title)').

    Note: Entering this value concatenates the job position from the HLW_STAFF table to the employee name. If no job title exists for the employee, "No Title" displays under the employee's name in the hierarchy.

  19. Under Full Page Options, find Font Size next to the Parent list, then choose 10pt.

  20. Next to the Child list, choose 10pt.

  21. Next to the Grandchild list, choose 8pt.

  22. Click Next.

  23. Click Next.

  24. On the Hierarchy and Customization Form Text page, in the Display Name field, enter Team Structure.

  25. In the Header Text field, enter:

    <b><font face="Arial"><font color="#002299"><font size=+2> The HLW Group
    </font></font></font></b>
    
    
  26. In the Footer Text field, enter:

    <div align=center>
    <form>
    <font size=+0>
    <input type=button value="Go Back" onClick="javascript:history.go(-1);">


    Notes:

    This footer text adds a "Back" button to the hierarchy so that you can return to the portal once you've clicked on the hierarchy.

    If you get an error running the code in this wizard, ensure you have entered quotes, usually straight quotes ('), that your browser can recognize.

  27. Click Finish.

  28. In the Manage Component tabbed dialog, click the Access tab.

  29. Select the Publish to Portal check box.

  30. Click Apply.

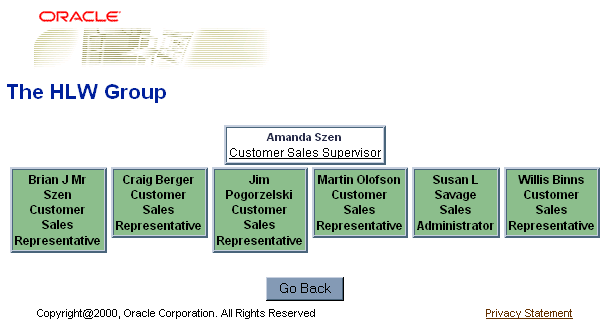
When you run the hierarchy, a new browser should display a department's organization that looks something like this:
4.2.1.1 Create a company-wide organization chart

If you want to create an organization chart for your entire company, follow these steps. We do not include this hierarchy in the Inside Healthy Living portal.

  1. In the Oracle Portal Navigator, navigate to Casebook30_Application.

  2. Click Casebook30_Application.

  3. Click Create New... Hierarchy.

  4. In the Name field, enter <YourName>_ALLGROUPLIST .

  5. In the Display Name field, enter <YourName> ALL GROUP LIST .

  6. Make sure Casebook30_Application is selected in the Application field.

  7. Follow steps 6 through 12 in Section 4.2.1, "Create a team organization chart".

  8. In the Default Start With Value field, enter 30.

  9. Follow steps 14 through 18 in Section 4.2.1, "Create a team organization chart".

  10. In the Display Name field, enter Company Structure.

  11. Follow steps 19 through 23 in Section 4.2.1, "Create a team organization chart", then click Finish.

You have created a hierarchy component that displays a company's organization.

4.2.2 Create an employee search form that links to the team organization chart

The steps in this section show you how to create a form to search for specific employees in the Healthy Living Company. You will also create a link that, when clicked, displays the hierarchy you created in Section 4.2.1, "Create a team organization chart".

4.2.2.1 Create JOB_LIST dynamic list of values

  1. In the Oracle Portal Navigator, click the Applications tab.

  2. Click Casebook30_Application.

  3. Next to Create New, click List of Values.

  4. Click Dynamic List of Values.

  5. Make sure Casebook30_Application is chosen in the Owner drop-down list.

  6. In the Name field, enter <YourName>_JOB_LIST.

  7. From the Default format list, choose Combo box.

  8. From the Show Null Value list, choose Yes.

  9. In the SQL Query field, enter something like this:

    select distinct job
    from <DEMO_SCHEMA>.hlw_staff
    order by job
    
    Note: You must replace <DEMO_SCHEMA> with the schema where the objects for 
    the demos in this book are installed
    
    
  10. Click OK.

4.2.2.2 Create the employee search form

  1. Navigate to the Oracle Portal Navigator.

  2. On the Applications tab, next to Create New, click Form.

  3. Click Form based on Table or View.

  4. In the Name field, enter <YourName>_EMPSEARCH.

  5. In the Display Name field, enter <YourName>_EMPSEARCH.

  6. Make sure Casebook30_Application is chosen from the Application list.

  7. Click Next.

  8. In the Tables or View field, enter <DEMO_SCHEMA>.HLW_STAFF.

    Note: <DEMO_SCHEMA> is the name of the schema where the demo schema objects are installed.

  9. Click Next.

  10. Choose a Tabular layout.

  11. Click Next.

  12. On the Formatting and Validation Options page in the left pane, delete all the buttons in the Top and Bottom sections of the form except:

    • QUERY_TOP

    • RESET_TOP

  13. In the left pane, under TOP_SECTION, delete all columns in the table, except:

    • EMPLOYEE_ID

    • NAME

    • JOB

    • DEPARTMENT_NO

  14. Make the following changes to the Form Level Options:

    • Box Background Color = Wheat

    • Box Background Image = Dude

    • Box Border = Thick Border

    • Order by NAME, Ascending

  15. Change the font, font color, and font size for all fields to:

    • Font Face = Arial

    • Font Color = Black

    • Font Size = 10pt

  16. Change the label for QUERY_TOP to Search.

  17. Change the label for EMPLOYEE_ID to Employee#.

  18. In the left pane, click JOB.

  19. From the Item Type list, choose Combobox.

  20. In the Label field, enter Position.

  21. From the List of Values list, choose <YourName>_JOB_LIST.

  22. Make sure the Default Value field is empty, and that Default Value Type is No Selection.

  23. In the left pane, click DEPARTMENT_NO.

  24. From the Item Type list, choose Combobox.

  25. In the Label field, enter Department.

  26. From the List of Values list, choose <YourName>_DEPARTMENT_LOV.

    Note: This is the LOV you created in Section 3.5.3.1, "Create the DEPARTMENT_LOV static list of values". If you did not create this LOV, use HLW_DEPT_LOV, which we have provided. If you do not see HLW_DEPT_LOV, contact your portal administrator.

  27. Make sure the Default Value field is empty, and that Default Value Type is No Selection.

  28. Next to FORM, click to create a new item on the form.

  29. In the Name field, enter Contact Employee.

  30. Click OK.

  31. Make the following changes to the Item Level Options for Contact Employee.

    • Item Type = Label Only

    • Label = The HLW Group Organization

    • Link = <DEMO_SCHEMA>.<YourName>_GROUPLIST.show.

      Note: This URL is for the hierarchy you created in Section 4.2.1, "Create a team organization chart". <DEMO SCHEMA> is the schema where the objects for the demos in this book are installed

    • Font Face = Arial

    • Font Color = Red

    • Font Size = 12pt

  32. Click Finish.

  33. In the Manage Component tabbed dialog, click the Access tab.

  34. Select the Publish to Portal check box.

  35. Click Apply.

  36. Click Close.

When you run the employee search form with a link to the hierarchy, it should look something like this:

4.3 Create components to display and post job vacancies

The steps in this section show you how to create a report and two forms. One form enables a public user to look up a particular vacancy in the database to determine whether it has been filled. The second form enables an HR representative to post or close a job vacancy. The report displays all current job vacancies.

4.3.1 Create a form to look up a specific job vacancy

In this section, you will create a form that will be connected to the job vacancy report. After you create this form, you will create the report, then link to this form from the report.

  1. Navigate to the Oracle Portal Navigator.

  2. On the Applications tab, next to Create New, click Form.

  3. Click Form based on table or view.

  4. In the Name field, enter <YourName>_VACANCYLOOKUP.

  5. In the Display Name field, enter <YourName> Vacancy Lookup.

  6. Make sure Casebook30_Application is chosen from the Application list.

  7. Click Next.

  8. In the Table or View field, enter <DEMO_SCHEMA>.HLW_VACANCIES.

    Note: <DEMO_SCHEMA> is the schema where the objects for the demos in this book are installed.

  9. Click Next.

  10. Select Tabular.

  11. Click Next.

  12. On the Formatting and Validation Options page, in the left pane, delete the following columns from the form:

    • DEPARTMENT_NO

    • REGION_ID

    • HIRING_MANAGER

    • HR_CONTACT

    • VACANCY_STATUS

  13. Remove all buttons in the Top and Bottom sections except NEXT and PREVIOUS.

  14. Click Form in the left pane.

  15. Change the following Form Level Options:

    • Box Background Color = Wheat

    • Box Background Image = Dude

    • Box Border = Thick Border

    • Order By = VACANCY_ID and VACANCY_TITLE

  16. Choose VACANCY_ID in the left pane, then change its Label to Vacancy#.

  17. Choose VACANCY_TITLE in the left pane, then change its label to Position.

  18. Change the font and font color for the following columns to Arial, Black.

    • VACANCY_ID

    • VACANCY_TITLE

    • RESPONSIBILITIES

    • QUALIFICATIONS

  19. On the Form Text tab, in the Header Text field, enter:

    <b><font face="Arial"><font color="#002299"><font size=+0> Look Up a Vacancy 
    </font></font></font></b>
    
    
  20. In the Footer Text field, enter:

    <div align=center><form><font size=+0><input type=button value="Go Back" 
    onClick = "javascript:history.go(-1);">
    
    Notes: 
    

    This footer text adds a "Back" button to the form so that you can return to the portal after entering information in the form.

    If you get an error running the code on this page, ensure you have entered quotes, usually straight quotes ('), that your browser can recognize.

  21. Click Finish.

  22. In the Manage Component tabbed dialog, click the Access tab.

  23. Select the Publish to Portal check box.

  24. Click Apply.

  25. Click Close.

When you run the job vacancy lookup form, it should look something like this:

4.3.2 Create a form to post or close a job vacancy

The steps in this section show you how to create three LOVs and a form that enables a Human Resources representative to post or close a job vacancy.

4.3.2.1 Create a database sequence for the form

In this section, you will create a database sequence that the job posting form will use when entering records into the database. This sequence will attach an ID number to each record.

  1. In the <DEMO_SCHEMA>, create a database sequence for the form.

    Note: For more information on creating a database sequence, see Section 2.4.4, "Create a database sequence for the form".

  2. In the Sequence Name field, enter <YourName>_Vacancy_Seq.

  3. In the Schema field, make sure the <DEMO_SCHEMA> is selected.

  4. Click Next.

  5. On the Start and Increment Values page, in the Increment By field, enter 1.

  6. In the Start With field, enter 10.

  7. Click Finish.

  8. In the Navigator, next to <YourName>_Vacancy_Seq, click Grant Access.

  9. In the User/Role field, enter Public.

  10. In the list, choose Alter.

  11. Click Add to List.

  12. Click Close.

4.3.2.2 Create three LOVs

4.3.2.2.1 Create the Manager dynamic list of values

This list of values will display all employees with the Manager or Administrator job titles in the Healthy Living company.

  1. Navigate to the Oracle Portal Navigator.

  2. On the Applications tab, next to Create New, click List of Values.

  3. Click Dynamic List of Values.

  4. In the Owner field, enter <YourName>_MGRLOV.

  5. From the Default format list, choose Combo box.

  6. From the Show Null Value list, choose Yes.

  7. In the SQL Query field, enter something like this:

    select NAME, employee_id
    from   <DEMO_SCHEMA>.hlw_staff
    where job like '%Manager%'
    or    job like '%Administrator%'
    and   department_no = :depno


    Notes:

    <DEMO_SCHEMA> is the schema where the objects for the demos in this book are installed.

    If you get an error running this code, ensure you have entered quotes, usually straight quotes ('), that your browser can recognize.

  8. Click OK.

4.3.2.2.2 Create the HR_CONTACTLOV dynamic list of values

This list of values will display all employees in the Human Resources department of the Healthy Living Company. These employees are the HR Representatives.

  1. Navigate to the Oracle Portal Navigator.

  2. On the Applications tab, next to Create New, click List of Values.

  3. Click Dynamic List of Values.

  4. In the Owner field, enter <YourName>_HRCONTACTLOV.

  5. From the Default format list, choose Combo box.

  6. From the Show Null Value list, choose Yes.

  7. In the SQL Query field, enter something like this:

    select name, employee_id from <DEMO_SCHEMA>.hlw_staff where department_no = 
    70
    

    Note: <DEMO_SCHEMA> is the schema where the objects for the demos in this book are installed.

  8. Click OK.

4.3.2.2.3 Create the Vacancy_Status static list of values

This static list of values will enable a user to select whether the job vacancy is open or closed.

  1. Navigate to the Oracle Portal Navigator.

  2. On the Applications tab, next to Create New, click List of Values.

  3. Click Static List of Values.

  4. In the Owner field, enter <YourName>_VACANCYSTATUS.

  5. From the Default format list, choose Combo box.

  6. From the Show Null Value list, choose No.

  7. In the first row, under Display Value, enter Open.

  8. Under Return Value, enter O.

  9. Under Display Order, enter 1.

  10. In the second row, under Display Value, enter Closed.

  11. Under Return Value, enter C.

  12. Under Display Order, enter 2.

  13. Click OK.

4.3.2.3 Create the form to post or close job vacancies

In this section, you will create a form (which you will later secure so that only HR Representatives can use) that enables a user to post a new job vacancy and update or close an existing one.

  1. Navigate to the Oracle Portal Navigator.

  2. On the Applications tab, next to Create New, click Form.

  3. Click Form based on table or view.

  4. In the Name field, enter <YourName>_VACANCYFORM.

  5. In the Display Name field, enter <YourName> Vacancy Form

  6. Make sure Casebook30_Application is chosen from the Application list.

  7. Click Next.

  8. In the Table or View field, enter <DEMO_SCHEMA>.HLW_VACANCIES.

    Note: <DEMO_SCHEMA> is the schema where the objects for the demos in this book are installed.

  9. Click Next.

  10. On the Formatting and Validation Options page, delete the REGION_ID field for the left pane.

  11. Click Form and change the following Form Level Options in the right pane:

    • Box Background Color = Wheat

    • Box Background Image = Dude

    • Box Border = Thick Border

  12. In the left pane, click VACANCY_ID and change its Label to Vacancy#.

  13. In the Default Value field, enter #<DEMO_SCHEMA>.<YourName>_vacancy_seq.nextval.

    Note: <DEMO_SCHEMA> is the name of the schema that owns the database sequence you created in Section 4.3.2.1, "Create a database sequence for the form".

  14. In the Form Level Validation list, choose isNumber.

  15. Change the Label for VACANCY_TITLE to Position.

  16. In the left pane, click DEPARTMENT_NO.

  17. From the Item Type list, choose Combobox.

  18. In the Label field, enter Department.

  19. From the List of Values list, choose <YourName>_DEPARTMENT_LOV.

    Note: This is the LOV you created in Section 3.5.3.1, "Create the DEPARTMENT_LOV static list of values". If you did not create this LOV, use HLW_DEPT_LOV, which we have provided. If you do not see HLW_DEPT_LOV, contact your portal administrator.

  20. Make sure the field Default Value is empty and Default Value Type is No Selection.

  21. In the left pane, click HIRING_MANAGER.

  22. From the Item Type list, choose Combobox.

  23. In the Label field, enter Hiring Manager.

  24. From the List of Values list, choose <YourName>_MGRLOV.

    Note: This is the LOV you created in Section 4.3.2.2.1, "Create the Manager dynamic list of values".

  25. From the Set the binding(s) for the bind variable(s) defined in the LOV depno list, choose DEPARTMENT_NO.

    Note: For more information on using bind variable LOVs, see Section 3.5.3, "Create two LOVs for the commission search form".

  26. Make sure the field Default Value is empty and Default Value Type is No Selection.

  27. In the left pane, click HR_CONTACT.

  28. From the Item Type list, choose Combobox.

  29. In the Label field, enter HR Contact.

  30. From the List of Values list, choose <YourName>_HRCONTACTLOV.

    Note: This is the LOV you created in Section 4.3.2.2.2, "Create the HR_CONTACTLOV dynamic list of values".

  31. Make sure the field Default Value is empty and Default Value Type is No Selection.

  32. In the left pane, click VACANCY_STATUS.

  33. From the Item Type list, choose Combobox.

  34. In the Label field, enter Status.

  35. From the List of Values list, choose <YourName>_VACANCYSTATUS.

    Note: This is the LOV you created in Section 4.3.2.2.3, "Create the Vacancy_Status static list of values".

  36. Make sure the field Default Value is empty and Default Value Type is No Selection.

  37. In the left pane, delete all buttons except:

    • CREATE_TOP

    • QUERY_TOP

    • RESET_TOP

    • NEXT

    • PREVIOUS

    Note: Buttons are listed in the sections labeled "TOP" and "BOTTOM."

  38. Change the font face, font color, and font size for all fields to:

    • Font Face = Arial

    • Font Color = Black

    • Font Size = 10pt

  39. On the Form Text tab, in the Display Name field, enter Advertise or Close a Vacancy.

  40. In the Header Text field, enter:

    <b><font face="Arial"></font><font color="#002299"></font><font size=+0> 
    Advertise a Vacancy</font></b>
    
    
  41. In the Footer Text field, enter:

    <div align=center>
    <form>
    <font size=+0>
    <input type=button value="Go Back" onClick="javascript:history.go(-1);">


    Notes:

    This footer text adds a Back button to the form so that you can return to the portal after entering information in the form.

    If you get an error running the code on this page, ensure you have entered quotes, usually straight quotes ('), that your browser can recognize.

  42. Click Finish.

  43. In the Manage Component tabbed dialog, click the Access tab.

  44. Select the Publish to Portal check box.

  45. Click Apply.

  46. Click Close.

When you run the form to post or close job vacancies, it should look something like this:

4.3.3 Create a link to connect the vacancy report with the lookup form

  1. In the Oracle Portal Navigator, navigate to Casebook30_Application.

  2. Click Casebook30_Application.

  3. Click Create New...Link.

  4. In the Link Name field , enter <YourName>_VacancyLink.

  5. Make sure Casebook30_Application is chosen from the Application list.

  6. Click Next.

  7. On the Link Target Type and Name page, select the Oracle Portal Component radio button.

  8. In the Target Component or URL field, enter
    Casebook30_Application.<YourName>_VACANCYLOOKUP.

    Tip: This is the form you created in Section 4.3.1, "Create a form to look up a specific job vacancy".

  9. Click Finish.

4.3.4 Create a report that displays all current job vacancies

  1. In the Oracle Portal Navigator, navigate to Casebook30_Application.

  2. Click Casebook30_Application.

  3. Click Create New...Report.

  4. Click Reports from SQL Query.

  5. In the Name field, enter <YourName>_VACANCIESREPORT

  6. In the Display Name field, enter <YourName>_Vacancies Report.

  7. Make sure Casebook30_Application is chosen from the Application list.

  8. On the SQL Query tab, in the SQL Query box, enter:

    select vacancy_id VacID, 
           vacancy_title  Position,
           decode (vacancy_status,'O','Open','C','Closed') status
    from   <DEMO_SCHEMA>.hlw_vacancies
    where  vacancy_status = 'O'


    Notes:

    <DEMO_SCHEMA> is the schema where the objects for the demos in this book are installed.

    If you get an error running this code, ensure you have entered quotes, usually straight quotes ('), that your browser can recognize.

  9. Click Next.

  10. On the Report Layout tab, choose Tabular.

  11. Click Next.

  12. On the Column Formatting page, next to VACID, enter Vacancy#.

  13. From the Align list, choose Right.

  14. From the Link list, choose <YourName>_VacancyLink.

    Note: Choose the link you created in Section 4.3.3, "Create a link to connect the vacancy report with the lookup form".

  15. Click to edit the link.

  16. In the Set Link Parameters dialog, for VACANCY_ID, choose = from the Condition list, and VACID from the Column Name list.

  17. Click Apply.

  18. Click Close.

  19. Next to Position, make sure the Column Heading Text is Position.

  20. Next to Status, make sure the Column Heading Text is Status.

  21. Click Next.

  22. Click Next.

  23. On the Display Options page, under Full Page Options, change the options for Row Text to the following:

    • Type Face = Tahoma

    • Font Size = 10pt

    • Border - Thin Border

    • Font Color = Black

    • Heading Background Color = Green, Pale

    • Table Row Color = White

  24. Under Portlet Options, change the options for Row Text to the following:

    • Heading Background Color = Green, Pale

    • Table Row Color = White

    • Border = Thin Border

  25. Under Row Order Options, next to Order by 1, choose VACID from the list.

  26. Click Next.

  27. Click Next.

  28. On the Report and Customization Form tab, in the Footer Text field, enter:

    <b><font face="Arial"><font color="#002299"><font size=-1> Click on a link 
    for position details.</font></font></font></b>


    Note: If you get an error running this code, ensure you have entered quotes, usually straight quotes ('), that your browser can recognize.

  29. Click Finish.

  30. In the Manage Component tabbed dialog, click the Access tab.

  31. Select the Publish to Portal check box.

  32. Click Apply.

  33. Click Close.

When you run the job vacancies report, it should look something like this:

4.4 Create a vacation request and approval system

The steps in this section show you how to create

4.4.1 Create a vacation request form

This section shows you how to create a form that enables employees to request vacation time. The requested vacation will then display on a calendar.

4.4.1.1 Create a database sequence for the form

The job posting form uses this sequence when entering records into the database. The sequence attaches an ID number to each record.

  1. Navigate to the Oracle Portal Navigator.

  2. On the Database Objects tab, next to Create New, click Sequence.

  3. In the Sequence Name field, enter <YourName>_Vacation_Seq,

  4. In the Schema field, enter <DEMO_SCHEMA>. <DEMO_SCHEMA> is the schema where the objects for the demos in this book are installed

  5. Click Next.

  6. On the Start and Increment values page, in the Increment By field, enter 1.

  7. In the Start With field, enter 10.

  8. Click Finish.

  9. In the Navigator, next to <YourName>_Vacancy_Seq, click Grant Access.

  10. In the User/Role field, enter Public.

  11. In the list, choose Alter.

  12. Click Add to List.

  13. Click Close.

4.4.1.2 Create the EMP_LIST LOV

This section shows you how to create an LOV that will display in a pop-up list in the Vacation Request form you create in the next section.

  1. Navigate to the Oracle Portal Navigator.

  2. On the Applications tab, next to Create New, click List of Values.

  3. Click Dynamic List of Values.

  4. In the Owner field, choose Casebook30_Application.

  5. In the Name field, enter <YourName>_EMP_LIST.

  6. From the Default format list, choose Pop up.

  7. From the Show Null Value list, choose %.

  8. In the SQL Query field, enter something like this:

    select NAME , 
           employee_id 
    from   <DEMO_SCHEMA>.hlw_staff
    order  by name


    Note: <DEMO_SCHEMA> is the schema where the objects for the demos in this book are installed.

  9. Click OK.

4.4.1.3 Create the Vacation Request form

This section shows you how to create a form to enable employees to request vacation time.

You will also use the database sequence you used in Section 4.4.1.1, "Create a database sequence for the form".

  1. Navigate to the Oracle Portal Navigator.

  2. On the Applications tab, next to Create New, click Form.

  3. Click Form based on table or view.

  4. In the Name field, enter <YourName>_VACATION_REQUEST.

  5. In the Display Name field, enter <YourName> Vacation Request.

  6. Make sure Casebook30_Application is chosen from the Application list.

  7. Click Next.

  8. In the Table or View field, enter <DEMO_SCHEMA>.HLW_VACATIONS.

  9. Click Next.

  10. Choose a Tabular layout.

  11. Click Next.

  12. On the Formatting and Validation Options page, click Form.

  13. Change the following Form Level Options:

    • Box Background Color = Wheat

    • Box Background Image = Dude

    • Box Border = Thick Border

    • Order By = VACA_START_DATE

  14. In the left pane, click VACA_ID and change its label to Vacation ID.

  15. In the Default Value field, enter #<DEMO_SCHEMA>.<YourName>_Vacation_Seq.nextval.

    Notes: <DEMO_SCHEMA> is the name of the schema where the demo schema objects are installed.

    <YourName>_Vacation_Seq is the name of the database sequence you created in Section 4.4.1.1, "Create a database sequence for the form".

  16. In the left pane, click EMPLOYEE_ID.

  17. From the Item Type list, choose Popup.

  18. In the Label field, enter Employee.

  19. From the List of Values list, choose <YourName>_EMP_LIST.

    Note: This is the LOV you created in Section 4.4.1.2, "Create the EMP_LIST LOV".

  20. Change the following field labels by clicking the item in the left pane and entering a new Label in the right pane:

    • VACA_START_DATE = Start Date

    • VACA_END_DATE = End Date

    • VACA_LENGTH = Duration

  21. Change the font, font color, and font size for all fields (those between the TOP and BOTTOM sections in the left pane) to:

    • Font Face = Arial

    • Font Color = Black

    • Font Size = 10pt

  22. Under BOTTOM_SECTION, delete all the buttons except:

    • PREVIOUS

    • NEXT

  23. Click Next.

  24. On the Form Text page, in the Display Name field, enter Vacation Request.

  25. In the Header Text field, enter:

    <b><font face="Arial"><font color="#002299"><font size=+0> Apply for a 
    Vacation</font></font></font></b>
    
    
  26. In the Footer Text field, enter:

    <div align=center>
    <form>
    <font size=+0>
    <input type=button value="Go Back" onClick="javascript:history.go(-1);">


    Notes: This footer text adds a Back button to the form so that you can return to the portal after entering information in the form.

    If you get an error running the code on this page, ensure you have entered quotes, usually straight quotes ('), that your browser can recognize.

  27. Click Finish.

  28. In the Manage Component tabbed dialog, note the module id of the Vacation Request form. You'll need it to insert a link in a calendar you later create in Section 4.4.3, "Create a calendar that displays requested vacation dates".

  29. Click the Access tab.

  30. Select the Publish to Portal check box.

  31. Click Apply.

  32. Click Close.

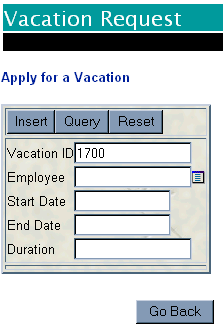
When you run the vacation request form, it should look something like this:
4.4.2 Create a vacation approval form

This shows you how to create a form that enables a manager to approve an employee's vacation request.

  1. Navigate to the Oracle Portal Navigator.

  2. On the Applications tab, next to Create New, click Form.

  3. Click Form based on table or view.

  4. In the Name field, enter <YourName>_APPROVE_VACATION.

  5. In the Display Name field, enter <YourName> Approve Vacation.

  6. Make sure Casebook30_Application is chosen from the Application list.

  7. Click Next.

  8. In the Table or View field, enter <DEMO_SCHEMA>.HLW_VACATIONS.

  9. Click Next.

  10. Choose a Tabular layout.

  11. Click Next.

  12. On the Formatting and Validations page, click Form.

  13. Change the following Form Level Options:

    • Box Background Color = Wheat

    • Box Background Image = Dude

    • Box Border = Thick Border

    • Order By = VACA_START_DATE

  14. In the left pane, delete all buttons (those between the TOP and BOTTOM sections except:

    • DELETE_TOP

    • RESET_TOP

    • PREVIOUS

    • NEXT

  15. Change following field labels by clicking the item in the left pane and entering a new Label in the right pane:

    • DELETE_TOP = Reject Request

    • VACA_ID = Vacation ID

    • EMPLOYEE_ID = Employee ID

    • VACA_START_DATE = Start Date

    • VACA_END_DATE = End Date

    • VACA_LENGTH = Duration.

  16. Change the font, font color, and font size for all items in the left pane to:

    • Font Face = Arial

    • Font Color = Black

    • Font Size = 10pt

  17. Click Next.

  18. On the Form Text page, in the Display Name field, enter Approve Vacation.

  19. Click Finish.

  20. In the Manage Component tabbed dialog, click the Access tab.

  21. Select the Publish to Portal check box.

  22. Click Apply.

  23. Click Close.

When you run the vacation approval form, it should look something like this:

4.4.3 Create a calendar that displays requested vacation dates

The steps in this section show you how to create a calendar that displays the requested vacation time. A link that you create enables a manger to display the approval form you created in Section 4.4.2, "Create a vacation approval form".

Note: Before you perform the following steps, note the module id of the Vacation Request form you created in Section 4.4.1, "Create a vacation request form". You can find this value by displaying the Manage Component dialog for the form. The module id displays in the Run Link field.

  1. Navigate to the Oracle Portal Navigator.

  2. On the Applications tab, next to Create New, click Calendar.

  3. Click Form based on table or view.

  4. In the Name field, enter <YourName>_VACATION_CALENDAR.

  5. In the Display Name field, enter <YourName> Vacation Calendar.

  6. Make sure Casebook30_Application is chosen from the Application list.

  7. Click Next.

  8. On the SQL Query page, in the SQL Query field, enter:

    select
        v.vaca_start_date the_date,
        E.name      the_name,
        null               the_date_link,
     '<PORTAL_SCHEMA>.wwa_app_module.link?p_arg_names=_moduleid&p_arg_
    values=<REQUEST_FORM_MODULE_ID>&p_arg_names=_sessionid&p_arg_values=&p_arg_
    names=_employee_id_cond&p_arg_values=%3D&p_arg_names=_show_header&p_arg_
    values=YES'||v.employee_ID||' '       the_name_link,
        null               the_target
    from <DEMO_SCHEMA>.hlw_vacations v
        ,<DEMO_SCHEMA>.hlw_staff e
    where e.employee_id = v.employee_id
    order by 1


    Notes:

    Change <PORTAL_SCHEMA> to the schema in which Oracle Portal is installed.

    Change <DEMO_SCHEMA> to the schema where the objects for the demos in this book are installed.

    Change "REQUEST_FORM_MODULE_ID" to the module ID of the Vacation Request form that you noted down earlier.

    If you get an error running this code, ensure you have entered quotes, usually straight quotes ('), that your browser can recognize.

  9. Click Next.

  10. On the Display Options page, in the Link Icon field, enter wgen.gif.

  11. Click Next.

  12. Click Next.

  13. On the Calendar and Customization Form page, in the Footer Text field, enter:

    <b><font face="Arial><font color="#002299"><font size=-1> My Team's Calendar 
    </font></font></font></b>
    
    
  14. Click Finish.

  15. In the Manage Component tabbed dialog, click the Access tab.

  16. Select the Publish to Portal check box.

  17. Click Apply.

  18. Click Close.

When you run the calendar that displays requested vacation time, it should look something like this:

Note: You may need to use the Vacation Request form that you created in Section 4.4.1, "Create a vacation request form" to submit data to your database so that the calendar displays.

4.4.4 Create a vacation balance report

  1. Navigate to the Oracle Portal Navigator.

  2. On the Applications tab, next to Create New, click Report.

  3. Click Reports from SQL Query.

  4. In the Name field, enter <YourName>_VACATION_BALANCE.

  5. In the Display Name field, enter <YourName> Vacation Balance.

  6. Make sure Casebook30_Application is chosen from the Application list.

  7. Click Next.

  8. On the SQL Query tab, in the SQL Query field, enter:

    select e.name   name
          ,e.employee_id  empno
          ,e.vacation_days  vacdays
          ,v.vaca_length vaclen
    from  hlw_staff e
          ,hlw_vacations v
    where e.employee_id = v.employee_id
    
    
  9. Click Next.

  10. On the Report Layout page, choose Tabular.

  11. Click Next.

  12. Click Next.

  13. On the Column Formatting page, change the Column Heading Text for the following columns:

    • NAME = Name

    • EMPNO = Employee ID

    • VACDAYS = Accumulated

    • VACLEN = Taken

  14. Click Next.

  15. On the Display Options page, make the following changes to the Full Page Options and Portlet Options:

    • Type Face = Tahoma

    • Font Size = 10pt

    • Border = Thin Border

    • Font Color = Black

    • Heading Background Color = Green, Pale

    • Table Row Color(s) = White

  16. Make the following changes to the Row Order Options:

    • Order By = NAME

  17. Click Next.

  18. On the Report and Customization Form Text tab, in the Display Name field, enter Staff Vacation Time.

  19. In the Footer Text field, enter:

    <b><font face="Arial"></font><font color="#002299"></font><font size=-1> 
    Current Vacation Balances</font></b>


    Note: If you get an error running this code, ensure you have entered quotes, usually straight quotes ('), that your browser can recognize.

  20. Click Finish.

  21. In the Manage Component tabbed dialog, click the Access tab.

  22. Select the Publish to Portal check box.

  23. Click Apply.

  24. Click Close. .

When you run the report, it should look something like this:

4.5 Implement security to control display of components

The steps in this section show you how to manage the security of the components that are not accessible to public users. The security implement here is based on two existing groups: HR Managers and HR Representatives.

For more information: Visit the Oracle Portal Online Help. From the Categories list, choose Application Tasks and click Go. In the right pane, under Building Components, click Granting component access privileges.

In this section, you will enable HR Managers to view any public components and the following:

Table 4-1 HR Managers Components
Component  To build this component: 
Vacation calendar  See Section 4.4.3, "Create a calendar that displays requested vacation dates" 

Vacation Approval form 

See Section 4.4.2, "Create a vacation approval form"

Vacation Balances report 

See Section 4.4.4, "Create a vacation balance report"

In addition to the public components, we will enable HR Representatives to view:

Table 4-2 HR Representatives Components
Component  To build this component: 

Advertise a Job Vacancy form  

See Section 4.3.2, "Create a form to post or close a job vacancy"

Vacation Balances report 

See Section 4.4.4, "Create a vacation balance report"

Contact your portal administrator if you have any questions about the HR Representatives and HR Managers groups.

4.5.0.1 Apply security to the Vacation Calendar

  1. In the Navigator, open Casebook30_Application.

  2. Next to <YourName>_Vacation_Calendar, click Grant Access.

  3. Clear the Inherit Privileges from Application check box.

  4. Click Apply.

  5. Under Grant Access, in the Grantee field, enter HR_MANAGERS.

  6. From the Privileges list, select Customize.

    Note: Choosing Customize enables the members of the HR_MANAGERS group to use the Customize link displayed on the portlets. Clicking the Customize link in the portlet runs the associated Customization Form, where users can change the parameters of the component.

  7. Click Add.

    The group displays under Change Access.

  8. Click Apply.

  9. Click Close.

You can now add the Vacation Calendar to the Manager tab of the Inside Healthy Living portal. For more information, see Section 4.6, "Design the tabs of the HR portal".

4.5.0.2 Apply security to the Vacation Approval Form

  1. In the Navigator, open Casebook30_Application.

  2. Next to <YourName>_Approve_Vacation, click Grant Access.

  3. Follow steps 3 through 9 in Section 4.5.0.1, "Apply security to the Vacation Calendar".

You can now add the Vacation Approval form to the Manager tab of the Inside Healthy Living portal. For more information, see Section 4.6, "Design the tabs of the HR portal".

4.5.0.3 Apply security to the Vacation Balance Report

  1. In the Navigator, open Casebook30_Application.

  2. Next to <YourName>_Vacation_Balance, click Grant Access.

  3. Clear the Inherit Privileges from Application check box.

  4. Click Apply.

  5. Under Grant Access, in the Grantee field, enter HR_MANAGERS.

  6. From the Privileges list, select Customize.

  7. Click Add.

    The group displays under Change Access.

  8. Under Grant Access, in the Grantee field, enter HR_REPRESENTATIVES.

  9. From the Privileges list, select Customize.

  10. Click Add.

  11. Click Apply.

  12. Click Close.

You can now add the Vacation Balance Report to the Manager tab and HR Representatives tab of the Inside Healthy Living portal. For more information, see Section 4.6, "Design the tabs of the HR portal".

4.5.0.4 Apply security to the Advertise Vacancy form

  1. In the Navigator, open Casebook30_Application.

  2. Next to <YourName>_VacancyForm, click Grant Access.

  3. Clear the Inherit Privileges from Application check box.

  4. Click Apply.

  5. Under Grant Access, in the Grantee field, enter HR_REPRESENTATIVES.

  6. From the Privileges list, select Customize.

  7. Click Add.

    The group displays under Change Access.

  8. Click Apply.

  9. Click Close.

You can now add the Advertise Vacancy form to the HR Representatives tab of the Inside Healthy Living portal. For more information, see Section 4.6, "Design the tabs of the HR portal".

4.6 Design the tabs of the HR portal

The steps in this section show you how to organize the portlets on your pages so that the appropriate component displays on the relevant page. For example, since only managers can approve vacations, the vacation calendar and the relevant approval form display only on the Managers tab.

You will also leverage the folders in an existing content area called the Inside Healthy Living Repository. For more information on creating this content area, see Chapter 5, "Creating an information repository".

4.6.1 Add portlets to the Human Resources tab

The steps in this section show you how to build the main Human Resources page, which is viewable by the public.

  1. In the Navigator, next to your Inside Healthy Living page, click Edit.

  2. Click the Human Resources tab.

  3. Add a column, then add a row to the left region, and a row to the right region.

    Note: If you are not sure how to add columns, rows, or regions to a tab, see Chapter 2, "Creating an intranet portal and adding simple portlets".

  4. In the top left region, add a portlet.

  5. In the Add Portlets dialog, find Healthy Living Repository.

  6. Add the Human Resources folder.

  7. Click OK.

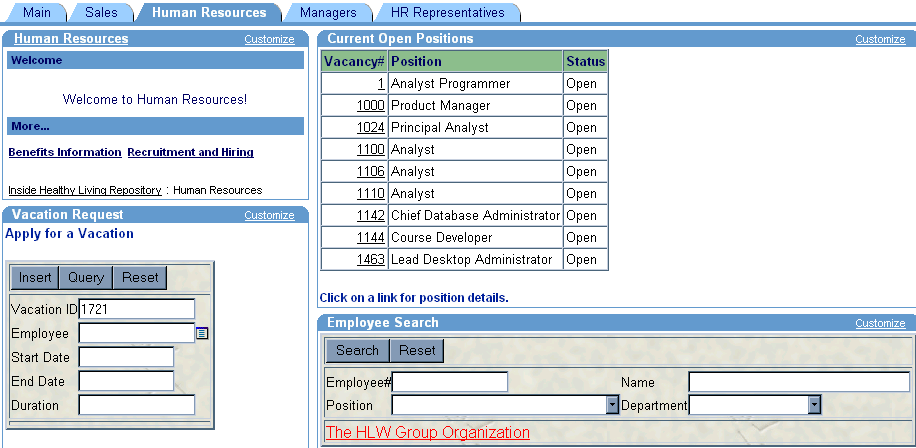
  8. In the bottom left region, add <YourName>_Vacation_Request.

    Note: This is the form you created in Section 4.4.1, "Create a vacation request form".

  9. In the top right region, add <YourName>_VACANCIESREPORT as a portlet.

    Note: This is the report you created in Section 4.3.4, "Create a report that displays all current job vacancies".

  10. In the bottom right region, add <YourName>_Employee_Search as a portlet.

    Note: This is the report you created in Section 4.2.2, "Create an employee search form that links to the team organization chart".

  11. Click Close.

  12. On the Pages tab of the Navigator, click <YourName> Inside Healthy Living to view the portal. Click the Human Resources tab if it's not already highlighted.

The Human Resources tab should look something like this:
4.6.2 Build the Managers tab

The steps in this section show you how to design the Managers tab of the Inside Healthy Living portal.

  1. In the Navigator, next to <YourName> Inside Healthy Living, click Edit.

  2. On the Add Portlets page, click the Managers tab.

  3. Add a column, then add a row to the left region.

    Note: If you are not sure how to add columns, rows, or regions to a tab, see Chapter 2, "Creating an intranet portal and adding simple portlets".

  4. In the top left region, add the Manager perspective from the Healthy Living Repository (content area).

    Tip: This portlet is under the Inside Healthy Living Repository provider.

  5. In the bottom left region, add the View Salary by Department chart from the Tutorial30 Application.

    Note: If you do not see this chart, contact your portal administrator. Or, you can omit this chart from the tab.

  6. In the right region, create a two-tabbed portlet.

  7. Name the first tab Vacation Calendar.

  8. Name the second tab Staff Vacation Balance Report.

  9. Add <YourName>_Vacation_Calendar to the first tab.

    Note: This is the component you built in Section 4.4.3, "Create a calendar that displays requested vacation dates".

  10. Add <YourName>_Vacation_Balance to the second tab.

    Note: This is the component you built in Section 4.4.4, "Create a vacation balance report".

  11. Click Close.

  12. On the Pages tab of the Navigator, click <YourName> Inside Healthy Living to view the portal. Click the Managers tab if it's not already highlighted.

The Managers tab should look something like this:

4.6.3 Build the HR Representatives tab

The steps in this section show you how to design the HR Representatives tab of the Inside Healthy Living portal.

  1. In the Navigator, next to <YourName> Inside Healthy Living, click Edit.

  2. On the Add Portlets page, click the HR Representatives tab.

  3. Add a column, then add two rows to the left region.

    Note: If you are not sure how to add columns, rows, or regions to a tab, see Chapter 2, "Creating an intranet portal and adding simple portlets".

  4. Add one row to the right region.

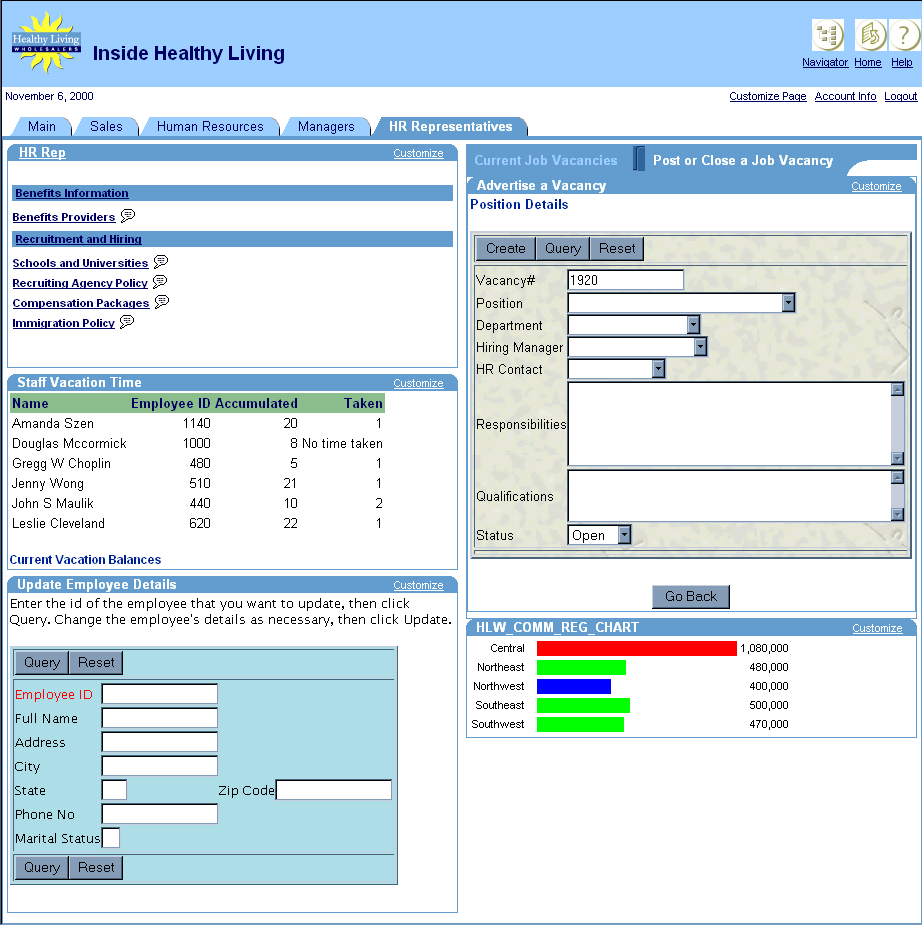
  5. In the top left region, add the HR Rep perspective from the Healthy Living Repository (content area).

    Tip: This portlet is under the Inside Healthy Living Repository provider.

  6. In the middle left region, add <YourName>_Vacation_Balance.

    Note: This is the component you built in Section 4.4.4, "Create a vacation balance report".

  7. In the bottom left region, add the Update Employee Details form from the Tutorial30 Application.

    Note: If you do not see this chart, contact your portal administrator. Or, you can omit this chart from the tab.

  8. In the top right region, create a two-tabbed portlet.

  9. Name the first tab Current Job Vacancies.

  10. Name the second tab Post or Close a Job Vacancy.

  11. Add <YourName>_VACANCIESREPORT to the first tab.

    Note: This is the component you built in Section 4.3.4, "Create a report that displays all current job vacancies".

  12. Add <YourName>_VacancyForm to the second tab.

    Note: This is the component you built in Section 4.3.2, "Create a form to post or close a job vacancy".

  13. In the bottom right region, add HLW_COMM_REG_CHART from the Casebook30 Application.

  14. Click Close.

  15. On the Pages tab of the Navigator, click <YourName> Inside Healthy Living to view the portal. Click the HR Reps tab if it's not already highlighted.

The HR Representatives tab should look something like this:
4.7 Summary

Congratulations! You have created an intranet portal specific to a department that uses different levels of security to customize the portal. You now know how to:

For more information about creating a portal and using security, see the Oracle Portal Online Help.


Go to previous page Go to next page
Oracle
Copyright © 2001 Oracle Corporation.

All Rights Reserved.
Go To Documentation Library
Library
Go To Product List
Solution Area
Go To Table Of Contents
Contents
Go To Index
Index