6
Personalization from Desktops
This document describes how to use the Personalization Portal from a browser interface. Each section of this document presents a different topic. These sections include:
- Section 6.1, "Overview"
- Section 6.2, "Logging in to Personalize the Portal"
- Section 6.3, "Logging In as a User"
- Section 6.4, "Activating a Service for a User"
- Section 6.5, "Editing a Folder"
- Section 6.6, "Creating a Subfolder"
- Section 6.7, "Creating a Bookmark"
- Section 6.8, "Creating Alerts"
- Section 6.9, "Managing Alert Addresses"
- Section 6.10, "Creating a LocationMark"
- Section 6.11Section 6.11, "Editing a LocationMark"
- Section 6.12, "Changing the Default Status of a LocationMark"
- Section 6.13, "Deleting a LocationMark"
- Section 6.14, "Editing a User Profile"
6.1 Overview
You can use access the Personalization Portal from a browser interface to both customize the Wireless Edition portal and assign Wireless Edition mobile services. In addition, you can create the objects that Wireless Edition uses to perform its functions.
The Personalization Portal operates on a folder model. For example:
- A group is a folder containing users and services.
- A user is a folder containing sub-folders, services, location marks, bookmarks, and alerts.
- A service is an alias for a master service created using Service Designer or by a user with designer privileges using the Personalization Portal.
Objects which can be created by a user are users, folders, alerts, and locationmarks. Other operations that can be performed using this interface include service assignment, subfolder creation, and URL bookmark association, as well as manipulation of other Wireless Edition repository objects.
6.2 Logging in to Personalize the Portal
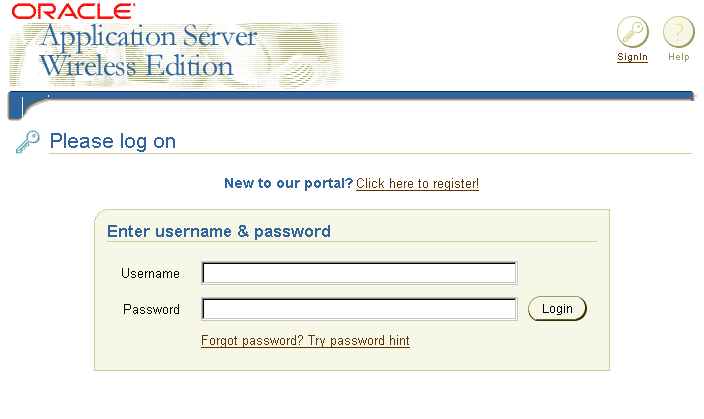
Before using the Personalization Portal, you must first use your browser to access the portal. From a Web browser, enter the following URL:
After you enter the URL, the Service screen of the Personalization tab appears.
Figure 6-1 The Login Screen of the Personalization Portal
Text description of the illustration paz_log1.gif
The Service tab presents the following login information for the Personalization Portal:
Table 6-1 Login Elements of the Service Tab of the Personalization Portal
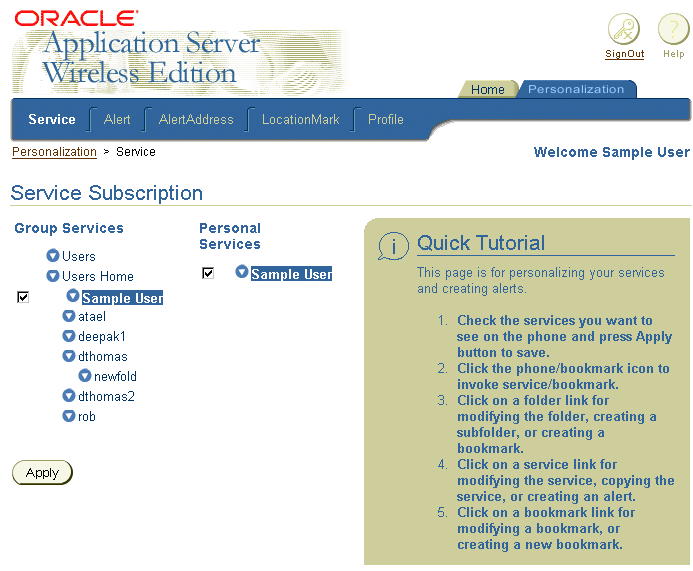
A default page appears when you log in as a user with Home and Personalization tabs in the upper-right corner.
Figure 6-2 The Service Subscription Page
Text description of the illustration paz_sub1.gif
The Service page includes the Service, Alert, Address, LocationMark and Profile pages.
Table 6-2 The Personalization Portal Tabs
6.3 Logging In as a User
A newly created user has an empty home folder bearing the user name. New users are assigned to a default group unless created by an administrator. Only an administrator can assign a user to a group or groups.
Using the tabs under the Personalization tab, users can:
- Copy services.
- Create folders and bookmarks.
- Select alert addresses.
- Schedule the delivery of alerts.
- Create and edit location marks.
- Edit personal profile information.
6.4 Activating a Service for a User
The Service Subscription page is the default page when you log in as a user or when you click the Service tab. The services and folders that exist within a user's group are displayed as a service tree under the Group Services heading. The user services and folders display under the Personal Services heading.
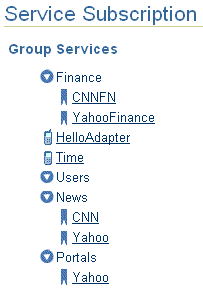
Figure 6-3 The Personalization Portal Icons
Text description of the illustration paz_icon.gif
Table 6-3 Personalization Portal Icon Functions
A user can use any service in the Group Services column. Services are activated by clicking on the symbol next to the service name. Users can personalize most services. A User personalizes services by copying the service and then modifying its input parameters to reflect that user's preferences. For example, a user can modify a stock price-quote service by selecting the stock's ticker symbol as an input parameter.
6.4.1 Copying or Editing a Service
Administrator level users can alter any service except a master service. Master services are created using the Service Designer and cannot be altered using the Edit Service option in the Personalization Portal. Non-administrator level users can only alter services that they own. A user owns a service if:
- The user is listed as the owner when the alias is created in the Service Designer.
- The user has made a personal copy of a service.
To copy a service:
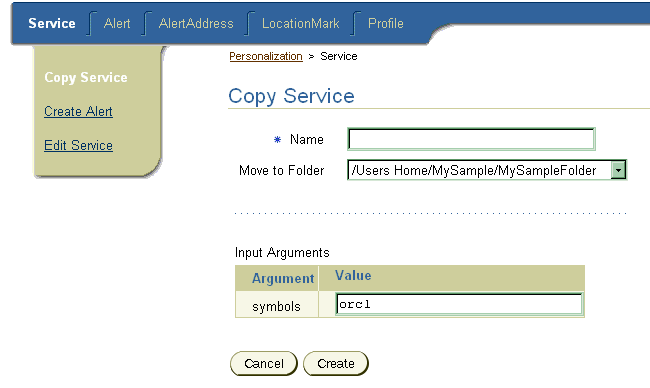
- Click a service under the Group Services column. The Copy Service page appears.
Figure 6-4 The Copy Service Page
Text description of the illustration paz_srv1.gif
- Edit the text in the Name field.
Note:
Because the user home folder contains copies of the group services, the name in the Move to Folder field is the same name that you used to log into the Personalization Portal.
|
- Alter any input parameters as needed. Leaving an input parameter text box blank means that the service prompts you for input when you activate it.
- Click the Create button to create the copy of the service and return to the previous page. The new service appears under the Personal Services column and is selected.
- Your folders and services appear as links with check boxes.
- Selecting a check box and clicking on the Apply button makes that service visible or invisible.
Editing a service you own uses the same steps, except that you select the Edit a Service option and the page title reads Edit a Service.
6.4.1.1 Configuring Input Arguments and Conditions
These elements vary from service to service, and are established when an administrator creates a master service using the Service Designer. For more information on this, see Chapter 3, "Wireless Edition Services".
The Personalization Portal allows you to use these services and input parameters yourself, or copy certain services and pre-configure the input parameters, personalizing it for your use.
The following example is for a stock quote service.
The input argument for an alert linked to a stock price-quote service is the stock's ticker symbol.
Conditions for this service include four types of arguments, Change, Price, Volume, and Change Per. Each argument can be modified by a drop-down list which specifies Greater, Less, Equal, or Contains. Each argument can also have a value entered in the text box.
6.5 Editing a Folder
To edit a folder:
- Click the Service tab.
- Click any folder name to display the Edit Folder page.
- The Edit Folder page displays the contents of the active folder, allows the creation of new subfolders and bookmarks using the Create Sub Folder and Create Bookmark links.
6.5.1 Reordering Folder Contents
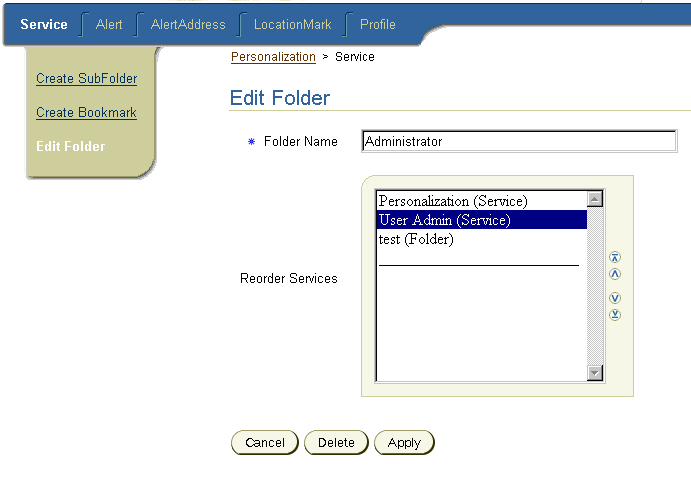
You can modify the order in which subfolders and services appear using the Reorder Services list box in the center of the Edit Folder page.
Figure 6-5 The Reorder Services List Box
Text description of the illustration paz_reor.gif
To reorder services:
- Click the service or subfolder you wish to move and use the scroll arrows on the side of the list box to adjust its position.
- Click the Apply button to complete the reordering to the user name folder and return to the Service Subscription page.
In addition to the apply button, the Edit Folder page contains a Delete button and a Cancel button. Clicking the Delete button deletes a service or a subfolder. Clicking the Cancel button suspends service or subfolder reordering and returns you to the Service Subscription page.
6.6 Creating a Subfolder
Subfolders can be created inside the user home folder or another subfolder and can contain services, bookmarks, locationmarks, and other folders. To create a subfolder:
- Click the Service tab.
- Click any folder, including the user home folder.
- Click the Create Sub Folder link to display the Create Sub Folder page.
- Enter the desired name in the Folder Name text box.
- Select the location for the new subfolder using the Move to Folder drop-down list box. The default location is as a sub folder of the user home folder.
Clicking the Cancel button suspends the process and returns to the Service Subscription page. Clicking the Create button creates the subfolder in the appropriate folder and returns you to the Service Subscription page where the new subfolder is displayed. The new sub folder can be populated with services, bookmarks, and subfolders.
6.6.1 Moving Objects Between Folders
Objects can be moved from one folder to another within a user's home folder. To move an object between folders:
- Click the object name to select it.
- Use the Move to Folder drop-down list box to select the destination folder.
- Click the Apply button. The object is moved to that folder and you are returned to the Service Subscription page.
6.7 Creating a Bookmark
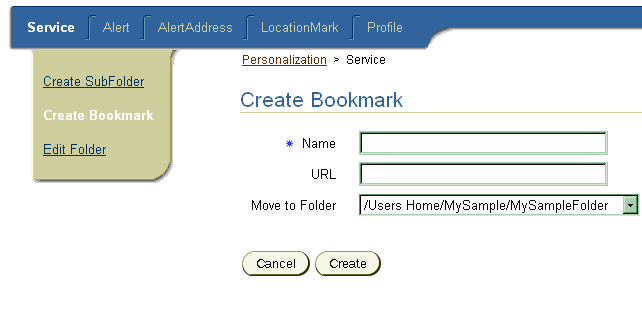
A bookmark is a link to a URL. To create a bookmark:
- Click the Service tab.
- Click any folder including the user home folder.
Figure 6-6 The Create Bookmark Screen
Text description of the illustration paz_cbmk.gif
- Click the Create Bookmark link to display the Create Bookmark page.
- Enter the bookmark name in the Name text box.
- In the URL text box, enter the URL of the new bookmark (for example,
www.oracle.com).
- Use the Move to Folder drop-down list box which determines the location of the new bookmark.
Clicking the Cancel button aborts the process and returns to the Service Subscription page. Clicking the Create button creates the bookmark in the appropriate folder and returns to the Service Subscriptions page where the new bookmark is displayed.
6.8 Creating Alerts
An alert is a notification service that alerts a user to important information or events. You use to AlertAddress page to create an alert. To access the AlertAddress page:
- Click the Service tab.
- Click any service. The Edit Service Page appears.
- Click the Create Alert link. The Create Alert page displays previously created alerts. For more information on managing previously created alerts, refer to Section 6.9.
6.8.1 Setting Alert Parameters
To set alert parameters:
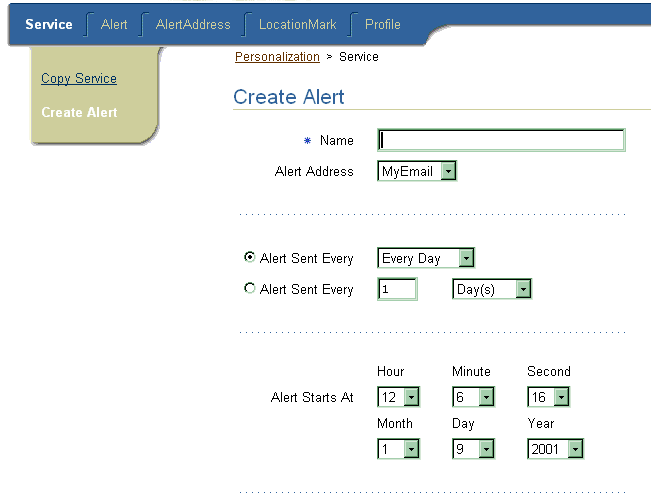
- Enter the alert name in the Name text field.
- Use the Alert Address drop-down box to select the destination for the alerts.
- Set the frequency for the alert by selecting from the Alert Sent Every and Alert Start Time radio buttons, data entry fields and drop-down menus. For more information the frequency settings, see Section 6.8.1.1 and Section 6.8.1.2.
- Click Create.
6.8.1.1 The Alert Sent Every Settings
The Alert Sent Every Settings determine the alert frequency. The top setting consists of a drop-down list for selecting a day of the week, weekday, weekend, or every day settings.
The bottom setting consists of a number field and a frequency drop-down list with a range of hour(s) to years(s). For example, you could schedule an alert to be delivered every hour, only on Monday, only on weekends, and so on.
6.8.1.2 The Alert Start Time settings
The Alert Start Time settings determine the starting time for an alert. The Alert Start Time section includes six drop-down list boxes for setting the hour, minute, second, month, day, and year. The default settings are based on the system clock of the server where Wireless Edition is running. For example, this alert could notify whenever the price of a stock changed by 1.0, or whenever the price crossed a particular threshold, up or down.
Figure 6-7 The Create Alert Screen
Text description of the illustration paz_aler.gif
6.8.2 Editing Alert Parameters
You edit the parameters of an alert using the AlertList page. To edit the alert parameters:
- Click the Alert tab to display the AlertList page. The AlertList displays previously created alerts in the Alert Address List.
- From the Alert Address List, select an alert using the radio button.
- Click the Edit button.
- Rename the alert by entering a new name in the Name field.
- Change the alert address setting using the drop-down list.
- Adjust the alert frequency.
- Click Apply to commit your changes and return to the AlertList page. Clicking the Cancel button suspends and returns to the AlertList page. Clicking the Delete button deletes the alert and returns to the AlertList page.
6.9 Managing Alert Addresses
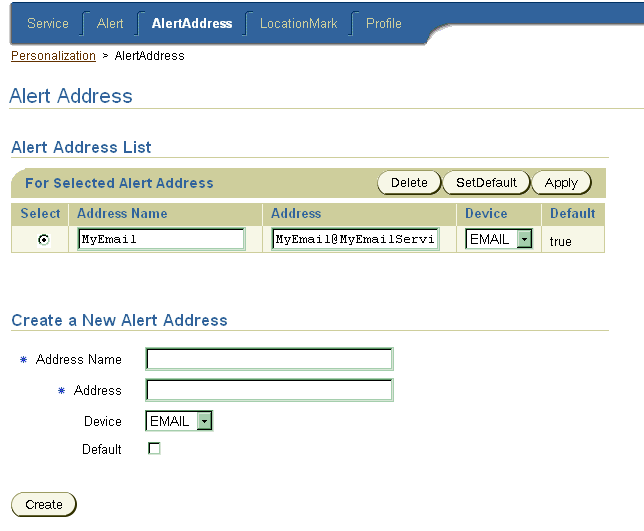
Clicking on the AlertAddress tab displays a page which lists all previously created alerts and a Create button for assigning new Alert Addresses. The list contains:
- A Select, radio button column.
- An AddressName text box.
- An Address text box. Enter an email address if the alert should be sent to an email account. If the alert is to be sent to an SMS service, such as a WAP enabled phone, the service provider supplies the address (for example, 1-555-555-5555@phone.company.com).
- A Device drop-down list box, listing the alert delivery devices currently supported by Wireless Edition.
- A Default state column.
The AlertAddress list has three buttons which control its function, the Delete, SetDefault, and Apply buttons.
- The Delete button removes the AlertAddress.
- The SetDefault button makes this alert the default setting.
Figure 6-8 The Alert Address Page
Text description of the illustration paz_addp.gif
6.9.1 Creating a New Alert Address
- Click the Alert Address tab.
- In the Create a New Alert Address section of the page, enter a name for the alert address in the Address Name field.
Note:
You must have an address to which Wireless Edition can send content. This information is provided by the service vendor. For example, a service (SMS) address might be 1-555-555-5555@phone.company.com.
|
- Enter the address for the new alert in the Address field.
Note:
The Address Name and Address fields are required.
|
- Select a device type from the Device drop-down list. The Device drop-down list displays a list of alert delivery logical devices that Wireless Edition supports for email and SMS.
- Select the Default check box to make this Alert Address the default.
- Click the Create button to create the AlertAddress. The new alert address then displays in the Alert Address List.
6.10 Creating a LocationMark
The form factor of some mobile devices limits the entry and display of such spatial information as street address and location coordinates. To solve this problem, the Wireless Edition stores spatial information as a locationmark, a name of a location that is meaningful to the user. For example, the locationmark My Home identifies "123 Main Street, Somewhere City, CA 12345.
Note:
Location marks must be identified as a point for this release of Oracle9i Application Server Wireless Edition.
|
Locationmarks enable users to avoid entering lengthy alphanumeric strings on their mobile devices. Instead, users enter and manage the underlying spatial information for the locationmarks using the Personalization Portal. You can access this information by selecting the locationmark on your mobile device. The locationmarks are stored in the Wireless Edition repository.
Note:
The locationmark feature does not function unless the server has access to geocoded data from a vendor.
|
To create a locationmark:
- Click a service. The Edit Service page appears.
- Click the LocationMark tab to invoke the LocationMark page.
- In the LocationMark page, Click the Create button. The Create LocationMark page appears.
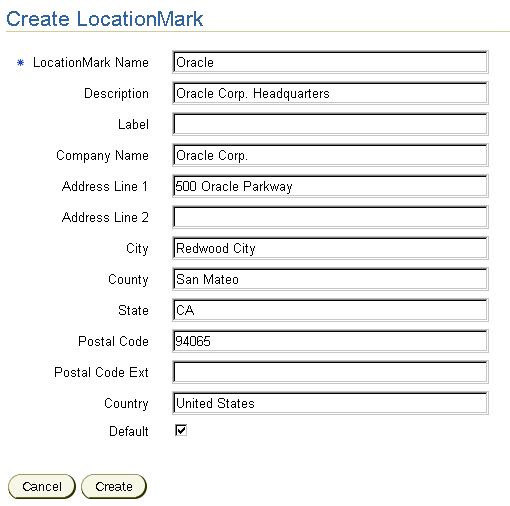
Figure 6-9 The Create LocationMark Page
Text description of the illustration paz_clmk.gif
- Enter the following information into the LocationMark page:
- Enter a name that is meaningful to in the LocationMark Name field. This is a required field.
- Enter a description for the locationmark that is meaningful to you (for example, Work or Home).
- Enter the name of the company in the Company Name field.
- Enter the street address information in Address Line 1 and Address Line 2.
- Enter the county and state information (if applicable) in the County and State fields.
- Enter the postal code in the Postal Code field. This can be a five-digit U.S. zip code or other postal code.
- Enter the postal code extension (if applicable) in the Postal Code Ext. field.
- Enter the country name in the Country name field.
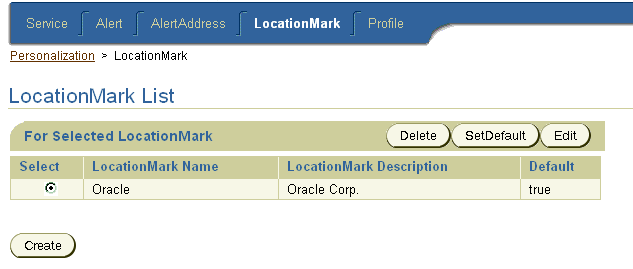
- Click the Create button to create the locationmark. The Wireless Edition checks the address data against the vendor's data and creates the locationmark. The new locationmark appears in the LocationMark List page. The LocationMark List contains the following elements:
Table 6-4 Elements in the LocationMark List
The LocationMark List also includes three buttons are activated by selecting a locationmark: Delete, SetDefault, and Edit. Clicking Delete deletes the selected locationmark. Clicking SetDefault sets the selected locationmark as the default locationmark. Clicking edit enables you to edit the properties of the locationmark.
Figure 6-10 The LocationMark List Page
Text description of the illustration paz_lmli.gif
6.11 Editing a LocationMark
To edit a locationmark:
- From the LocationMark List, select the desired locationmark and then click the Edit button. The Edit LocationMark page displays. This page contains the same fields as Create Location Mark page, complete with the data used to create the selected locationmark. For more information, see Section 6.10.
- Edit the desired fields by clicking within a field to insert the cursor.
- Click the Apply button to save the changes to the locationmark and return to the Location Mark List page. Clicking the Cancel button suspends all the changes and returns you to the LocationMark List page. Clicking on the Delete button deletes the locationmark.
6.12 Changing the Default Status of a LocationMark
To change the default status of a locationmark, choose a locationmark using the select column radio button, and click the SetDefault button to make it the default LocationMark. The status in the Default column of the LocationMark List changes to true. Only one LocationMark can be the default.
6.13 Deleting a LocationMark
To delete a locationmark, choose a locationmark using the select column radio button, and click the Delete button.
6.14 Editing a User Profile
Users can edit their own profiles by clicking the Profile page in the Personalization tab.
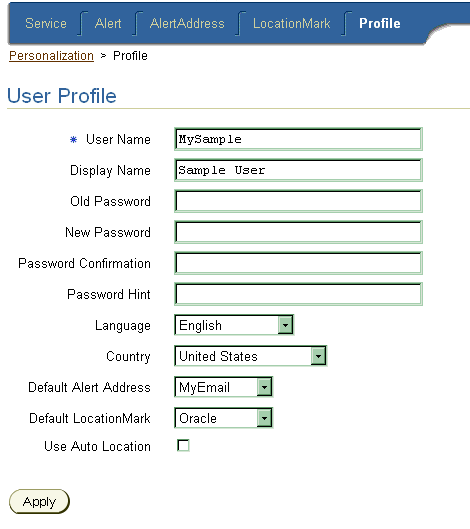
Figure 6-11 The User Profile Page
Text description of the illustration paz_usrp.gif
To edit a user profile:
- Click the Profile page in the Personalization tab. The User Profile page appears and displays the configuration information of the current user. The User Profile page contains the following parameters:
Table 6-5 Parameters for the User Profile Page
- Change the user configuration parameters as needed:
- Enter a new user name in the User Name field.
- Enter a new display name for the user in the Display Name field.
- Enter a new password for the user in the Password field.
- Enter the new password again in the Password Confirmation field.
- Enter a password hint that is meaningful to the user in the Password Hint field.
- From the Group list box, select a new group for the user.
- Select a language from the Language list box.
- Select a country from the Country list box.
- Select a default alert address from the Default Alert Address list box.
- Select a default locationmark address from the Default LocationMark list box.
- Select the Auto Location check box to report the user's location to the server for personalized content from a location-dependent service. This is an optional step.
- Click Apply.


