Release 4.1 for Windows NT
A87430-01
Library |
Service |
Contents |
Index |
| Oracle Discoverer 4i Configuration Guide for Oracle9i Application Server Release 4.1 for Windows NT A87430-01 |
|
![]()
![]()
This chapter explains how to configure Oracle Discoverer 4i Plus to work with corporate firewalls, using Visibroker Gatekeeper version 3.4.
Note: This chapter does not apply to Discoverer Viewer 4i Viewer. Discoverer Viewer 4i uses HTTP and HTTPS protocols that are firewall compliant and do not require Visibroker Gatekeeper.
The topics include:
For more information about Visibroker Gatekeeper, refer to the Borland Inprise Corporation Internet site at:
Before you can decide how to deploy Discoverer 4i Plus through your organization's firewall, you need to work with your Network Administrator to find out what the firewall policy is in your organization. You might also take into consideration the firewall policies in organizations that wish to access your Discoverer data across the Internet.
When discussing your organization's firewall policy with your Network Administrator, you need to be aware of the following basic concepts:
An Internet Firewall is one system or a group of several systems put in place to enforce a security policy between the Internet and an organization's network.
In other words, an Internet firewall is an electronic `fence' around a network to protect it from unauthorized access.
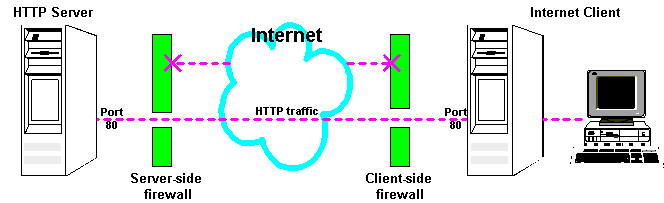
Typically, an organization using a Web Server machine that communicates across the Internet has a firewall between its HTTP Server machine and the Internet. This is known as a Server-side firewall. Other organizations (or remote parts of the same organization) connecting to this Web Server machine typically have their own firewall, known as a Client-side firewall. Information that conforms to the organization's firewall policy is allowed to pass through the firewalls enabling server machines and client machines to communicate.
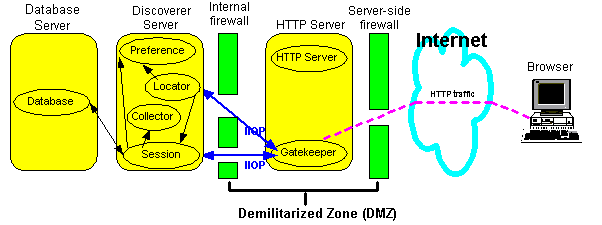
A Demilitarized Zone (DMZ) is a firewall configuration that provides an additional level of security. In this configuration, the DMZ is an extra network placed between a protected network and the Internet. Resources residing within the DMZ are visible on the public Internet, but are secure. DMZs typically hold servers that host a company's public web site, File Transfer Protocol (FTP) site, and Simple Mail Transfer Protocol (SMTP) server.
Refer to Section 7.6.1, "About firewall configurations" for more information about DMZs.
Internet servers and clients interconnect using Transmission Control Protocol/Internet Protocol (TCP/IP) ports, known as secure ports. Internet server machines run different services (for example HTTP or FTP) on different TCP/IP ports (see table below).
| Port | Service |
|---|---|
|
21 |
FTP |
|
23 |
Telnet |
|
79 |
Finger |
|
80 |
HTTP |
|
443 |
SSL |
A port can only operate one service. For example, port 80 can only be used for HTTP traffic and port 443 can only be used for SSL traffic.
Firewalls provide secure networks by restricting traffic to secure TCP/IP ports, for example port 80 for HTTP.
A typical firewall blocks all communication to all ports except port 80 and port 443:
All other types of traffic on all other ports are blocked. Therefore, a person could not use the FTP on port 80 to access the Internet server and retrieve files because FTP communcation is blocked on port 80.
This section explains what Visibroker Gatekeeper is and why it is used by Discoverer.
Visibroker Gatekeeper is a third-party software package, developed by Inprise Corporation, which enables Visibroker CORBA clients and servers to communicate across networks while still conforming to security restrictions imposed by Internet browsers and firewalls.
Discoverer 4i Plus uses CORBA (Common Object Request Broker Architecture) to enable clients and servers to communicate. CORBA is an architecture that enables pieces of programs (called objects) to communicate with one another regardless of what programming language they were written in or what operating system they are running on.
CORBA is implemented over the internet using the IIOP (Internet Inter-ORB Protocol) protocol. The IIOP protocol enables the exchange of integers, arrays, and more complex objects between server and client machines. By contrast, the HTTP (HyperText Transfer Protocol) protocol that is the underlying protocol used by the internet only supports transmission of text.
For security reasons, some commercial firewalls do not allow IIOP traffic to pass directly through.
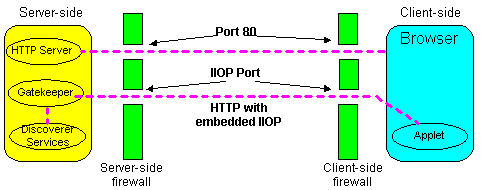
Visibroker Gatekeeper enables CORBA-based IIOP traffic to pass through firewalls.

Visibroker Gatekeeper typically runs behind the Server-side firewall on the HTTP Server machine. Visibroker Gatekeeper:
In this respect, Visibroker Gatekeeper works like a proxy server machine (a machine that acts as an intermediary between a workstation and the Internet).
Oracle Discoverer 4i Plus uses Visibroker Gatekeeper version 3.4. Visibroker Gatekeeper is included as part of the Discoverer 4i Plus installation.
This section describes typical firewall configurations and advises you on which Visibroker Gatekeeper configuration you need to deploy Discoverer 4i Plus across public networks such as the Internet.
Firewall policies vary across organization, and there are a wide variety of bespoke and off-the-shelf firewall packages in use. This guide cannot cover every firewall scenario. Therefore, only the most common firewall configurations are covered.
A typical DMZ configuration comprises two firewalls, (see figure below):

A good firewall configuration assumes that resources in the DMZ will be breached, and should minimize damage to the internal network and any sensitive data residing on the network when this happens. This involves two steps:
When deploying the Discoverer Server, two typical security configurations are:


Visibroker Gatekeeper typically handles IIOP or HTTP protocol traffic from clients and forwards them to Discoverer Services. This means that Visibroker Gatekeeper uses either an IIOP Proxying configuration or a HTTP Tunnelling configuration. Which configuration you choose depends on the restrictions imposed by your firewall policy.
Refer to Section 7.7, "Using Visibroker Gatekeeper with an IIOP Proxying Configuration".
Refer to Section 7.8, "Using Visibroker with a HTTP Tunnelling Configuration".
This section explains how to configure Discoverer 4i Plus to use an IIOP Proxying configuration.
In an IIOP Proxying configuration, the Server-side and Client-side firewalls are opened to allow TCP/IP traffic.
When Discoverer 4i Plus starts, the HTTP Server sends the Discoverer Applet to the Browser via Port 80. Once initialized, the Discoverer Applet communicates with the Gatekeeper via the specified IIOP port.

Visibroker Gatekeeper runs behind the Server-side firewall on the HTTP Server machine and helps Clients communicate with Discoverer Services. To do this, the Gatekeeper intercepts all requests from Clients and forwards them to Discoverer Services on behalf of the Clients. Replies from Discoverer Services to the Client are also passed through the Gatekeeper.
You can configure the Gatekeeper to use an IIOP Proxying configuration at two different security levels:
In this configuration, the Discoverer Server and the HTTP Server are deployed in the DMZ.
IIOP packets are not restricted to Discoverer Services - they can be sent to any location. The Discoverer Services and Locator are on the same sub-net (see figure below).

To configure Visibroker Gatekeeper:
If you do not control the Client-side firewall, there are three possible solutions for configuring the Server firewall:
Note: Firewall configuration is specific to the firewall type used by your site. Contact your Firewall Administrator for details.
In this configuration, the HTTP Server is deployed in the DMZ. The Discoverer Server and the database are deployed behind the Internal firewall (see figure below).

To configure Visibroker Gatekeeper with a Demilitarized Zone:
This sections explains how to configure Discoverer to use a HTTP Tunnelling configuration.
If the Client is running behind a firewall that only allows HTTP traffic, the client and server communicate by embedding IIOP data into HTTP packets, which allows them to pass through the firewall.
In an HTTP Tunnelling Configuration, Visibroker Gatekeeper extracts the IIOP requests from the HTTP packets and passes them on to the Discoverer Server components. Replies are sent back to the Client as HTTP response packets, which the Client extracts to get the IIOP packets.
The main advantage of using the HTTP Tunnelling configuration is that you do not have to open up your firewall for TCP/IP traffic. However, you must ensure that the firewall allows HTTP traffic to the host and port that your Gatekeeper is running on, see Section 7.10.1, "Where to run Visibroker Gatekeeper".
NOTE: There is an alternative method of running Discoverer through multiple firewalls without having to open up the firewalls. This involves running Visibroker Gatekeeper on port 443, (refer to Section 6.8, "Configuring Discoverer 4i Plus to use SSL").
Because the port 80 is the default port used by HTTP Servers, Visibroker Gatekeeper must use a different port number when running Visibroker Gatekeeper on the HTTP Server. The default port number that Visibroker Gatekeeper uses is port 15000. You can also run Visibroker Gatekeeper on a different machine from the HTTP Server, see Section 7.10.3, "Running Visibroker Gatekeeper on a different Server".
You can configure the Gatekeeper to use an HTTP Tunnelling configuration at two different security levels:
In this configuration, the Discoverer Server and the HTTP Server are deployed in the DMZ (see figure below).

To configure Visibroker Gatekeeper:
Note: Firewall configuration is specific to the firewall type used by your site. Contact your Firewall Administrator for details.
In this configuration, the HTTP Server is deployed in the DMZ. The Discoverer Server and the database are deployed behind the Internal firewall (see figure below).
To configure Visibroker Gatekeeper:
Because HTTP is a connectionless protocol, a new HTTP connection must be established every time a Discoverer Client wants to communicate via the gatekeeper. This connection is made, a response is received, and the connection is closed.
The Discoverer Client and the gatekeeper can communicate via a connection that is established and used for all requests until the Discoverer Client exits. This is known as a Persistent Connection. When using HTTP Tunnelling, Persistent Connections are recommended for Discoverer 4i Plus.
To use a Persistent Connection, the HTTP proxies running on the firewalls between the client and gatekeeper must support Persistent Connections.
Note: Firewall configuration is specific to the firewall type used by your site. Contact your Firewall Administrator for details.
This section explains how to configure the Discoverer client to work with Visibroker Gatekeeper.
By default, a new Discoverer client session tries to connect to the Discoverer server in the following three-step connection sequence.

To improve the performance of Discoverer, you can specify an alternative connection sequence (for more information refer to Section 7.9.2, "How to use a specific connection method").
You can specify a connection method for a Discoverer client using one of the following URL parameters:
NOTE: Do not use both URL parameters in the same connect string.
Table 7-2Note: Use these parameters to set up separate URLs for clients who you know will always be connecting from behind firewalls.
See also "Enabling SSL in Discoverer 4i Plus start pages".
This section explains how to configure Visibroker Gatekeeper to work with Discoverer 4i Plus.
You configure Visibroker Gatekeeper using the Gatekeeper Configuration Manager (see figure below).

When configuring Visibroker Gatekeeper, you have two options:
NOTE: This configuration is strongly recommended for Discoverer 4i Plus.
The default Visibroker Gatekeeper port is 15000, though this can be changed to any port number (except 80). See Section 7.10.2, "Running Visibroker Gatekeeper on the HTTP Server".
NOTE: This configuration has a greater set up time and maintenance overhead and is not recommended for Discoverer 4i Plus, unless option 1 (above) is not viable.
The Visibroker Gatekeeper file gatekeeper.ior must be copied to the HTTP Server every time Visibroker Gatekeeper is re-started. See Section 7.10.3, "Running Visibroker Gatekeeper on a different Server".
NOTE: If you wish to use Secure Sockets Layer (SSL), you must run Visibroker Gatekeeper on port 443, (the standard SSL port), (refer to "Installing Visibroker Gatekeeper to work with SSL").
This section explains how to run Visibroker Gatekeeper on the HTTP Server (for more information about choosing a configuration, see Section 7.10.1, "Where to run Visibroker Gatekeeper").
<ORACLE_806_HOME>\vbroker\bin\gatekeeper.exe
This section explains how to run Visibroker Gatekeeper on a machine other than the HTTP Server machine (for more information about choosing a configuration, see Section 7.10.1, "Where to run Visibroker Gatekeeper").
HKEY_LOCAL_MACHINE\Software\Oracle\DISCWB4_START_GATEKEEPER
To work with Discoverer, Visibroker Gatekeeper is configured as follows:
Note: If you are running Visibroker Gatekeeper on the HTTP Server, you cannot set the Visibroker Gatekeeper port to port 80. This is because port 80 is the default HTTP Server port on which most HTTP Servers install themselves.
To change the default Visibroker Gatekeeper port, follow these steps:

Visibroker Gatekeeper is now configured to use the new port number.
To change the amount of information generated by the Visibroker Gatekeeper log, follow these steps:

Visibroker Gatekeeper is now configured to use the log level selected.
To configure the Gatekeeper to work with your Network Address Translation (NAT) device in front of the Gatekeeper, follow these steps:

Visibroker Gatekeeper is now configured to use your NAT device in front of the Gatekeeper.
NOTE: Discoverer 4i does not support the use of NAT devices behind the Gatekeeper.
|
|
 Copyright © 2000 Oracle Corporation. All Rights Reserved. |
|