Release 1.0.2.1
Part Number A88706-01
Library |
Service |
Contents |
Index |
| Oracle Database Cache Concepts and Administration Guide Release 1.0.2.1 Part Number A88706-01 |
|
To manage your Oracle Database Cache environment, you use Cache Manager, a component of Oracle DBA Studio. Cache Manager provides a Java interface that lets you start and stop caching for one or more middle-tier caches, monitor the ratio of hits to misses, modify which data is cached, and modify the synchronization policy.
Occasionally, as when you perform maintenance on a node, upgrade software, or change the memory allocation for a cache, you may need to start or stop a cache. Likewise, when you want to test the performance of the queries without Oracle Database Cache, you can pause the routing of queries to a middle-tier cache.
Using Cache Manager, you can start or stop caches or pause or resume routing on one or more caches. The General page shows the current state of the cache and lets you change the state:
Select an option to change the state of the cache:
When you click Apply, Oracle Database Cache changes the state of the cache.
To start or stop caches or to pause or resume query routing on all caches, select the Caches folder and choose one of the following from the Object menu:
A progress box displays the results of the operation. When the operation is complete, click Close to close the progress box.
You can also use the cache management API to enable and disable routing. To enable or disable routing of queries, you can use the DBMS_SET_ROUTING_STATE procedure. For more information, see "SET_ROUTING_STATE Procedure".
To enable or disable routing of PL/SQL subprograms (procedures and functions) and anonymous blocks to the cache, you can use the DBMS_ICACHE.SET_FLAG procedure. See "SET_FLAG Procedure" for more information.
To check whether the routing of PL/SQL subprograms is enabled or disabled, you can use the DBMS_ICACHE.GET_FLAG function. See "GET_FLAG Function" for more information about this function.
Cache Manager helps you to monitor your Oracle Database Cache environment. It provides information about which queries are hits and which are misses, as well as information about hits and misses per second, processor time, and memory usage.
To monitor a cache, select the cache from the Navigator tree. Cache Manager displays the property sheet for the cache.
To view information about which queries are hits and which are misses, select the Hit/Miss Statistics tab. A hit is a query that was satisfied in the middle-tier cache. A miss is a query that could not be satisfied in the cache and that was routed to the origin database.
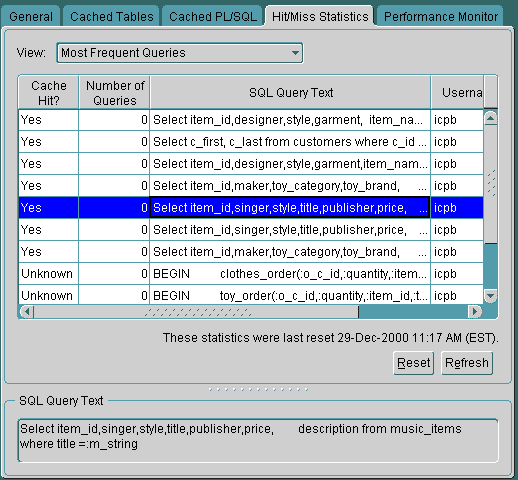
By selecting an option from the View box, you can display statistics for the following categories of queries:
The page shows the following information about the top 50 queries in the selected category:
Yes denotes a hit; No denotes a miss. Unknown denotes that Oracle Database Cache cannot determine whether the query is a hit or a miss, because new data has recently been cached and the query has not yet been reissued. The next time the query is issued, Oracle Database Cache will determine whether the query is a hit or a miss. It attempts to find the data in the cache. If the query cannot be satisfied in the cache, Oracle Database Cache routes the query to the origin database and marks the query as a miss. If the query can be satisfied in the cache, Oracle Database Cache returns the data to the user and marks the query as a hit.
If a query is a miss, but has been executed many times, consider adding the tables listed in the query to the cache.
Sometimes, the query may be marked as a miss, but the table is already cached. In this case, the user information in the cache may need to be updated. For example, the user's password may have changed in the origin database, but that information has not been propagated to the cache. To update the user information in the cache, select the cache from the Navigator tree and choose Update User List from the drop-down menu.
To refresh the statistics, click Refresh. However, even when you click Refresh, you may not receive the most up-to-date statistics, because, by default, the statistics are gathered once every 5 minutes.
You can also use the DBA_ICACHE_QUERY_STATS view, provided by Oracle Database Cache, to retrieve information about hit and miss statistics. For more information, see Appendix A.
You can reset the hit and miss statistics for the cache by clicking Reset. Consider resetting when you add or remove several tables from the cache. Resetting the statistics resets the hit and miss count to zero, making it easier to see which queries are being executed most frequently at the current time.
You can also reset the statistics using the DBMS_ICACHE.RESET_STATS procedure. See "RESET_STATS Procedure" for more information.
To view other performance information about the cache, select the Performance Monitor tab.
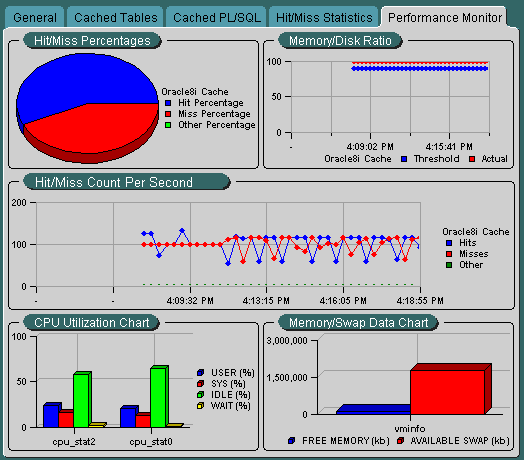
The page shows the following:
This chart shows you the percentage of hits (Hit Percentage) and the percentage of misses (Miss Percentage) for the cache. Other Percentage refers to the percentage of requests that were requests other than queries, such as updates, inserts, or deletes. Reviewing this information can help you determine whether or not you have cached the appropriate data.
If the Hit Percentage is high or the Miss Percentage is low, you have probably cached the appropriate data. If this is not the case, select the Hit/Miss Statistics tab. For View, select Most Frequent Queries, Misses Only. Consider caching the tables that are accessed by the top queries in this category.
If the Other Percentage is high, your application may not be ideal for Oracle Database Cache. Consider moving the update, insert, or delete requests to another application.
For better performance, a high percentage of queries should be satisfied by the data in cache memory because access to memory is much faster than access to disk. The optimal range is 90% or higher. If the percentage is low, consider increasing the amount of memory allocated to the cache. (First, check the Memory Swap Data chart to verify that you have available memory on your system. Then, select the Cached Tables tab and specify the new amount in the Memory Allocated box.)
This chart, along with the Hit/Miss Percentages chart, helps you to determine if you have cached the appropriate data.
For caches on UNIX systems, this chart shows the CPU utilization for all processes on the cache node. For caches on Windows NT, this chart shows the non-idle processor time utilization for all processes on the cache node. This chart shows you whether the CPU of the cache node is overloaded or underutilized.
This chart shows whether the memory of the cache node is overloaded or underutilized. The numbers refer to the memory on the cache node.
You can customize the charts and view additional information by right-clicking. The context menu shows the options for that chart.
You can also monitor performance using the DBA_ICACHE_AGGREGATE_STATS view, provided by Oracle Database Cache. For more information, see Appendix A.
Using Cache Manager, you can add tables and PL/SQL objects to one or more caches or remove tables and PL/SQL objects from one or more caches, as the following sections describe.
You can add tables to one cache by using the property sheet of the cache. Take the following steps:
You can also remove tables using this dialog box by selecting the table from the Cached Tables list. Click the left arrow (<) to move the table to the Available Tables list.
As you move tables to or from the Cached Tables list, Cache Manager updates the information in the Disk Space Available and Disk Space Required for Cached Tables boxes. If the tables use more disk space than the Disk Space Available, Cache Manager warns you that it cannot add all of the tables. It adds as many tables as the disk space allows.
When you add very large tables to a cache, the operation may take some time to complete.
You can add PL/SQL objects to one cache by using the property sheet of the cache. Take the following steps:
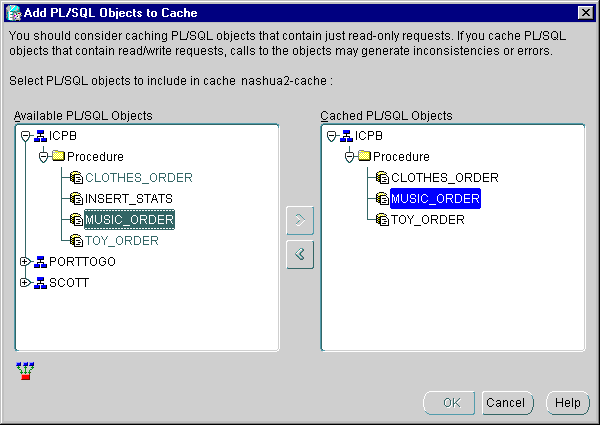
Text description of the illustration addplsql.gif
To add a PL/SQL object to the cache, expand the schemas and folders in the Available PL/SQL Objects list. Then, select the PL/SQL object. Click the right arrow (>) to move the PL/SQL object to the Cached PL/SQL Objects list.
You can also remove PL/SQL object using this dialog box by selecting the PL/SQL object from the Cached PL/SQL Objects list. Click the left arrow (<) to move the object to the Available PL/SQL Objects list.
To add tables or PL/SQL objects (packages, procedures, and functions) to one or more caches at the same time, use the Add Wizard. With the wizard, you can add tables to one or more caches and specify the synchronization policy for each table and add PL/SQL objects to one or more caches.
To invoke the Add Wizard, select the Caches folder from the Navigator tree and choose Object -> Add Objects to Caches. Then, take the steps outlined in "Using the Add Wizard to Set Up Caches".
You can remove tables from one cache by using the property sheet of the cache. Take the following steps:
You can remove PL/SQL objects from one cache by using the property sheet of the cache. Take the following steps:
To remove tables and PL/SQL objects from one or more caches, you can use the Remove Wizard. Take the following steps:
The wizard displays a progress box. When it completes the operation, the selected objects are removed from the caches.
Using the property sheet of a cache, you can change the characteristics of that cache, including the memory and disk space allocated to the cache and the synchronization policy of a table.
To change the amount of memory allocated to a cache, take the following steps:
Note that the change will not take effect until the next time the cache and applications are started.
You can modify the amount of disk space available for a cache in the following ways:
Note that performance improves if you allocate the disk space in large amounts. That is, performance is better if you allocate disk space using a few large files rather than many smaller files.
To modify the amount of disk space allocated to a cache, take the following steps to invoke the Change Allocated Disk Space dialog box:
To increase the amount of disk space allocated to a cache by adding a new file, take the following steps:
You can delete a file if you have not yet clicked Apply to add the additional file. The row will display an icon in the left column. To delete the file, take the following steps:
To increase the amount of disk space allocated to a cache by increasing the size of an existing file, take the following steps:
To decrease disk space allocated to the cache, you can decrease the size of one or more existing files. Take the following steps:
The synchronization policy establishes how and how often the data in the cache is refreshed from the origin database. When you set up a middle-tier cache, you specified the synchronization policy for each table in that cache. Sometimes, though, the frequency or extent at which the data in the origin database is modified does not stay the same, necessitating a change to the synchronization policy for a table.
For example, for an online catalog, prices and merchandise are changing more rapidly than when you first created the cache. Instead of refreshing the data once a week, you want to refresh it once a day.
To modify the synchronization policy for a table, take the following steps:
For example, for the table BOOKS, you could select a start time of 02-Feb-2000 3:00 AM, an interval of 1, and a unit of 1 Week. In this case, the table would be refreshed once a week at 3:00 a.m., beginning on February 2.
Note that while you can easily change the synchronization policy from scheduled to not scheduled, changing the policy from Complete to Incremental or Incremental to Complete consumes more resources and may take considerable time if the table is very large.
When the synchronization policy of a table is not scheduled, you must initiate the synchronization of the table using Cache Manager. Even if the synchronization policy is Scheduled, you may decide that you want to initiate the action, rather than wait until the next scheduled synchronization.
For example, the table SPORTSWEAR for your online catalog is scheduled for synchronization in two days, but the data in the origin database has changed substantially with the addition of new spring clothing and markdowns on winter clothing. You do not want to wait for the scheduled synchronization to update the data in the caches.
Cache Manager lets you synchronize tables in two ways:
The following sections describe these methods.
To initiate the synchronization of some or all of your tables in one cache, take the following steps:
If the synchronization policy of a table is Complete, Cache Manager performs a Complete synchronization on the selected table immediately. Similarly, if the synchronization policy of a table is Incremental, Cache Manager performs an Incremental synchronization immediately.
To initiate the synchronization of some or all of your tables in more than one cache, you use the Synchronize Wizard. The wizard synchronizes the tables in parallel. For example, if you want to synchronize TABLE_A and TABLE_B on Cache1 and Cache2, the wizard starts the synchronization of TABLE_A on both Cache1 and Cache2. The operations on multiple caches run in parallel. When the synchronization of TABLE_A is completed on Cache1, the wizard starts the synchronization of TABLE_B on Cache1.
If the synchronization policy of a table is Complete, the Synchronize Wizard performs a Complete synchronization on the table immediately. Similarly, if the synchronization policy of a table is Incremental, the Synchronize Wizard performs an Incremental synchronization immediately.
To synchronize tables immediately, take the following steps:
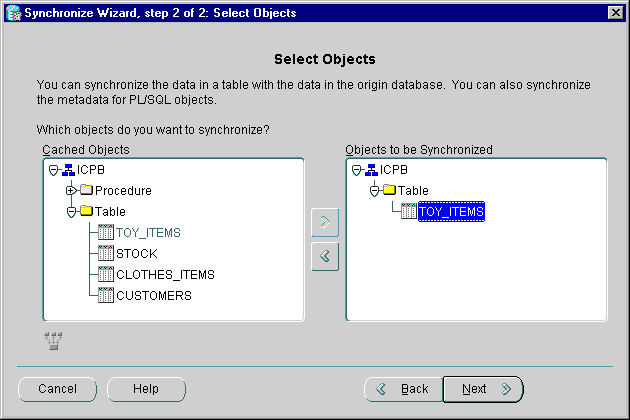
Text description of the illustration synch_table.gif
On this page, you can also select PL/SQL objects to be synchronized. See "Synchronizing PL/SQL Objects" for information about synchronizing the metadata of PL/SQL Objects.
Oracle Database Cache immediately synchronizes the selected tables using the synchronization policy that is specified for each table. That is, if a table has a synchronization policy of Complete (whether or not it is Scheduled), Oracle Database Cache immediately performs a complete synchronization. If a table has a synchronization policy of Incremental (whether or not it is Scheduled), Oracle Database Cache immediately performs an incremental synchronization.
If the tables are very large and the synchronization method is Complete, the operation may take some time to complete. Similarly, if the tables are very large and the synchronization method is Incremental and there are many changes to the data in the origin database, the operation may take some time to complete.
If you update the definition (the metadata) of a PL/SQL object (a package, procedure, or function) in the origin database, you should update the definition in the cache by synchronizing the PL/SQL object in the cache with the PL/SQL object in the origin database.
Note that you cannot schedule the synchronization of a PL/SQL object.
To initiate the synchronization of some or all of the PL/SQL objects in one cache, take the following steps:
Oracle Database Cache synchronizes the metadata of the PL/SQL objects in the cache with the metadata of the PL/SQL objects in the origin database.
To initiate the synchronization of some of all of your PL/SQL objects in one or more caches, you use the Synchronize Wizard. Take the following steps:
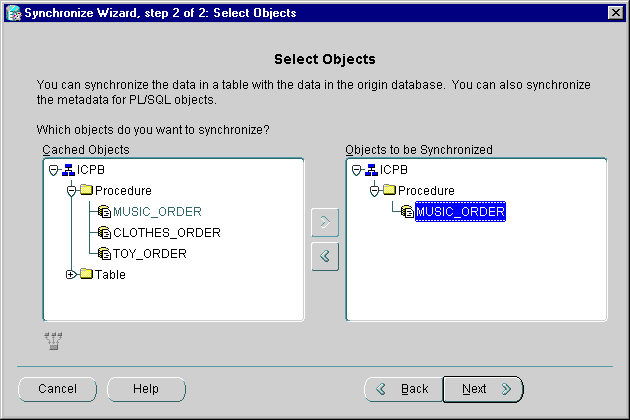
Text description of the illustration synch_plsql2.gif
On this page, you can also select tables to be synchronized. See "Synchronizing Data" for information about synchronizing the data in tables.
Oracle Database Cache immediately synchronizes the selected PL/SQL objects in the selected caches.
When you install Oracle Database Cache, the installation procedure reads the list of users in the origin database and propagates the list of users and the attributes of the users to the cache. (The procedure copies only the user-defined database users, not system-defined database users, such as SYS and SYSTEM.) As a result, you can cache objects from the schemas associated with these users in your cache, and applications can access data owned by these users.
If a new user-defined database user has been added to the origin database, you must add that user to the cache before you can cache objects from that user's schema. Similarly, if an attribute, such as the password, of an existing user is modified in the origin database, you must update the attribute in the cache. If you do not update the password, for example, applications invoked by that user will not be able to access data in the cache.
If a user is dropped from the origin database, you must drop the user from the cache. If you do not, queries on tables in that user's schema continue to access the data in the cache. In addition, synchronization of the table may fail.
To add or drop a user or update the user's attributes, use Cache Manager to update the list of users for one cache or for all caches associated with an origin database. To maintain consistency between the origin database and all caches, Oracle Corporation recommends that you update users for all caches at the same time.
To update the list of users and their attributes for all caches associated with one origin database, take the following steps:
Cache Manager updates the user list for all caches and displays a progress box. If Cache Manager cannot update the user list for a cache, perhaps because the cache is not running, it displays a message.
To update the list of users and their attributes for one cache, take the following steps:
Cache Manager updates the user list for the selected cache and displays a progress box.
To see the date when the user list was last updated for a cache, check the User List Last Updated at field on the General page.
To make most changes to a middle-tier cache, such as adding or removing tables or modifying the memory or disk space allocation, you can use Cache Manager, the management interface for Oracle Database Cache.
However, you must use the Oracle Database Cache Configuration Assistant to reconfigure the following characteristics of the cache:
In addition, you can use the Configuration Assistant to change the cache name, although you can also accomplish this using Cache Manager.
The Configuration Assistant file is named wtacca and is located in the bin subdirectory of the Oracle home. To modify a cache, invoke the Configuration Assistant by using the following command on the cache node:
$ wtacca
The Configuration Assistant displays the Welcome page. To modify your cache, click Next and take the following steps:
If you enter a user name that is not valid or that does not have SYSDBA privileges, or if you enter an invalid password, the Configuration Assistant returns an error and allows you to enter another value.
The Configuration Assistant displays a progress box informing you of the results of the modifications.
|
|
 Copyright © 2001 Oracle Corporation. All Rights Reserved. |
|