10g (9.0.4)
Part Number B10326-01
Home |
Contents |
Index |
| Oracle Application Server Containers for J2EE Services Guide 10g (9.0.4) Part Number B10326-01 |
|
This chapter discusses the following topics:
Download the JMS example used in this chapter from the OC4J sample code page on the OTN Web site.
Java clients and Java middle-tier services must be capable of using enterprise messaging systems. Java Message Service (JMS) offers a common way for Java programs to access these systems. JMS is the standard messaging API for passing data between application components and allowing business integration in heterogeneous and legacy environments.
JMS provides two programming models:
JMS queues and topics are bound in the JNDI environment and made available to J2EE applications.
You can choose between a number of JMS providers, depending on their integration and quality-of-service (QOS) requirements, as follows:
Oracle Application Server JMS (OracleAS JMS) is a Java Message Service that provides the following features:
This section covers the following:
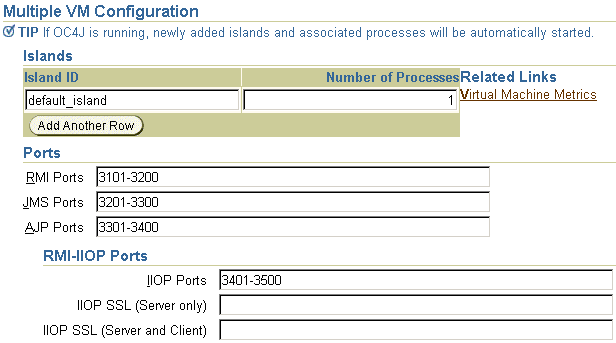
Figure 3-1 demonstrates how you can configure the port range that OracleAS JMS uses within the Oracle Enterprise Manager The default range is between 3201 and 3300. From the OC4J Home page, select the Administration page. Select Server Properties in the instance Properties column. Then scroll down to the Multiple VM Configuration section.
OracleAS JMS Destination objects, which can be either queues or topics, are configured in the jms.xml file. OracleAS JMS is already installed with OC4J, so the only configuration necessary is for the queues, topics, and their connection factories that your applications use.
jms.xml file directly through Oracle Enterprise Manager, select Advanced Properties under the Instance Properties column on the Administration page. In this section, choose jms.xml to modify the straight XML file.
jms.xml file in J2EE_HOME/config/jms.xml. If you want, you can change the name and location of this file. To modify the name and location of the JMS configuration file, specify the new name and location in the OC4J server configuration file--J2EE_HOME/config/server.xml. The server.xml file designates the name and location of the JMS configuration file through the <jms-config> element.
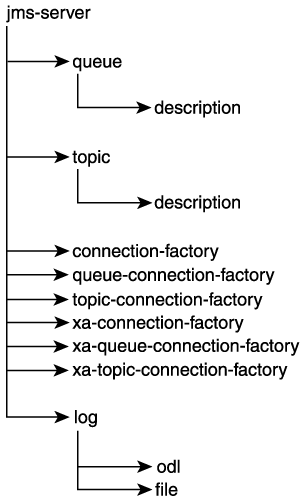
Figure 3-2 demonstrates the order in which the elements in the jms.xml file are structured. "OracleAS JMS Configuration File Elements for jms.xml" provides a complete description of all elements and their attributes in the jms.xml file.
The jms.xml file defines the topics and queues used. For each Destination object (queue or topic)--you must specify its name (also known as its location) and connection factory in the jms.xml file. The following jms.xml file example configuration defines a queue that is used by the Oc4jjmsDemo demo.
The queue is defined as follows:
jms/demoQueue
jms/QueueConnectionFactory
The topic is defined as follows:
jms/demoTopic
jms/TopicConnectionFactory
<?xml version="1.0" ?>
<!DOCTYPE jms-server PUBLIC "OracleAS JMS server"
"http://xmlns.oracle.com/ias/dtds
/jms-server.dtd">

<jms-server port="9127">
   <queue location="jms/demoQueue"> </queue>
   <queue-connection-factory location="jms/QueueConnectionFactory">
   </queue-connection-factory>

   <topic location="jms/demoTopic"> </topic>
   <topic-connection-factory location="jms/TopicConnectionFactory">
   </topic-connection-factory>

    <!-- path to the log-file where JMS-events/errors are stored -->
    <log>
        <file path="../log/jms.log" />
    </log>
</jms-server>
See "OracleAS JMS Configuration File Elements for jms.xml" for descriptions of the elements in the jms.xml file.
OracleAS JMS creates two default Destination objects, as follows:
You can use these Destination objects in your code without needing to add them to the jms.xml configuration file.
The default connection factories that are automatically associated with these objects are as follows:
OracleAS JMS creates six default connection factories ranging over the XA/non-XA and various JMS domains. You can use these connection factories in your code without needing to add them to the jms.xml configuration file, rather than defining new connection factories. The only reason to define a new connection factory in the jms.xml file is if you need to specify non-default values for one or more of the optional attributes of connection-factory elements.
The default connection factories are as follows:
jms/ConnectionFactory
jms/QueueConnectionFactory
jms/TopicConnectionFactory
jms/XAConnectionFactory
jms/XAQueueConnectionFactory
jms/XATopicConnectionFactory
Thus, if you used only the default connection factories, then you could define only the topic and queues necessary in the jms.xml file. The following example defines the jms/demoQueue and the jms/demoTopic. Both of these use their respective default connection factories.
<?xml version="1.0" ?>
<!DOCTYPE jms-server PUBLIC "OracleAS JMS server"
"http://xmlns.oracle.com/ias/dtds
/jms-server.dtd">

<jms-server port="9127">
   <queue location="jms/demoQueue"> </queue>
   <topic location="jms/demoTopic"> </topic>
    <!-- path to the log-file where JMS-events/errors are stored -->
    <log>
        <file path="../log/jms.log" />
    </log>
</jms-server>
OracleAS JMS internally creates the default connection factory objects and binds them to the default names within the OC4J server where the JMS connection is created.
However, you can also redefine the default connection factories to have specific attributes by configuring them in the jms.xml file.
A JMS client sends or receives a JMS message by doing the following:
Destination object (queue or topic) and its connection factory using a JNDI lookup.
If you are sending messages, then do the following:
Destination, create a sender for a queue, or a publisher for a topic.
Destination types.
However, if you are receiving messages, then do the following:
5. Providing the retrieved JMS Destination, create a receiver for a queue or a
topic subscriber.
6. Receive the message using the queue receiver or the topic subscriber.
7. Close the queue session.
8. Close the connection for either JMS Destination types.
Example 3-1 demonstrates these steps for sending a JMS message; Example 3-2 demonstrates these steps for receiving a JMS message. For the complete example, download the JMS example used in this chapter from the OC4J sample code page on the OTN Web site.
|
Note: For simplicity, most of the error code is removed in Example 3-1 and Example 3-2. To see the error processing, see the sample code available on the OTN Web site. |
The JNDI lookup for OracleAS JMS requires the OracleAS JMS Destination and connection factory be defined within the jms.xml file, prepended with the java:comp/env/ prefix.
|
Note: Alternatively, you could use logical names in the JNDI lookup. See "Map Logical Names in Resource References to JNDI Names" for directions. The only difference between an OracleAS JMS client and an OJMS client is the name provided in the JNDI lookup. To make your client independent of either JMS provider, use logical names in the implementation, and change only the OC4J-specific deployment descriptor. |
The following method--dosend--sets up a queue to send messages. After creating the queue sender, this example sends out several messages.
public static void dosend(int nmsgs){// 1a. Retrieve the queue connection factoryQueueConnectionFactory qcf = (QueueConnectionFactory)
ctx.lookup("java:comp/env/jms/QueueConnectionFactory");// 1b. Retrieve the queueQueue q = (Queue) ctx.lookup("java:comp/env/jms/demoQueue");// 2. Create the JMS connectionQueueConnection qc = qcf.createQueueConnection();// 3. Start the queue connection.qc.start();// 4. Create the JMS session over the JMS connectionQueueSession qs = qc.createQueueSession(false,Session.AUTO_ACKNOWLEDGE);//5. Create a sender on the JMS session to send messages.QueueSender snd = qs.createSender(q);// Send out messages...for (int i = 0; i < nmsgs; ++i){//6. Create the message using the createMessage method of the// JMS sessionMessage msg = qs.createMessage();//7. Send the message out over the sender (snd) using the
// send methodsnd.send(msg);System.out.println("msg:" + " id=" + msg.getJMSMessageID());}//8,9 Close the sender, the JMS session and the JMS connection.snd.close();qs.close();qc.close();}
The following method--dorcv--sets up a queue to receive messages off of it. After creating the queue receiver, it loops to receive all messages off of the queue and compares it to the number of expected messages.
public static void dorcv(int nmsgs){Context ctx = new InitialContext();// 1a. Retrieve the queue connection factoryQueueConnectionFactory qcf = (QueueConnectionFactory)
ctx.lookup("java:comp/env/jms/QueueConnectionFactory");// 1b. Retrieve the queueQueue q = (Queue) ctx.lookup("java:comp/env/jms/demoQueue");// 2. Create the JMS connectionQueueConnection qc = qcf.createQueueConnection();// 3. Start the queue connection.qc.start();// 4. Create the JMS session over the JMS connectionQueueSession qs = qc.createQueueSession(false,Session.AUTO_ACKNOWLEDGE);// 5. Create a receiver, as we are receiving off of the queue.QueueReceiver rcv = qs.createReceiver(q);// 6. Receive the messagesint count = 0;while (true){Message msg = rcv.receiveNoWait();System.out.println("msg:" + " id=" + msg.getJMSMessageID());++count;}if (nmsgs != count){System.out.println("expected: " + nmsgs + " found: " + count);}// 7,8 Close the receiver, the JMS session and the JMS connection.rcv.close();qs.close();qc.close();}
OC4J JMS comes with an OC4J-specific command-line utility, com.evermind.server.jms.JMSUtils, that is used for debugging and information access.
The J2EE_HOME/oc4j.jar must be in the CLASSPATH. Then execute JMSUtils, as follows:
java com.evermind.server.jms.JMSUtils [gen_options] [command]

                     [command_options]
The OracleAS JMS server must be running. Only the administrator can use JMSUtils. You define a user within the administrator role in the security User Manager. For information on defining users within security roles, see the Oracle Application Server Containers for J2EE Security Guide.
The generic options for JMSUtils facilitate connecting to the OracleAS JMS server. Table 3-1 describes these options.
The commands describe the action to be taken and are discussed in Table 3-2. Some of these commands have their own options (command_options) to further describe the action desired.
To display the syntax usage, issue the preceding command with no argument. To display extensive information about the set of commands that are available, the arguments' options, and the behavior of each command, issue the following:
java com.evermind.server.jms.JMSUtils help
| Utility | Command Description |
|---|---|
|
|
Print detailed help for all utilities commands. |
|
|
Check validity of a JMS message selector, identified by the |
|
|
Display all available system properties (shown in Table 3-5) and their current settings on the OC4J JMS server. |
|
|
Display all available DMS statistics on the OC4J JMS server (this will include non-JMS statistics as well). (For information on DMS, see the Oracle Application Server 10g Performance Guide.) |
|
|
Print a list of all permanent |
|
|
Print a list of all durable subscriptions known to OC4J JMS. |
|
|
Create a new durable subscription on the |
|
|
Drop an existing, inactive durable subscription. The durable subscription is identified by a name ( |
|
|
Browse messages on a given destination (queue or topic durable subscription, defined in |
|
|
Dequeue messages on a given destination (queue or topic durable subscription). |
|
|
Copy messages from one destination (queue or topic durable subscription) to a different destination. If the source and sink destinations are the same, then the command is not executed, generating an error instead. |
|
|
Move messages from one destination (queue or topic durable subscription) to a different destination. If the source and sink destinations are the same, then the command is not executed, generating an error instead. |
Table 3-3 describes the command options.
An example for using JMSUtils to browse the exception queue is as follows:
java com.evermind.server.jms.JMSUtils -username admin -password welcome

	browse jms/Oc4jJmsExceptionQueue
OC4J JMS supports file-based persistence for JMS Destination objects (queues and topics). File-based persistence is discussed more in the following sections:
If persistence is enabled, then OC4J automatically performs the following:
Even if persistence is enabled, only certain messages are persisted to a file. For a message to be persisted, all of the following must be true:
Destination object is defined to be persistent within the persistence-file attribute in the jms.xml file.
DeliveryMode.NON_PERSISTENT) are not persistent.
The complete semantics of which messages are persisted are documented within the JMS specification.
To enable file-based persistence for Destination objects, specify the persistent-file attribute in the jms.xml file. For JMS objects within standalone OC4J, this is all you have to do to enable persistence. The following XML configuration demonstrates how the persistence-file attribute defines the name of the file as pers. See "OracleAS JMS Configuration File Elements for jms.xml" for information on the path and naming conventions for the persistence-file attribute.
<queue name="foo" location="jms/persist" persistence-file="pers">
</queue>
The path for the persistence-file attribute is either an absolute path of the file or a path relative to the persistence directory defined in application.xml; the default path is J2EE_HOME/persistence/<island> for Oracle Application Server environments and J2EE_HOME/persistence for standalone environments.
Oracle Application Server may have multiple OC4J instances writing to the same file directory, even with the same persistence filename. Setting this attribute enables file-based persistence, but also allows the possibility that your persistence files be overwritten by another OC4J instance.
The file-based persistence of OC4J JMS provides recoverable and persistent storage of messages. Each OC4J JMS Destination, which can be either a queue or topic, can be associated with a relative or absolute path name that points to a file that stores the messages sent to the Destination object. The file can reside anywhere in the file system (and not necessarily inside a J2EE_HOME directory). Multiple persistence files can be placed in the same directory; persistence files can be placed on a remote network file system or can be part of a local file system.
The following sections discuss the various aspects of persistence recovery for OracleAS JMS:
OC4J JMS cannot recover from all possible types of failures. If any of the following failures occur, then OC4J JMS does not guarantee the recoverability of the persistence file.
java.io.FileDescriptor.sync() failure--the sync() call does not properly and completely flush all file buffers that are associated with the given descriptor to the underlying file system.
When the OC4J JMS server is running, you must not copy, delete, or rename persistence files currently in use. It is an unrecoverable error to perform any of these actions on any of these files when they are being used by OC4J JMS.
However, when no OC4J JMS server is using a persistence file, you can perform the following administrative and maintenance operations on these files:
Destination name and the file is maintained), pointed to by any suitable path name, to go back to the previous contents of the JMS Destination.
Persistence files cannot be concatenated, split up, rearranged, or merged. Attempting any of these operations will lead to unrecoverable corruption of the data in these files.
In addition to persistence files specified by a user and lock files, OC4J JMS uses a special file, jms.state, for internal configuration and transaction state management. OC4J JMS cleans up this file and its contents during normal operations. You must never delete, move, copy, or otherwise modify this file, even for archival purposes. Attempting to manipulate the jms.state file can lead to message and transaction loss.
The sequence of operations when a JMS client enqueues or dequeues a message or commits or rolls back a transaction is as follows:
If a failure occurs during the pre-persistence or persistence phase, the client receives a JMSException or some other type of error, but no changes are made to the persistence file.
If a failure occurs in the post-persistence phase, the client may receive a JMSException or some other type of error; however, the persistence file is still updated and OC4J JMS recovers as if the operation succeeded.
Lock files prevent multiple OC4J processes from writing into the same persistence file. If multiple OC4J JVMs are configured to point to the same file in the same persistence-file location, then they could overwrite each other's data and cause corruption or loss of persisted JMS messages. To protect against these kinds of sharing violations, OracleAS JMS associates each persistence file with a lock file Thus, each persistence file--for example, /path/to/persistenceFile-- is associated with a lock file named /path/to/persistenceFile.lock. (See "Enabling Persistence" for more information on persistence files.).
OC4J must have appropriate permissions to create and delete the lock file. If OC4J is terminated normally, then the lock files will be cleaned up automatically. However, if OC4J is terminated abnormally, the lock files continue to exist in the file system. Since OC4J cannot distinguish left-over lock files from sharing violations, the user must manually remove all lock files before restarting OC4J after abnormal termination. OracleAS JMS will not attempt to create the relevant persistent JMS destinations if it detects an existing lock file for it.
OC4J JMS never attempts to delete lock files automatically. Lock files must be manually deleted for OC4J JMS to use a given persistence file. The remainder of the discussion in this subsection assumes that all lock files in question have been removed.
|
Note: This manual intervention is required only on abnormal shutdown. See "Abnormal Termination". |
OC4J JMS performs recovery operations on all persistence files as configured in OC4J JMS at the time of abnormal termination. In other words, if OC4J terminates abnormally, the user modifies the JMS server configuration and restarts OC4J, the JMS server still attempts to recover all the persistence files in the original configuration, and once recovery is successful, moves to using the new configuration that is specified.
If recovery of the old configuration fails, the OC4J JMS server does not start. The server must be shut down or restarted repeatedly to give recovery another chance, until recovery is successful.
OC4J JMS caches its current persistence configuration in the jms.state file, which is also used to maintain transaction state. If you wish to bypass all recovery of the current configuration, you can remove the jms.state file, remove all lock files, possibly change the OC4J JMS server configuration, and start the server in a clean-slate mode. (We do not recommend doing this.) If the OC4J JMS server cannot find a jms.state file, it creates a new one.
If, for some reason, the jms.state file itself is corrupted, the only recourse is to delete it, with the attendant loss of all pending transactions--that is, transactions that have been committed, but the commits not yet performed by all individual Destination objects participating in the transactions.
If messaging activity was in progress during abnormal termination, OC4J JMS does its best to recover its persistence files. Any data corruption (of the types mentioned earlier) is handled by clearing out the corrupted data; this may lead to a loss of messages and transactions.
If the headers of a persistence file are corrupted, OC4J JMS may not be able to recover the file, because such a corrupted file is often indistinguishable from user configuration errors. The oc4j.jms.forceRecovery administration property (described in Table 3-5) instructs the OC4J JMS server to proceed with recovery, clearing out all invalid data at the cost of losing messages or masking user configuration errors.
If OC4J terminates normally, the lock files are cleaned up automatically. However, if OC4J terminates abnormally (for example, a kill -9 command), the lock files remain in the file system. Because OC4J cannot distinguish leftover lock files from sharing violations, you must manually remove all lock files before restarting OC4J after abnormal termination. OC4J JMS does not attempt even to create the relevant persistent JMS Destination objects if it detects already existing lock files for them.
The default location of the lock files are in the persistence directory--J2EE_HOME/persistence. (The persistence directory is defined in the application.xml file.) Other locations can be set within the persistence-file attribute of the Destination object.
As an extension to the JMS specification, OC4J JMS comes with a predefined exception queue for handling undeliverable messages. This is a single, persistent, global exception queue to store undeliverable messages in all of its Destination objects. The exception queue has a fixed name (jms/Oc4jJmsExceptionQueue), a fixed JNDI location (jms/Oc4jJmsExceptionQueue), and a fixed persistence file (Oc4jJmsExceptionQueue).
The exception queue is always available to OC4J JMS and its clients, and should not be explicitly defined in the jms.xml configuration file; attempting to do so is an error. The name, JNDI location, and persistence path name of the exception queue must be considered reserved words in their respective name spaces; any attempt to define other entities with these names is an error.
Messages can become undeliverable due to message expiration and listener errors. The following subsection explains what happens to undeliverable messages in the first case.
By default, if a message that was sent to a persistent Destination expires, OC4J JMS moves the message to the exception queue. The JMSXState of the expiring message is set to the value 3 (for EXPIRED), but the message headers, properties, and body are not otherwise modified. The message is wrapped in an ObjectMessage (with appropriate property name and value copies performed as described elsewhere in this chapter) and the wrapping message is sent to the exception queue.
To affect the behavior of what goes into the exception queue, use the oc4j.jms.saveAllExpired property (described in Table 3-5).
The wrapping ObjectMessage has the same DeliveryMode as the original message.
By default, messages expiring on nonpersistent or temporary Destination objects are not moved to the exception queue. The messages sent to these Destination objects are not worth persisting and neither should their expired versions be.
You can move all expired messages, regardless of whether or not they are sent to persistent, nonpersistent, or temporary Destination objects, by setting the oc4j.jms.saveAllExpired administration property (described in Table 3-5) to true when starting the OC4J server. In this case, all expired messages are moved to the exception queue.
The OracleAS JMS server supports paging in and out message bodies under the following circumstances:
Destination object (see "OracleAS JMS File-Based Persistence").
Only message bodies are paged. Message headers and properties are never considered for paging. You set the paging threshold through the OracleAS JMS system property, oc4j.jms.pagingThreshold, which is a double value (narrowed into the range [0,1]) that represents the memory usage fraction above which the OracleAS JMS server will begin to consider message bodies for paging. This value is an estimate of the fraction of memory in use by the JVM. This value can range from 0.0 (the program uses no memory at all) to 1.0 (the program is using all available memory).
The value ranges from somewhere above 0.0 to somewhere below 1.0: it is almost impossible to write a Java program that uses no JVM memory, and programs almost always die by running out of memory before the JVM heap gets full.
For example, if the paging threshold is 0.5, and the memory usage fraction of the JVM rises to 0.6, OracleAS JMS will try to page out as many message bodies as it possibly can until the memory usage fraction reduces below the threshold, or no more message bodies can be paged out.
When a message that has been paged out is requested by a JMS client, the OracleAS JMS server will automatically page in the message body (regardless of the memory usage in the JVM) and deliver the correct message header/body to the client. Once the message has been delivered to the client, it may once again be considered for paging out depending on the memory usage in the server JVM.
If the memory usage fraction drops below the paging threshold, the OracleAS JMS server will stop paging out message bodies. The bodies of messages already paged out will not be automatically paged back in---the paging in of message bodies happens only on demand (that is, when a message is dequeued or browsed by a client).
By default, the paging threshold of the OracleAS JMS server is set to 1.0. In other words, by default, the OracleAS JMS server never pages message bodies.
Depending on the JMS applications, and the sizes of the messages they send/receive, and the results of experiments and memory usage monitoring on real-life usage scenarios, the user should choose a suitable value for the paging threshold.
No value of the paging threshold is ever incorrect. JMS semantics are always preserved regardless of whether paging in enabled or disabled. Control of the paging threshold does allow the OracleAS JMS server to handle more messages in memory than it might have been able to without paging.
This section describes the XML elements for OC4J JMS configuration in jms.xml. The following is the element order structure within the XML file.
<jms-server>
	<queue>
		<description></description>
	</queue>
	<topic>
		<description></description>
	</topic>
	<connection-factory></connection-factory>
	<queue-connection-factory></queue-connection-factory>
	<topic-connection-factory></topic-connection-factory>
	<xa-connection-factory></xa-connection-factory>
	<xa-queue-connection-factory></xa-queue-connection-factory>
	<xa-topic-connection-factory></xa-topic-connection-factory>
	<log>
		<file></file>
	</log>
</jms-server>
The JMS configuration elements are defined below:
jms-server
The root element of the OC4J JMS server configuration.
Attributes:
host--The host name defined in a String (DNS or dot-notation host name) that this OC4J JMS server should bind to. By default, the JMS server binds to 0.0.0.0 (also known as [ALL] in the configuration file). Optional attribute.
port--The port defined as an int (valid TCP/IP port number) to which this OC4J JMS server should bind. The default setting is 9127. This setting applies only to the standalone configuration of OC4J. In the Oracle Application Server, the port setting in the configuration file is overridden by command line arguments that are used (by, for example, OPMN, DCM, and others) when starting the OC4J server. Optional attribute.
queue
This element configures OracleAS JMS queues. The queues are available when OC4J JMS starts up, and are available for use until the server is restarted or reconfigured. You can configure zero or more queues in any order. Any newly configured queue is not available until OC4J is restarted.
Attributes:
name--This required attributes is the provider-specific name (String) for the OC4J JMS queue. The name can be any valid nonempty string (with white space and other special characters included, although this is not recommended). The name specified here can be used in Session.createQueue() to convert the provider-specific name to a JMS queue. It is invalid for both a queue and a topic to specify the same name. However, multiple queues can specify the same name and different locations. There is no default name.
location--This required attribute states the JNDI location (String) to which the queue is bound. The value should follow the JNDI rules for valid names. Within the OC4J JMS container, the location is bound and accessible as is. In application clients, the name is part of the java:comp/env/ JNDI name space, and should be appropriately declared in the relevant deployment descriptors. The java:comp/env/ names can also be used within the container, assuming that the relevant deployment descriptors have been appropriately specified. The location should be unique across all Destination objects and connection factory elements in jms.xml. There is no default.
persistence-file--An optional path and filename (String). The path for the persistence-file attribute is either an absolute path of the file or a path relative to the persistence directory defined in application.xml; the default path is J2EE_HOME/persistence/<island> for Oracle Application Server environments and J2EE_HOME/persistence for standalone environments.
See "Recovery" for more details on the meaning of this attribute. If multiple queue elements with the same name and different locations are declared in jms.xml, then all of them should specify the same value for persistence-file or should not specify the value at all--if at least one of these multiple declarations specifies a persistence-file, that value is used for this queue.
topic
This element configures OracleAS JMS topic. The topics are available when OC4J JMS starts up, and are available for use until the server is restarted or reconfigured. You can configure zero or more topics in any order. Any newly configured topic is not available until OC4J is restarted.
Attributes:
name--This required attributes is the provider-specific name (String) for the OC4J JMS topic. The name can be any valid nonempty string (with white space and other special characters included, although this is not recommended). The name specified here can be used in Session.createTopic() to convert the provider-specific name to a JMS topic. It is invalid for both a queue and a topic to specify the same name. However, multiple topics can specify the same name and different locations. There is no default name.
location--This required attribute states the JNDI location (String) to which the topic is bound. The value should follow the JNDI rules for valid names. Within the OC4J JMS container, the location is bound and accessible as is. In application clients, the name is part of the java:comp/env/ JNDI name space, and should be appropriately declared in the relevant deployment descriptors. The java:comp/env/ names can also be used within the container, assuming that the relevant deployment descriptors have been appropriately specified. The location should be unique across all topics and connection factory elements in jms.xml. There is no default.
persistence-file--An optional path and filename (String). The path for the persistence-file attribute is either an absolute path of the file or a path relative to the persistence directory defined in application.xml; the default path is J2EE_HOME/persistence/<island> for Oracle Application Server environments and J2EE_HOME/persistence for standalone environments.
See "Recovery" for more details on the meaning of this attribute. If multiple queue or topic elements with the same name and different locations are declared in jms.xml, then all of them should specify the same value for persistence-file or should not specify the value at all--if at least one of these multiple declarations specifies a persistence-file, that value is used for this topic.
description
A user-defined string to remind the user for what the queue or topic is used.
connection-factory
JMS domain connection factory configuration. Table 3-4 describes all of the attributes for this element.
queue-connection-factory
JMS domain connection factory configuration. Table 3-4 describes all of the attributes for this element.
topic-connection-factory
JMS domain connection factory configuration.Table 3-4 describes all of the attributes for this element.
xa-connection-factory
XA variants of connection factory configuration. Table 3-4 describes all of the attributes for this element.
xa-queue-connection-factory
XA variants of connection factory configuration. Table 3-4 describes all of the attributes for this element.
xa-topic-connection-factory
XA variants of connection factory configuration. Table 3-4 describes all of the attributes for this element.
log
Log configuration element. Enables logging of the JMS activity in either file or ODL format. See the "Enabling OC4J Logging" section in the Oracle Application Server Containers for J2EE User's Guide for complete information on logging.
Table 3-4 describes all of the attributes for any connection factory definition.
|
Note:
In Table 3-4, the property |
The following code samples show connection factory configuration fragments:
The following configures a connection factory of jms/Cf, a queue connection factory of jms/Qcf, an XA topic connection factory of jmx/xaTcf.
<connection-factory location="jms/Cf">
</connection-factory>

<queue-connection-factory location="jms/Qcf">
</queue-connection-factory>

<xa-topic-connection-factory location="jms/xaTcf"
    username="foo" password="bar" clientID="baz">
</xa-topic-connection-factory>
If you wanted to add a topic connection factory, you must use a unique name. For example, you could not name it with the same name as the connection factory (above) of jms/Cf. Thus, the following would be invalid.
<!-- Invalid: cannot reuse "location"  -->
<topic-connection-factory location="jms/Cf">
</topic-connection-factory>
The following code samples show queue and topic configuration fragments. This segment creates a queue foo and a topic bar.
<queue name="foo" location="jms/foo">
</queue>

<topic name="bar" location="jms/bar">
</topic>
There are certain locations that are reserved and cannot be redefined within the jms.xml configuration file. The following shows how you cannot use the jms/Oc4jJmsExceptionQueue when defining a queue location, as it is a reserved location.
<!-- Invalid: cannot use a reserved "location" -->
<queue name="fubar" location="jms/Oc4jJmsExceptionQueue">
</queue>
When defining a persistence file for queues and topics, you can define the location and the filename. In addition, you can specify multiple persistence files, as long as the persistence filename is the same. Thus, the persistence file is simply written out to two locations for the same queue.
<queue name="foo" location="jms/persist" persistence-file="pers">
</queue>

<!-- OK: multiple persistence file specification ok if consistent -->
<queue name="foo" location="jms/file" persistence-file="pers">
</queue>

<!-- Invalid: multiple persistence file specifications should be consistent -->
<queue name="foo" location="jms/file1" persistence-file="notpers">
</queue>
Alternatively, you cannot have two objects writing out to the same persistence file. Each queue or topic must have their own persistence filename, even if the locations are different.
<topic name="demoTopic" location="jms/dada" persistence-file="/tmp/abcd">
</topic>

<!-- Invalid: cannot reuse persistence-file for multiple destinations -->
<topic name="demoTopic1" location="jms/dada1" persistence-file="/tmp/abcd">
</topic>
OC4J JMS allows runtime configuration of the OC4J JMS server and JMS clients through JVM system properties. None of these properties affects basic JMS functionality--they pertain to OC4J JMS specific features, extensions, and performance optimizations.
Table 3-5 provides a brief summary of these administration properties.
| JVM System Property | Property Type | Default Value |
Server/ Client |
Use |
|---|---|---|---|---|
|
|
long |
|
JMS client |
Interval (in milliseconds) that JMS connections ping the OC4J server and report communication exceptions to exception listeners. |
|
|
long |
|
JMS client |
Maximum interval (in milliseconds) that JMS asynchronous consumers wait before checking the OC4J JMS server for new messages. |
|
|
int |
|
JMS client |
Number of listener delivery attempts, before the message is declared undeliverable. |
|
|
int |
|
OC4J server |
Maximum number of open file descriptors (for persistence files) in the OC4J JMS server; relevant if the server is configured with more persistent |
|
|
boolean |
|
OC4J server |
Save all expired messages on all |
|
|
int |
|
JMS client |
When using TCP/IP sockets for client-server communication, use the specified buffer size for the socket input/output streams. A minimum buffer size of 8 KB is enforced. The larger the size of messages being transferred between the client and server, the larger the buffer size should be to provide reasonable performance. |
|
|
boolean |
|
JMS client |
If |
|
|
boolean |
|
JMS client |
If |
|
|
boolean |
|
OC4J server |
If |
|
oc4j.jms.pagingThreshold |
double value |
1.0 |
OC4J server |
Represents the memory usage fraction above which the OracleAS JMS server will begin to consider message bodies for paging. This value is an estimate of the fraction of memory in use by the JVM. This value can range from 0.0 (the program uses no memory at all) to 1.0 (the program is using all available memory). See "Message Paging" for more information. |
|
oc4j.jms.usePersistenceLockFiles |
boolean |
true |
OC4J server |
Control whether lock files should be used to protect against OracleAS JMS persistence files from being overwritten by more than one OC4J process. By default, lock files are used to protect against accidental overwrite by more than one OC4J process. But this requires users to manually remove lock files when OC4J terminates abnormally. Setting this system property to false does not create lock files for persistent destinations. Set this property to false only if you can guarantee that only one active process accesses each persistence file. Set when starting the OC4J server. It remains in effect for all JMS clients until shutdown. |
OC4J provides a ResourceProvider interface to transparently plug in JMS providers.
The ResourceProvider interface of OC4J allows EJBs, servlets, and OC4J clients to access many different JMS providers. The resources are available under java:comp/resource/. Oracle JMS is accessed using the ResourceProvider interface. See "Oracle JMS" for more information on Oracle JMS.
A custom resource provider can be configured in one of these ways:
application.xml file.
orion-application.xml file of the application.
To add a custom resource provider, add the following to the chosen XML file (as listed above):
<resource-provider class="providerClassName" name="JNDIname"> <description>description</description> <property name="name" value="value" /> </resource-provider>
For the <resource-provider> attributes, configure the following:
class--The name of the resource provider class.
name--A name by which to identify the resource provider. This name is used in finding the resource provider in the application's JNDI as "java:comp/resource/JNDIname/".
The sub-elements of the <resource-provider> are configured as follows:
description sub-element--A description of the specific resource provider.
property sub-element--The name and value attributes are used to identify parameters provided to the resource provider. The name attribute identifies the name of the parameter, and its value is provided in the value attribute.
When retrieving the resource provider, use the following syntax in the JNDI lookup:
java:comp/resource/JNDIname/resourceName
where JNDIname is the name of the resource provider (as given in the name attribute of the <resource-provider> element) and resourceName is the resource name, which is defined in the application implementation. See "Using OJMS as a Resource Provider" for an example of Oracle JMS defined as a resource provider.
Oracle JMS (OJMS) is the JMS interface to the Oracle Database Streams Advanced Queuing (AQ) feature in the Oracle database. OJMS implements the JMS 1.0.2b specification and is compatible with the J2EE 1.3 specification. OJMS access in OC4J occurs through the resource provider interface. For more information about AQ and OJMS, see the Oracle9i Application Developer's Guide--Advanced Queuing for Release 2 (9.2).
Oracle JMS is fully described in the following sections:
To access OJMS queues, do the following:
Destination objects in OJMS. "Create JMS Destination Objects".
<resource-provider> element with information about the back-end database. Create data sources or LDAP directory entries, if needed. See "Define the OJMS Resource Provider".
You or your DBA must install OJMS according to theOracle9i Application Developer's Guide--Advanced Queuing for Release 2 (9.2) and generic database manuals. Once you have installed and configured this JMS provider, you must apply additional configuration. This includes the following:
Destination objects. See "Create JMS Destination Objects".
The following sections use SQL for creating queues, topics, their tables, and assigning privileges that is provided within the JMS demo on the OC4J sample code page on the OTN Web site.
Note:
Create an RDBMS user through which the JMS client connects to the database. Grant access privileges to this user to perform OJMS operations. The privileges that you need depend on what functionality you are requesting. Refer to the Oracle9i Application Developer's Guide--Advanced Queuing for Release 2 (9.2) for more information on privileges necessary for each type of function.
The following example creates jmsuser, which must be created within its own schema, with privileges required for OJMS operations. You must be a SYS DBA to execute these statements.
DROP USER jmsuser CASCADE ;

GRANT connect,resource,AQ_ADMINISTRATOR_ROLE TO jmsuser

   IDENTIFIED BY jmsuser ;
GRANT execute ON sys.dbms_aqadm  TO  jmsuser;
GRANT execute ON sys.dbms_aq     TO  jmsuser;
GRANT execute ON sys.dbms_aqin   TO  jmsuser;
GRANT execute ON sys.dbms_aqjms  TO  jmsuser;

connect jmsuser/jmsuser;
You may need to grant other privileges, such as two-phase commit or system administration privileges, based on what the user needs. See the JTA chapter for the two-phase commit privileges.
Each JMS provider requires its own method for creating the JMS Destination object. Refer to the Oracle9i Application Developer's Guide--Advanced Queuing for Release 2 (9.2) for more information on the DBMS_AQADM packages and OJMS messages types. For our example, OJMS requires the following methods:
|
Note: The SQL for creating the tables for the OJMS example is included in the JMS example available on the OC4J sample code page on the OTN Web site. |
Destination (queue or topic).
In OJMS, both topics and queues use a queue table. The JMS example creates a single table: demoTestQTab for a queue.
To create the queue table, execute the following SQL:
DBMS_AQADM.CREATE_QUEUE_TABLE(
        Queue_table            => 'demoTestQTab',
        Queue_payload_type     => 'SYS.AQ$_JMS_MESSAGE',
        sort_list => 'PRIORITY,ENQ_TIME',
        multiple_consumers  => false,
        compatible             => '8.1.5');
The multiple_consumers parameter denotes whether there are multiple consumers or not; thus, is always false for a queue and true for a topic.
Destination. If you are creating a topic, you must add each subscriber for the topic. The JMS example requires a single queue--demoQueue.
The following creates a queue called demoQueue within the queue table demoTestQTab. After creation, the queue is started.
DBMS_AQADM.CREATE_QUEUE(
      Queue_name          => 'demoQueue',
      Queue_table         => 'demoTestQTab');

DBMS_AQADM.START_QUEUE(
      queue_name         => 'demoQueue');
If you wanted to add a topic, then the following example shows how you can create a topic called demoTopic within the topic table demoTestTTab. After creation, two durable subscribers are added to the topic. Finally, the topic is started and a user is granted a privilege to it.
DBMS_AQADM.CREATE_QUEUE_TABLE(
        Queue_table            => 'demoTestTTab',
        Queue_payload_type     => 'SYS.AQ$_JMS_MESSAGE',
        multiple_consumers  => true,
        compatible             => '8.1.5');
DBMS_AQADM.CREATE_QUEUE( 'demoTopic', 'demoTestTTab');
DBMS_AQADM.ADD_SUBSCRIBER('demoTopic',

                        sys.aq$_agent('MDSUB', null, null));
DBMS_AQADM.ADD_SUBSCRIBER('demoTopic',

                        sys.aq$_agent('MDSUB2', null, null));
DBMS_AQADM.START_QUEUE('demoTopic');
You can define the OJMS resource provider through either the Oracle Enterprise Manager or by hand-editing the XML files, as described in the following sections:
The OJMS provider can be configured using Application Server Console in the JMS section. To add an OJMS provider, select JMS Providers under the Application Defaults column on the Administration page. This brings you to the following page:
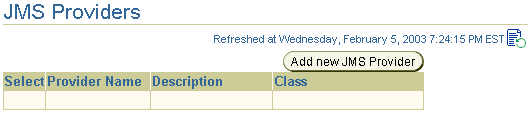
Click the Add new JMS Provider button to configure each JMS provider, which brings up the following page:
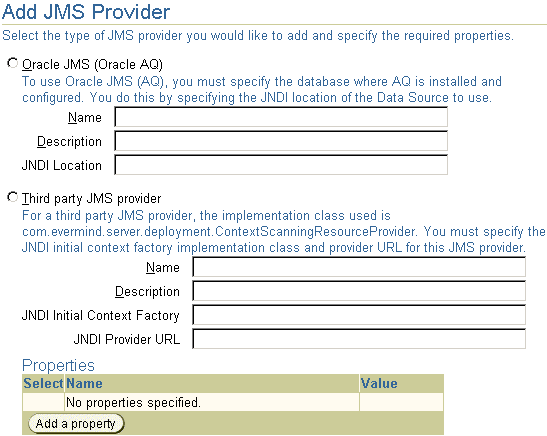
This page enables you to configure either OJMS or a third-party JMS provider. OracleAS JMS is always provided and preconfigured, except for the topics and queues, with the OC4J installation.
Once you choose the type of JMS provider, you must provide the following:
java.naming.factory.initial and java.naming.provider.url, click Add a property. A row is added where you can add the name for each JNDI property and its value.
This only configures the providers; it does not configure the Destination objects (topic, queue, and subscription).
To configure a JMS provider that is only for a specific application, select the application from the Applications page, scroll down to the Resources column, and select JMS Providers. The screens that appear are the same as for the default JMS provider.
Configure the OJMS provider within the <resource-provider> element.
application.xml file.
orion-application.xml file of the application.
The following code sample shows how to configure the JMS provider using XML syntax for OJMS.
<resource-provider class="oracle.jms.OjmsContext" name="ojmsdemo">
   <description> OJMS/AQ </description>
   <property name="datasource" value="jdbc/emulatedDS"></property>
</resource-provider>
where the attributes of the <resource-provider> element contain the following:
class attribute--The OJMS provider is implemented by the oracle.jms.OjmsContext class, which is configured in the class attribute.
name attribute--The name of the OJMS resource provider is ojmsdemo.
In addition, the name/value attributes of the <property> element identifies the data source used by OJMS. The topic or queue connects to this data source to access the tables and queues that facilitate the messaging. In this example, a data source is identified as jdbc/emulatedDS.
How you configure the attributes of the <property> element in the resource provider configuration depends on where your application is running. With OJMS and accessing AQ in the database, the resource provider must be configured using either a data sources property or a URL property, as discussed in the following sections:
Use a data source when the application runs within OC4J. To use a data source, first you must configure it within the data-sources.xml file where the OJMS provider is installed. The JMS topics and queues use database tables and queues to facilitate messaging. The type of data source you use depends on the functionality you want.
The following example contains an emulated data source that uses the thin JDBC driver. To support a two-phase commit transaction, use a non-emulated data source. For differences between emulated and non-emulated data sources, see "Defining Data Sources".
The example is displayed in the format of an XML definition; see the Oracle Application Server Containers for J2EE User's Guide for directions on adding a new data source to the configuration through Oracle Enterprise Manager.
<data-source
  class="com.evermind.sql.DriverManagerDataSource"
  name="OracleDS"
  location="jdbc/emulatedOracleCoreDS"
  xa-location="jdbc/xa/emulatedOracleXADS"
  ejb-location="jdbc/emulatedDS"
  connection-driver="oracle.jdbc.driver.OracleDriver"
  username="jmsuser"
  password="jmsuser"
  url="jdbc:oracle:thin:@myhost.foo.com:1521:mydb"
/>
Customize this data source to match your environment. For example, substitute the host name, port, and SID of your database for myhost:1521:orcl.
|
Note: Instead of providing the password in the clear, you can use password indirection. For details, see the Oracle Application Server Containers for J2EE Services Guide. |
Next, configure the resource provider using the data source name. The following is an example of how to configure the resource provider for OJMS using a data source of jdbc/emulatedDS.
<resource-provider class="oracle.jms.OjmsContext" name="ojmsdemo">
  <description> OJMS/AQ </description>
  <property name="datasource" value="jdbc/emulatedDS"></property>
</resource-provider>
For details on configuring data sources, see "Defining Data Sources".
In this release, the data source is not serializable. Thus, application clients must use a URL definition to access OJMS resources. When the application is a standalone client (that is, when it runs outside of OC4J), configure the <resource-provider> element with a URL property that has the URL of the database where OJMS is installed and, if necessary, provides the username and password for that database. The following demonstrates a URL configuration:
<resource-provider class="oracle.jms.OjmsContext" name="ojmsdemo">
  <description> OJMS/AQ </description>
  <property name="url" value="jdbc:oracle:thin:@hostname:port number:SID">
  </property>
  <property name="username" value="user"></property>
  <property name="password" value="passwd"></property>
The steps for accessing OJMS resources are the same as for OracleAS JMS resources, as listed in "Steps for Sending and Receiving a Message". The only difference is the name of the resource provided in the JNDI lookup.
java:comp/resource" + JMS provider name + "TopicConnectionFactories" or "QueueConnectionFactories" + a user defined name. The user-defined name can be anything and does not match any other configuration. The xxxConnectionFactories details what type of factory is being defined. For this example, the JMS provider name is defined in the <resource-provider> element as ojmsdemo.
ojmsdemo and you decide to use a name of myQCF, the connection factory name is "java:comp/resource/ojmsdemo/QueueConnectionFactories/myQCF".
ojmsdemo and you decide to use a name of myTCF, the connection factory name is "java:comp/resource/ojmsdemo/TopicConnectionFactories/myTCF".
The user defined names, as shown above by myQCF and myTCF, are not used for anything else in your logic. So, any name can be chosen.
Destination is "java:comp/resource" + JMS provider name + "Topics" or "Queues" + Destination name. The Topic or Queue details what type of Destination is being defined. The Destination name is the actual queue or topic name defined in the database.
For this example, the JMS provider name is defined in the <resource-provider> element as ojmsdemo. In the database, the queue name is demoQueue.
ojmsdemo and the queue name is demoQueue, then the JNDI name for the topic as "java:comp/resource/ojmsdemo/Queues/demoQueue."
ojmsdemo and the topic name is demoTopic, then the JNDI name for the topic as "java:comp/resource/ojmsdemo/Topics/demoTopic."
Example 3-4 demonstrates the steps for sending a JMS message; Example 3-5 demonstrates the steps for receiving a JMS message. For the complete example, download the JMS example used in this chapter from the OC4J sample code page on the OTN Web site.
|
Note: For simplicity, most of the error handling is removed in Example 3-4 and Example 3-5. To see the error processing, see the sample code available on the OTN Web site. |
The following method--dosend--sets up a queue to send messages. After creating the queue sender, this example sends out several messages. The steps necessary for setting up the queue and sending out the message are delineated in "Steps for Sending and Receiving a Message".
public static void dosend(int nmsgs) { // 1a. Retrieve the queue connection factory QueueConnectionFactory qcf = (QueueConnectionFactory)
ctx.lookup(
"java:comp/resource/ojmsdemo/QueueConnectionFactories/myQCF"); // 1b. Retrieve the queue Queue q = (Queue)
ctx.lookup("java:comp/resource/ojmsdemo/Queues/demoQueue"); // 2. Create the JMS connection QueueConnection qc = qcf.createQueueConnection(); // 3. Start the queue connection. qc.start(); // 4. Create the JMS session over the JMS connection QueueSession qs = qc.createQueueSession(false, Session.AUTO_ACKNOWLEDGE); // Create a sender on the JMS session to send messages. QueueSender snd = qs.createSender(q);// Send out messages...for (int i = 0; i < nmsgs; ++i) {//Create the message using the createMessage methodMessage msg = qs.createMessage();
// of the JMS session// Send the message out over the sender (snd) using the send methodsnd.send(msg); System.out.println("msg:" + " id=" + msg.getJMSMessageID()); } // Close the sender, the JMS session and the JMS connection. snd.close(); qs.close(); qc.close(); }
The following method--dorcv--sets up a queue to receive messages off of it. After creating the queue receiver, it loops to receive all messages off of the queue and compares it to the number of expected messages. The steps necessary for setting up the queue and receiving messages are delineated in "Steps for Sending and Receiving a Message".
public static void dorcv(int nmsgs) { Context ctx = new InitialContext(); // 1a. Retrieve the queue connection factoryQueueConnectionFactory qcf = (QueueConnectionFactory) ctx.lookup(// 1b. Retrieve the queue Queue q = (Queue)
"java:comp/resource/ojmsdemo/QueueConnectionFactories/myQCF");
ctx.lookup("java:comp/resource/ojmsdemo/Queues/demoQueue"); // 2. Create the JMS connection QueueConnection qc = qcf.createQueueConnection(); // 3. Start the queue connection. qc.start(); // 4. Create the JMS session over the JMS connection QueueSession qs = qc.createQueueSession(false, Session.AUTO_ACKNOWLEDGE); // Create a receiver, as we are receiving off of the queue. QueueReceiver rcv = qs.createReceiver(q); // Receive the messages int count = 0; while (true) { Message msg = rcv.receiveNoWait(); System.out.println("msg:" + " id=" + msg.getJMSMessageID()); ++count; } if (nmsgs != count) { System.out.println("expected: " + nmsgs + " found: " + count); } // Close the receiver, the JMS session and the JMS connection. rcv.close(); qs.close(); qc.close(); }
This section addresses common issues encountered by users of OJMS (AQ/JMS) with Oracle Application Server.
A common error condition seen when using OJMS with the Oracle Application Server is:
PLS-00306 "wrong number or types of arguments"
If you receive this message, then the aqapi.jar file being used in Oracle Application Server is not compatible with the version of the Oracle database being used for AQ. A common mistake is to copy the aqapi.jar file from the Oracle database installation into the Oracle Application Server installation, or vice versa, under the assumption that they are interchangeable. The confusion is due to the Oracle Application Server and the Oracle database both shipping the OJMS client JAR file. Do not copy this file. Use the matrix in Table 3-6 to find the correct version of the database and Oracle Application Server, then use the aqapi.jar file that comes with the Oracle Application Server.
In an Oracle Application Server installation the OJMS client JAR file can be found at ORACLE_HOME/rdbms/jlib/aqapi.jar and should be included in the CLASSPATH.
Table 3-6 summarizes which version of the Oracle database to use with the Oracle Application Server when the OJMS client is running in OC4J. An X indicates that the Oracle database version and the Oracle Application Server version that intersect at that cell are certified to work together. If the intersection has no X, then the corresponding version of the Oracle database and Oracle Application Server should not be used together.
| OracleAS / Oracle database | v9.0.1 | v9.0.1.3 | v9.0.1.4 | v9.2.0.1 | v9.2.0.2+ |
|---|---|---|---|---|---|
|
9.0.2 |
X |
X |
|
X |
|
|
9.0.3 |
|
|
X |
|
X |
|
10g (9.0.4) |
|
|
X |
|
X |
The client sends and receives messages through a JMS Destination object. The client can retrieve the JMS Destination object and connection factory either through using its explicit name or by a logical name. The examples in "Oracle Application Server JMS" and "Oracle JMS" used explicit names within the JNDI lookup calls. This section describes how you can use logical names in your client application; thus, limiting the JNDI names for the JMS provider within the OC4J-specific deployment descriptors. With this indirection, you can make your client implementation generic for any JMS provider.
If you want to use a logical name in your client application code, then define the logical name in one of the following XML files:
application-client.xml file
ejb-jar.xml file
web.xml file
Map the logical name to the actual name of the topic or queue name in the OC4J deployment descriptors.
You can create logical names for the connection factory and Destination objects, as follows:
<resource-ref> element.
<res-ref-name> element.
<res-type> element as either javax.jms.QueueConnectionFactory or javax.jms.TopicConnectionFactory.
Container or Bean) is defined in the <res-auth> element.
Shareable or Unshareable) is defined in the <res-sharing-scope> element.
Destination--the topic or queue--is identified in a <resource-env-ref> element.
The following shows an example of how to specify logical names for a queue.
<resource-ref>
  <res-ref-name>myQCF</res-ref-name>
  <res-type>javax.jms.QueueConnectionFactory</res-type>
  <res-auth>Container</res-auth>
  <res-sharing-scope>Shareable</res-sharing-scope>
</resource-ref>
<resource-env-ref>
  <resource-env-ref-name>myQueue</resource-env-ref-name>
  <resource-env-ref-type>javax.jms.Queue</resource-env-ref-type>
</resource-env-ref>
Then, you map the logical names to actual names in the OC4J deployment descriptors. The actual names, or JNDI names, are different in OracleAS JMS than in OJMS. However, the mapping is defined in one of the following files:
orion-application-client.xml
orion-ejb-jar.xml
orion-web.xml file.
The logical names in the client's deployment descriptor are mapped as follows:
<resource-ref> element is mapped to its JNDI name in the <resource-ref-mapping> element.
Destination defined in the <resource-env-ref> element is mapped to its JNDI name in the <resource-env-ref-mapping> element.
See the following sections for how the mapping occurs for both OracleAS JMS and OJMS and how clients use this naming convention:
The JNDI name for the OracleAS JMS Destination and connection factory are defined within the jms.xml file. As shown in Example 3-1, the JNDI names for the queue and the queue connection factory are as follows:
jms/demoQueue."
jms/QueueConnectionFactory."
Prepend both of these names with "java:comp/env/" and you have the mapping in the orion-ejb-jar.xml file as follows:
<resource-ref-mapping

        name="myQCF"

       location="java:comp/env/jms/QueueConnectionFactory">
</resource-ref-mapping>

<resource-env-ref-mapping

       name="myQueue"

       location="java:comp/env/jms/demoQueue">

</resource-env-ref-mapping>
The JNDI naming for OJMS Destination and connection factory objects is the same name that was specified in the orion-ejb-jar.xml file as described in "Access the OJMS Resources".
The following example maps the logical names for the connection factory and queue to their actual JNDI names. Specifically, the queue defined logically as "myQueue" in the application-client.xml file is mapped to its JNDI name of "java:comp/resource/ojmsdemo/Queues/demoQueue."
<resource-ref-mapping

  name="myQCF"

  location="java:comp/resource/ojmsdemo/QueueConnectionFactories/myQF">
</resource-ref-mapping>

<resource-env-ref-mapping

  name="myQueue"

  location="java:comp/resource/ojmsdemo/Queues/demoQueue">

</resource-env-ref-mapping>
In the Oracle Application Server, a Java application client would access a JMS Destination object by providing the following in the JNDI properties:
java.naming.factory.initial=

   com.evermind.server.ApplicationClientInitialContextFactory
java.naming.provider.url=opmn:ormi://$HOST:$OPMN_REQUEST_PORT:$OC4J_INSTANCE/
java.naming.security.principal=admin
java.naming.security.credentials=welcome
Where:
ApplicationClientInitialContextFactory as your initial context factory object.
In an OC4J standalone environment, a Java application client would access a JMS Destination object by providing the following in the JNDI properties:
java.naming.factory.initial=

   com.evermind.server.ApplicationClientInitialContextFactory
java.naming.provider.url=ormi://myhost/
java.naming.security.principal=admin
java.naming.security.credentials=welcome
Where:
ApplicationClientInitialContextFactory as your initial context factory object.
Once the resources have been defined and the JNDI properties configured, the client sends a JMS message by doing the following:
Destination and its connection factory using a JNDI lookup.
Destination, create a sender for a queue, or a publisher for a topic.
Destination types.
The method of sending a message to a topic is almost the same. Instead of creating a queue, you create a topic. Instead of creating a sender, you create publishers.
The following JSP client code sends a message to a topic. The code uses logical names, which should be mapped in the OC4J deployment descriptor.
<%@ page import="javax.jms.*, javax.naming.*, java.util.*" %>
<%

//1a. Lookup the topic
jndiContext = new InitialContext();
topic = (Topic)jndiContext.lookup("demoTopic");

//1b. Lookup the Connection factory
topicConnectionFactory = (TopicConnectionFactory)
   jndiContext.lookup("myTCF");

//2 & 3. Retrieve a connection and a session on top of the connection
topicConnection = topicConnectionFactory.createTopicConnection();
topicSession = topicConnection.createTopicSession(true,
                                     Session.AUTO_ACKNOWLEDGE);

//4. Create the publisher for any messages destined for the topic
topicPublisher = topicSession.createPublisher(topic);

//5 & 6. Create and send out the message
for (int  ii = 0; ii < numMsgs; ii++)
{
  message = topicSession.createBytesMessage();
  String  sndstr = "1::This is message " + (ii + 1) + " " + item;
  byte[]  msgdata = sndstr.getBytes();
  message.writeBytes(msgdata);

  topicPublisher.publish(message);
  System.out.println("--->Sent message: " + sndstr);
}

//7,8. Close publisher, session, and connection for topic
topicPublisher.close();
topicSession.close();
topicConnection.close();
%>
This section discusses the following third-party JMS providers and how they integrate with OC4J using the resource provider interface:
Here are the operations that the resource provider interface supports:
java:comp/resource/providerName/resourceName
The context-scanning resource provider class is a generic resource provider class that is shipped with OCJ for use with third-party message providers.
WebSphere MQ is an IBM messaging provider. This example demonstrates how to make WebSphere MQ the default resource provider for JMS connections. The WebSphere MQ resources are available in OC4J under java:comp/resource/MQSeries/.
To configure WebSphere MQ, perform the following steps:
<resource-provider> element in orion-application.xml. Use either method to add WebSphere MQ as a custom resource provider. The following demonstrates an example of configuring WebSphere MQ through the <resource-provider> element. You could use the same information to configure through Oracle Enterprise Manager.
<resource-provider

class="com.evermind.server.deployment.ContextScanningResourceProvide
r"
      name="MQSeries">
  <description> MQSeries resource provider </description>
  <property
      name="java.naming.factory.initial"
      value="com.sun.jndi.fscontext.RefFSContextFactory">
  </property>
  <property
      name="java.naming.provider.url"
      value="file:/var/mqm/JNDI-Directory">
  </property>
</resource-provider>
J2EE_HOME/lib:
com.ibm.mq.jar
com.ibm.mqbind.jar
com.ibm.mqjms.jar
mqji.properties
fscontext.jar and providerutil.jar to J2EE_HOME/lib.
SonicMQ is a messaging provider from Sonic Software Corporation. The resource provider interface furnishes support for plugging in third-party JMS implementations. This example describes how to make SonicMQ the default resource provider for JMS connections. The SonicMQ resources are available in OC4J under java:comp/resource/SonicMQ.
To configure SonicMQ, perform the following steps:
<resource-provider> element in orion-application.xml. Use either method to add SonicMQ as a custom resource provider as the message provider and the file system as the JNDI store. The following demonstrates an example of configuring SonicMQ through the <resource-provider> element. You could use the same information to configure through Oracle Enterprise Manager.
<resource-provider

class="com.evermind.server.deloyment.ContextScanningResourceProvider
"
  name="SonicJMS">
   <description>
      SonicJMS resource provider.
   </description>
   <property name="java.naming.factory.initial"
         value="com.sun.jndi.fscontext.RefFSContextFactory">
   <property name="java.naming.provider.url"
         value="file:/private/jndi-directory/">
</resource-provider>
J2EE_HOME/lib:
Sonic_client.jar
Sonic_XA.jar
SwiftMQ is a messaging provider from IIT Software. This example describes how to make SwiftMQ the default resource provider for JMS connections. The SwiftMQ resources are available in OC4J under java:comp/resource/SwiftMQ.
To configure SwiftMQ, perform the following steps:
<resource-provider> element in orion-application.xml. Use either method to add SwiftMQ as a custom resource provider. The following demonstrates an example of configuring SwiftMQ through the <resource-provider> element. You could use the same information to configure through Oracle Enterprise Manager.
<resource-provider

class="com.evermind.server.deloyment.ContextScanningResourceProvider
"
  name="SwiftMQ">
   <description>
      SwiftMQ resource provider.
   </description>
   <property name="java.naming.factory.initial"
      value="com.swiftmq.jndi.InitialContextFactoryImpl">
   <property name="java.naming.provider.url"
      value="smqp://localhost:4001">
</resource-provider>
J2EE_HOME/lib:
swiftmq.jar
See the MDB chapter of the Oracle Application Server Containers for J2EE Enterprise JavaBeans Developer's Guide for details on deploying an MDB that accesses OracleAS JMS or OJMS.
A highly available JMS server provides a guarantee that JMS requests will be serviced with no interruptions because of software or hardware failures. One way to achieve high availability is through fail-over; if one instance of the server fails, a combination of software, hardware and infrastructure mechanisms make sure that another instance of the server takes over the servicing of requests.
Table 3-7 summarizes the support for high availability in OracleAS JMS and OracleAS JMS.
Table 3-7 High Availability Summary
JMS clustering provides an environment wherein JMS applications deployed in this type of environment are able to load balance JMS requests across multiple OC4J instances or processes. Clustering of stateless applications is trivial; the application is deployed on multiple servers and user requests are routed to one of them.
JMS is a stateful API; both the JMS client and the JMS server contain state about each other, which includes informations about connections, sessions and durable subscriptions. Users can configure their environment and use a few simple techniques when writing their applications to make them cluster-friendly.
The following sections discuss how both OJMS and OracleAS JMS use high availability and clustering:
Oracle Application Server JMS (OracleAS JMS) clustering normally implies that an application deployed in this type of environment is able to load balance messages across multiple instances of OC4J. There is also a degree of high availability in this environment since the container processes can be spread across multiple nodes/machines. If any of the processes or machines goes down, then the other processes on an alternate machine continue to service messages.
In this section two JMS clustering scenarios are described:
In this configuration, all factories and destinations are defined on all OC4J instances. Each OC4J instance has a separate copy of each of the destinations. Each copy of the destinations is unique and is not replicated or synchronized across OC4J instances. Destinations can be persistent or in-memory. A message enqueued to one OC4J instance can be dequeued only from that OC4J instance.
This configuration is ideal for high throughput applications where requests need to be load balanced across OC4J instances. No configuration changes are required for this scenario.
In this configuration, a single JVM within a single OC4J instance is dedicated as the JMS server. All other OC4J instances that are hosting JMS clients forward their JMS requests to the dedicated JMS server.
This configuration is the easiest to maintain and troubleshoot and should be suitable for the majority of OracleAS JMS applications, especially those where message ordering is a requirement.
The terms being introduced here are explained in much more detail in the Oracle Application Server 10g High Availability Guide and the Oracle Process Manager and Notification Server Administrator's Guide.
ORACLE_HOME)
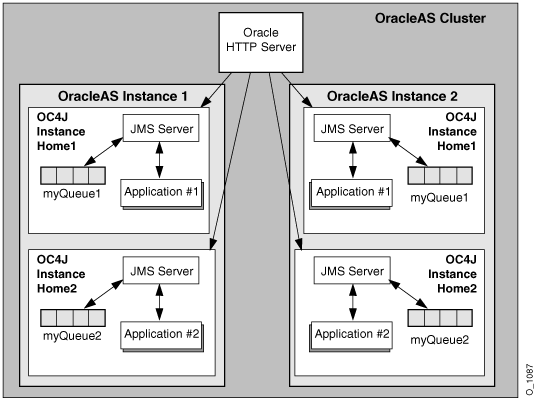
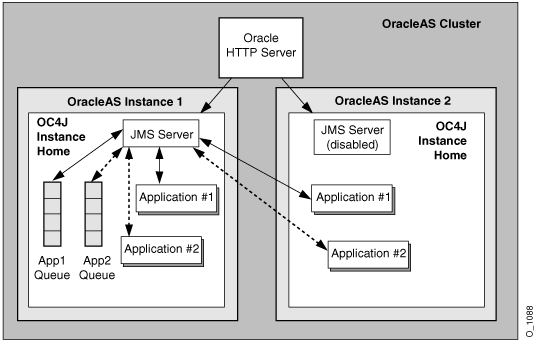
In this configuration OHS services HTTP requests and load balances them across the two Oracle Application Server instances that are in an Oracle Application Server cluster. This of course can scale to more than two Oracle Application Server instances. There are a number of advantages to this type of deployment:
Destination objects can be persistent or in-memory.
Within each Oracle Application Server instance two OC4J instances have been defined. Each of these OC4J instances is running a separate application. In other words, OC4J instance #1 (Home1) is running Application #1 while OC4J instance #2 (Home2) is running Application #2. Remember, each OC4J instance can be configured to run multiple JVMs allowing the application to scale across these multiple JVMs.
Within an Oracle Application Server cluster, the configuration information for each Oracle Application Server instance is identical (except for the instance-specific information like host name, port numbers, and so on). This means that Application #1 deployed to OC4J instance #1 in Oracle Application Server instance #1 is also deployed on OC4J instance #1 in Oracle Application Server instance #2. This type of architecture allows for load balancing of messages across multiple Oracle Application Server instances--as well as high availability of the JMS application, especially if Oracle Application Server instance #2 is deployed to another node to ensure against hardware failure.
The sender and receiver of each application must be deployed together on an OC4J instance. In other words, a message enqueued to the JMS Server in one OC4J process can be dequeued only from that OC4J process.
All factories and destinations are defined on all OC4J processes. Each OC4J process has a separate copy of each of the destinations. The copies of destinations are not replicated or synchronized. So in the diagram, Application #1 is writing to a destination called myQueue1. This destination physically exists in two locations (Oracle Application Server instance #1 and #2) and is managed by the respective JMS servers in each OC4J instance.
It must be noted that this type of JMS deployment is only suited for specific types of JMS applications. Assuming that message order is not a concern messages are enqueued onto distributed queues of the same name. Given the semantics of JMS point-to-point messaging, messages must not be duplicated across multiple queues. In the case above, messages are sent to whatever queue the load balancing algorithm determines and the MDB's dequeue them as they arrive.
In this configuration a single OC4J instance is configured as the dedicated JMS server within an Oracle Application Server clustered environment. This OC4J instance handles all messages, thus message ordering is always maintained. All JMS applications use this dedicated server to host their connection factories, destinations, and service their enqueue and dequeue requests.
Only one OC4J JVM is acting as the dedicated JMS provider for all JMS applications within the cluster. This is achieved by limiting the JMS port range in the opmn.xml file to only one port for the dedicated OC4J instance.
While this diagram shows the active JMS server in the OC4J Home instance, it is recommended that the JMS provider be hosted in its own OC4J instance. For example, while Home is the default OC4J instance running after an Oracle Application Server install, you should create a second OC4J instance with the Oracle Enterprise Manager. In the opmn.xml file example below, you can see that we have created an OC4J instance called JMSserver.
Once we create an OC4J instance called JMSserver, we need to make the following two changes to the opmn.xml file for this Oracle Application Server instance:
JMSserver).
The single JVM in the OC4J instance ensures that other JVMs will not attempt to use the same set of persistent files.
The single port value is necessary to ensure that OPMN always assigns this value to the dedicated JMS server. This port value is used to define the connection factory in the jms.xml file that other OC4J instances will use to connect to the dedicated JMS server.
For more information on OPMN and dynamic port assignments, see the Oracle Process Manager and Notification Server Administrator's Guide.
|
Note: When editing any configuration file by hand (that is, not using Oracle Enterprise Manager), the following Distributed Configuration Management (DCM) command should be run: See the Distributed Configuration Management Reference Guide for more information. |
The following XML from the opmn.xml file shows what changes need to be made and how to find where to make these changes.
JMSserver, then the line denoted by (1) demonstrates where to locate the start of the JMSserver definition.
JMSserver default island. By default, this value is set to 1. This value must always be 1.
<ias-component id="OC4J">
	(1) <process-type id="JMSserver" module-id="OC4J" status="enabled">
		<module-data>
			<category id="start-parameters">
				<data id="java-options" value="-server

					-Djava.security.policy=$ORACLE_HOME/j2ee/home/config/java2.policy

					-Djava.awt.headless=true
				"/>
			</category>
			<category id="stop-parameters">
				<data id="java-options"

					value="-Djava.security.policy=

						$ORACLE_HOME/j2ee/home/config/java2.policy

					-Djava.awt.headless=true"/>
			</category>
		</module-data>
		<start timeout="600" retry="2"/>
		<stop timeout="120"/>
		<restart timeout="720" retry="2"/>
		<port id="ajp" range="3000-3100"/>
		<port id="rmi" range="3201-3300"/>
		(2) <port id="jms" range="3701-3701"/>
		(3) <process-set id="default_island" numprocs="1"/>
	</process-type>
</ias-component>
As already described in this scenario, one of the OC4J instances is dedicated as the JMS server. Other OC4J instances and standalone JMS clients running outside of OC4J will have to be setup to forward JMS requests to the dedicated JMS server. All connection factories and destinations are defined in the JMS server instance's jms.xml file. This jms.xml file should then be copied to all the other OC4J instances that will be communicating with the JMS server.
The connection factories configured in the jms.xml file on the dedicated JMS server should specify, explicitly, the host name and the port number of the server. These values, in particular the port number, should also use the single port number defined by OPMN for the dedicated server as discussed above. The same connection factory configuration should also be used in all of the other OC4J instances so that they all point to the dedicated JMS server for their operations.
Thus, if the dedicated JMS server runs on host1, port 3701, then all connection factories defined within the jms.xml file for each OC4J instance in the cluster should point to host1, port 3701--where this port is the single port available in the opmn.xml file used in the dedicated OC4J instance (in our example, JMSserver) used for the dedicated JMS server.
The destinations configured in the jms.xml file on the dedicated JMS server should also be configured on all of the other OC4J instances; the physical store for these destinations, however, is on the dedicated JMS server.
The following is an example for defining a queue connection factory in the jms.xml file of the dedicated OracleAS JMS server.
<!-- Queue connection factory -->
<queue-connection-factory name="jms/MyQueueConnectionFactory"
	host="host1" port="3701"
	location="jms/MyQueueConnectionFactory"/>
Administrative changes (that is, add a new Destination object) should be made to the dedicated JMS server's jms.xml file. These changes should then be made in the jms.xml files of all other OC4J instances running JMS applications. Changes can be made either by hand or by copying the dedicated JMS server's jms.xml file to the other OC4J instances.
It is up to the user to decide where the JMS application(s) will actually be deployed. While the dedicated JMS server services JMS requests, it can also execute deployed JMS applications. JMS applications can also be deployed to other OC4J instances (that is, Home).
Remember, the jms.xml file from the dedicated JMS server must be propagated to all OC4J instances where JMS applications are to be deployed. JMS applications can also be deployed to standalone JMS clients running in separate JVM's.
OPMN provides the failover mechanism to make sure the dedicated JMS server is up and running. If for some reason the JMS server fails, OPMN will detect this and restart the JVM. If there is a hardware failure then the only way to recover messages is to make sure the persisted destinations are hosted on a network file system. An OC4J instance can then be brought up and configured to point to these persisted files.
See the Oracle Process Manager and Notification Server Administrator's Guide for more information on how OPMN manages Oracle Application Server processes.
High availability is achieved with OJMS by running the following:
Each application instance in an Oracle Application Server cluster uses OC4J resource providers to point to the backend Oracle database, which is operating in RAC-mode. JMS operations invoked on objects derived from these resource providers are directed to the RAC database.
If a failure of the application occurs, state information in the application is lost (that is, state of connections, sessions, and messages not yet committed). As the application server is restarted, the applications should recreate their JMS state appropriately and resume operations.
If network failover of a backend database occurs, where the database is a non-RAC database, state information in the server is lost (that is, state of transactions not yet committed). Additionally, the JMS objects (connection factories, Destination objects, connections, sessions, and so on) inside the application may also become invalid. The application code can see exceptions if it attempts to use these objects after the failure of the database occurs. The code should throw a JMSException until it gets to the point where it can lookup, through JNDI, all JMS administered objects, and proceed from there.
An application that uses an RAC (real application clusters) database must handle database failover scenarios. There are two types of failover scenarios, which is detailed fully in Chapter 4, "Data Sources". The following sections demonstrate how to handle each failover scenario:
The RAC-enabled attribute of a data source is discussed in Chapter 4, "Data Sources". For more information on using this flag with an infrastructure database, see the Oracle Application Server 10g High Availability Guide.
Note:
A standalone OJMS client running against an RAC database must write code to obtain the connection again, by invoking the API com.evermind.sql.DbUtil.oracleFatalError(), to determine if the connection object is invalid. It must then reestablish the database connection if necessary. The oracleFatalError() method detects if the SQL error that was thrown by the database during network failover is a fatal error. This method takes in the SQL error and the database connection and returns true if the error is a fatal error. If true, you may wish to aggressively rollback transactions and recreate the JMS state (such as connections, session, and messages that were lost).
The following example outlines the logic:
getMessage(QueueSesssion session)
{
    try
    {
        QueueReceiver rcvr;
         Message msgRec = null;
        QueueReceiver rcvr = session.createReceiver(rcvrQueue);
         msgRec = rcvr.receive();
    }
    catch(Exception e )
    {
        if (exc instanceof JMSException)
        {
           JMSException  jmsexc = (JMSException) exc;
           sql_ex = (SQLException)(jmsexc.getLinkedException());

           db_conn =
             (oracle.jms.AQjmsSession)session.getDBConnection();

           if ((DbUtil.oracleFatalError(sql_ex, db_conn))
           {
               // failover logic
            }
          }
     }
}
|
Note: Transparent application failover (TAF) is discussed fully in Chapter 4, "Data Sources". |
In most cases where TAF is configured, the application does not notice that failover to another database instance has occurred. So, for the most part, you will not have to do anything to recover from failure.
However, in some cases, an ORA error is thrown when a failure occurs. OJMS passes these errors through to the user as a JMSException with a linked SQL exception. In this case, do one or more of the following:
DbUtil.oracleFatalError method. If it is not a fatal error, the client recovers by sleeping for a short time and then retrying the current operation.
The following shows JMS application code for a queue that is tolerant to server-side failover. This example is valid for both OJMS and OracleAS JMS.
while (notShutdown)
{
 Context ctx = new InitialContext();

 /* create the queue connection factory */
 QueueConnectionFactory qcf = (QueueConnectionFactory)
    ctx.lookup(QCF_NAME);
 /* create the queue */
 Queue q   = (Queue) ctx.lookup(Q_NAME);
 ctx.close();

 try
 {
  /*Create a queue connection, session, sender and receiver */
  QueueConnection qc = qcf.createQueueConnection();
  QueueSession qs = qc.createQueueSession(true, 0);
  QueueSender snd = qs.createSender(q);
  QueueReceiver rcv = qs.createReceiver(q);

  /* start the queue */
  qc.start();

  /* receive requests on the queue receiver and send out
     replies on the queue sender.
  while (notDone)
  {
    Message request = rcv.receive();
    Message reply   = qs.createMessage();

   /* put code here to process request and construct reply */

   snd.send(reply);
   qs.commit();
  }
  /* stop the queue */
  qc.stop();
 }
 catch (JMSException ex)
 {
  if (transientServerFailure)
 { // retry }
 else {
  notShutdown = false;
 }
}
JMSException.
|
|
 Copyright © 1996, 2003 Oracle Corporation. All Rights Reserved. |
|