| Oracle® Warehouse Builder User's Guide 10g Release 2 (10.2.0.2) Part Number B28223-05 |
|
|
View PDF |
| Oracle® Warehouse Builder User's Guide 10g Release 2 (10.2.0.2) Part Number B28223-05 |
|
|
View PDF |
Oracle Warehouse Builder provides a metadata snapshot feature that enables you to backup and restore your metadata, maintain a history of metadata changes, and compare different versions of the metadata.
This section contains the following topics:
This chapter describes the metadata change management feature using the Warehouse Builder GUI. For information about creating and managing snapshots using scripts, refer to the Oracle Warehouse Builder API and Scripting Reference.
A snapshot contains all the information about its objects and the relationships for the object. While an object can only have one current definition in the repository, it can have multiple snapshots that describe it at various points in time. Warehouse Builder supports two types of snapshots:
Full snapshots provide backup and restore functionality.
Signature snapshots provide historical records for comparison.
Snapshots are stored in the database, in contrast to Metadata Loader exports, which are stored as separate disk files. You can, however, export snapshots to disk files.
Snapshots can be useful to both warehouse managers and designers. Managers can use full snapshots to perform large-scale actions, such as deploying a warehouse or restoring a warehouse to a previous point in history. Designers can create full snapshots of a particular component under development so that, if necessary, they can restore the component to its previous state. They can also use signature snapshots to track the changes made to a particular component.
When used with other Warehouse Builder facilities, such as MDL metadata imports and impact analyses, snapshots can help you manage your metadata. For example, you can use snapshots to determine the impact an MDL metadata import will have on the current metadata repository. With the knowledge gained by the comparison, you might import the metadata at a lower level of detail to avoid overwriting the definition of related metadata objects.
Snapshots are also used by Warehouse Builder to support the recycle bin, providing the information needed to restore a deleted metadata object.
Metadata change management enables you to take snapshots that capture the content of your metadata repository, or specific objects in your repository, at a given point in time. You can use a snapshot to detect and report changes in your metadata.
Note:
A snapshot of a collection is not a snapshot of just the shortcuts in the collection but a snapshot of the actual objects.You can create snapshots of any objects that you can access from the Project Explorer.
To open the Create Snapshot wizard and create a snapshot:
In the Design Center Project Explorer, select all the components you want to include in the snapshot. You do not need to select required or child objects, because the wizard does that for you.
For example, if you select a collection containing two cubes, then both the cubes are included in the snapshot. You can optionally add the dimensions, source tables, and so forth automatically.
Right-click and select Snapshot, then New from the pop-up menu.
or
From the Design menu, select Snapshot, then New.
The Welcome page of the Create Snapshot wizard is displayed.
Click Next. The Name page of the wizard is displayed.
Specify a name and the type of snapshot. You can also provide a description (optional).
Click Next to open the Components page of the wizard.
The page displays the components whose snapshot will be taken. If a component is a folder level object, such as a module, then select the Cascade option to include the subcomponents.
Click Next to open the Dependency page.
Specify the depth of dependency to include dependent objects while taking the snapshot.
Click Next. The Finish page is displayed and it provides the details of the snapshot.
Click Finish to create the snapshot.
After you create a snapshot, you can add more components. Keep in mind, however, that when you add components, you are changing the historical record provided by the snapshot, so its creation date changes.
To update a snapshot, use the Add to Snapshot wizard.
To open the Add to Snapshot wizard and add new components:
In the Design Center Project Explorer, select all the components you want to add to the snapshot. For example, you can select tables, mappings, and dimensions from an Oracle module.
From the Design menu, select Snapshot, then Add to Existing.
or
Right-click and select Snapshot, then Add to Existing from the pop-up menus.
The Welcome page of the Add to Snapshot wizard is displayed. The Welcome page lists the steps of the wizard.
Click Next.
The Snapshot page is displayed. From the list, select the snapshot to which you want to add the components.
Click Next.
The Components page is displayed. The page displays the components to be added to the snapshot. If a component is a folder level object, such as a module, then select the Cascade option to include the subcomponents.
Click Next.
The Finish page displays the details of the components to be added.
Click Finish to add the components to the snapshot.
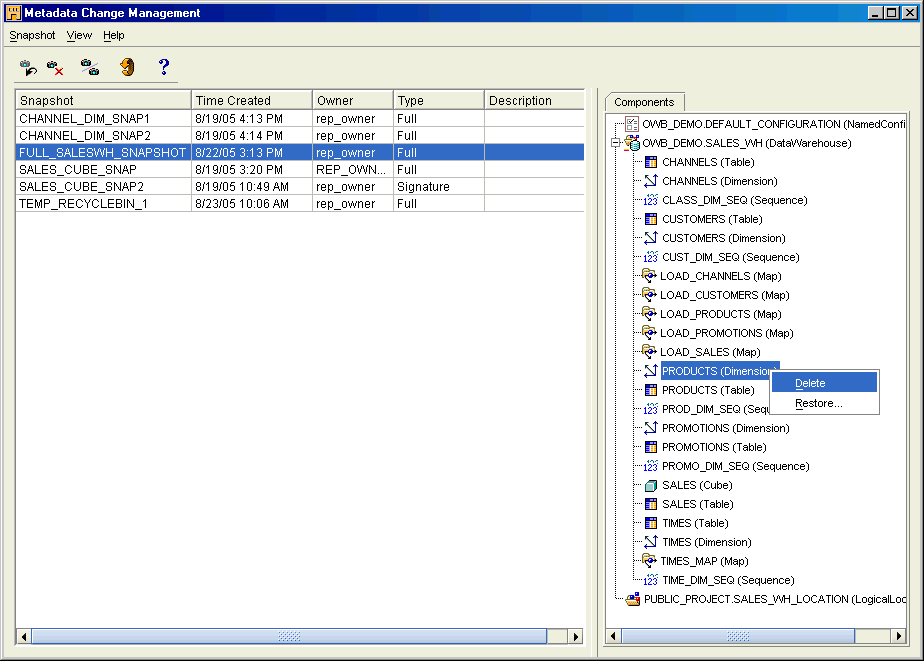
You can manage your snapshots from the Metadata Change Management window in the Design Center. To open this window, select Change Manager from the Tools menu.
The Metadata Change Management window contains a menu bar and a tool bar. You can initiate most tasks in several different ways, either by using the menus, clicking the tools, or right-clicking a snapshot or a component.
You can perform the following activities from the Metadata Change Management window:
Figure 32-1 shows the Metadata Change Management window.
Figure 32-1 Metadata Change Management Window

You can control access to snapshots just like any other Warehouse Builder object. By default, everyone has full access rights to the snapshots.
To change access privileges:
In the left section of the Metadata Change Management window, right-click the name of the snapshot.
Click Security from the menu.
The Snapshot Privilege Management dialog box is displayed.
For each role and user, select the privileges you wish to grant and clear the privileges you wish to deny. Click Help for additional information.
You can compare two snapshots or a snapshot with a current repository object. The results list all objects and identify which objects are identical, which objects appear only in one place, and which objects appear in both but are not the same.
If you take a snapshot of a parent object and a child object changes, a snapshot comparison will show the parent object as having changed. For example, if you create a Cascade snapshot of a project, all the modules in that project are its children. If any of the modules change, a comparison of the snapshot to the repository will show that the project has changed.
The Metadata Change Manager uses Universal Object Identifiers (UOIDs) as the basis for all comparisons. When you delete an object and re-create it with the same metadata, the object has a different UOID although it may be identical to the deleted object in all other aspects. When you compare the re-created object to its original version, the results show that all the metadata has changed. Likewise, objects will not match if they have been deleted and re-created during an import or Intelligence Object derivation.
Use one of the following methods:
From the Metadata Change Management window, select Compare from the Snapshot menu.
Or
Select the two snapshots you want to compare, right-click, and select Compare from the menu.
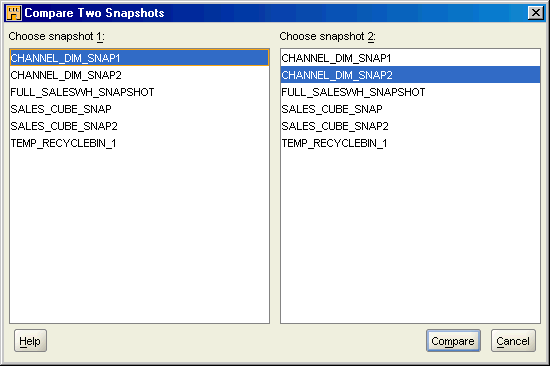
The Compare Two Snapshots dialog box is displayed, as shown in Figure 32-2. Snapshots that were selected in the Metadata Change Management window are also selected in the Compare Two Snapshots dialog box.
If you have not selected two snapshots for comparison yet, select one from each list.
Click Compare.
The Snapshot Comparison window displays the differences between the two objects. If there are none, then a message informs you that the objects are the same. For more information, click Help.
Figure 32-2 Compare Two Snapshots Dialog Box

To compare the current version of an object with a snapshot version:
Select the object you want to compare from the Design Center Project Explorer.
Right-click, select Snapshot, and then Compare.
The Choose Snapshot dialog box is displayed with a list of all the snapshots containing versions of that object.
Select the snapshot you want to compare with the current repository object.
Click OK.
The Snapshot Comparison window displays the differences between the two objects. If there are none, then a message informs you that the objects are the same.
You can convert full snapshots to signature snapshots when they are no longer needed for backup. Conversion preserves the snapshot history and results in significant space savings in your repository.
Note:
Converting a full snapshot to a signature snapshot means that you can no longer use that snapshot to restore metadata objects.To convert a full snapshot:
Open the Metadata Change Management window, as described in "Managing Snapshots".
Select the snapshot that you want to convert.
From the Snapshot menu, choose Convert to Signature.
On the Warehouse Builder Warning box, click Yes.
You can replace the current definition of an object in the repository with the snapshot image of that object. You can only use full snapshots; you cannot restore objects from signature snapshots. You can restore all components or only selected components of the snapshot.
Note:
When you restore a collection from a snapshot, you restore both the collection and the actual objects.Similarly, when you restore a container, all its child objects are also restored.
To restore only the collection or selected objects within a container, use the Components tab.
To restore objects from a snapshot:
Save any work that you have done in the current session.
Open the Metadata Change Management window, as described in "Managing Snapshots".
Select the snapshot that contains the version of the objects you want to restore.
To restore all objects, right-click the snapshot and select Restore from the menu.
or
To restore selected components, select them on the Components tab, right-click, and choose Restore from the menu.
The Restore Snapshot dialog box is displayed, as shown in Figure 32-3.
Review the objects in the list and verify that the correct objects will be restored.
Click Restore.
You can export a full snapshot to an MDL file and use this file to re-create metadata objects either in the same database or a different one. You cannot export signature snapshots or individual components of a snapshot.
To export a snapshot:
Open the Metadata Change Management window and select the full snapshot you want to export.
From the Snapshot menu, choose Export.
The Metadata Export dialog box is displayed.
Click Help for information about completing the dialog box.
To import a snapshot:
Open the Design Center and choose Import from the Design menu.
Choose Warehouse Builder Metadata from the menu.
The Metadata Import dialog box is displayed.
Click Help for information about completing the dialog box.
The imported snapshot will be listed in the Metadata Change Management window.
You can delete snapshots or components within a snapshot from the Metadata Change Management window.
To delete a snapshot:
Open the Metadata Change Management window and select the snapshot you want to delete.
Right-click the snapshot and select Delete from the menu.
Or
From the Snapshot menu, select Delete.
Warehouse Builder displays a delete confirmation box.
Click Yes to delete the selected snapshot from the repository.
To delete components from a snapshot:
Open the Metadata Change Management window and select the snapshot from which you want to delete components.
On the Components tab, select the components, right-click, and select Delete from the pop-up menu.
Or
From the Snapshot menu, select Delete.
Warehouse Builder displays a delete confirmation dialog box.
Click Yes to delete the selected component from the snapshot.