|
Applications Administration Guide > Enterprise Selling Process >
Charting the Organization's Reporting Structure
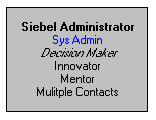
The Organization Chart displays nodes (boxes) that contain information for each of the contacts you have analyzed and associated with the account or contact. Figure 34 shows a contact node with associated information.
You can visually represent the formal hierarchy in the organization by creating the Organization Chart for the account or unit. To represent a reporting structure
- In the Organization Chart view, select the contact node and drag it beneath the node that represents the manager of the contact.
After you drop the contact node on the manager node, a line between the nodes appears, reflecting the reporting relationship.
- Repeat this process for each contact until you have completed the organization chart.
NOTE: The reporting relationships are also stored in the Contacts list (toggle view). Information about the manager of the contact appears in the fields Manager Last Name, and Manager First Name. To expose this information in the list, click the menu button, and then select Columns Displayed.
To delete contacts from the organization chart
- In the Organization Chart view, select the contact node, right click, and choose Edit > Delete from the menu.
You can also delete a contact by selecting the contact node, and then pressing the DELETE key.
- To confirm the deletion, click OK.
When you delete a contact, the contact is removed from the contacts list as well as the organization chart.
Using the Organization Chart to Draw Lines of Influence
You can also map the political structure in the account or unit organization by identifying informal lines of influence for contacts. This feature helps you identify contacts who are not highly ranked (and are easier to access) but who have significant influence on key decision makers. Lines of Influence information is automatically updated in the Relationships view of the Contacts screen. You can add lines of influence in the Relationships view if you prefer. To draw a line of influence
- In the Organization Chart view, select the contact, and then simultaneously hold down the CTRL key on your keyboard.
- Select the contact node, and then drag and drop the contact node onto other contacts to draw the lines of influence.
The CTRL key must be depressed throughout this process for the informal line of influence to appear.
To delete lines of influence
Printing the Organization Chart
You can print the Organization chart for distribution to your sales team. NOTE: The Organization Chart does not print in the Account Plan Report or Account Map Report. You must print it from the Organization Chart view using the right-click menu.
To print an organization chart
- In the Organization Chart view, right-click your mouse.
- From the menu, choose the Zoom level at which you want to print the chart.
|