Release 10.1.3.4
Part Number E12187-01
Contents
Previous
Next
| Oracle Business Intelligence Publisher Report Designer's Guide Release 10.1.3.4 Part Number E12187-01 | Contents | Previous | Next |
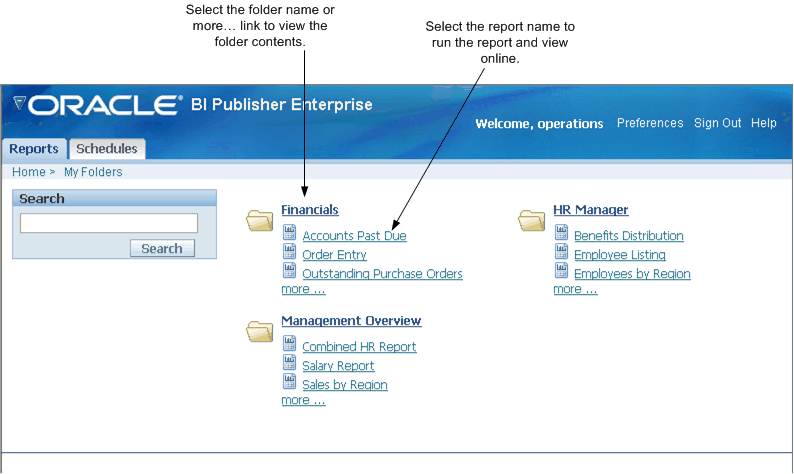
The Reports home page offers different functionality depending on your user permissions.
To view a report
Navigate to the report.
The Reports home page displays two main reports folders.
Shared Folders contains the reports and folders you have been granted access to based on your role
My Folders contains the reports and folders your administrator has assigned to you and the reports you have created (if you have the BI Publisher Developer or Administrator role).
Each folder displays the first three items (reports or folders) contained in the folder. To see additional items contained in a folder, either select the folder name, or select the more link.
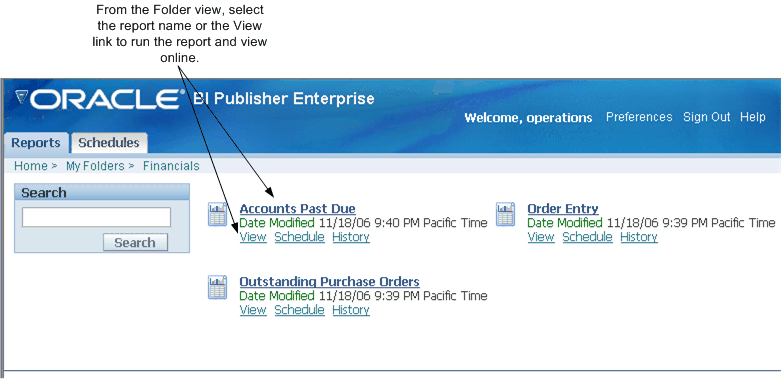
Viewing a Report
From the Reports home page, select the report name; or, from the Folder view, select the View link for the report. This will run the report using the default options and display it in your browser.
Note: Some reports may not allow online execution. For these reports, the View link will not display. Select Schedule to schedule a report run. See Scheduling a Report.
Folder View
Depending on the report definition and your user permissions, you may be presented with the following options:
Change parameter values - if the report includes parameters, these are presented on the View page. To display the report with new parameter values, enter the values and select View.
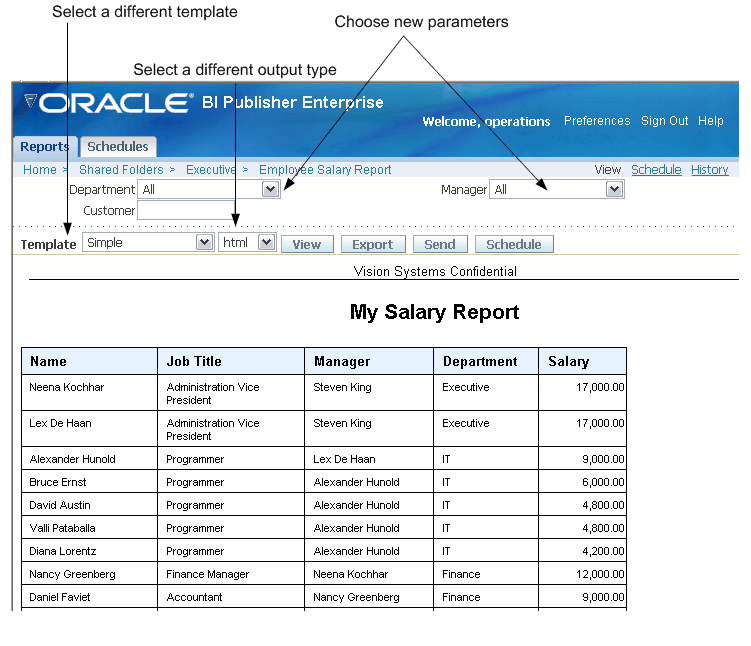
Change the report template - if multiple templates are available they will be displayed in the Template list. Select a new template, then select View.
Change the output type - if multiple output types are available, select the desired output type from the list and select View. The output will be rendered in your browser. Possible values are:
HTML - (Hypertext Markup Language) formats the report for browser viewing. -
PDF - (Portable Document Format) - opens the report in Adobe Acrobat reader.
RTF - (Rich Text Format) will open your report in Microsoft Word.
Excel - choose this output type if you have Microsoft Excel 2003 or later installed. This option generates an MHTML format file that can be opened in Excel 2003 or later. This option supports embedded images, such as charts and logos.
Excel2000 - choose this output type if you have Microsoft Excel 2000 or 2002. Note that although Excel2000 is a new choice, it is actually the Excel option that was available in previous releases. This option generates HTML that can be opened in Excel. It does not support embedded images.
PowerPoint - requires Microsoft PowerPoint 2003 or later.
MHTML - (Mime HyperText Markup Language) this format enables you to save a Web page and its resources as a single MHTML file (.mht), in which all images and linked files will be saved as a single entity. Use this option if you want to send or save HTML output and retain the embedded images and stylesheet formatting.
CSV - displays the data in comma separated value format. The data must be in a simple <rowset>/<row> structure.
Data - displays the report data as XML.
Flash - displays output for Flash templates. You must have the Adobe Flash Player Plug-in installed for your Web browser.
Export the report - select the Export button to export the report to the default application for its output type (for example: Adobe Acrobat for pdf output or Microsoft Excel for excel output).
Send the report - select the Send button to invoke the Destination dialog. Select the delivery method (Email, Printer, Fax, FTP or Web Folder) and enter the appropriate information for your choice.
Note: To Send a report to the Printer or Fax, you must first change the output type to PDF and select View. Then selectSend.
Link to this report - enables you to copy a link to the report you are currently viewing. When you select one of the options, a dialog is invoked that displays the URL to the report. You can choose from the following modes:
Current Page - displays the link to the current page as shown.
No header - displays the URL to the current report without the logo, tabs, or navigation path.
No parameters - displays the URL to the current report without the header or any parameter selections. The controls, such as Template selection, View, Export, and Send will still be available.
Document - displays the URL to the current report document only. No other page information or options will be displayed.
Note: Link to this Report is a report property that can be disabled by the report designer. See Using the Report Editor for information on setting this property.
Access to the following functions must be granted by the System Administrator and may not be available to all users:
Schedule a report - see Scheduling a Report.
Invoke Analyzer - see Using the Online Analyzer.
Invoke Excel Analyzer - see Using the BI Publisher Analyzer for Excel.
Note: Your system administrator must assign you access to this feature.
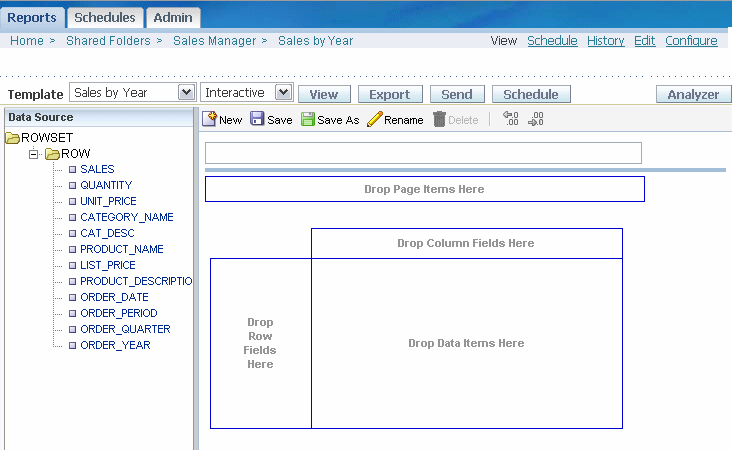
The online Analyzer enables you to create ad hoc analyses of your data by quickly dragging and dropping your report data elements into a cross tab structure. You can then save this interactive analysis as a template for the report to so that you do not have to rebuild your analysis each time you view the report. The interface enables you to easily rearrange and pivot your data by dragging items to different row, column or summary positions.
You can filter the data displayed in your pivot table by defining page-level data items. Drag and drop the desired field to the Page item area and then choose from the values that immediately populate the list.
After selecting all the data items for the table, choose whether to view the Sum, Average, or Count of the data items.
This topic contains two procedures:
The Analyzer toolbar enables you to perform the following functions:
New - if you are currently viewing your report data through an analyzer template or ad hoc table you have created, you can click New to be presented with a clean crosstab structure to build a new analysis. If you want to save the existing analysis, be sure to click Save before you click New.
Save - saves the current analysis as a template.
Save As - saves the current analysis as a new template. Use this option if you have manipulated an existing analyzer template and wish to save your new analysis as a new template.
Rename - enables you to rename the current analyzer template.
Delete - deletes the analyzer template and clears the analyzer interface.
Move decimal left - click once to display additional decimal positions. You can click multiple times.
Move decimal right - click one to remove the display of a decimal position. You can click multiple times.
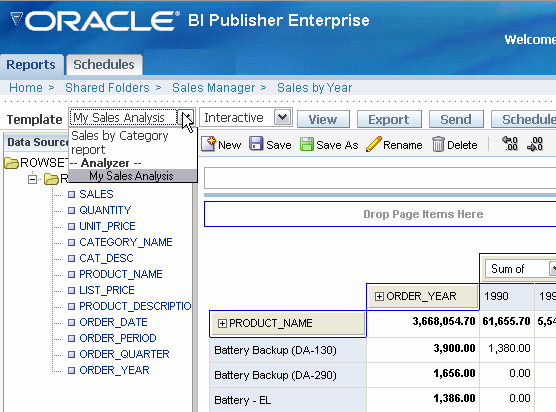
The following example displays the usage of the Analyzer with a simple Sales Analysis report:
Select the Analyzer button from the View Report page.
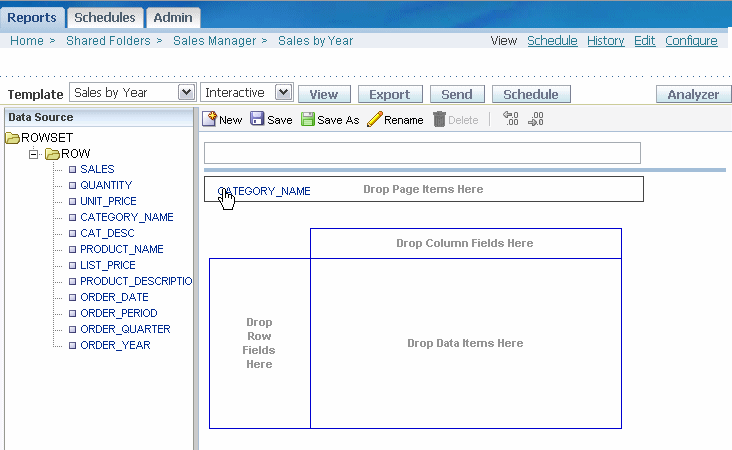
The Analyzer interface displays the list of data fields on a pane and an empty crosstab structure on the adjacent pane, as shown in the following figure.
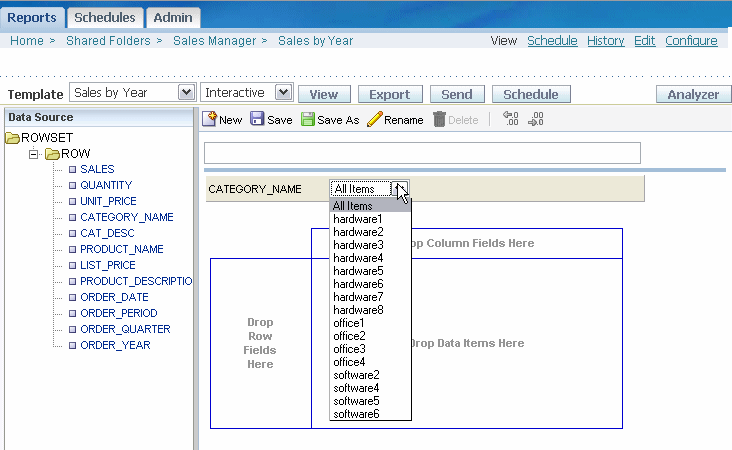
To filter by CATEGORY_NAME, drag the item to the Page Items region, as shown in the following figure:
Now you can choose a value from the CATEGORY_NAME list to filter the page data:
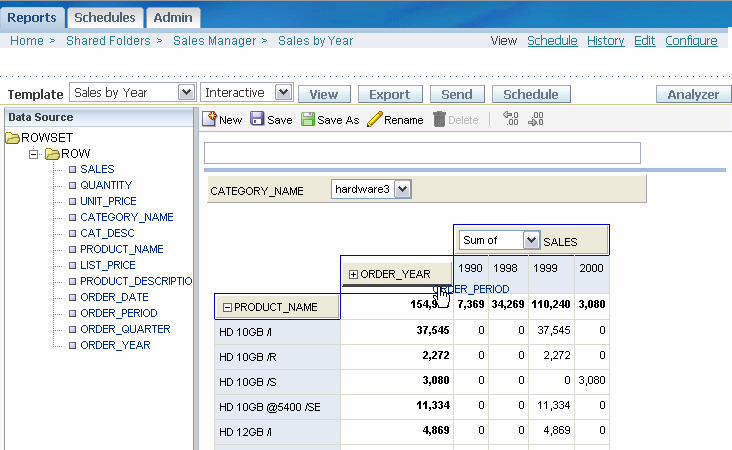
To view product sales by year, drag PRODUCT_NAME into the Row Field area, and drop ORDER_YEAR into the Column Field area. Drop the SALES data into the table body area, as shown in the following figure:

You can now see the calculated sales totals as a sum of the data items.
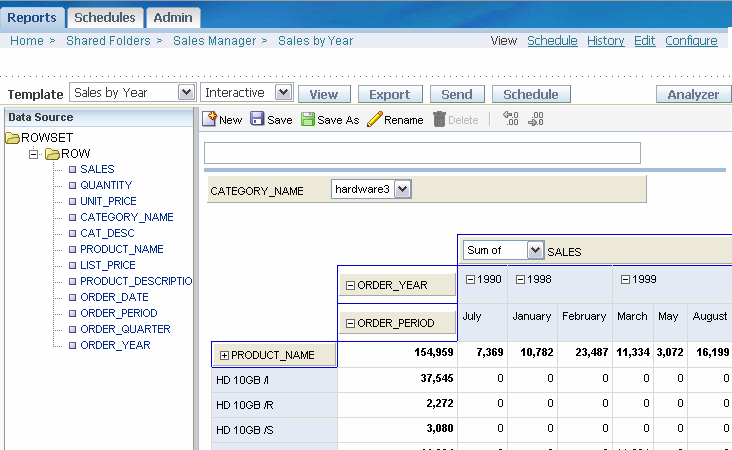
Add the dimension of ORDER_PERIOD to the table by dragging the data item over the ORDER_YEAR. Now you can click the ORDER_YEAR to open it up to display each ORDER_PERIOD total. Click again to close the item and view only the ORDER_YEAR total.
Saving Your Analysis as a Template
To save your analysis as a template that you can view later:
Click Save, or if you have manipulated an existing template, click Save As.
At the prompt, enter a new Template Name. A confirmation message displays to indicate the template has been saved successfully. The analyzer template will be added to the Template list under the Analyzer heading, and the output type will be displayed as Interactive.
To view your template next time you view the report, select it from the Template list, as shown in the following figure:
Note: Your system administrator must assign you access to this feature.
Microsoft .NET Framework 2.0
If not installed on your computer, you will be prompted to download it the first time you use the Analyzer for Excel.
Microsoft Excel 2000 or later
Note: If you are using Windows Vista you must use the Analyzer for Excel link available from the Developer Tools region to install the Analyzer for Excel. If you are using another supported client operating system, you will be prompted to download the Analyzer for Excel the first time you click the Analyzer for Excel button.
The Analyzer for Excel offers two modes: Client access enabled and Client access disabled. The mode is set at the report level. The client access enabled mode is the default mode and is described in this section. For information on the client access disabled mode, see the description of the property Disable Client Access from Analyzer for Excel.
The Analyzer for Excel enables you to:
Export the results of the report query to an Excel spreadsheet.
Log in to BI Publisher Enterprise from Excel to refresh your data, apply new parameters, and apply a template to the report data.
Create Excel templates and upload them to the BI Publisher server
Access and run your reports from an Excel session.
Select the Excel Analyzer button from the View report page. You will be prompted to Save or Open the report .xls file.
When you open the file, select Enable Macros from the Excel dialog.
Note: You must enable macros to use the Analyzer for Excel.
The report data will render in your Excel application window and the Oracle BI Publisher menu will appear on your Excel menu bar. Note that the data are the results of the report query with no template and default filtering applied.
You can now manipulate the data as you wish in Excel.
If the report has parameters, the parameter names will appear at the top of the sheet, but you must log in to apply new parameter values. See Using the Oracle BI Publisher Menu.
You must log in to enable all the menu commands.
Login – allows you to log in to the BI Publisher server.
Note: If you do not have Microsoft .NET Framework 2.0 installed on your computer, you will be prompted to download it. Select the URL and follow the instructions on the Microsoft Web site to download and install .NET. If you do not wish to install .NET, click OK to close the message window.
If this is the first time you have used the Analyzer for Excel, or if you do not have the latest version of Analyzer for Excel, you will be prompted to install the latest version.
Show Report Parameters – displays the updateable parameters and available templates for the report in a toolbar.
Analyzer for Excel Toolbar
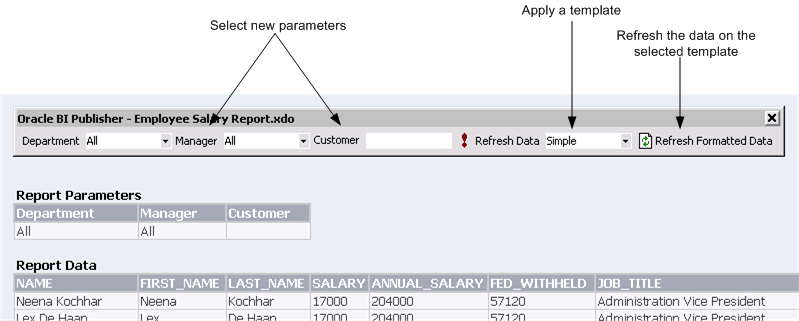
To update the data, select a new parameter value then select Refresh Data to refresh the data in the current sheet.
To apply a template, select the template, then select Refresh Formatted Data. This will download the report as HTML into a new worksheet. Select the new worksheet to see the data with the new template applied.
Note: The template you select must have HTML as an available output.
To change the parameters from this worksheet, select the new values, then select Refresh Data, then select Refresh Formatted Data.
Update Excel Template
If you used the Open Template dialog to download a template from the BI Publisher server, use this option to upload the updated layout back to the server.
Add as New Excel Template -
If you used the Open Template dialog to download a template or to open a report from the BI Publisher server, use this option to upload the layout to the server. Also use this option to upload modifications to an existing template under a different name.
Note that if you created any charts on a separate worksheet the charts cannot be scheduled and viewed within BI Publisher Enterprise. Only charts that you create on the same worksheet that is downloaded by the Excel Analyzer can be updated and viewed within the BI Publisher application.
View Report Online
Launches the View report page.
Browse for Reports Online
This dialog enables you to select reports from the BI Publisher Report Server or the Oracle BI Answers server. You can either load the report data to create a new template, or download an existing template to update it or to use as a starting point for a new template.
When you use the Open Template dialog to initiate the template building process, you can then use the Update Excel Template options from the Oracle BI Publisher Menu to upload the template directly to the appropriate report in the BI Publisher server.
From the Oracle BI Publisher menu, select Open Template.
Workspace
The default workspace is the Oracle BI Publisher server; you can also select Oracle BI to connect to the Answers server. Browse the directory structure of the workspace to select the desired report. Select a folder to display its contents in the Reports pane.
Reports Pane
The Reports pane lists the reports in the selected directory. Select a report to display the available templates in the Layout Templates pane.
Open Report
Loads the XML data of the selected report to the Template Builder.
Open Layout Template Downloads and opens the selected template in the Template Builder and loads the XML data.
To start a new template, select <New> from the list of templates then select Open Layout Template; or double-click <New>.
Use the Report Browser’s Up icon to move up the directory structure.
Use the View As menu to view the folder contents as Large Icons, Small Icons, List or Details.
Preferences - select your locale and proxy settings if required.
Once you have installed the Analyzer for Excel, you can log in to the BI Publisher Enterprise server any time from Excel, you do not have to log in to BI Publisher first.
Once you have Excel open, simply select Log in from the Oracle BI Publisher menu. The BI Publisher Enterprise log in screen will prompt you to enter your credentials and to select (or enter) the Report Server URL.
To schedule a report:
Select the name of the folder that contains the report to access the Folder view; or, select the report name to View the report.
Select the Schedule link.
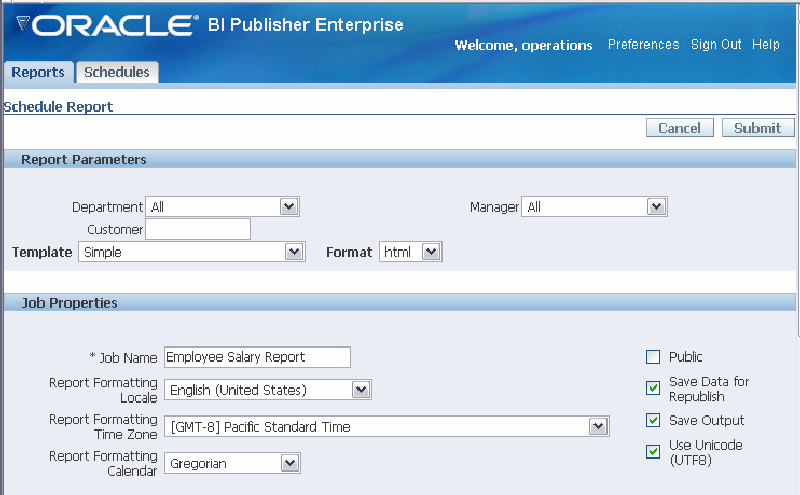
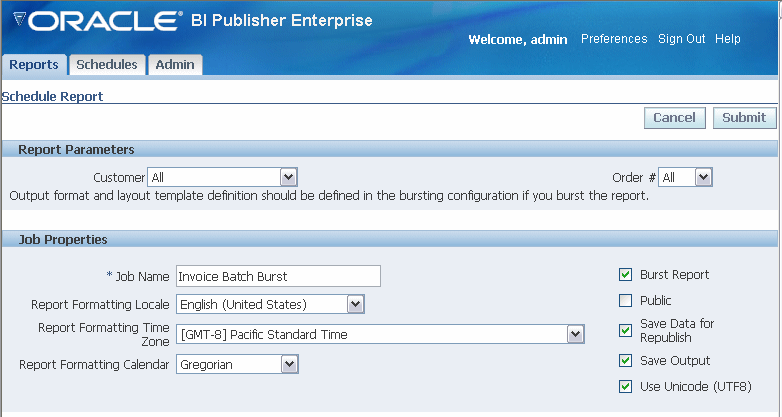
On the Schedule Report page, enter the following:
Report Parameters (if applicable) - if the report definition includes parameters, select the desired values for this submission.
If this report is to be burst, select the Burst Report check box, under Job Properties. For more information on report bursting, see Scheduling a Report to be Burst.
Template - select the layout template to apply to the report. You can apply one template per job submission. If you selected Burst Report, this option will not be available.
Format - select the output format. If you selected Burst Report, this option will not be available.
Job Name - enter a name for your report run.
Report Formatting Locale - Select the language-territory combination for the report. This field defaults to the Report Locale defined in the user Preferences (see Setting Preferences).
Note: A report must have an available template translation for the selected locale. If not, BI Publisher will apply a locale fallback logic to select the template. For more information, see Locale Selection Logic.
The appropriate number and date formatting will be applied independently of the template translation.
Report Formatting Time Zone - select the time zone that you want use for the published report. The time zone defaults to the time zone of the BI Publisher server.
Report Formatting Calendar - select the calendar to apply to the date.
Burst Report - select this check box if you wish this report run to be burst. See Scheduling a Report to be Burst.
Public - select this check box to make this job available to all users with access to the report. Users with access can view the report from the History page.
Save data for Republish - select this check box if you want the XML data from the report run saved.
Save Output - select this check box if you want the report output saved. You must select this option if you want to view your report from the History page.
Use Unicode (UTF8)
Schedule Report Page
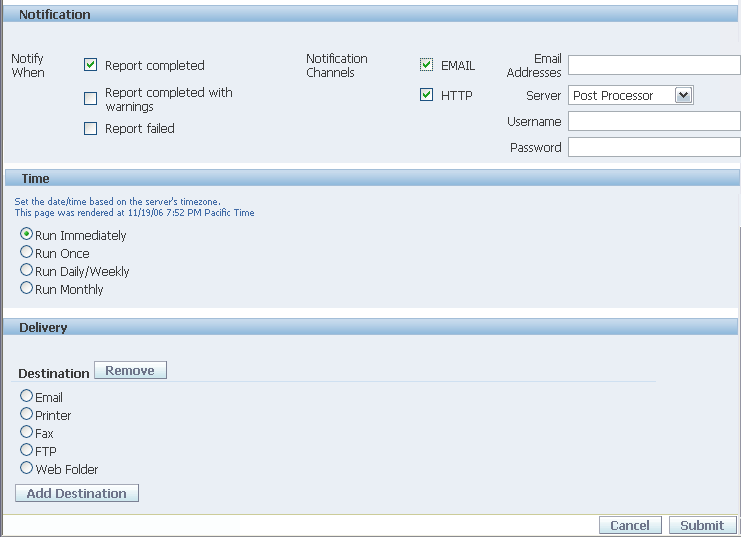
Select a notification option if desired.
If you wish to send a notification by e-mail:
Select the report completion status or statuses for which you want to be notified, and enter a comma-separated list of addresses to which to send the notification.
If you wish to send an HTTP notification:
Select the report completion status or statuses for which you want the notification to be sent. Select the server to which to send the HTTP notification. Enter the user name and password for the server, if required.
Note that the HTTP server must be set up as a delivery option by the Administrator for the HTTP notification to be available. For more information, see Set Up an HTTP Server, Oracle Business Intelligence Publisher Administrator's and Developer's Guide.
Enter the Time criteria.
If you select Run Once, select the Run Date and Run Time.
If you select Run Daily/Weekly select the days of the week, the Run Time, Active Start Date to begin the recurring job and the Active End Date to end the recurring schedule.
If you select Run Monthly, select the month, the day of the month to run the report, the Run Time, the Active Start Date to begin running the report and the Active End Date. To select multiple days of the month to run the report, enter each day separated by a comma (example: 1,15,28).
Select the Destination mode and enter the appropriate fields for your selection. To deliver via multiple channels, select the Add Destination button and continue adding destinations as needed.
If you do not wish to choose any of these destinations, leave this region blank. Select the Save output check box in the Job Properties region to view the output from the History page. See Viewing Report History.
Note that delivery options must be set up by your Administrator. For more information, see Setting Up Delivery Options, Oracle Business Intelligence Publisher Administrator's and Developer's Guide.
Email - enter multiple e-mail addresses separated by a comma. Enter any Body text that you want to include with the report.
Printer - Select the Printer Group and the Printer, enter the Number of copies, and select Single sided or Double sided (the printer must support duplex printing for this option to take effect), the optionally select the printer Tray from which to print the report, and the Pages to print if you do not wish to print the entire report.
Fax - select the Fax server to deliver the report and enter the Fax number to which to send the report.
FTP
FTP Server - select the server to deliver the report.
Username - enter a valid username for the server.
Password - enter a valid password.
Remote Filename - enter the full path to the file on the remote server. (Example: /home/user/myreport.pdf)
Use Secure FTP - select the check box to use secure FTP.
Web Folder
Web Folder Server - select the server to deliver the report.
Username - enter a valid username for the server.
Password - enter a valid password.
Remote Filename - enter the full path to the file on the remote server. (Example: /public/myreport.pdf)
Select Submit. This will invoke the Schedules page where you can monitor your report. See Managing Your Scheduled Reports.
If your report has been enabled for bursting, the Schedule Report page will include a Burst Report option under the Job Properties region. Once you select this option, the Template and Format parameters and the Delivery options for the report run are disabled because these parameters are defined in the delivery dataset defined for the report. See Enabling a Report for Bursting for more information on bursting set up.
Oracle Enterprise Performance Management Workspace (Workspace) is a component of Oracle's Hyperion Foundation Services. It is the central Web interface for users to access all Performance Management content and tools. With its ease-of-use and flexibility, Workspace provides users with a "windows-on-the-Web" experience.
Oracle BI Publisher can be integrated into the Oracle Enterprise Performance Management Workspace, Fusion Edition 11.1.1 release.
For information on setting up the integration between BI Publisher and EPM Workspace, see Setting Up Integration with Oracle Enterprise Performance Management Workspace, Oracle Business Intelligence Publisher Administrator's and Developer's Guide. After you configure Oracle BI Publisher to run within EPM Workspace, you can begin using BI Publisher, as described in the following sections.
For more information about the EPM Workspace interface and using its features, see the Oracle Enterprise Performance Management Workspace, Fusion Edition User's Guide.
To launch Oracle BI Publisher, use the Navigate menu in the upper-left corner of EPM Workspace window.
Select Navigate, then Applications, then Oracle BI Publisher.
When BI Publisher launches, the BI Publisher menu will appear on the EPM Workspace menu bar. The BI Publisher menu contains the following selections:
Reports
History
Schedule
Admin
These correspond to the Reports, Schedules and Admin tabs in the BI Publisher native user interface. The History option launches the History of Scheduled Reports page. Use the menu to navigate to the desired BI Publisher page.
To specify preferences for BI Publisher within Workspace, complete the following steps:
From the File menu, select Preferences.
From the left-hand list, select Oracle BI Publisher.
Update the information on items such as your report locale and time zone.
Note: Accessibility Mode and UI Language are inherited from Workspace preference settings and are not updateable from the BI Publisher Preferences dialog. For information on setting the user interface language for Workspace, see the Oracle Enterprise Performance Management Workspace, Fusion Edition Administrator's Guide.
When you are finished, click OK.
For more information on BI Publisher preferences see Setting Preferences.
All BI Publisher Administration tasks can be performed within EPM Workspace. After launching BI Publisher within Workspace, choose Admin from the BI Publisher menu. This will launch the BI Publisher Administration interface. Fo more information about the administration tasks see the Oracle Business Intelligence Publisher Administrator's and Developer's Guide.
To download BI Publisher's desktop tools, the Template Builder for Microsoft Word Add-in and the Analyzer for Microsoft Excel, perform the following:
From the Tools menu, select Install, then choose Template Builder or Analyzer for Excel.
For more information about the desktop tools, see Creating an RTF Template Using the Template Builder for Microsoft Word Add-in and Using the BI Publisher Analyzer for Microsoft Excel.
Navigate to the Reports repository by selecting the BI Publisher menu, then Reports. Navigate to and select the report to run as you would in the native BI Publisher interface. For more information see Navigating the Reports Repository and Viewing a Report.
To view report schedules:
From the BI Publisher menu, select Schedule. For more information about the Schedules page, see Managing Your Scheduled Reports.
To view report history:
From the BI Publisher menu, select History. For more information about the Report History page, see Viewing Report History and Saved Output.
Oracle Smart Space, Fusion Edition is a personalized information delivery solution for Business Intelligence and Enterprise Performance Management that uses configurable desktop gadgets to deliver BI and EPM to every user in the enterprise, utilizing the Windows desktop. In addition, Oracle Smart Space includes a development toolkit for creating additional gadgets that employs common development languages and methodologies and a secure instant messaging system for shared decision making.
You can use gadgets from Oracle Smart Space, Fusion Edition 11.1.1 release to access and interact with the Oracle BI Publisher reports repository. For example, you can launch BI Publisher reports in the Oracle Smart Space Content Viewer and add BI Publisher reports to a Smart Book gadget and a Favorites gadget. You can use Oracle Smart Space Collaborator to share BI Publisher content with other Oracle Smart Space users.
For information on setting up the integration between Oracle BI Publisher and Oracle Smart Space and for information on using Oracle Smart Space, see the Oracle Smart Space, Fusion Edition User's Guide.
Once Oracle Smart Space is connected to BI Publisher, you can use Windows Explorer to browse the BI Publisher repository and see the folders and reports that are available to you.
From Windows Explorer, right-click a report name to see the available BI Publisher report functions. The following figure shows the right-click menu launched for a BI Publisher report in Oracle Smart Space:
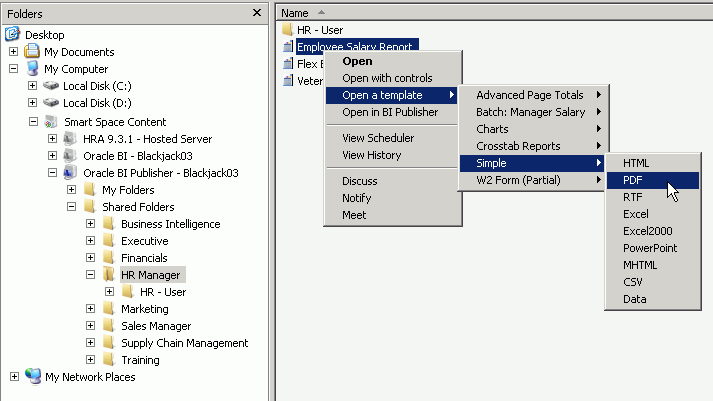
Following are the BI Publisher report functions available from the Oracle Smart Space right-click menu. Note that to enable some functions in Oracle Smart Space report-level properties must be set in BI Publisher. For more information about setting the report-level properties, see Using the Report Editor.
| Oracle Smart Space Function | Description | Required Report-Level Properties in BI Publisher |
|---|---|---|
| Open | Opens the report with the default template in the Oracle Smart Space Content Viewer. The default view in the Content Viewer does not show the report control region. | Auto Run, Run Report Online |
| Open with controls | Select this option to view the Control region of the report. The Control region consists of the Template list, Output type list, and Parameter lists. Note that the property "Show controls" must be enabled for the report in BI Publisher for this option to be active. | Show Controls, Run Report Online |
| Open a template | If multiple templates are available you can select this option to choose another template for the report. Once you have selected a template from the list, the submenu will display the available output types for the template (for example, PDF, RTF, HTML, EXCEL). Output types are enabled at the template-level in the BI Publisher report definition. Because the Template list is part of the control region, the property "Show Controls" must be enabled for the report in BI Publisher for this option to be active. | Auto Run, Run Report Online |
| Open in BI Publisher | Launches the BI Publisher View Report page. For more information about this page, see Viewing a Report Through the Report Viewer. | None |
| View Scheduler | Launches the BI Publisher Schedule Report page. For more information about this page, see Scheduling a Report. | None |
| View History | Launches the BI Publisher History page. For more information about the Report History page, see Viewing Report History and Saved Output | None |
The Schedules tab displays information about scheduled reports and the History of reports that have already run.
Schedules Page
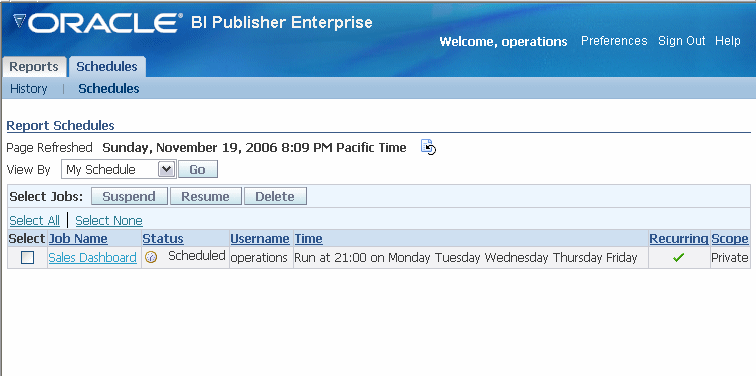
Navigate to this page by selecting the Schedules tab, and then the Schedules subtab.
View current schedules for your private, shared, and public reports
Monitor the status of a submitted report
Delete a scheduled report
Suspend/Resume a scheduled report
View the submission details
The History page displays information about scheduled reports and reports that have already run.
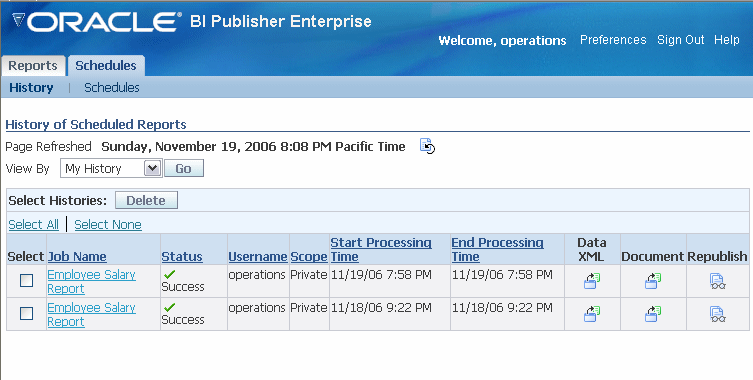
Navigate to this page by selecting the Schedules tab then the History subtab. Use this page to:
View the status of private, shared, and public submitted reports
View start and end processing times
Download or view the XML data produced from the report (if you selected Save Data for the report)
Download or view the report document (if you selected Save output)
View report submission details
Republish the report data using other formats or templates (if you selected Save Data for the report)
You can sort the table of reports by Job Name, Status, Username, Scope, Start Time, or End Time by selecting the column heading.
![]()
Copyright © 2003, 2008, Oracle and/or its affiliates. All rights reserved.