


|
|
This section provides information about securing WebLogic Operations Control (WLOC). It includes the following topics:
To secure access to WLOC, WLOC uses role-based access control, which enables you to assign different levels of privileges to different users or groups. WLOC provides the security roles and determines their access privileges. To facilitate the administration of large numbers of users, WLOC also provides a set of groups that you can configure to be in one or more WLOC roles. You use the WLOC Administration Console to create users and assign them to groups or directly to security roles. For more information about using the WLOC Administration Console to manage users, groups, and security roles, see Manage users and groups in the WLOC Administration Console Help.
Anonymous users cannot access the WLOC Administration Console.
When running the WLOC Configuration Wizard to create the Controller, the wizard prompts for the username and password of the boot user. This account is used to log into the WLOC Administration Console. The default username and password are WLOCBootUser and changeit respectively. To secure the console, this should be changed.
| WARNING: | Do not delete the boot user. Otherwise, you will no longer be able to log into the WLOC Administration Console without recreating the Controller. |
A user is an entity that can be authenticated. WLOC uses password authentication only. A group is a collection of users who usually have something in common, such as working in the same department in a company. For efficient security management, BEA recommends that instead of adding users directly to security roles, you add users to groups and then you assign groups to security roles.
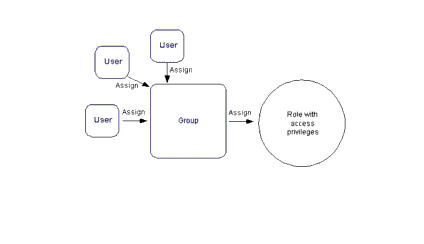
Table 7-1 describes WLOC security groups and the out-of-box security role assignment for the group. You may create additional groups, but may not create additional security roles. You can indirectly create a scoped service admin role by creating a service; when you create a new service, a security role is created to administer that service.
WLOC provides the following security roles:
In addition, for each service that you create, WLOC provides a role named ServiceAdminService-Name, where Service-Name is the name of the service.
Table 7-2 describes the access privileges for the WLOC security roles. You cannot create additional security roles or change the access privileges for any role.
To secure communications between WLOC, managed endpoints, and the infrastructure that hosts the endpoints, WLOC uses 1-way or 2-way SSL. It assumes that you have configured perimeter security measures (e.g., firewalls) and restricted access to the host and its filesystem to trusted users.
Figure 7-2 summarizes security for WLOC communication.
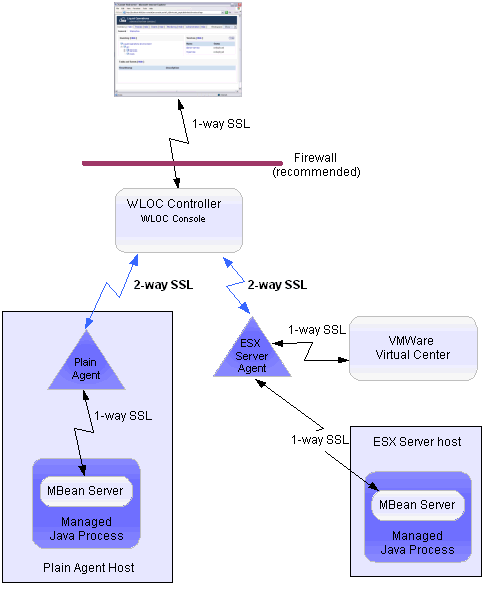
BEA recommends that you place the Controller and all Agents behind the same firewall whenever possible (see Figure 7-2). Controllers and Agents communicate only through HTTPS if secure communications is enabled. In this communication, the Controller always initiates communication by sending a request and the Agent returns a response. Once the Controller has initiated a connection to the Agent and the Agent responds, either the Agent or the Controller can initiate an HTTPS connection.
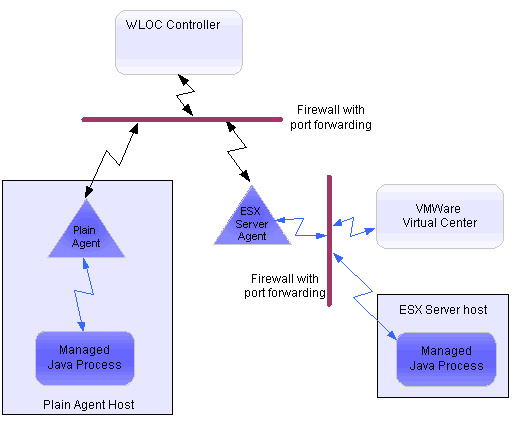
If you place Controllers and Agents behind separate firewalls, you must configure the firewall to open at least one HTTPS communication channel. In addition, you must configure port forwarding for each Agent behind the firewall. In such an environment, the Controller sends requests to the firewall and the firewall forwards each request to the appropriate Agent. See Figure 7-3.
Similarly, Agents use one-way protocols (HTTPS or IIOPS) to communicate with hypervisor software and with managed processes. If you use a firewall to separate Agents from hypervisor software and managed processes, you must configure the firewall to forward requests from the Agent to the hypervisor software and managed processes.
Communication between the Web browser and the WLOC Administration Console is secured using 1-way SSL. In this communication:
controller) is included in the keystore. See Keystores.
To enable secure communication between the Administration Console and the Controller, set the Controller’s Console Security Mode to SECURE or BOTH. This can be set when running the configuration wizard. In addition, it can be changed using Administration Console on the Networking tab or by modifying the <console-mode> element in loc-controller-config.xml.
The Controller uses a separate SSL connection to communicate with each Agent using 2-way SSL over HTTPS. In this communication the Controller is the SSL client and each Agent is a SSL server.
To enable secure connections between a Controller-Agent connections:
While the use of 2-way SSL prevents potential attackers from snooping communications, an Agent’s Web Services interface does not require authorization. An Agent assumes that once an SSL connection is established, the caller is trustworthy. To prevent unauthorized use of WLOC Agents, ensure that all Agents are behind a firewall and that secure communications between the Controller and Agent is enabled.
“Unsecure’ connections can be used in testing or other environments that do not require encryption. Be aware, however, that this would allow an attacker to directly access all Agent and Controller functions without any constraints.
Importing the Controller's identity certificate into an Agent's internal trust keystore is performed using the Keytool utility located in BEA_HOME\jrockit_150_12\bin. To perform the import, follow these steps.
keytool -import -noprompt -alias controllerinternal -file BEA_HOME/user_projects/controller/ssl/internal/controllerinternalidentity.pem -keystore BEA_HOME/user_projects/agent1/ssl/internal/internaltrust.jks -storepass jks_password
controllerinternal is an alias to create. jks_password is the current password for the Agent’s internal trust keystore. (The default value is changeit.)
keytool -list -v -keystore BEA_HOME/user_projects/agent1/ssl/internal/internaltrust.jks -storepass jks_password
Importing the Agent's identity certificate into the Controller’s internal trust keystore is performed using the Keytool utility located in BEA_HOME\jrockit_150_12\bin. To perform the import, follow these steps.
keytool -import -noprompt -alias agentinternal -file BEA_HOME/user_projects/agent1/ssl/internal/agentinternalidentity.pem -keystore BEA_HOME/user_projects/controller/ssl/internal/internaltrust.jks -storepass jks_password
agentinternal is an alias to create. This must be different for each imported Agent identity.
jks_password is the Controller’s internal trust keystore password. (The default value is changeit.)
keytool -list -v -keystore BEA_HOME/user_projects/controller/ssl/internal/internaltrust.jks -storepass jks_password
All communications between Agents and Virtual Center are secured using 1-way SSL. In this communication the Agent is the SSL client and Virtual Center is the SSL server. To enable SSL, the Virtual Center’s certificate must be imported into the Agent’s internal trust keystore.
To configure secure connections between an agent and the Virtual Center, the Virtual Center's identity certificate must be imported into the Agent's trust keystore. This will be automatically performed if you select the Connect to the Virtual Center to retrieve SSL certificate option when creating the agent instance with the configuration wizard.
The Virtual Center identity can also be imported by using the GrabCert utility to copy the certificate from the Virtual Center and then using Keytool to perform the import. The Keytool utility is located in BEA_HOME\jrockit_150_12\bin.
To do this, follow these steps.
BEA_HOME/WLOC_HOME/user_projects/ESXAgent/ssl/internal.
keytool -import -noprompt -alias vcinternal -trustcacerts -keystore BEA_HOME/WLOC_HOME/user_projects/ESXAgent/ssl/internal/internaltrust.jks -storepass jks_password -file BEA_HOME/WLOC_HOME/user_projects/ESXAgent/ssl/internal/vcidentity.pem
vcinternal is an alias to use for the Virtual Center identity.jks_password is the Agent’s internal trust keystore password (default is changeit).
keytool -list -v -keystore BEA_HOME/user_projects/ESXAgent/ssl/internal/internaltrust.jks -storepass jks_password
jks_password is the keystore password (default is changeit).
An Agent communicates with MBean Servers using IIOPS over a 1-way SSL connection. In this communication, the Agent is the SSL client and the MBean server is the SSL server. The managed process provides a certificate which you import into the managing Agent’s internal trust keystore.
In addition, MBean Servers are usually configured to require authentication using a user name and password as credentials. (WebLogic Server MBean Servers always require authentication and authorization.)
For secure communications, WLOC uses Java keystores that are distributed throughout the environment. The WLOC Configuration Wizard creates all WLOC keystores and populates the identity keystores with private keys and self-signed certificates. The self-signed certificates are also available as pem files outside of the identity keystores, so they can be imported into the corresponding trust keystores.
You populate the trust keystores. Managed processes and hypervisor software provide their own identity keystores. WLOC does not create keystores for managed processes and hypervisor software. See Figure 7-4.
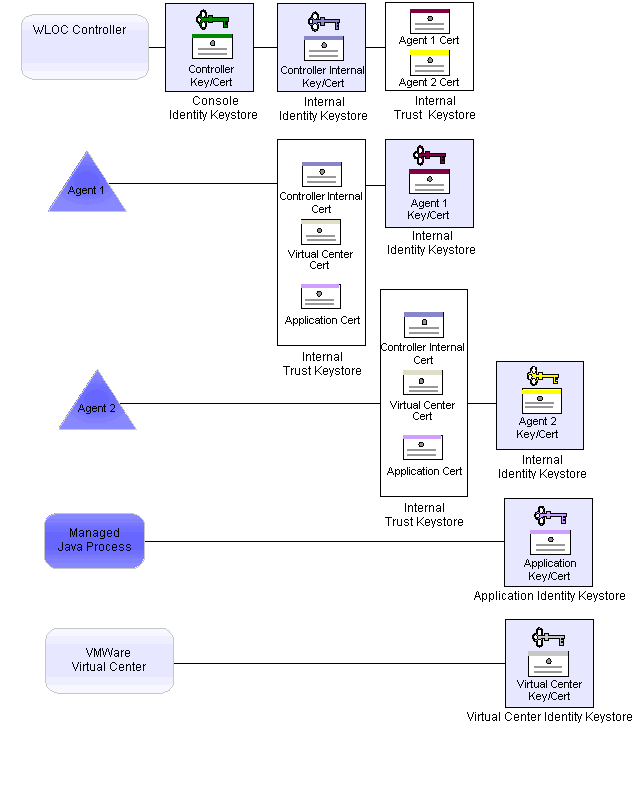
To support 1-way SSL between Web browsers and the WLOC Administration Console, the Controller uses the Console Identity Keystore. To support 2-way SSL between the Controller and each Agent, the Controller uses the Controller Internal Identity Keystore and Controller Internal Trust Keystore.
The console identity keystore contains the private key and self-signed certificate that supports 1-way SSL communication between a Web browser and the WLOC Administration Console application. When a user initiates a session with the WLOC Administration Console application, the Web browser prompts the user to trust the Controller's certificate.
controlleridentity.jks and is located in CONTROLLER_HOME/ssl where CONTROLLER_HOME is the directory in which you install the Controller. controller and contains the name of the host on which the Controller is installed. It has a key size of 1024 and a private key type of RSA with a signature algorithm of MD5withRSA. It expires in 10958 days (30 years).controller.
The keystore is named internalidentity.jks and is located in CONTROLLER_HOME\ssl\internal where CONTROLLER_HOME is the directory in which you install the Controller.
The certificate in this keystore is saved under the alias controllerinternal and contains the name of the host on which the Controller is installed. It has a key size of 1024 and a private key type of RSA with a signature algorithm of MD5withRSA. It expires in 10958 days (30 years).
Access to the keystore via the JDK keystore tools is protected by a password. You specify the password when running the configuration wizard. The password is stored as an encrypted string in the Controller’s configuration document. While this keystore is not intended to be modified, you can use the JDK keystore tools to read the certificate values.
The Controller’s internal trust keystore contains a copy of each Agent’s self-signed certificate. (Note that WLOC does not support the use of CA certificates in its internal trust keystores.) These certificates are required to support 2-way SSL communication between the Controller and all Agents.
The WLOC Configuration Wizard creates this keystore, but does not populate it with Agent identities. This is accomplished as described in Importing an Agent Identity into the Controller Trust Keystore.
The keystore is named internaltrust.jks and is located in CONTROLLER_DIR\ssl\internal where CONTROLLER_DIR is the directory in which you install the Controller.
To support 2-way SSL between an Agent and the Controller, as well as 1-way SSL between an Agent and managed processes and between an Agent and VMware Virtual Center, an Agent uses its Agent Identity Keystore and Agent Internal Trust Keystore.
An Agent’s identity keystore contains the private key and self-signed certificate that supports 2-way SSL communication between the Agent and the Controller.
The WLOC Configuration Wizard creates this keystore as well as the private key and self-signed certificate. You cannot replace or modify the key or certificate in this keystore.
The keystore is named internalidentity.jks and is located in AGENT_DIR\ssl\internal where AGENT_DIR is the directory in which you install an Agent.
The certificate in this keystore is saved under the alias agentinternal and contains the name of the host on which the Agent is installed. It has a key size of 1024 and a private key type of RSA with a signature algorithm of MD5withRSA. It expires in 10958 days (30 years).
Access to the keystore via the JDK keystore tools is protected by a password. You specify the password when you configure the Agent. The password is stored as an encrypted string in the Agent’s configuration XML document.
While this keystore is not intended to be modified, you can use the JDK keystore tools to read the certificate values.
An Agent’s internal trust keystore contains a copy of the Controller’s self-signed certificate, as well as a copy of the CA certificates of the processes that it manages. A Hypervisor Agent also contains a copy of the VMware Virtual Center CA certificate. These certificates are required to support 2-way SSL communication between the Agent and Controller, as well as 1-way SSL between an Agent and managed processes and between an Agent and VMware Virtual Center.
The WLOC Configuration Wizard creates this keystore when you configure an Agent. It is named internaltrust.jks and is located in AGENT_HOME\ssl\internal where AGENT_HOME is the directory in which you install an Agent.
To import the Controller’s identity into the keystore, see Importing the Controller Identity into an Agent Trust Keystore. To import the Virtual Center’s identity into an ESX Agent’s keystore, see Importing the Virtual Center Identity into an Agent Trust Keystore.
Any passwords you enter when installing WLOC, running the configuration wizard, or using the WLOC Administration Console will be encrypted before being stored in any of the XML configuration files.
| WARNING: | If you enter or modify a password by directly editing the configuration XML file, the password will remain in clear text until a new configuration file is generated (usually as a result of making a change to the configuration using the Administration Console), at which time any passwords in clear text will be encrypted. Note that simply stopping and re-starting the Controller or an Agent will not encrypt any clear text passwords. |
The file system security in your environment should completely restrict access to WLOC files and directories by non-WLOC users. This includes development or testing environments where passwords may be stored in clear text.


|