


|
|
The Transport SDK provides a layer of abstraction between transport protocols and the AquaLogic Service Bus runtime system. This layer of abstraction makes it possible to develop and plug in new transport providers to AquaLogic Service Bus. The Transport SDK interfaces provide this bridge between transport protocols, such as HTTP, and the AquaLogic Service Bus runtime.
| Tip: | Before beginning this chapter, be sure to review Design Considerations first. |
This chapter explains the basic steps involved in developing a custom transport provider. This chapter includes these topics:
The process of designing and building a custom transport provider is complex. This section offers a recommended path to follow as you develop your transport provider. Development of a custom transport provider breaks down into these basic stages:
The section Basic Development Steps outlines the steps you need to take to develop a transport provider, including schema configurations and interface implementations.
The section Important Development Topics discusses in detail several topics that you might need to refer to during the development cycle. This section includes detailed information on topics such as Handling Messages, Transforming Messages, Handling Errors, and others.
For detailed information on packaging and deploying a transport provider, see Deploying a Transport Provider.
Before you begin to develop a custom transport provider, you need to consider and review a number of design issues, which include:
The basic steps to follow when developing a custom transport provider include:
1. Review the Transport Framework Components.
2. Create a Directory Structure for Your Transport Project.
3. Create an XML Schema File for Transport-Specific Artifacts.
4. Define Transport-Specific Artifacts.
5. Define the XMLBean TransportProviderConfiguration.
6. Implement the Transport Provider User Interface.
7. Implement the Runtime Interfaces.
8. Deploy the Transport Provider.
Figure 3-1 illustrates the components that you must implement and configure to create a custom transport provider. The transport manager controls and manages the registration of transport providers and handles communication with AquaLogic Service Bus. A transport provider manages the life cycle and runtime behavior of transport endpoints (resources where messages originate or are targeted). You use the Transport SDK to develop custom transport providers. Using the Transport SDK to develop a custom transport provider is the subject of this chapter.

The parts of the transport subsystem that you must implement and configure include:
Before developing a new transport provider, take time to set up an appropriate directory structure for your project. The recommended approach is to copy the directory structure used for the sample socket transport provider. For a detailed description of this structure, see Sample Location and Directory Structure.
Create an XML schema (xsd) file for transport-specific definitions. You can base this file on the schema file developed for the sample socket transport provider:
BEA_HOME/WLS_HOME/samples/servicebus/sample-transport/schemas/
SocketTransport.xsd
where BEA_HOME is the directory in which you installed AquaLogic Service Bus.
| Note: | The SocketTransport.xsd file imports the file TransportCommon.xsd. This file is the base schema definition file for service endpoint configurations. This file is located in BEA_HOME/ALSB_HOME/lib/sb-kernel-api.jar. You might want to review the contents of this file before continuing. |
Define XML schema for the following transport-specific artifacts in the XML schema file described in the previous section, 3. Create an XML Schema File for Transport-Specific Artifacts.
| Note: | Only simple XML types are supported when defining transport provider-specific metadata and headers. For example, complex types with nested elements are not supported. Furthermore, an additional restriction is that there can be at most one header with a given name |
| Tip: | Each of these schema definitions is converted into a corresponding Java file and compiled. You will find these converted Java source files for the sample socket transport provider in the directory:sample-transport/build/classes/com/bea/alsb/transports/sock/impl |
EndPointConfiguration is the base type for endpoint configuration, and describes the complete set of parameters necessary for the deployment and operation of an inbound or outbound endpoint. This configuration consists of generic and provider-specific parts. For more information on the EndPointConfiguration schema definition, refer to the documentation elements in the TransportCommon.xsd file.
You need to specify a provider-specific endpoint configuration in the schema file. Listing 3-1 shows an excerpt from the SocketTransport.xsd.
<xs:complexType name="SocketEndpointConfiguration">
    <xs:annotation>
      <xs:documentation>
        SocketTransport - specific configuration
      </xs:documentation>
    </xs:annotation>
    <xs:sequence>
      <xs:choice>
        <xs:element name="outbound-properties"
                    type="SocketOutboundPropertiesType"/>
        <xs:element name="inbound-properties"
                    type="SocketInboundPropertiesType"/>
      </xs:choice>
      <xs:element name="request-response" type="xs:boolean">
        <xs:annotation>
          <xs:documentation>
            Whether the message pattern is synchronous
            request-response or one-way.
          </xs:documentation>
        </xs:annotation>
      </xs:element>
      ...
It is required that each transport provider store metadata (message headers) in a Plain Old Java Object (POJO) and pass that to the pipeline. Examples of information that might be transmitted in the metadata are the Content-Type header, security information, or locale information. A RequestMetaData POJO is a generic object that extends the RequestMetaData abstract class and describes the message metadata of the incoming or outgoing request. The transport provider has to deliver the message metadata to AquaLogic Service Bus runtime in a RequestMetaData POJO. See also Request and Response Metadata Handling.
RequestMetaDataXML is an XML representation of the same RequestMetaData POJO. This XML representation uses Apache XML Bean technology. It is only needed by AquaLogic Service Bus runtime if or when processing of the message involves any actions in the pipeline that need an XML representation of the metadata, such as setting the entire metadata to a specified XML fragment on the outbound request.
You need to specify request metadata configuration in the schema file. Listing 3-2 shows an excerpt from the SocketTransport.xsd.
<xs:complexType name="SocketRequestMetaDataXML">
    <xs:annotation>
      <xs:documentation/>
    </xs:annotation>
    <xs:complexContent>
      <xs:extension base="ts:RequestMetaDataXML">
        <xs:sequence>
          <xs:element name="client-host"
                      type="xs:string" minOccurs="0">
            <xs:annotation>
              <xs:documentation>
                Client host name
              </xs:documentation>
            </xs:annotation>
          </xs:element>
          <xs:element name="client-port" type="xs:int" minOccurs="0">
            <xs:annotation>
              <xs:documentation>Client port</xs:documentation>
            </xs:annotation>
          </xs:element>
        </xs:sequence>
      </xs:extension>
    </xs:complexContent>
  </xs:complexType>
RequestHeadersXML is the base type for a set of inbound or outbound request headers. You need to specify the RequestHeadersXML configuration in the schema file. Listing 3-2 shows an excerpt from the SocketTransport.xsd.
<xs:complexType name="SocketRequestHeadersXML">
    <xs:annotation>
      <xs:documentation/>
    </xs:annotation>
    <xs:complexContent>
      <xs:extension base="ts:RequestHeadersXML">
        <xs:sequence>
          <xs:element name="message-count" type="xs:long" minOccurs="0">
            <xs:annotation>
              <xs:documentation>
                Number of messages passed till now.
              </xs:documentation>
            </xs:annotation>
          </xs:element>
        </xs:sequence>
      </xs:extension>
    </xs:complexContent>
  </xs:complexType>
ResponseMetaDataXML is the base type for metadata for a response to an inbound or outbound message. You need to specify the ResponseMetaDataXML configuration in the schema file. Listing 3-2 shows an excerpt from the SocketTransport.xsd.
<xs:complexType name="SocketResponseMetaDataXML">
    <xs:complexContent>
      <xs:extension base="ts:ResponseMetaDataXML">
        <xs:sequence>
          <xs:element name="service-endpoint-host"
                      type="xs:string" minOccurs="0">
            <xs:annotation>
              <xs:documentation>
                Host name of the service end point connection.
              </xs:documentation>
            </xs:annotation>
          </xs:element>
          <xs:element name="service-endpoint-ip"
                      type="xs:string" minOccurs="0">
            <xs:annotation>
              <xs:documentation>
                IP address of the service end point connection.
              </xs:documentation>
            </xs:annotation>
          </xs:element>
        </xs:sequence>
      </xs:extension>
    </xs:complexContent>
  </xs:complexType>
ResponseHeadersXML is the base type for a set of response headers. You need to specify the ResponseHeadersXML configuration in the schema file. Listing 3-2 shows an excerpt from the SocketTransport.xsd.
<xs:complexType name="SocketResponseHeadersXML">
    <xs:annotation>
      <xs:documentation/>
    </xs:annotation>
    <xs:complexContent>
      <xs:extension base="ts:ResponseHeadersXML"/>
    </xs:complexContent>
  </xs:complexType>
To configure the TransportProviderConfiguration XML bean, edit the transport provider configuration file. This XML file is located in the config directory in the transport provider root directory. See Sample Location and Directory Structure for the location of this file (SocketConfig.xml) in the sample socket transport provider implementation.
inbound-direction-supported element to true. outbound-direction-supported element to true. self-described with the value set to true. A self-described transport is one whose services are responsible for describing their shape (schema or WSDL) based on their endpoint configuration.UDDI. See the section Publishing Proxy Services to a UDDI Registry for more info.| Tip: | The schema for TransportProviderConfiguration is defined in TransportCommon.xsd, which is located in BEA_HOME/ALSB_HOME/lib/sb-kernel-api.jar. Refer to the schema file for more information. |
When you add a business or proxy service using the AquaLogic Service Bus Console, you select a transport provider from a menu in the Service Creation wizard. This menu includes the transport providers that are provided with AquaLogic Service Bus and any custom transport providers that were developed with the Transport SDK.
This section discusses the Transport SDK API components that bind your custom transport provider to the AquaLogic Service Bus Console user interface. You must implement these APIs to connect your provider to the user interface.
| Tip: | This section assumes that you are familiar with the Service Creation Wizard. See Configuring the Socket Transport Sample for a detailed, illustrated example. |
public boolean isServiceTypeSupported(BindingTypeInfo binding)
This method determines if the transport provider is suitable for the selected Service Type.
public TransportUIError[] validateMainForm(TransportEditField[] fields)
public TransportEditField[] getEditPage(EndPointConfiguration config, BindingTypeInfo binding) throws TransportException
The Transport SDK offers a set of TransportUIObjects that represent fields in the configuration page. For example, you can add text boxes, checkboxes, and other types of UI elements. Use the TransportUIFactory to create them. After creation use the same factory to specify additional properties and obtain TransportEditField objects that can be displayed by the Service Creation wizard.
For a complete list of the available TransportUIObjects, refer to the Javadoc.
| Tip: | You can associate events with most of the UI fields. An event acts like a callback mechanism for the TransportUIBinding class and lets you refresh, validate, and update the configuration page. When an event is triggered, the wizard calls the method:updateEditPage(TransportEditField[] fields, String name) throws TransportException |
TransportUIError[] validateProviderSpecificForm(TransportEditField[] fields)
public TransportViewField[] getViewPage(EndPointConfiguration config) throws TransportException
void validateEndPointConfiguration(TransportValidationContext context)
If no error is reported, a new endpoint is created. The Transport Manager then calls the method:
TransportEndPoint createEndPoint(EndPointOperations.Create context) throws TransportException
If this method returns successfully, the new service is listed in the AquaLogic Service Bus Console and the underlying transport configuration is associated with an endpoint on the TransportProvider.
| Note: | The endpoint configuration is saved in the AquaLogic Service Bus session and does not need to be persisted or recovered in case of a server restart by the transport provider. |
| Tip: | For the sample socket transport provider, you can find the implementations of these interfaces in the sample-transport/src directory. |
A new custom transport provider must implement the following runtime interfaces. For a summary of the Transport SDK interfaces and related classes, see Transport SDK Interfaces and Classes. . For detailed information on interfaces and classes, see the AquaLogic Service Bus Javadoc description.
| Tip: | For the sample socket transport provider, you can find the implementations of these interfaces in the sample-transport/src directory. |
| Note: | Only implement the TransportWLSArtifactDeployer interface if the transport provider needs to deploy WebLogic Server-related artifacts, such as EAR/WAR/JAR files, that go into a WebLogic Server change list at the time of endpoint creation. For more information, see When to Implement TransportWLSArtifactDeployer. |
| Note: | Only implement the Transformer interface if the transport provider needs to work with non-standard payload bindings, for example, anything other than Stream, DOM, SAX, or XMLBean. For more information, see Transforming Messages. |
For detailed information on deployment, see Deploying a Transport Provider.
This section discusses several topics that you will encounter while developing a custom transport provider. These topics include:
This section discusses message handling in transport providers and includes these topics:
The Transport SDK features a flexible representation of message payloads. All Transport SDK APIs dealing with payload use the Source interface to represent message content.
The Source-derived message types provided with the Transport SDK include:
| Note: | StreamSource is a single use source; that is, it implements the marker interface SingleUseSource. With the other Sources, you can get the input stream from the source multiple times. Each time the Source object gets the input stream from the beginning. With a SingleUseSource, you can only get the input stream once. Once the input is consumed, it is gone (for example, a stream from a network socket); however, AquaLogic Service Bus buffers the input from a SingleUseSource, essentially keeping a copy of all of its data. |
| Note: | If you implement a Source class for your transport provider, you need to determine whether you can re-get the input stream from the beginning. If the nature of the input stream is that it can only be consumed once, it is recommended that your Source class implement the marker interface SingleUseStream. |
The Transport SDK provides a set of Transformers to convert between Source objects. You can implement new transformations, as needed, as long as they support transformations to/from a set of canonical representations. See Transforming Messages for more information. See also Designing for Message Content.
When implementing inbound endpoints to deliver the inbound message to AquaLogic Service Bus runtime, you need to call TransportManager.receiveMessage(). The transport provider is free to expose the incoming message payload in either one of the standard Source-derived objects, such as stream, DOM or SAX, or a custom one.
If AquaLogic Service Bus needs to send a response message back to the client that sent the request, it will call methods setResponseMetaData() and setResponsePayload() followed by close() on InboundTransportMessageContext to indicate that the response is ready to be sent back. When AquaLogic Service Bus runtime calls the inbound transport message context close() method, this will be done from a different thread than that on which the inbound request message was received. The transport provider should be aware of this as it may affect the semantics of transactions. Also, the transport provider cannot attempt to access the response payload and/or metadata until close() method has been called.
It is required that each transport provider store metadata and headers in a Plain Old Java Object (POJO) and pass that to the pipeline. There are some cases where AquaLogic Service Bus requires an XMLBean. In these cases, you need to implement a conversion from POJO to XMLBean using the API.
The following are the methods you must provide to convert from a POJO to XML:
For the reverse direction (XML to POJO) you need to implement:
Each transport provider is responsible for specifying the character set encoding of the incoming message payload to AquaLogic Service Bus. For outgoing messages (outbound request and inbound response), the transport provider is responsible for telling AquaLogic Service Bus what character set encoding to use for the outgoing payload. The character-set encoding is specified in request and response metadata.
In virtually every case, the character-set encoding that the transport is responsible for inserting into the metadata is exactly the encoding that is statically specified in the service configuration. One of the few exceptions to this is HTTP transport, which inspects Content-Type for any “charset” parameters and overrides any encoding configured in the service. This is necessary in order to conform to HTTP specifications. Other transport protocols may need to handle similar issues.
| Tip: | In general, the encoding for a service is fixed. If someone sends an UTF-16 encoded message to a proxy that is specified to be SHIFT_JIS, then that is generally considered to be an error. Transport providers should not need to inspect the message simply to determine encoding. |
For outgoing messages, the transport provider tells AquaLogic Service Bus what encoding it requires for the outbound request, and AquaLogic Service Bus performs the conversion if necessary.
Transports should always rely on this encoding for outgoing messages and should not assume that it is the same as the encoding specified in the service configuration. If there is a discrepancy, the transport can choose to allow it, but others could consider it an error and throw an exception. Also the transport has the additional option of leaving the encoding element blank. That leaves the pipeline free to specify the encoding (for example, via pass-through).
If a given transport provider supports proxy service endpoints, it is possible to configure the request pipeline such that there is a routing step that routes to that provider’s proxy service. Furthermore there could be a Publish or a Service Callout action that sends a message to a proxy service instead of a business service. This use case is referred to as co-located calls.
The transport provider needs to be aware of co-located calls, and handle them accordingly. Depending on the nature of the proxy service endpoint implementation, the transport provider may choose to optimize the invocation such that this call bypasses the entire transport communication stack and any inbound authentication/authorization, and instead is a direct call that effectively calls TransportManager.receiveMessage() immediately.
| Tip: | AquaLogic Service Bus has implemented this optimization with the HTTP, File, Email and FTP transport providers. The JMS provider does not use this optimization due to the desire to separate the transactional semantics of send operation versus receive operations. |
If you want to use this optimization in a custom transport provider, you need to extend the CoLocatedTransportMessageContext class and call its send() method when TransportProvider.sendMessageAsync() is invoked.
When AquaLogic Service Bus runtime sends a message to an outbound endpoint and there is a response message to be returned, the transport provider must return this response asynchronously. That means TransportSendListener.onReceiveResponse() or TransportSendListener.onError() methods need to be called from a different thread than the one on which TransportProvider.sendMessageAsync() was called.
If the transport provider has a built-in mechanism by which the response arrives asynchronously, such as responses to JMS requests or HTTP requests when the async response option is used, it happens naturally. However, if the transport provider has no built-in mechanism for retrieving responses asynchronously, it can execute the outbound request in a blocking fashion and then schedule a new worker thread using the TransportManagerHelper.schedule() method, in which the response is posted to the TransportSendListener.
When AquaLogic Service Bus needs to set either the request payload to an outbound message or the response payload to an inbound message, it asks the transport provider to do so through an object derived from the Source interface. The transport provider then needs to decide what representation the underlying transport layer requires and use the Transformer.transform() method to translate the Source object into the desired source.
| Tip: | For more information on message transformation, see Designing for Message Content. For a list of built-in transformations, see Built-In Transformations and Source and Transformer Classes and Interfaces. |
A custom transport provider can support new kinds of transformations. Suppose a transport provider needs to work with a DOM object in order to send the outbound message. When called with setRequestPayload(Source src), the transport provider needs to call the method: TransportManagerHelper.getTransportManager().getTransformer()..
transform(src, DOMSource.class, transformOptions)
The return value of the method gives a DOMSource, which can then be used to retrieve the DOM node.
| Note: | If the transport provider requires a stream, there is a shortcut: each Source object supports transformation to stream natively. |
You can add new transformations to a custom transport provider. For example, suppose you want to add a new kind of Source-derived class, called XYZSource. For performance reasons, transport providers are encouraged to provide conversions from XYZSource to one of the two canonical Source objects, XmlObjectSource and StreamSource when applicable. Without such transformation, generic transformers will be used, which rely on the StreamSource representation of XYZSource. Of course, if XYZSource is a simple byte-based Source with no internal structure, then relying on the generic transformers is usually sufficient. Note that any custom transformer that is registered with TransportManager is assumed to be thread-safe and stateless.
To support attachments, the transport provider has three options:
multipart/related. Both HTTP(S) and Email transports rely on this third option for supporting attachments.
A TransportOptions object is used to supply options for sending or receiving a message. A TransportOptions object is passed from the transport provider to the transport manager on inbound messages. On outbound messages, a TransportOptions object is passed from the AquaLogic Service Bus runtime to the transport manager, and finally to the transport provider.
This section includes these topics:
The transport provider supplies these parameters to TransportManager.receiveMessage():
TransportManager.receiveMessage() when an error occurs during the AquaLogic Service Bus pipeline processing. The options for throwing the exception include: throw the exception back to the inbound message or create a response message from the error and notify the inbound message with the response message. Typically, you set Throw On Error to true when QOS is exactly-once (for transactional messages). For example, JMS/XA sets this flag to true to throw the exception in the same request thread, so it can mark the exception for rollback. HTTP sets the flag to false, because there is no retry mechanism. The error is converted to a status code and a response message is returned.
For outbound processing, the AquaLogic Service Bus runtime supplies these parameters to the transport manager, which uses some of the parameters internally and propagates some parameters to TransportProvider.sendMessageAsync(). These parameters include:
The request mode is defined as an enumeration with two values: REQUEST_ONLY (also called “one-way”) and REQUEST_RESPONSE. These modes are interpreted as follows for requests and responses:
REQUEST_ONLY.
There are three different use cases to consider with respect to the effect runtime exceptions have on the transactional model. These cases include:
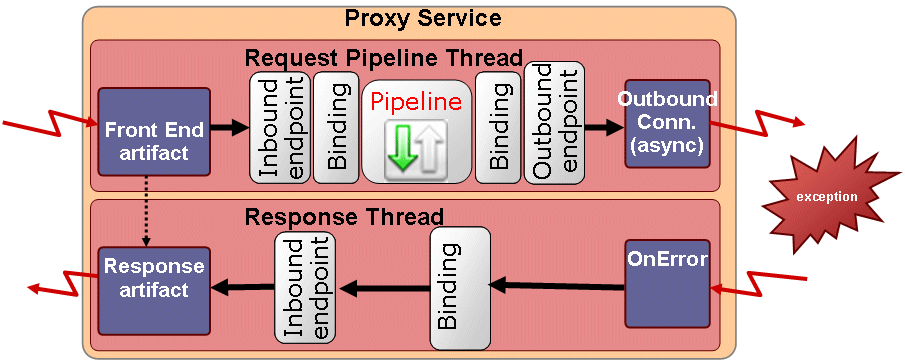
The exception occurs somewhere in the request pipeline but before the outbound call to the business service, as shown in Figure 3-2. For example, executing a specific XQuery against the contents of the request message raises an exception.
If there is a user-configured error handler configured for the request pipeline, the error will be handled according to the user configuration. Otherwise, the proxy service will either catch an exception when calling TransportManager.receiveMessage() or will be notified in the InboundTransportMessageContext.close() method of the error through response metadata, based on the transport options passed as an argument to the receiveMessage() call. If the proxy service indicates that the exception should be thrown, surround receiveMessage() with a try/catch clause and mark the transaction for rollback.

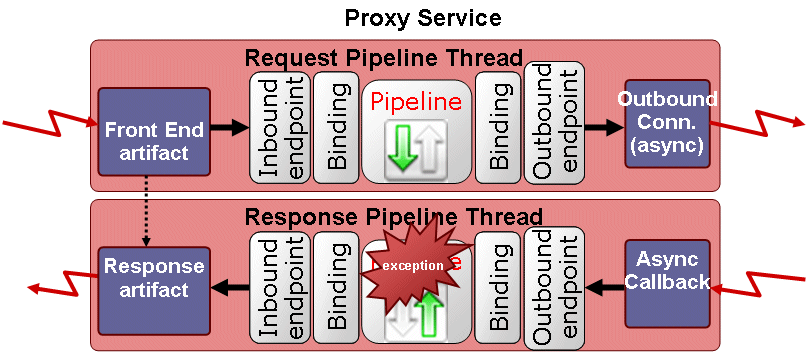
The exception occurs during the business service call, as shown in Figure 3-3. The outbound transport provider either:
TransportProvider.sendMessageAsync(). For example, the outbound provider throws an exception if there was an error while establishing a socket connection to external service. This situation could occur if the business service cannot be called because of an incorrect URL, a faulty connection, or other reasons. In these cases, the transport provider must raise an exception. TransportSendListener.onError(). For example, if the business service was called, but the call resulted in an error (such as a SOAP fault), the transport provider needs to call TransportSendListener.onError() instead of raising an exception.
In the first instance, the exception handling is the same as that described in Case 1. In the second instance, if there is an error handler configured for the response pipeline, the error is handled according to the user configuration. Otherwise, the exception is propagated back to the proxy service endpoint in InboundTransportMessageContext.close() through the response metadata.
The exception occurs sometime after the business service call in the response pipeline, as shown in Figure 3-4. Again, in the absence of a user-defined error handler for the response pipeline, the proxy service endpoint is notified of the error with the InboundTransportMessageContext.close() method with appropriate response metadata. If the inbound transport endpoint is a synchronous transactional endpoint, it is guaranteed that the transaction that was active at the time request was received is still active and it may be rolled back. If the inbound endpoint is not transactional or not synchronous, there is not an inbound transactional context to roll back, so some other action might need to be performed.
Universal Description, Discovery, and Integration (UDDI) is a standard mechanism for describing and locating Web services across the internet. You might want to publish proxy services based on a custom transport provider to a UDDI registry. This allows proxy services to be imported into another AquaLogic Service Bus server in a different domain as the one hosting the business service.
To publish a proxy service, the transport provider needs to define a tModel that represents the transport type in the “UDDI” section of TransportProviderConfiguration XML schema definition. (For more information on the schema-generated interfaces, see Schema-Generated Interfaces.)
This tModel must contain a CategoryBag with a keyedReference whose tModelKey is set to the UDDI Types Category System and keyValue is “transport.” You are required to provide only the UDDI V3 tModel key for this tModel.
If UDDI already defines a tModel for this transport type, it is recommended that the definition be copied and pasted into the UDDI section.
An example of such a tModel is provided in Listing 3-6.
<?xml version="1.0" encoding="UTF-8"?>
<ProviderConfiguration xmlns="http://www.bea.com/wli/sb/transports">
   …
   …
  <UDDI>
    <TModelDefinition>
      <tModel tModelKey="uddi:bea.uddi.org:transport:socket">
        <name>uddi-org:socket</name>
        <description>Socket transport based webservice</description>
        <overviewDoc>
          <overviewURL useType="text">
            http://www.bea.com/wli/sb/UDDIMapping#socket
          </overviewURL>
        </overviewDoc>
        <categoryBag>
          <keyedReference keyName="uddi-org:types:transport"
                          keyValue="transport"
                          tModelKey="uddi:uddi.org:categorization:types"/>
        </categoryBag>
      </tModel>
    </TModelDefinition>
  </UDDI>
</ProviderConfiguration>
If UDDI does not already define a tModel for this transport type, AquaLogic Service Bus can publish the tModel you define here to configured registries. When a UDDI registry is configured to AquaLogic Service Bus, the “Load tModels into Registry” option can be specified. That option causes all of the tModels of AquaLogic Service Bus, including the tModels for custom transport providers, to be published to the UDDI registry. After deploying your transport provider, you can update your UDDI registry configuration to publish your tModel.
During UDDI export, TransportProvider.getBusinessServicePropertiesForProxy(Ref) is called and the resulting map is published to the UDDI registry. The provider is responsible for making sure to preserve all important properties of the business service in the map so that during the UDDI import process the business service definition can be correctly constructed without loss of information.
During UDDI import, TransportProvider.getProviderSpecificConfiguration(Map) is called and the result is an XmlObject that conforms to the provider-specific endpoint configuration schema, which goes into the service definition.
| Tip: | OASIS, the Organization for the Advancement of Structured Information Standards, is responsible for creating the UDDI standard. To read more about UDDI, including the full technical specification, go to: http://www.oasis-open.org/committees/tc_home.php?wg_abbrev=uddi-spec |
Two sets of transport provider interfaces are provided that deal with individual service registration. TransportProvider has methods like create/update/delete/suspend/resume and TransportWLSArtifactDeployer has the same methods. This section discusses these two implementations and explains when you need to implement TransportWLSArtifactDeployer.
Only implement TransportWLSArtifactDeployer if your provider needs to make changes to WebLogic Server artifacts in the AquaLogic Service Bus domain. The methods on TransportWLSArtifactDeployer are only called on an Administration Server. In this case, changes are made through the DomainMBean argument that is passed in, and then the changes are propagated to the entire cluster.
The TransportProvider methods are called on all servers (Administration and Managed Servers) in the domain. Because you cannot make changes to AquaLogic Service Bus domain artifacts on a managed server, the purpose of the method calls on TransportProvider is to update its internal data structures only.
When a given Transport provider implements the TransportWLSArtifactDeployer interface, the methods on TransportWLSArtifactDeployer are called before the corresponding methods on TransportProvider. For example, TransportWLSArtifactDeployer.onCreate() is called before TransportProvider.createEndPoint().
For more information on TransportWLSArtifactDeployer, see Summary of General Interfaces.
You can provide online help for your custom transports in the design environment (WorkSpace Studio) and the run-time environment (ALSB console). Providing help is optional, but it can be extremely useful in guiding service creators through the transport configuration process.
Figure 3-5 shows help included with a custom transport in the development and run-time environments.

This section includes the following topics:
This section describes the different options available for providing custom transport help in WorkSpace Studio and the ALSB console.
| Note: | Because of potential user interface and functionality differences between transport configuration in WorkSpace Studio and the ALSB console, consider creating separate help topics for both environments. |
WorkSpace Studio help is based on the Eclipse help framework. You have choices for your custom transport help implementation in WorkSpace Studio.
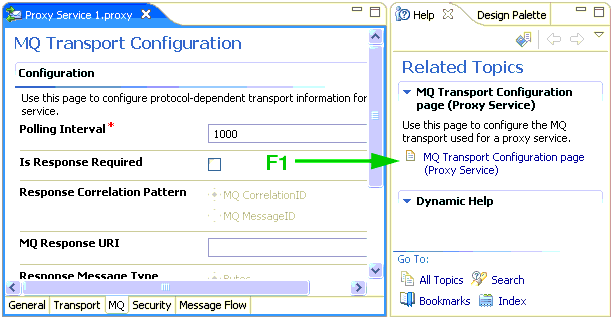
Context-sensitive help, launched by pressing F1 in WorkSpace Studio, shows help topics within WorkSpace Studio instead of launching a separate help window that displays the entire help system. Figure 3-6 shows how context-sensitive help appears in WorkSpace Studio.
All of the native ALSB transports provide context-sensitive help from their respective transport configuration wizards and editors.
The benefit of context-sensitive help is quick user access to targeted help topics without leaving WorkSpace Studio, which is particularly useful for help with custom transports.
You can provide help content for your custom transport in the WorkSpace Studio help system, accessible from the WorkSpace Studio Help menu. When you launch WorkSpace Studio help, a separate window displays the contents of the entire help system.
Figure 3-7 shows online help for transports in the WorkSpace Studio help system.
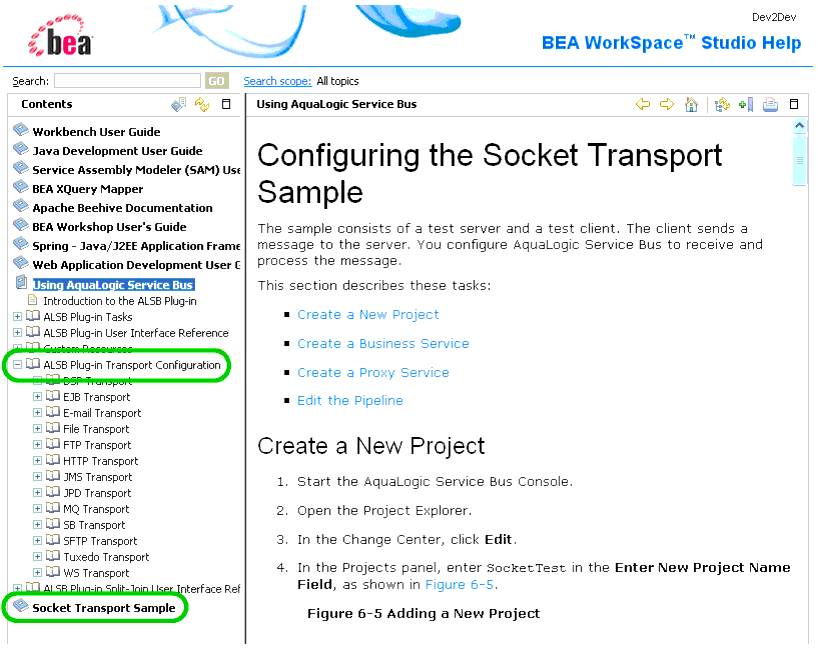
Your help topic(s) can appear in different locations of the help system table of contents, as shown in Figure 3-7, depending on how you package and configure your custom transport. For example, you can merge your transport help with the transport section of the ALSB help topics, or you can provide your transport help at the top level of the help system.
You can also provide transport configuration help at run time in the ALSB console. The ALSB console provides its own integrated help system, but ALSB displays custom transport help stand-alone in its own browser window, as shown in Figure 3-8. Custom transport help is displayed when you click Help on the transport configuration page.
The following sections show you how to provide online help for your custom transport in both WorkSpace Studio and in the ALSB console.
If you make your custom transport available for service configuration in the WorkSpace Studio, you can provide help content that appears as context-sensitive help in WorkSpace Studio, in the WorkSpace Studio help system, or both. This section shows you how.
The sample socket transport and the ALSB native transports provide a best-practice reference implementation for WorkSpace Studio help and are used as examples in this section.
Transport help is part of the WorkSpace Studio plug-in you create for your transport. For details on plug-in creation, see Developing ALSB Transports for WorkSpace Studio.
Providing context-sensitive help gives users information about transport configuration directly in WorkSpace Studio, where they are configuring the transport.
You can provide context-sensitive help on the transport configuration pages in both the service configuration wizard and the service editor in WorkSpace Studio.
The following steps are required for providing context-sensitive help:
org.eclipse.help.contexts example in Listing 3-1.This entry tells the plug-in where to find the context.xml file. The path to context.xml is relative to the plug-in root.
You can add your transport help to the main WorkSpace Studio help system. Your help topics appear in the table of contents, as shown in Figure 3-7.
primary attribute.primary=“true”.primary=“false”.For details on plug-in packaging, see Developing ALSB Transports for WorkSpace Studio.
WorkSpace Studio help, which is based on the Eclipse help framework, requires the resources described in this section.
Use this reference section in conjunction with the previous procedures for implementing transport help in WorkSpace Studio.
| Note: | ALSB provides a sample help implementation in its sample socket transport, located at BEA_HOME/ALSB_HOME/samples/servicebus/sample-transport. The sample transport is a good reference implementation for developing your own custom transports and help. The sample plugin.xml is in the /eclipse subdirectory, and the help resources are in the /help subdirectory. |
| Note: | The ALSB transport plug-ins located at BEA_HOME/ALSB_HOME/eclipse/plugins/com.bea.alsb.transports.<transport>_<version> also implement help as a custom transport would. |
This section describes the following WorkSpace Studio help resources:
The plugin.xml file is the key to adding your transport and transport help files to the WorkSpace Studio environment. You must add entries in plugin.xml for your help table of contents (toc.xml) and for context-sensitive help (context.xml).
Listing 3-1 shows the toc.xml and context.xml (contexts_socketTransport.xml) entries in the sample socket transport’s plugin.xml file, located in the BEA_HOME/ALSB_HOME/samples/servicebus/sample-transport/eclipse directory.
<?xml version="1.0" encoding="UTF-8"?>
<?eclipse version="3.2"?>
<plugin>
...
<extension
point="org.eclipse.help.toc">
<toc file="/help/en/toc.xml" primary="true"/>
</extension>
<extension
point="org.eclipse.help.contexts">
<contexts
file="/help/en/contexts_socketTransport.xml"
plugin="Socket_Transport"/>
</extension>
</plugin>
org.eclipse.help.toc extension point makes the connection to the WorkSpace Studio help system left navigation area.
The <toc file...> entry references the toc.xml file containing the help topic hierarchy you create for your transport help.
primary=“true” attribute is important. If set to true, your transport table of contents appears at the top level of the WorkSpace Studio help system. Set it to true if you are packaging your custom transport plug-in as a JAR file.If set to false, WorkSpace Studio expects your toc.xml to be merged into an existing toc.xml hierarchy, such as the main ALSB help system. See the following toc.xml section for more information.
org.eclipse.help.contexts lets you implement Eclipse-based context-sensitive (F1) help for your transport. Context-sensitive help topic links appear in the Related Topics area of the Help view in WorkSpace Studio.For details on plug-in packaging, see Developing ALSB Transports for WorkSpace Studio.
The toc.xml file determines how your custom transport help appears in the left navigation area of the WorkSpace Studio help system. You can provide your transport help at the top level of the WorkSpace Studio help system table of contents (Listing 3-2) or merged into the ALSB transport help topics (Listing 3-3).
<?xml version="1.0" encoding="UTF-8" standalone="yes" ?>
<?NLS TYPE="org.eclipse.help.toc"?>
<toc label="Socket Transport Sample">
	<topic label="Socket Transport Configuration Page (Business
       Services)" href="help/en/tpSOCKETTransportBizService.html"/>
	<topic label="Socket Transport Configuration Page (Proxy Services)"
       href="help/en/tpSOCKETTransportProxyService.html"/>
	<topic label="Configuring the Socket Transport Sample (ALSB
       Console)" href="help/en/example.html"/>
</toc>
If you add your transport help as a top-level entry in the WorkSpace Studio help system, be sure to set primary=“true” in the org.eclipse.help.toc extension point in plugin.xml.
<?xml version="1.0" encoding="UTF-8" standalone="yes" ?>
<?NLS TYPE="org.eclipse.help.toc"?>
<toc link_to="../com.bea.alsb.docs/toc.xml#alsbTransports"
    label="Socket Transport Sample">
	<topic label="Socket Transport Configuration Page (Business
       Services)" href="help/en/tpSOCKETTransportBizService.html"/>
	<topic label="Socket Transport Configuration Page (Proxy Services)"
       href="help/en/tpSOCKETTransportProxyService.html"/>
	<topic label="Configuring the Socket Transport Sample (ALSB
       Console)" href="help/en/example.html"/>
</toc>
The toc.xml merge illustrated in Listing 3-3 tells the WorkSpace Studio help framework to merge your table of contents at that location in the main ALSB help toc.xml that contains an anchor called alsbTransports.
primary=“false” in the org.eclipse.help.toc extension point in plugin.xml.This toc.xml merging, which uses a relative reference to another plug-in, is possible only when you package your transport plug-in as an exploded directory.
The context.xml file, shown in Listing 3-4, maps the context IDs of your transport configuration wizard and editor pages to help topics. When users press F1 on your transport configuration pages, WorkSpace Studio displays your help links in the Help view, as shown in Figure 3-6.
<?xml version="1.0" encoding="UTF-8"?>
<?NLS TYPE="org.eclipse.help.contexts"?>
<contexts>
    <!-- Default Socket Transport help -->
<context id="tpSOCKETTransportBizService"
	title="Socket Transport Configuration page (Business Service)">
    <description>The Sample socket transport illustrates Transport SDK
    concepts.</description>
	<topic href="help/en/tpSOCKETTransportBizService.html"
	label="Socket Transport Configuration Page (Business Services)"/>
</context>
<context id="tpSOCKETTransportBizWizard"
	title="Socket Transport Configuration page (Business Service)">
    <description>The Sample socket transport illustrates Transport SDK
    concepts.</description>
	<topic href="help/en/tpSOCKETTransportBizService.html"
	label="Socket Transport Configuration Page (Business Services)"/>
</context>
<context id="tpSOCKETTransportProxyService"
	title="Socket Transport Configuration page (Proxy Service)">
    <description>The Sample socket transport illustrates Transport SDK
    concepts.</description>
	<topic href="help/en/tpSOCKETTransportProxyService.html"
	label="Socket Transport Configuration Page (Proxy Services)"/>
</context>
<context id="tpSOCKETTransportProxyWizard"
	title="Socket Transport Configuration page (Proxy Service)">
    <description>The Sample socket transport illustrates Transport SDK
    concepts.</description>
	<topic href="help/en/tpSOCKETTransportProxyService.html"
	label="Socket Transport Configuration Page (Proxy Services)"/>
</context>
</contexts>
<context> entries:Also notice that the four entries reference only two HTML files: one for business service configuration in the wizard and the editor and one for proxy service configuration in the wizard and the editor.
context id attribute value is the context ID of the wizard or editor user interface.topic href attribute tells WorkSpace Studio which help topic to link to when the user presses F1.topic label attribute determines the link text that appears in the Related Topics area of the WorkSpace Studio Help view.description element provides the text above the displayed link when the user presses F1.context id attribute, following the exact text and case sensitivity. If your id values are incorrect, context-sensitive help will not work for your transport.
The <TRANSPORT_ID> value comes from your implementation of the TransportProvider class, where you set the String ID of the transport. Notice that the <TRANSPORT_ID> must be all uppercase letters even if you named the transport ID with lowercase letters.
You have a lot of flexibility in deciding what type of help content to provide, from a simple page of text with no graphics to multiple pages with many graphics, PDF files, embedded video and so on.
For example, you could create a single HTML file and reference it from the toc.xml and context.xml files; or you could create separate help files that describe the transport configuration fields for business services and proxy services and also provide a high-level overview, pointing at the three help files in different combinations from toc.xml and context.xml.
You can store your help topics and resources anywhere in your transport plug-in, as long as you reference them correctly in toc.xml and/or context.xml.
If you want your custom transport help to look like the ALSB transport help, use the existing ALSB transport plug-in HTML files and CSS. Transport help files are located in ALSB_HOME/eclipse/plugins/com.bea.alsb.transports.<transport>_<version>/help/en.
Because of potential user interface and functionality differences between transport configuration in WorkSpace Studio and the ALSB console, consider creating separate help topics for WorkSpace Studio and for the ALSB console.
Your transport plug-in should contain the following:
Whether you package your transport plug-in as a JAR or as an exploded directory, following is a recommended packaging structure for your transport help with relation to other resources:
Notice that with the /en directory the help is packaged to support localization. To provide localization, you must create a plug-in for each locale, as described in the Eclipse documentation.
| Note: | You can also package your help files in a doc.zip file. For more information, see Help server and file locations in the Eclipse Platform Plug-In Development Guide. |
For complete information on the Eclipse help framework, see the Eclipse help system at http://help.eclipse.org/help32/topic/org.eclipse.platform.doc.isv/guide/ua_help.htm.
For information on plug-in packaging, see Developing ALSB Transports for WorkSpace Studio.
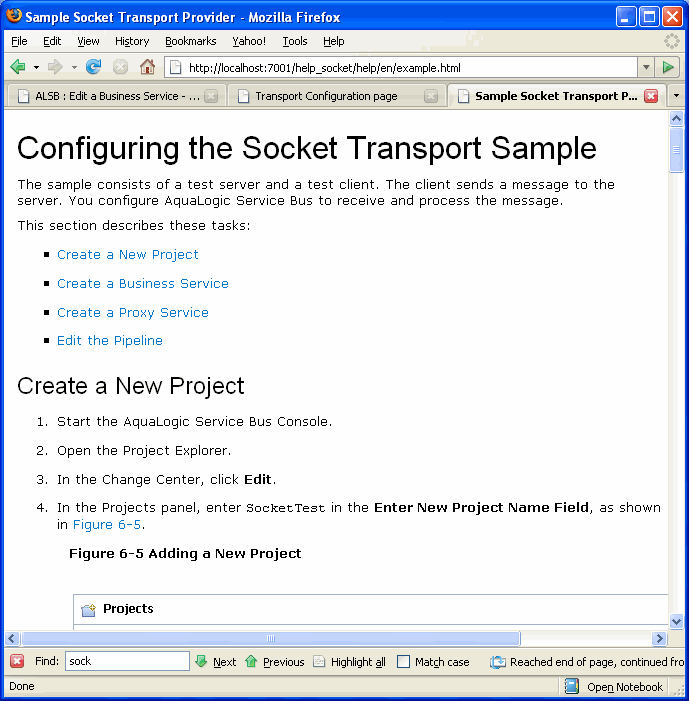
This section shows you how to provide help for your custom transport at run time in the ALSB console. ALSB displays custom transport help as a stand-alone help page in a browser, as shown in Figure 3-8.
Figure 3-9 provides a high-level view of the ALSB console help framework for custom transports.
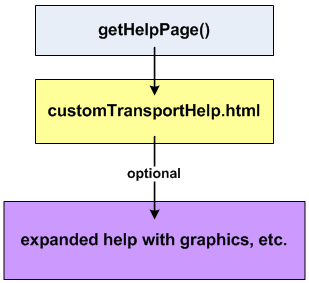
By implementing a specific ALSB interface, you use the getHelpPage() method to launch a single HTML page when the user clicks Help in the ALSB console when your user interface has focus. The HTML file can contain the following:
In most situations, you should be able to provide all the help for your custom transport with text and inline formatting.
However, if you want to provide full-featured Web-based help that includes graphics and other external resources, those resources must be hosted in a Web application or an external Web site. You must either reference those external resources in the HTML file or provide a link from the HTML file to an external location. For example, the sample socket transport help provides a link from the starting HTML file to a help topic with graphics that is running in a custom Web application. Using an embedded JavaScript call, you could also set up your HTML file to automatically redirect to the expanded help URL you want.
Following are the tasks involved in creating custom transport help in the ALSB console:
To develop the configuration user interface for your custom transport, you implement the TransportUIBinding interface in a custom class. To provide help for your transport configuration user interface in the ALSB console, you must also implement the CustomHelpProvider interface. CustomHelpProvider contains the getHelpPage() method you need to launch help for your transport configuration page in the ALSB console.
The sample socket transport implements CustomHelpProvider in its SocketTransportUIBinding.java class, located at ALSB_HOME/samples/servicebus/sample-transport/src/com/bea/alsb/transports/sock.
Listing 3-5 contains snippets that illustrate the implementation of CustomHelpProvider.
public class SocketTransportUIBinding
    implements TransportUIBinding, CustomHelpProvider {
.
.
.
  public Reader getHelpPage() {
    String helpFile = "help/en/contexts_socketTransport.html";
    ClassLoader clLoader = Thread.currentThread().getContextClassLoader();
    InputStream is = clLoader.getResourceAsStream(helpFile);
    InputStreamReader helpReader = null;
    if(is!=null)
      helpReader = new InputStreamReader(is);
    else
      SocketTransportUtil.logger
        .warning(SocketTransportMessagesLogger.noHelpPageAvailableLoggable().
                getMessage(uiContext.getLocale()));
    return helpReader;
  }
}
In Listing 3-5, Reader getHelpPage() returns a Reader stream that the ALSB console uses to send the HTML page to the browser. The helpFile path is relative to the root within the transport JAR.
If you are providing help in multiple languages, use
TransportUIContext.getLocale() to help provide the appropriate path to the localized content; in this case, providing the locale value for /help/<locale>/your.html.
Create an HTML file for the getHelpPage() method to launch, as illustrated by help/en/contexts_socketTransport.html in Listing 3-5.
If you want to keep your help implementation simple, create the HTML file to use text, inline CSS definitions, and inline JavaScript functions. If you do this, you do not need to create a separate Web application to host graphics or other external resources.
However, if you want to provide more expanded help with graphics and other resources, reference those external resources in your HTML file, such as img src=“/help_socket/help/en/wwimages/addProject.gif” or a href=“http://www.yoursite.com”.
You can also set the HTML file up to automatically redirect to the expanded help with an embedded JavaScript call, as shown in Listing 3-7, which redirects from the sample socket transport HTML page to the expanded help_socket Web application help content.
<script language="JavaScript" type="text/javascript">
<!-- Begin
window.location="/help_socket/help/en/example.html";
// End -->
</script>
The sample socket transport HTML file provides a link to its expanded help. The HTML file, contexts_socketTransport.html, is located at ALSB_HOME/samples/servicebus/sample-transport/help/en/.
If you want to go beyond a basic text HTML file for your transport help, you can provide expanded help with graphics and other resources in various ways:
Create the following files for your Web application:
In application.xml, give your Web application a context root that is used for the Web application’s root URL. For example, Listing 3-6 shows the context root for the sample socket transport Web application.
<application>
    <display-name>Socket Transport</display-name>
    <description>Socket Transport</description>
    <module>
        <web>
            <web-uri>webapp</web-uri>
            <context-root>help_socket</context-root>
        </web>
    </module>
</application>
The sample socket transport application.xml file is located at ALSB_HOME/samples/servicebus/sample-transport/META-INF/.
This entry maps the file system directory /webapp to an alias Web application root URL:
http://server:port/help_socket/
With your help files inside the Web application in a directory such as /help/en/, the full URL to your expanded help would be:
http://server:port/help_socket/help/en/index.html
But your internal links to it only need to be
/help_socket/help/en/index.html
where index.html is the landing HTML page.
In web.xml, enter a display name and description for the Web application. This is standard deployment descriptor information. For example, Listing 3-7 shows the name and description of the sample socket transport Web application.
<web-app>
    <display-name>Sample Socket Transport Help WebApp</display-name>
    <description>
        This webapp implements the help webapp for the socket transport.
    </description>
</web-app>
The sample socket transport web.xml file is located at ALSB_HOME/samples/servicebus/sample-transport/webapp/WEB-INF/.
Create and package your expanded help files inside the Web application directory. In the sample socket transport, the help files are stored in ALSB_HOME/samples/servicebus/sample-transport/help/en.
| Note: | The reason the socket transport help files are not stored in the /webapp directory is because the help directory contains help files and resources for both the WorkSpace Studio plug-in and the ALSB console. When the sample socket ANT build creates the transport JAR, transport EAR, and WorkShop Studio plug-in, it packages the help in different ways. For the transport EAR build, it moves the help files under the /webapp directory. |
Because of potential user interface and functionality differences between transport configuration in WorkSpace Studio and the ALSB console, consider creating separate help topics for WorkSpace Studio and for the ALSB console.
Your transport EAR should contain the following:


|