|
|
This chapter contains general notes about the synchronized configuration of a BEA AquaLogic Service Registry cluster and instructs how to deploy BEA AquaLogic Service Registry to a WebLogic Cluster (WebLogic-Specific Settings).
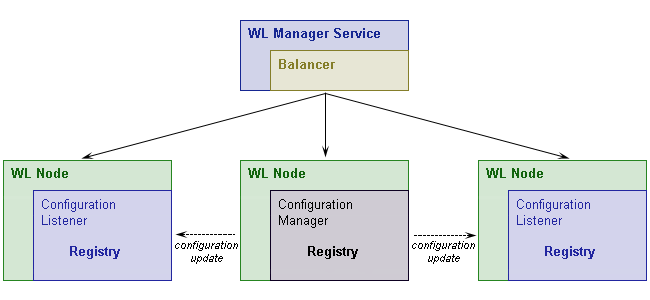
A BEA AquaLogic Service Registry cluster is a group of registries deployed on multiple servers possibly with a clustered database in the back end. It consists of a Configuration Manager, Configuration Listeners and a Load Balancer:
For security reasons, the Configuration Manager and Configuration Listener need to know the certificates of the other registries in the cluster. For more information, see Security Certificates Setup.
The configuration file, configurator.xml, is located in the following directory on each BEA AquaLogic Service Registry installation in the cluster:
By default, it resembles the following configuration.
<?xml version="1.0" encoding="UTF-8"?>
<config name="configurator" savingPeriod="5000" local="false">
    <configManagerUrls>
        <url>https://10.0.0.127:8443</url>
        <managerServiceUrlPath>/uddi/configuratorManager</managerServiceUrlPath>
        <managerConfiguratorUrlPath>/uddi/configurator</managerConfiguratorUrlPath>
    </configManagerUrls>
    <IPFilter name="configuratorFilter">
        <subnet IPAddress="10.0.0.127" subnetMask="255.255.255.255"/>
    </IPFilter>
    <configManager cluster="false" resendInterval="300">
        <configuratorListeners>
        <!--
        <configuratorListener>
            https://hostname:8443/uddi/configuratorListener
            </configuratorListener>
        -->
        </configuratorListeners>
    </configManager>
...
</config>
incoming IP address and subnet mask) == (IPaddress and subnetMask)
| Note: | Cluster configuration events are logged in the REGISTRY_HOME/log/configuratorEvents.log file. |
Because an HTTPS connection is used between the manager and clients, you must import certificates on both sides. On the manager side, you need the certificates of all clients and each client needs the certificate from the manager. These certificates must be imported into the pstore.xml file located in the REGISTRY_HOME/conf directory.
Use the PStoreTool (described in PStore Tool in the Administrator’s Guide in Using the AquaLogic Service Registry.). For the standalone installation, the certificate file is located in REGISTRY_HOME/doc/registry.crt. If BEA AquaLogic Service Registry is ported to an application server, use a web browser to obtain the server's certificates and export them into a file.
| Note: | If BEA AquaLogic Service Registry is installed as a cluster of standalone registries, you must ensure that each cluster node shares the same private key that is used for checking of authentication token validity. (By a standalone registry, we mean that BEA AquaLogic Service Registry that is not ported to an application server). |
To setup each cluster node to share the same private key that is used for checking of authentication token validity, choose one of the cluster nodes and copy it's private key to all other nodes in the cluster by entering these commands at a command prompt: (You do not need to do this if BEA AquaLogic Service Registry is ported to an application server)
PStoreTool copy -alias authTokenIdentity -keyPassword SSL_CERTIFICATE_PASSWORD -config REGISTRY_HOME\conf\pstore.xml -config2 TARGET_REGISTRY_HOME\conf\pstore.xmlPStoreTool export -alias authTokenIdentity -certFile authTokenIdentity.crt -config REGISTRY_HOME\conf\pstore.xmlPStoreTool add -certFile authTokenIdentity.crt -config TARGET_REGISTRY_HOME\conf\pstore.xml
SSL_CERTIFICATE_PASSWORD is a ssl certificate password entered during the installation
TARGET_REGISTRY_HOME is the directory where one of cluster nodes is installed.
This cluster contains three BEA AquaLogic Service Registry servers, BEA AquaLogic Service Registry 1 (IP 10.0.0.1), BEA AquaLogic Service Registry 2 (IP 10.0.0.2), and BEA AquaLogic Service Registry 3 (IP 10.0.0.3). The Configuration Manager Server is BEA AquaLogic Service Registry 1.
<?xml version="1.0" encoding="UTF-8"?>
<config name="configurator" savingPeriod="5000" local="false">
    <configManagerUrls>
        <url>https://10.0.0.1:8443</url>
        <managerServiceUrlPath>/uddi/configuratorManager</managerServiceUrlPath>
        <managerConfiguratorUrlPath>/uddi/configurator</managerConfiguratorUrlPath>
    </configManagerUrls>
    <IPFilter name="configuratorFilter">
        <subnet IPAddress="10.0.0.1" subnetMask="255.255.255.255"/>
        <subnet IPAddress="10.0.0.2" subnetMask="255.255.255.255"/>
        <subnet IPAddress="10.0.0.3" subnetMask="255.255.255.255"/>
    </IPFilter>
    <configManager cluster="true">
        <configuratorListeners>
            <configuratorListener>
              https://10.0.0.2:8443/uddi/configuratorListener
            </configuratorListener>
            <configuratorListener>
              https://10.0.0.3:8443/uddi/configuratorListener
            </configuratorListener>
        </configuratorListeners>
    </configManager>
    ...
</config>
To port BEA AquaLogic Service Registry to a WebLogic cluster follow these steps:
cluster, and the configuration manager, named myserver, is running on 10.0.0.79. The nodes in the WebLogic cluster are named:%WEB_LOGIC_HOME%\weblogic81\server\lib. CertGen is located in weblogic.jar's utils package. Invoke it with the following command:java -cp weblogic.jar utils.CertGen changeit kilacert kilakey export kila.mycompany.com
The output resembles the following:
kilacert kilakey export kila.mycompany.com
        ...... Will generate certificate signed by CA from CertGenCA.der file
        ...... With Export Key Strength
        ...... Common Name will have Host name kila.mycompany.com
        ...... Issuer CA name is
        CN=CertGenCAB,OU=FOR TESTING ONLY,O=MyOrganization,L=MyTown,ST=MyState,C=US
Use the password changeit for starting particular UDDI node servers. The output file with the certificate is kilacert, and kilakey is the output file containing the private key. Generate certificates for all remaining nodes from their CertGen tools. (In our case, the other node is fido.mycompany.com.)
kilacert.der and fidocert.der), import them to pstore.xml using the PstoreTool. Also include CertGenCA.der (from the directory %WEB_LOGIC_HOME%\weblogic81\server\lib). The pstore.xml file is now ready. For more info about WebLogic certificates and SSL settings, see
Configuring SSL in BEA WebLogic Server product documentation.
http://e-docs.bea.com/wls/docs92/secmanage/ssl.html
| Note: | If you want to use both a standalone server and a ported application server, make a backup copy of pstore.xml. When you have performed the following steps, replace pstore.xml with the backup copy. |
configurator.xml as described above (where the application server context is wasp).| Note: | If you want to use both a standalone server and a ported application server, make a backup copy of configurator.xml. When you have perfumed the following steps, replace configurator.xml with the backup copy. |
<?xml version="1.0" encoding="UTF-8"?>
<config name="configurator" savingPeriod="5000" local="true">
    <configManagerUrls>
        <url>https://kila.mycompany.com:7102</url>
        <managerServiceUrlPath>/wasp/uddi/configuratorManager</managerServiceUrlPath>
        <managerConfiguratorUrlPath>/wasp/uddi/configurator</managerConfiguratorUrlPath>
    </configManagerUrls>
    <IPFilter name="configuratorFilter">
        <subnet IPAddress="10.0.0.79" subnetMask="255.255.255.255"/>
        <subnet IPAddress="10.0.0.134" subnetMask="255.255.255.255"/>
    </IPFilter>
    <configManager cluster="true">
        <configuratorListeners>
            <configuratorListener>
              https://fido.mycompany.com:7102/wasp/uddi/configuratorListener
            </configuratorListener>
        </configuratorListeners>
    </configManager>
    <UDDIInterceptorChain name="configuratorApiChain">
    </UDDIInterceptorChain>
    <UDDIInterceptorMapping>
        <mapping UDDIInterceptorChainName="configuratorApiChain"
	      UDDIServiceInterface="org.systinet.uddi.configurator.ConfiguratorApi"/>
    </UDDIInterceptorMapping>
</config>
REGISTRY_HOME/conf/porting/weblogic/wasp.war) as described in Cluster Configuration Example.In our case, the http port is 7101, the https port is 7102, and the application server context is wasp.
log4j.appender.eventLog.File, log4j.appender.errorLog.File, and wasp.war\conf\log4j.config are valid on all cluster nodes.wasp.war into all WebLogic cluster nodesYou must also prepare the package for balancer which will be deployed only to cluster manager server. To do so:
<?xml version="1.0" encoding="UTF-8"?>
<!DOCTYPE web-app PUBLIC "-//Sun Microsystems, Inc.//DTD Web Application 2.3//EN"
       "http://java.sun.com/dtd/web-app_2_3.dtd">
<web-app>
  <servlet>
     <servlet-name>HttpClusterServlet</servlet-name>
     <servlet-class>weblogic.servlet.proxy.HttpClusterServlet</servlet-class>
     <init-param>
        <param-name>WebLogicCluster</param-name>
        <param-value>kila:7101|fido:7101</param-value>
     </init-param>
  </servlet>
  <servlet>
      <servlet-name>FileServlet</servlet-name>
      <servlet-class>weblogic.servlet.FileServlet</servlet-class>
  </servlet>
  <servlet-mapping>
     <servlet-name>FileServlet</servlet-name>
     <url-pattern>/uddi/webdata*</url-pattern>
  </servlet-mapping>
  <servlet-mapping>
     <servlet-name>HttpClusterServlet</servlet-name>
     <url-pattern>/</url-pattern>
  </servlet-mapping>
  <servlet-mapping>
    <servlet-name>FileServlet</servlet-name>
    <url-pattern>/uddi/bsc/webdata*</url-pattern>
  </servlet-mapping>
</web-app>
weblogic.xml containing the following text, where /wasp is the context of BEA AquaLogic Service Registry ported to this application server. Your text must be customized for your own installation.<!DOCTYPE weblogic-web-app PUBLIC "-//BEA Systems, Inc.//DTD Web Application 8.1//EN"
"http://www.bea.com/servers/wls810/dtd/weblogic810-web-jar.dtd">
<weblogic-web-app>
<context-root>/wasp</context-root>
</weblogic-web-app>
%PACKAGE_HOME%\uddi\webdata. REGISTRY_HOME\app\uddi\bsc.jar and copy the content of the webroot subdirectory from the jar to %PACKAGE_HOME%\uddi\bsc\webdataREGISTRY_HOME\app\uddi\web.jar and copy the content of the webroot subdirectory from the jar to %PACKAGE_HOME%\uddi\webdata.%PACKAGE_HOME% into the file balancer.war using jar or some other compression utility.
This section describes how to configure a cluster in an ALSR domain.
For example, you could create an administration server with two managed servers (mgr_1, mgr_2) and a HTTP load balancer.
startWeblogic.cmd file in your domain. For example, <BEA_HOME>user_projects/domains/<DOMAIN_NAME>/bin/.JAVA_OPTIONS line:
Set JAVA_OPTIONS= %JAVA_OPTIONS% -Djava.security.auth.login.config=<ALSR_INSTALL_DIR>\conf\jaas.config
The ALSR install will copy the registry.war into the <ALSR_INSTALL_DIR>/conf/porting/weblogic/build directory.
registry.war into a temporary directory (<TEMP>) and unjar it. registry.war file as indicated in step 8 through step 10.<TEMP>/app/uddi/conf/configurator.xml:<configManagerUrls> to point to the ALSR Configuration Manager URL (mgr_1):
https://<mgr_1_hostName:mgr_1_port
<configuratorFilter> is mgr_1.cluster=true in <configManagerUrls>.
https://<mgr_2_hostName>:<mgr_2_ssl_port>/registry/uddi/configuratorListener
<TEMP>/app/uddi/conf/node.xml, add the following to the <webUIUrl>:
https://<mgr_1_hostName>:mgr_1_ssl_port>/registry/uddi
<TEMP>/app/uddi/web.xml, add the following line to the <url>:
http://<mgr_1_hostName>:mgr_1_port/registry
<ALSR_INSTALL_DIR>/bin to update the pstore.xml file in <ALSR_INSTALL_DIR>/conf with the security credentials as described in Security Certificates Setup. pstore.xml file in <TEMP>/conf with the new one from the previous step. registry.war.


|