| Oracle® Enterprise Service Bus Developer's Guide 10g (10.1.3.3.0) Part Number E10295-01 |
|
|
View PDF |
| Oracle® Enterprise Service Bus Developer's Guide 10g (10.1.3.3.0) Part Number E10295-01 |
|
|
View PDF |
This chapter discusses creating inbound and outbound services.
This chapter contains the following topics:
The services you create with Oracle JDeveloper enable you to integrate the Oracle Enterprise Service Bus with file systems, database tables, database queues, Java Message Services (JMS), MQ services, and Oracle E-Business Suite and any SOAP service. In addition to these services, which get messages into the enterprise service bus, Oracle Enterprise Service Bus provides a service known as a routing service, which determines the path that messages take across the enterprise service bus to get from a source endpoint to a target endpoint.
Services are the core of the enterprise service bus. You design an Oracle Enterprise Service Bus by creating a variety of services to move messages onto, across, and off of the service bus.
To move data on to the service bus, you use inbound adapter services or have an external application call an ESB service; to move data off of the service bus, you use an outbound adapter service or invoke an external SOAP service. To move data across the service bus and transform the data structure from the structure presented by the source application to the structure required by the target application you use routing services.
The following sections describe adapter services and routing services in more detail.
See Chapter 5, "Creating Routing Services and Routing Rules" for information about routing services.
Oracle Enterprise Service Bus provides support for creating services for the Oracle Technology adapters. The Oracle Technology adapters enable you to integrate mainframe and legacy applications with enterprise resource planning (ERP), customer relationship management (CRM), database, and messaging systems.
Table 4-1 provides a summary of the Oracle Technology adapter services you can create. Adapters services can be configured as inbound or outbound adapters services. Inbound adapter services send messages to the enterprise service bus, while outbound adapter services send messages to an application or system external to the enterprise service bus.
Table 4-1 Summary of Oracle Technology Adapters
| Adapter Service | Description |
|---|---|
|
AQ Adapter Service |
Sends or receives messages from Oracle Advanced Queuing single or multiconsumer queues |
|
Database Adapter Service |
Sends or receives messages extracted from an Oracle Database table or created by executing a stored procedure |
|
File Adapter Service |
Sends or receives messages from a file in the local file system |
|
FTP Adapter Service |
Sends or receives messages from a file at a remote FTP server |
|
JMS Adapter Service |
Sends or receives messages from a JMS queue or topic |
|
MQ Adapter |
Sends or receives messages from IBM's MQ Series |
|
Oracle Applications Adapter Service |
Sends or receives messages from an Oracle E-Business Suite interface |
This section includes the following topics:
See Also:
Oracle Application Server Adapter Concepts for an overview of adapters
Oracle Application Server Adapter for Files, FTP, Databases, and Enterprise Messaging User's Guide for specific details about configuring adapters for Oracle Enterprise Service Bus
Oracle Application Server Adapter for Oracle Applications User's Guide for information about using the Oracle Applications adapter for Oracle E-Business Suite
Oracle Enterprise Service Bus Quick Start Guide for a tutorial that describes how to design an enterprise service bus that uses a file adapter service, a database adapter services and a JMS adapter service.
Oracle JDeveloper provides wizards that assist you in creating inbound and outbound adapter services. The wizard collects the necessary information to generate the WSDL file that defines the service.
To add an adapter service, perform the following steps:
In the Application navigator, navigate to the ESB project for which you want to create an adapter service, expand the Resources folder and double click project-name.esb, where project-name is the name of the project to which you want to add the SOAP service.
The Design tab for the project is displayed.
In the Component Palette, click the down arrow and select Adapter Services if not already selected.
Drag and drop an adapter into the Design tab.
The create adapter service dialog box for the specific adapter type opens.
Enter the Name, System/Group, and an optional Description for the adapter.
Name: Enter a unique name across the ESB system in which you are creating the service; spaces are not allowed. For example: CustomerDataFileIn.
System/Group: Click the flashlight (torch) to open the ESB Service Group Browser dialog and select the system/group for this service. For example: CustomerData under Systems/Groups in project.
Description: Enter an optional description. For example: This adapter service reads records from a local data file.
To complete WSDL File field, you can click the following icons to the right of the field:
Configure adapter service wsdl icon
Click this icon to launch the adapter configuration wizard for the specific type of adapter you have selected from the Component Palette. The wizard guides you through the setups.
For details about configuring the AQ, database, file, FTP, JMS, and MQ adapters in Oracle JDeveloper, see Oracle Application Server Adapter for Files, FTP, Databases, and Enterprise Messaging User's Guide. For details about configuring the Oracle application adapter for Oracle E-Business Suite, see Oracle Application Server Adapter for Oracle Applications User's Guide.
Service Explorer icon
Click this icon to launch the Service Explorer and search for deployed services.
In the Port Type field, click the down arrow, and then select the port type for the routing service.
Click OK.
After you complete the process for creating an adapter service, an icon for the service appears in the Design tab. In the Applications Navigator, files with esbsvc and wsdl extensions are created in the Resources folder of the project. The esbsvc file provides the definition of the ESB service. The wsdl file defines the input and output messages for this instance flow, the supported client interface and operations, and other features.
In addition to the wsdl files that are named with the adapter service name, there are standard JCA header files that are created with a new adapter. The header file name is of the form adapter_typeAdapterOutboundHeader.wsdl or adapter_typeAdapterInboundHeader.wsdl, depending on whether the service is inbound or outbound. The adapter_type specifies the type of adapter, such as DB, file, or jms. For information about the adapter inbound and outbound header WSDL files, see Oracle Application Server Adapter for Files, FTP, Databases, and Enterprise Messaging User's Guide.
When you create an inbound adapter service, Oracle JDeveloper automatically creates a routing service for the newly created adapter and sets up the link between the two. The name of this routing service is the name of the inbound adapter appended with the string _RS, as an abbreviation for routing service. See "Specifying Routing Rules".
To modify an existing adapter service, perform the following steps:
Double click the upper section of the adapter service icon in the Design tab. The cursor is shaped like a hand on that region of the icon.
Make your changes to the adapter service information that can be modified. Note that the name of the service cannot be changed.
In the Endpoint Properties panel, you can add, delete, update, or view endpoint properties for the service. Click the + next to Endpoint Properties to open the panel. See "Using Endpoint Properties".
Save your changes.
To delete an adapter service, perform the following steps:
Select the adapter service icon in the Design tab.
Click the large red X at the top of Design tab to delete the selected adapter service.
Confirm that you want to delete the selected service.
Save your changes.
Note:
Do not delete adapter services in the Application Navigator.For an example of the information that is collected by Oracle JDeveloper wizards, assume you want to create inbound file adapter service to read in local XML files from the c:\customer\in directory. To create this adapter, perform these steps:
In the Applications navigator, navigate to the ESB project for which you want to create a SOAP service, expand the Resources folder and double click project-name.esb, where project-name is the name of the project to which you want to add the SOAP service.
The Design tab for the project is displayed.
In the Component Palette, click the down arrow and select Adapter Services if not already selected.
Drag and drop File Adapter into the Design tab.
The Create File Adapter Service dialog box opens.
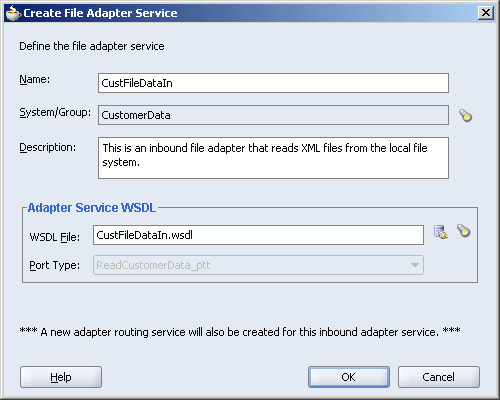
In the Create File Adapter Service dialog box, enter the name.
Enter a unique name across the ESB system in which you are creating the service; spaces are not allowed.
For example: CustFileDataIn
In the Create File Adapter Service dialog box, enter the system/group.
Click the browse (flashlight) icon to display the ESB Service Group Browser dialog. Locate the system/group where you want to place this adapter. For example: CustomerData under ESB > Systems/Groups in project
In the Create File Adapter Service dialog box, enter the optional description.
For example: File adapter service for inbound data files
In the Create File Adapter Service dialog box, enter the WSDL file.
Click the Configure adapter service wsdl icon to launch the Adapter Configuration Wizard.
In the Welcome page, click Next.
In the Service page, accept the Service Name and click Next.
You can add an optional description.
In the Operation page, enter the Operation type and name, then click Next.
For example:
Operation type: Read file
Operation Name: ReadCustFileData
In the File Directories page, update the directory information and click Next.
For example:
Directory Names are Specified as: Physical Path
Directory for Incoming Files (physical path): c:\customer\in
Delete files after successful retrieval: check box to enable
Accept the other default setups on the page.
In the File Filtering page, update the filtering setups and click Next.
For example:
Name Patterns are specified with: File Wildcards (po*.txt)
Include Files with Name Pattern: *.xml
Accept the other default setups on the page.
In the File Polling page, update the polling setups and click Next.
Polling Frequency: 10 seconds
Minimum File Age: 0 seconds
Accept the other default setups on the page.
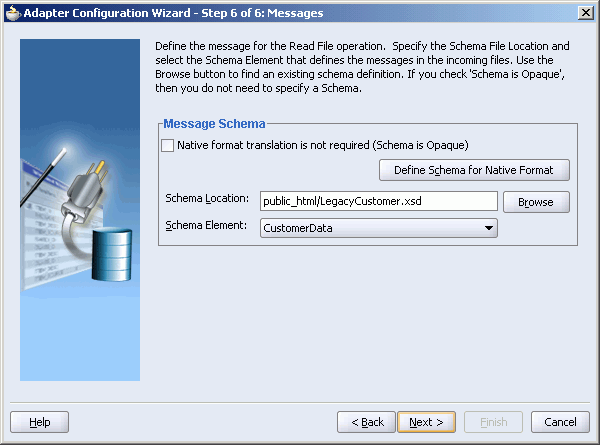
In the Messages page, specify the message schema and click Next.
For example:
To locate an existing CustomerData schema, click the Browse button for Schema Location to display the Type Chooser dialog box. Expand Project Schema Files /Legacy Customer.xsd and select CustomerData. Click OK.
Accept the other default setups on the page.
Figure 4-1 Adapter Configuration Wizard - Messages Page
In the Finish page, click Finish to complete the Adapter Configuration Wizard.
In the Create File Adapter Service dialog box, click OK to create the service.
Figure 4-2 Create File Adapter Service Dialog
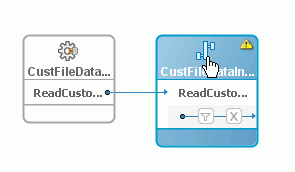
The new adapter service appears in the Design tab with a new routing service. The routing service has the _RS suffix attached to the name.
For example, when use the Oracle JDeveloper Adapter Configuration wizard to create an inbound file adapter service named CustFileDataIn, Oracle JDeveloper automatically creates a routing service named CustDataFileIn_RS and creates a connection from the CustDataFileIn adapter service to the CustDataFileIn_RS routing service, as illustrated in Figure 4-3.
Figure 4-3 Automatic Routing Service Creation
You now need to add the routing rules for this new routing service. See "Specifying Routing Rules".
A SOAP invocation service enables you to integrate external Web services, such as Apache AXIS, JDeveloper Web Services and .NET, into Oracle Enterprise Service Bus.
This section includes the following topics:
This section describes how to use Oracle JDeveloper to create an outbound SOAP service that integrates with an external service.
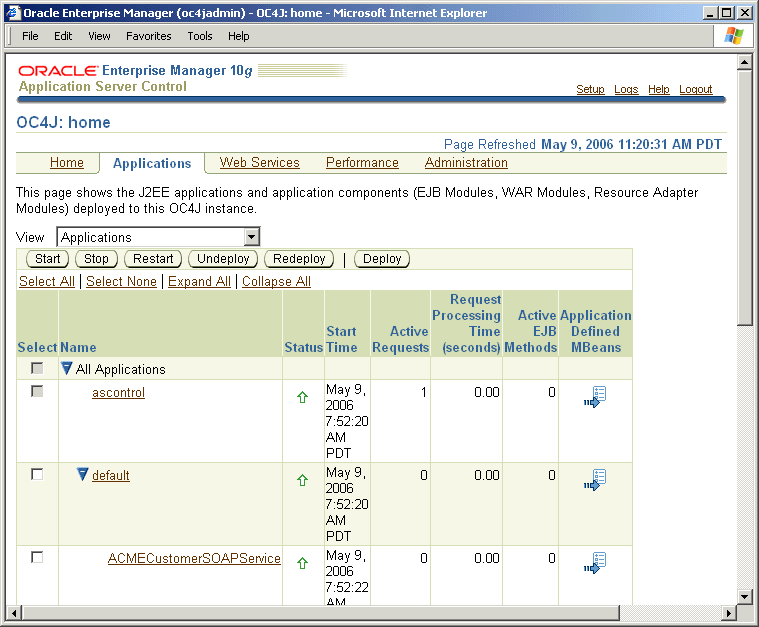
The external service could be an application deployed in an OC4J instance, such as ACMECustomerSOAPService shown in Figure 4-4.
Figure 4-4 Oracle Application Server Control – Applications
To create an outbound SOAP service with Oracle JDeveloper, follow these steps:
In the Applications navigator, navigate to the ESB project for which you want to create a SOAP service, expand the Resources folder and double click project-name.esb, where project-name is the name of the project to which you want to add the SOAP service.
The Design tab for the project is displayed.
In the Component Palette, click the down arrow and select ESB services if not already selected.
Drag and drop SOAP Service into the Design tab.
The Create SOAP Invocation Service dialog box opens.
In the Create SOAP Invocation Service dialog box, enter the following information:
Name
Enter a unique name across the ESB system in which you are creating the service; spaces are not allowed.
For example: ACMEService
System/Group
For example: CustomerData
Description
For example: A SOAP Service
WSDL File
For example: http://localhost:8888/ESBSamples-AcmeCust-context-root/ReceiveCustomerDataSoapHttpPort?WSDL
Port Type
For example: ReceiveCustomerData
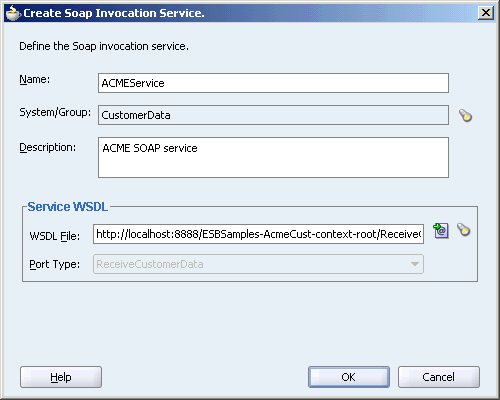
Click OK when finished.
The new SOAP service appears in the Design tab.
Now you need to add a routing rule that has the new SOAP service as a target. For information about defining routing rules, see "Specifying Routing Rules".
You can modify SOAP services in Oracle JDeveloper by opening the SOAP service property page.
To modify a SOAP service:
In the Oracle JDeveloper Design tab, double click the upper section of the SOAP service icon. The cursor is shaped like a hand on that region of the icon.
Make your changes to the service information that can be modified. Note that the name of the service cannot be changed.
In the Endpoint Properties panel, you can add, delete, update, or view endpoint properties for the service. Click the + next to Endpoint Properties to open the panel. See "Using Endpoint Properties".
Save your changes.
You can delete a SOAP service in the Oracle JDeveloper Design tab.
To delete a SOAP service:
In the Oracle JDeveloper Design tab, select the SOAP service icon.
Click the large red X at the top of Design tab to delete the selected service.
Confirm that you want to delete the selected service.
Save your changes.
Note:
Do not delete SOAP services in the Application Navigator.You can browse for deployed services with the Service Explorer. The Service Explorer is available when creating a adapter, routing, or SOAP service.
To browse for deployed services, perform the following steps.
If you have not already done so, open the Create Adapter, Routing, or SOAP Service dialog.
Enter information for other fields on the page, such as Name, System/Group, and Description.
If you are creating a routing service, choose Select Existing WSDL in the Create Routing Service dialog.
To the right of the WSDL Location field, click the flashlight (torch) icon to open the Service Explorer dialog.
Select a branch of the Service Explorer tree, such as BPEL Server Connection.
Expand the server connection folder to view the existing projects.
For example, expand the integration server connection that is set up.
Expand the project to view the deployed services.
Select a deployed service.
Click OK when done to close the dialog box.
The Service Explorer dialog box closes and you are returned to the Create Service dialog box.
Each adapter type and SOAP service has a specific set of endpoint properties that are provided when the service is created. For example, you can specify a new URL, or URLs, for the Location endpoint property of a SOAP service. When you specify multiple URLs for Location endpoint property, the SOAP service can be exposed externally to multiple endpoints. If one endpoint is down, Oracle Enterprise Service Bus redirects the request to alternative endpoint.
You can also change the RetryCount and RetryInterval endpoint properties to override the default values for adapter error handling. For information about adapter error handling, see "Inbound Adapter Error Handling".
There are two types of endpoint properties: predefined and logical.
Predefined (override) properties
These properties are defined in the adapter wizard and the value can be overridden or a value can be provided at runtime.
Logical properties
For the file and FTP adapters you can specify that the directories are logical rather than physical. These logical names appear as endpoint properties in the Endpoint Property Chooser dialog.
In addition, any adapter property can be made into a logical property by inserting a $ into the wizard value (or manually edit the WSDL file). For example, if the user specifies $myName as a value in the adapter wizard, then myName appear in the Endpoint Property Chooser dialog.
You can add, delete, update, or view endpoint properties for the service in the Endpoint Properties panel when modifying an adapter or SOAP service in Oracle JDeveloper. See "Modifying Adapter Services" and "Creating a SOAP Service". You can also access endpoints in the Property tab of the Oracle ESB Control Services view. See "Oracle ESB Control Services View".
You can add and modify endpoint properties in Oracle JDeveloper by opening the adapter or SOAP service property page.
To add or modify endpoint properties:
In the Oracle JDeveloper Design tab, double click the upper section of the adapter or SOAP service icon to open the properties page. The cursor is shaped like a hand on that region of the icon.
In the Endpoint Properties panel, you can add, delete, update, or view endpoint properties for the service.
Click the + next to Endpoint Properties to open the panel. The Endpoint Properties panel includes the following options:
Large Green Plus Sign (+) in upper right
Opens the Endpoint Properties Chooser dialog to enable you to add an endpoint property to the service. Select a property from the list in the Endpoint Properties Chooser dialog and click the OK button to add the endpoint property. Place the cursor over the property name to view the tooltip description for the property.
Large Red X in upper right
Deletes the selected endpoint property.
Name
Name of the endpoint property. Place the cursor over the property name to view the tooltip description for the property.
Value
Click in this field to enter or update the value of the endpoint property.
Select File > Save to save your changes to the property page.
You can create a partner link from BPEL to an ESB service, as shown in Figure 4-6, if SOA Suite is installed with both BPEL and ESB. For example, you can create a partner link for an Invoke activity that invokes an ESB routing service.
To create a partner link from BPEL to invoke an ESB service:
In an Oracle JDeveloper BPEL Process project, drag and a drop an Invoke activity from the Process Activities Component palette to the Design tab.
Enter a name in the Name field in the Invoke dialog.
In the Invoke dialog, click the torch icon next to Partner Link field to display the Partner Link Chooser dialog.
In the Partner Link Chooser, select Partner Links and click the magic wand to display the Create Partner Link dialog.
In the Create Partner Link dialog, enter a name in the Name field.
In the Create Partner Link dialog, click the torch icon to display the Service Explorer dialog.
In the Service Explorer dialog, select the desired ESB routing service in the Registered ESB Services tree and click OK.
In the Create Partner Link dialog, select the Partner Role from the list and click OK.
In the Create Partner Link dialog, click the magic wand next to the Input Variable field to display the Create Variable dialog.
In the Create Variable dialog, click OK.
In the Invoke dialog, click OK.
After you have successfully deployed the BPEL process to the integration server, the ESB service that you specified in the BPEL partner link will be invoked by the BPEL process.
For information about creating BPEL projects, see Oracle BPEL Process Manager Developer's Guide.
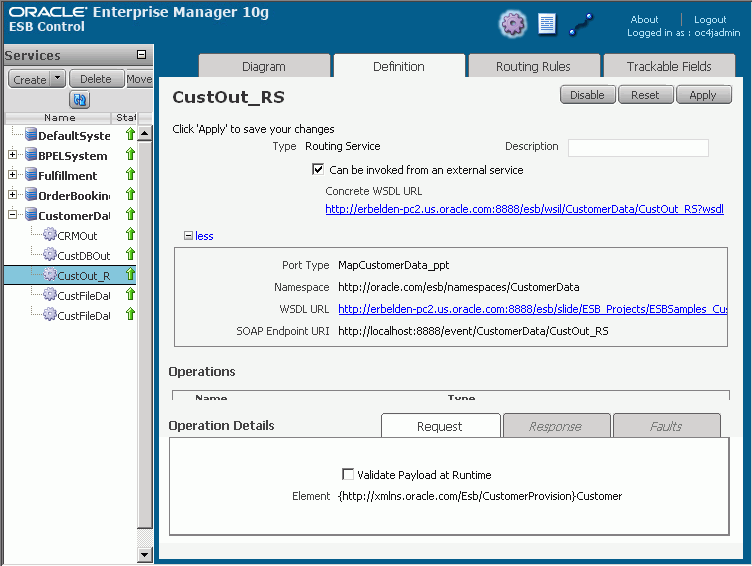
You can call an ESB service from an external service with the Concrete WSDL URL of the service. You can find the Concrete WSDL URL in the Definition tab of the Oracle ESB Control Services view, shown in Figure 4-7. Copy and paste the Concrete WSDL URL into the external tool that you are using to call the ESB service.
Note that you need to specify that the ESB service can be invoked from an external service in the service property page in Oracle JDeveloper or in the Definition tab of Oracle ESB Control. For information about the service property page in Oracle JDeveloper, see "Overview of Service Definitions and Routing Rules". For information about the service Definition tab in Oracle ESB Control, see "Viewing Service Definitions".
Figure 4-7 Oracle ESB Control – Definition Tab of Services View
For information testing an ESB service in Oracle Enterprise Manager, see "Testing the ESB Services".