| Oracle® Enterprise Service Bus Developer's Guide 10g (10.1.3.3.0) Part Number E10295-01 |
|
|
View PDF |
| Oracle® Enterprise Service Bus Developer's Guide 10g (10.1.3.3.0) Part Number E10295-01 |
|
|
View PDF |
The primary interface for developing an enterprise service bus is Oracle JDeveloper. This chapter provides an introduction to Oracle JDeveloper, an overview of the design process, and detailed descriptions of how to accomplish the tasks required to design an Oracle Enterprise Service Bus.
This chapter contains the following topics:
Oracle JDeveloper is a integrated development environment that provides tools to help you design the enterprise service bus. It includes wizards and a design panel that enable you to view the services that you create visually.
When you open Oracle JDeveloper, the interface appears as shown in Figure 1-6, "Oracle JDeveloper – Initial Display".
The following sections introduce the key components of Oracle JDeveloper:
The Connection Navigator tab, which appears in the upper left corner of Oracle JDeveloper, enables you to create connections from Oracle JDeveloper to various servers, such as an application or integration server. You can also create a connection to a database. If the Connection Navigator is not visible in your console, from the View menu, select Connection Navigator.
The Application Navigator tab, which appears in the upper left corner of Oracle JDeveloper, is the starting point of the design process. If the Applications Navigator is not visible in your console, from the View menu, select Application Navigator.
You use the Application Navigator tab to create an application workspace and an ESB project. Within an ESB project you can create multiple ESB systems. As you build the enterprise service bus, the files you create for the services, transformation maps, and so on, are presented in the Applications Navigator within the project folder.
A sample Application Navigator tab is shown in Figure 2-1. In this sample, an application workspace named ESBSamples contains an ESB project named CustomerData. See "Creating Applications and ESB Projects" for step-by-step instructions.
When you right-click a node in the Application Navigator tab, a menu of commands is displayed. The menu commands displayed depend on the node selected. For example, when you right-click an ESB project, such as CustomerData in Figure 2-1, the following commands are included in the menu:
New
This command opens the New Gallery dialog box, which provides access to dialog boxes and wizards that enable you to create new projects, create inbound and outbound adapter services, and access the document transformation tool.
Register with ESB
This command enables you to register the adapter services, transformations, and routing services that you design using Oracle JDeveloper with Oracle Enterprise Service Bus. When you register the ESB project with the ESB Server, as described in "Registering ESB Projects and Services with the ESB Server", the files are written to the ESB repository and are available from the Oracle ESB Control.
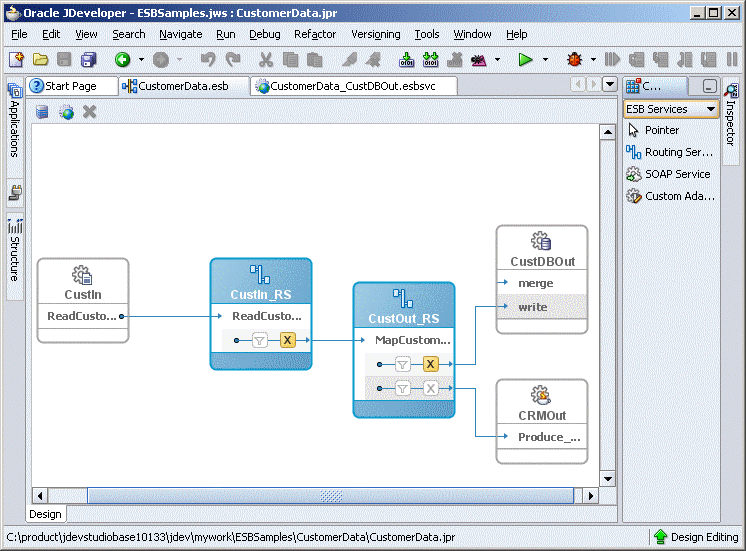
When you double-click an ESB project in the Applications Navigator, the project properties dialog displays. Click the diagram component (esb file) in the Resources folder within the project to display the Design tab and the Component Palette. If you click the down arrow under Component Palette and select ESB Services, the types of ESB services from which you can choose to build your enterprise service bus are displayed, as shown in Figure 2-2. Similarly, if you click the down arrow under the Component Palette and select Adapter Services, you can choose the type of adapter service you want to create to move messages into and out of the enterprise service bus.
The Design tab initially appears in the empty area in the middle of the figure; the Components Palette appears to its right. In Figure 2-2, the CustomerData project is selected in the Applications view and the Design tab displays the adapter and routing services in the project.
Figure 2-2 Oracle JDeveloper Design Tab and Component Palette
To create an ESB service, you drag a desired ESB service type from the Components palette and drop it onto the Design tab. When you do so, a wizard or dialog box opens to assist you in creating the desired service. Alternatively, you can create ESB services and Adapter Services using dialog boxes only, but the Design tab provides a visual method for building the enterprise service bus.
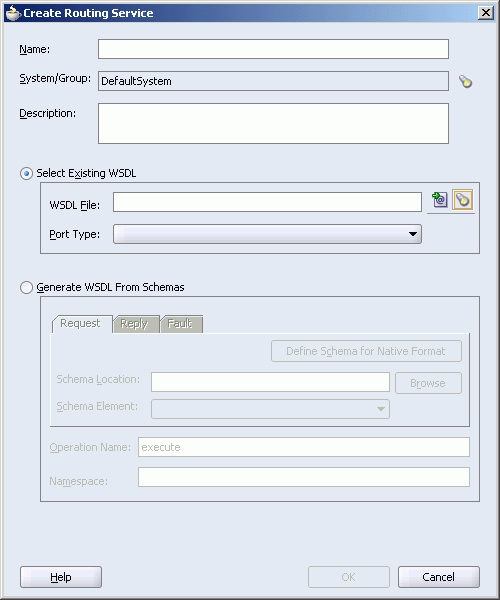
For example, you can drag and drop a Routing Service from the Component Palette to the Design tab. When you do so, the Create Routing Service dialog box opens, as shown in Figure 2-3. When you complete this dialog box and click OK, an icon appears on the Design tab, similar to the CustOut_RS in Figure 2-2.
Figure 2-3 Create Routing Service Dialog Box
You can use this building block approach to add the component services to the enterprise service bus design one-by-one. Figure 2-2, for example, shows a completed simple ESB configuration.
See Chapter 4, "Creating Inbound and Outbound Services" for conceptual information and step-by-step instructions on creating adapter services. See Chapter 5, "Creating Routing Services and Routing Rules" detailed conceptual information and step-by-step instructions on creating routing services and specifying routing rules.
After you have created some services, you can view the definition of, and define properties for, each service. You can also view routing rules for a routing service.
For example, suppose you create the routing service whose icon is in the Design tab shown in Figure 2-2. When you double-click the top of the icon, property sheets replace the visual presentation of the enterprise service bus configuration. The Routing Rules panel is only displayed when you are viewing the property sheets for a routing service.
As shown in Figure 2-4, the Definition section presents the service name, ESB system (and group, if applicable), a description of the service, the name of the WSDL file that defines the service, the port type and an indication of whether the service can be invoked from a service that is external to the ESB system in which the service was created.
Figure 2-4 Sample Property Sheet for a Routing Service
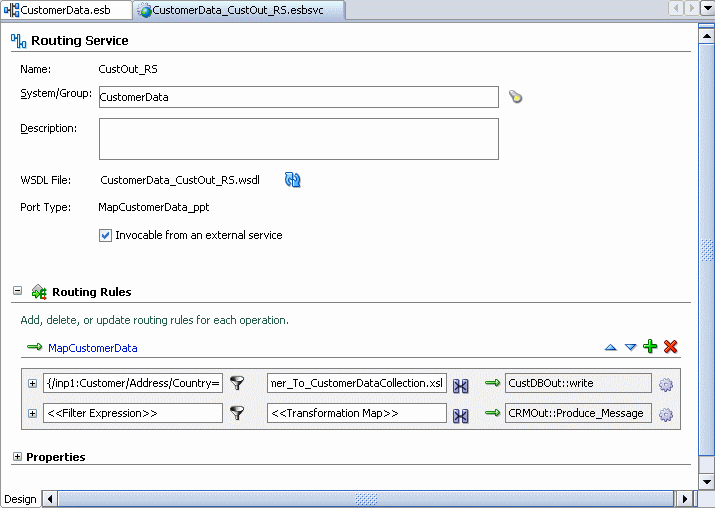
The Routing Rules section, shown in Figure 2-4, presents icons that provide access to the tools that enable you to specify a filter expression, a transformation map, and the target operation (defined within the target service WSDL). It also enables you to limit the ESB systems from which messages will be accepted and whether execution of the target operation is to be synchronous or asynchronous.
See Chapter 5, "Creating Routing Services and Routing Rules" for step-by-step instructions about creating routing services.
The overall process and tasks required for designing the enterprise service bus are outlined in the following list. Links to step-by-step instructions are specified for each task:
Start the ESB Server and open Oracle JDeveloper
The key Oracle Enterprise Service Bus design components are the ESB Server, Oracle JDeveloper, and the database that serves as the ESB Metadata Server. For information about starting ESB components, see "Starting, Stopping, and Accessing Oracle Enterprise Service Bus Components".
Create the necessary server and database connections.
Create the Oracle JDeveloper applications and projects
Create ESB systems and, optionally, service groups.
Add or import into an ESB project.
See "Adding Project Content" and "Importing Files into a Project".
Create the inbound and outbound services, or invoke external services.
Create routing services and configure the routing rules to:
Apply conditional expressions to the message instance payload
Transform the structure of the message payload
Specify where a response in a request/response scenario be sent
Specify where faulted messages be sent
See Chapter 5, "Creating Routing Services and Routing Rules".
Register services with the ESB repository.
See "Registering ESB Projects and Services with the ESB Server".
Sync services with the ESB Server.
If you no longer need a service, you can remove it. See "Deleting ESB Projects".
To begin configuring an Oracle Enterprise Service Bus, you need to create the necessary server and database connections.
This section discusses the following topics:
To view port numbers that are used when setting up connections, you can use the following:
On Windows, click the desktop Start button, select All Programs > Oracle – Oracle_Home > Oracle Process Manager > Oracle Assigned Port Numbers, where Oracle_Home is the name of the Oracle home where you installed Oracle Enterprise Service Bus.
Run Oracle_Home/opmn/bin/opmnctl.exe status -l, where Oracle_Home is the name of the Oracle home where you installed Oracle Enterprise Service Bus.
In Oracle Enterprise Manager Application Server Control, open the Cluster Topology > Runtime Ports page.
View the port numbers in the Oracle_Home/opmn/config/opmn.xml file.
To create a new application server connection, follow these steps:
Select Connection Navigator under the View menu to display the Connections Navigator.
Right-click Application Server in the tree and select New Application Server Connection to launch the Create Application Server Connection wizard. The information you need to provide varies depending on the type of connection you choose on the Type page. Follow the instructions in the wizard to complete each of the following pages:
Welcome page
Type page
Connection Name: Enter a name, such as LocalApplicationServer
Connection Type: Select a type, such as Oracle Application Server 10g 10.13
Authentication page
Username: Enter the OC4J username
Password: Enter the password
Deploy Password: Specify whether to deploy the password
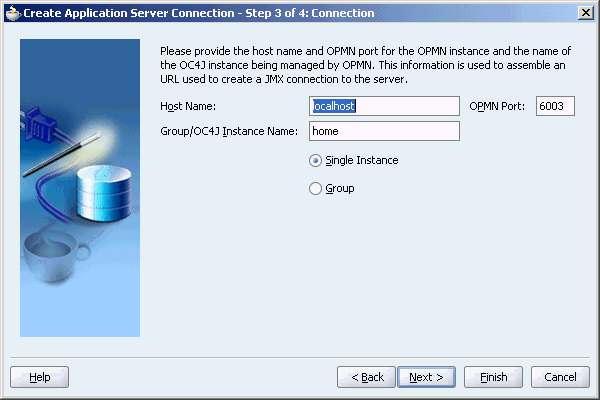
Connection page
Enter the information for the specific connection type. For example, these are options for the Oracle Application Server 10g 10.13 type:
Host Name: Enter the host name or localhost
OPMN Port: Enter the port number, such as 6003
OC4J Instance Name: Enter the OC4J instance name
Connect To: Select Single Instance or Group
Test page
On the Test page, click the Test Connection button to test the information you provided. If the test succeeds, click the Finish button. If the test fails, review the information for the connection and correct as necessary. Before testing, make sure the ESB Server is running.
To create a new integration server connection, follow these steps:
Select Connection Navigator under the View menu to display the Connections Navigator.
Right-click Integration Server tree and select New Integration Server Connection to launch the Create Integration Server Connection wizard. Follow the instructions in the wizard to complete each of the following pages:
Welcome page
Name page
Connection Name: Enter a name, such as LocalIntegrationServer
Connection page
Application Server: Select an application server that has been previously set up from the list
Host Name: Enter the host name or localhost
Port Number: Enter the port number, such as 8888
Add Host Name: Specify whether you want to add the host name to the proxy exceptions
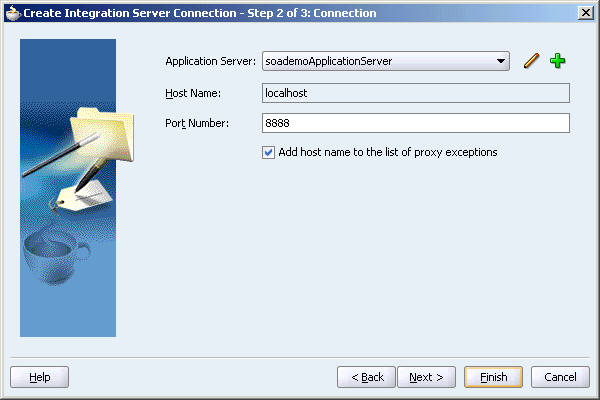
Test page
On the Test page, click the Test Connection button to test the information you provided. If the test succeeds, click the Finish button. If the test fails, review the information for the connection and correct as necessary. Before testing, make sure the ESB Server is running.
To create a new database server connection, follow these steps:
Select Connection Navigator under the View menu to display the Connections Navigator.
Right-click Database tree and select New Database Connection to launch the Create Database Connection wizard.
Note:
If you have selected the Basic Installation on Windows, an Oracle Lite database has been installed with a Windows Service namedOracle Lite Multiuser Service.Follow the instructions in the wizard to complete each of the following pages. The Oracle Lite database is used an example in the steps.
Welcome page
Type page
Connection Name: Enter a name for the database connection, such as Olite. For the Oracle Lite database, it is strongly recommended to use Olite to matched the predefined JNDI name (eis/DB/Olite) and in the name in connector XML file.
Connection Type: Select a connection type from the list, such as Oracle Lite
Authentication
Username: Enter the username for the database account
Password: Enter the password for the username
Role: Enter the database role for the user
Deploy Password: Specify whether to deploy the password
Connection page
Provide the connections details for the type of database connection selected on the Type page. For example, if Oracle Lite database type is selected you would enter data for the fields described in this step.
Driver type and connection details for an Oracle Lite database:
Driver: Select the driver, such as Type 4 Driver
Host Name: Enter the host name where the database is installed
JDBC Port: Enter the port number for database, such as 1531
SID: Enter the service ID of the database, such as oraesb
Location of the Oracle Lite driver jar:
Driver Class: Enter the class name or accept the default class name, such as oracle.lite.poljdbc.POLJDBCDriver
Library: Enter the library name, such as Olite40.jar
Classpath: Enter the classpath or accept the default classpath, such as c:\product\10.1.3.1\OraceleAS_1\integration\esb\lib\olite40.jar
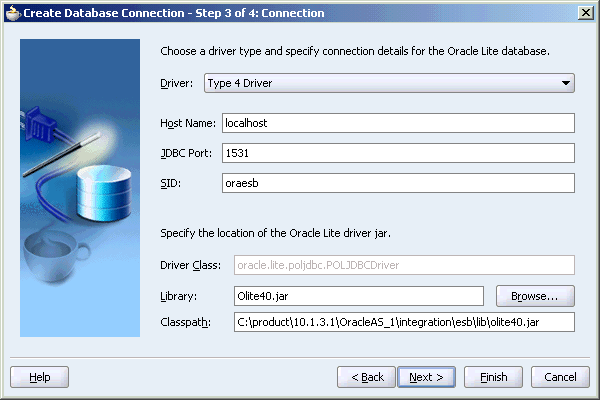
Test page
On the Test page, click the Test Connection button to test the information you provided. If the test succeeds, click the Finish button. If the test fails, review the information for the connection and correct as necessary. Before testing, make sure the database is running.
To review and test the connections in Oracle JDeveloper, perform the following steps:
Select Connection Navigator under the View menu to display the Connections Navigator.
In the Connections Navigator, expand the connection tree that you want to test.
For example, expand the Application Server tree.
Right-click a connection in the tree that has been already been set up and select Properties to display the Edit Connection property sheet. You can also double-click the connection to display the property sheet.
For example, right-click an application server under the expanded Application Server tree and select Properties. Click the Connection tab to view the connection properties.
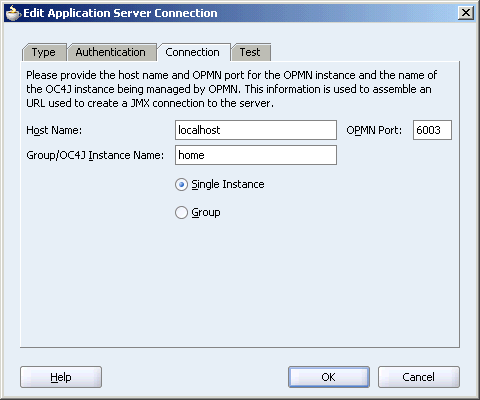
Review the information in the property tabs for the connection.
In the Test tab, click Test Connection to test the connection.
If the test fails, then correct the information in the property tabs and retest. Make sure that the necessary server is running before testing the connection.
To begin configuring an Oracle Enterprise Service Bus, you must create an application and an ESB project. An application contains one or more projects. An ESB project is a collection of related files, for example, all the Oracle Enterprise Service Bus services and associated files within a single Oracle Enterprise Service Bus.
To create an application in Oracle JDeveloper follow these steps:
From the File menu, click New.
The New Gallery dialog box opens.
In the Categories panel, select General.
In the Items panel, double-click Application.
The Create Application dialog box opens.
In the Application Name field, enter a name for the application.
In the Directory Name field, accept the default value or enter the directory specification for the directory on the local file system where you want to store the project files.
Click OK.
The Create Project dialog box opens.
In the Create Project dialog box, click Cancel. You will use a different dialog box to create an ESB project.
To create an ESB project, follow these steps after you have created an application:
In the Applications Navigator, right-click the application to which you want to add a project and then click New Project.
The New Gallery dialog box opens.
Select ESB Project under General Projects, and then click OK.
The Create ESB Project dialog box opens.
In the Project Name field, enter the name of the project.
In the Directory Name field, specify the directory where the project files will be stored, if you do not want to accept the default directory.
In the Diagram Name field, optionally enter a name for the diagram that will schematically represent the project, if you do not want to accept the default diagram name.
Click OK.
A design area is presented with a label of esb_project-name.esb, or diagram-name.esb if you specified an optional name for the diagram in the previous step.
You use this design area to model the enterprise service bus system. It enables you to drag and drop ESB Services (adapter, routing, and SOAP services) from the Component Palette panel in the upper-right corner into the design area.
ESB systems and service groups are units for organizing the services for the Oracle Enterprise Service Bus.
The following sections contain information about and step-by-step instructions on creating these organizational units:
A system is a representation of a single application, proxy for an application, or a technical system. Examples of systems are:
An Oracle Applications instance
A set of transformations, Oracle BPEL Process Manager services, and adapter services for an SAP instance
A set of transformations, BPEL Services, and database services for a custom database application
A standalone Oracle Business Activity Monitoring instance, complex event processing (CEP) services, and other related services
An Oracle B2B engine (that serves as a proxy for trading partners) and related transformation services and other services
A set of services, adapter services, and Oracle BPEL Process Manager services representing a bridge to a third party integration infrastructure (such as webMethods, Inc, and IBM infrastructures)
If you do not explicitly specify an ESB system, then the services created in the ESB project are added to the default system. The default system is provided for getting started quickly.
Follow these steps to create an ESB system using Oracle JDeveloper:
In the Applications Navigator, open the ESB Project in which you want to create the ESB system.
In the Design tab, click the Create System/Group icon on the top of the Design window. This is the icon on left in the group of three icons. See Figure 2-2 for a screenshot that shows the icons at the top of the Design tab.
The Create ESB System or Service Group dialog box opens.
In the Create ESB System or Service Group dialog box, follow these steps:
For the Create option, select System.
In the Name field, enter a unique name.
The name must be unique across the ESB project in which you are creating it.
Optionally, in the Description field, enter a description of the ESB service.
Click OK.
In the Applications Navigator, click the refresh icon.
An entry for the ESB system in the form, system-name.esbsys, is added to the Resources folder under the project name. For example, Figure 2-1 shows a Oracle JDeveloper application that contains an ESB project named CustomerData and an ESB system also named CustomerData.
For information about creating an ESB system from the Oracle ESB Control, see "Managing Oracle Enterprise Service Bus Systems and Service Groups".
A service group is an organization unit for ESB services. Its purpose is much like a directory in a file structure – it is a mean to organize ESB services in groups.
A service group is similar to a directory in a directory structure. Just as a file can belong to only one directory, a service can belong to only one service group. Different services, with the same name can belong to different service groups, just as different files with the same file name can reside in different directories in a file system. In addition, you can create one service group within another, resulting in nested service groups.
Before you can create an ESB service group, you must create an ESB system to contain it, as described in "Creating ESB Systems", then follow these steps to create the ESB service group:
In the Applications Navigator, open the ESB Project in which you want to create the ESB system.
In the Design tab, click the Create System/Group icon on the top of the Design window. This is the icon on the left in the group of three icons. See Figure 2-2 for a screenshot that shows the icons at the top of the Design tab.
The Create ESB System or Service Group dialog box opens.
In the Create ESB System or Service Group dialog box, follow these steps:
For the Create option, select Service Group.
In the Name field, enter a unique name.
The name must be unique across the ESB system in which you are creating it.
In the System/Group field, enter the ESB system or an existing service group in which you want to create this service group.
Optionally, in the Description field, enter a description of the ESB service group.
Click OK.
In the Applications Navigator, click the refresh icon.
An entry for the ESB service group in the form, service-group-name.esbgrp, is added to the Resources folder under the project name.
You can add project content to an add existing project.
To add content to a project in Oracle JDeveloper, follow these steps:
In the Applications Navigator, right-click the ESB Project to which you want to add project content.
Click Add to Project Content in the menu.
The Project Properties dialog opens.
Expand Project Content in the tree to view the categories of content that can be added. These include:
Integration Content
Modelers
Offline Database
Resources
TopLink
Web Application
Make your selections for Project Content additions or for additions in the categories under Project Content.
Click OK.
Note:
If you add an XSD file to the project with the Java Content feature, the XSD file is not copied to the project directory if it is not already present in the project directory. Although the file shows up in the project tree, it does not get deployed to the ESB Server with the Register with ESB menu option.You can import files into an existing project.
To import files into a project in Oracle JDeveloper, follow these steps:
In the Applications Navigator, select the ESB Project to which you want to import files.
Select Import from the File menu.
The Import dialog opens.
Select the type of file you want to import from the list in the dialog, then click OK to launch the wizard for the specific file type. Follow the instructions provided by each wizard.
For example, select Web Source to launch the Web Source wizard. Browse the local files system to locate schema files (XSD) that you want to copy into the project, then click OK.
You use the integration server connection to register the ESB project and services that you have created with Oracle JDeveloper. This registration with the ESB Metadata Server is required to run these services, and to view and manage these services in the Oracle ESB Control. Before registering an ESB project and services, make sure you have a working integration server connection. See "Creating and Testing Connections".
To register services using an integration server connection, follow these steps:
Right click the ESB project in the Application Navigator.
Select the Register with ESB from the menu.
Click a local ESB Server option or on a connection to another integration server that has been set up.
When the ESB Registration Summary dialog displays, click OK.
When you refresh the Oracle ESB Control, the ESB services that you registered with the ESB Metadata Server display in the Oracle ESB Control Service Navigation tree.
Note:
You can also deploy one or multiple ESB projects to the ESB Metadata Server by using the custom ant tasks such asdeployESBProjects. The files required for using the custom ant tasks are available in the following folder of your installation directory:
ORACLE_HOME\integration\esb\deployment
The deployment folder also contains the documentation about using the ant tasks.
Use the Sync from ESB Server option to copy the metadata from the ESB Server and replace the corresponding metadata in Oracle JDeveloper. For example, if a routing rule has been modified in Oracle ESB Control, you can update that routing rule in Oracle JDeveloper.
This option only replaces Oracle JDeveloper metadata that currently exists in the ESB Server. When registering services, Oracle JDeveloper can determine that a change has occurred and gives you the option of syncing services. For information about registering services, see "Registering ESB Projects and Services with the ESB Server".
To sync metadata from the ESB Server:
Click the Sync from ESB Server icon at the top of the Design tab. This is the middle icon (gear with sphere overlay) in the group of three icons. See Figure 2-2 for a screenshot that shows the icons at the top of the Design tab.
Click Yes in the Confirm Sync from ESB Server dialog.
To delete an ESB project in the Application Navigator, follow these steps:
Select the project or service in the Application Navigator.
Select Delete from the Edit menu.
Click Yes when the Removing Files from IDE dialog displays.
Note that deleting projects or services from the Oracle JDeveloper does not remove the object from Oracle ESB Control or the ESB Server.