| Oracle® Retail Demand Forecasting Installation Guide Release 14.1.2 E70806-01 |
|

 Previous |
 Next |
| Oracle® Retail Demand Forecasting Installation Guide Release 14.1.2 E70806-01 |
|
Previous |
Next |
Before patching an RDF domain, confirm that the necessary RPAS client, server and Configuration Tools patch updates have been successfully applied. Refer to the Oracle Retail Predictive Application Server Installation Guide for RPAS installation instructions.
|
Note: When patching an RDF domain, you need the same-rf arguments of rpasInstall as a full install of the domain
(For example: - |
Complete the following steps to patch your RDF domain.
|
Note: The RDF plug-in now supports changing forecast level intersections in patching. This enhances the currently existing ability to change forecast data sources. However, the RDF plug-in does not support addition or removal of forecast or promotion levels. |
Extract the RDF patch.
Create a directory to store the RDF/CPEM media pack on the target server. This directory will be referred to as [RDF Installation]. It is the location where the RDF installation routine is run.
Download the package from My Oracle Support (https://support.oracle.com). Using FTP in binary mode, transfer the RDF/CPEM media pack to the [RDF Installation] directory on the target server.
Extract the package to the folder [RDF Installation] directory.
cd [RDF Installation]
unzip [RDF Package]
Extract the RDF Installer.
cd CDROM
unzip RDF.zip
Copy the RDF plug-in to the Configuration Tools.
The RDF plug-in enables the RDF solution to be configured using the RPAS Configuration Tools. It also supports the domain installation process.
Locate the plug-in directory by changing to the root of the [RDF Patch Install] directory.
Navigate to [RDF Patch Install]/CDROM/rdf/rdf/plugin/ and copy the resources directory to the Configuration Tools installation ($RIDE_HOME).
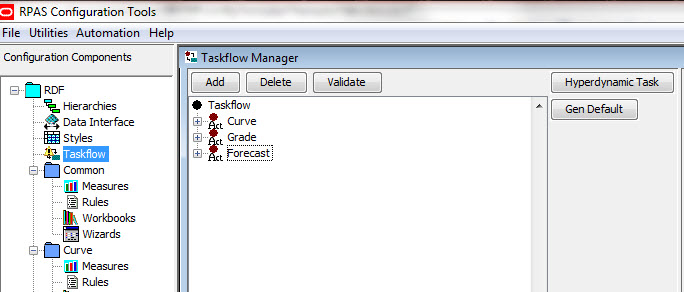
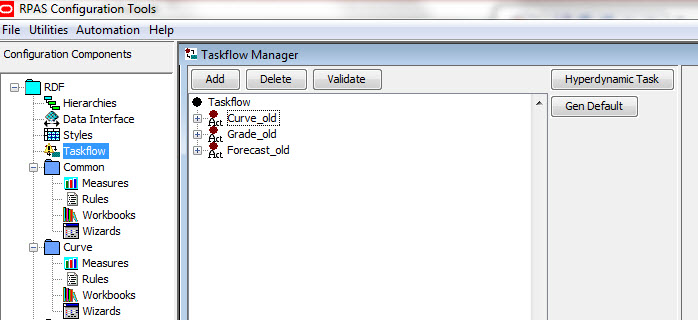
Delete or rename old activities before running regeneration.
The RDF plugin regeneration generates task flow activities with the same label as the old activities. So either delete or rename the old activities before running regeneration so that RDF can distinguish the old activities from the new ones.
Locate the taskflow in the Configuration Tools.
In the Taskflow Manager, right-click on each taskflow and change the name for each one as shown in the following images.
Using the Configuration Tools on a Windows machine, auto-generate the RDF, Curve, Promote, or Grade solutions that are implemented.
It is necessary to open the configuration in the patched version of the RPAS Configuration Tools and autogenerate each of the existing solution extension configurations on a Windows machine. This auto-generation step is also required if you are making a change to your existing configuration of a RDF, Curve, Promote, or Grade solution.
Copy the configuration files to the domain server.
Copy the updated configuration files from the Windows machine to the domain server. The location on the domain server should have the same structure as the Windows machine used to autogenerate the solution extensions.
If you are using WinZip to archive the configuration files, you must use unzip -a to unzip the archive on the UNIX server.
If you do not specify domain paths during the RPAS patching process, then run the RPAS upgradeDomain utility.
For information on the upgradeDomain utility, refer to either the Classic Client or Fusion Client version of the Oracle Retail Predictive Application Server Administration Guide.
To patch the RDF domain:
Set $RDF_HOME
export RDF_HOME=$RPAS_HOME
Verify BSA/bsa folder exists within $RPAS_HOME/bin
Edit the following path parameters, then copy/paste entire section on the command line (selecting either patch or build).
|
Note: Run the script from the $RPAS_HOME/bin directory. For additional information about thebuildRDF.sh parameters, refer to Table 2-2. |
[Patch]
(m = # of maxProcesses) (p = indicates patchInstall)
buildRDF.sh \
-c /configPath \
-i /inputPath \
-l /logPath \
-f patch_domain.log \
-d /domainPath \
-m 2 \
-p
[Build]
buildRDF.sh \
-c /configPath \
-i /inputPath \
-l /logPath \
-f build_domain.log \
-d /domainPath \
-m 2
CD to BSA log file path, then tail to verify running successfully
/home/user/temp/logs
Verify that the rpasInstall script is called within the BSA log
Ex: 10:45:39: INFORMATION : buildRDF.sh[202] - _call run command 'rpasInstall -patchinstall -ch /vol.nas/rpas_qc/qc_testing/RDF/aix61/13.4/Rahman/patch/config -cn RDF -in /vol.nas/rpas_qc/qc_testing/RDF/aix61/13.4/Rahman/input -log /vol.nas/rpas_qc/qc_testing/RDF/aix61/13.4/Rahman/patch/domains/1323_1340/patch_domain.log -dh
/vol.nas/rpas_qc/qc_testing/RDF/aix61/13.4/Rahman/patch/domains/1323_1340 -verbose -p pgrp -rf AppFunctions -rf RdfFunctions -rf ClusterEngine -rf LostSaleFunctions -rf ASOExpressions'
CD to log file specified in script parameters, then tail to verify successful run
$ tail -f patch_domain.log