| Oracle® WebCenter Framework Tutorial 10g (10.1.3.2.0) Part Number B31072-02 |
|
|
View PDF |
| Oracle® WebCenter Framework Tutorial 10g (10.1.3.2.0) Part Number B31072-02 |
|
|
View PDF |
In this lesson you will learn how to publish content that resides on a file system in your WebCenter application. You'll see how easy it is to build content rich applications with Oracle JDeveloper and experiment with the various ways you can present file and folder information.
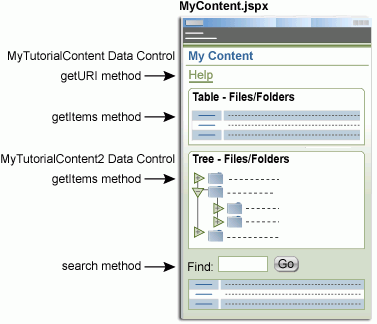
Figure 7-1 illustrates what your page (MyContent.jspx) will look like at the end of the lesson.
Figure 7-1 MyContent.jspx at the End of Lesson 7
During this lesson you'll need access to the sample you downloaded in Chapter 2, "Getting Started". Before you start, make a note of the location where the sample content is stored, see also Downloading Sample Tutorial Files.
In this step you'll define a data control that can access and publish some sample tutorial content stored on your file system. A data control is a container for all the data objects, collections, methods, and operations used to create UI components within your application.
In the Applications Navigator, right-click Model, and choose New.
Expand the Business Tier node and select Content Repository.
Select Content Repository Data Control, and then click OK to display the wizard.
This wizard creates a data control for a content repository, even when the content is on a file system.
Click Next to skip the Welcome page.
Name the data control. Enter MyTutorialContent, and then click Next.
We want to publish content on your file system. Click the Repository Type drop-down list, and choose File System.
You can also set up a data control to access content in an Oracle Content DB repository, or an OracleAS Portal repository. For detailed information about how to set up these types of data controls, see the Oracle WebCenter Framework Developer's Guide.
In the Base Path field, enter the path to the sample content you unzipped earlier. For example: C:\TutorialContent
This shows the data control where to find your content.
Click the Test button to check whether you've entered the connection details correctly. You should see a Success! message like Figure 7-2.
Figure 7-2 File System Data Control - Testing the Connection
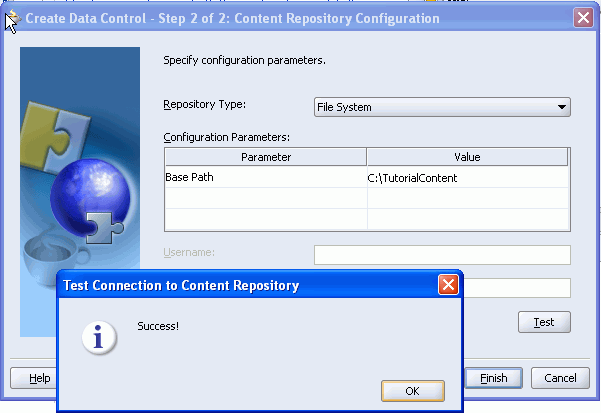
If you get an error message, click OK and edit the Base Path, taking care to specify the full path. If the test is successful, click OK to close the message box.
Click Next.
File system data controls expose several default attributes (name, path, URI, primaryType) and optionally, one custom attribute (lastModified) —see Figure 7-3.
Figure 7-3 File System Data Control - Custom Attribute Configuration
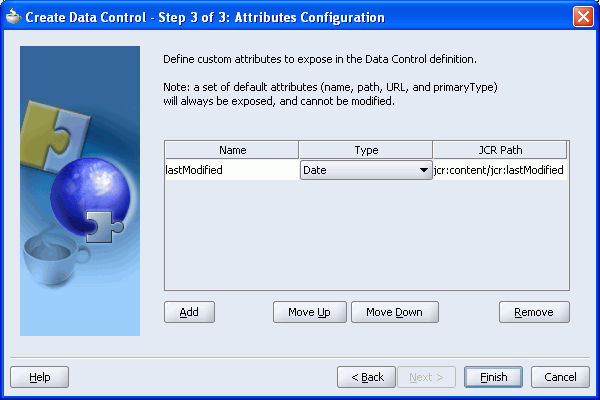
To accept the default attribute set, click Finish.
Take a look at the Applications Navigator. You should see several new entries under Model, Application Sources (Figure 7-4). For more information about data controls and the files they generate, see Oracle WebCenter Framework Developer's Guide.
Figure 7-4 Files for File System Data Control MyTutorialContent
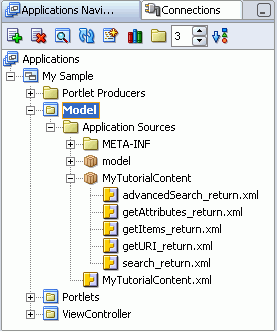
The new data control should be available in the Data Control Palette, so let's display that now. From the View menu, select Data Control Palette.
Under MyTutorialContent, you should see a hierarchical list of objects, collections, methods, parameters, and operations for the new data control (Figure 7-5).
Figure 7-5 Data Control Palette - MyTutorialContent

File system data controls (such as MyTutorialContent) provide several methods for accessing and displaying file and folder information:
search - Enables you to perform searches on the content exposed through the data control.
advancedSearch - Enables you to perform advanced searches on the content exposed through the data control.
getItems - Returns files and folders stored in a specific location of the content repository.
getAttributes - Returns a list of attributes and their values for a given file or folder.
getURI - Returns the URI of a file. In this release, direct access to folders through URIs is not supported.
You'll find detailed information about these methods in the Oracle WebCenter Framework Developer's Guide.
Let's see how to use some of these objects.
In this step, you'll learn how to publish a hyperlink to a file using the data control method getURI. Let's start by creating a brand new page called MyContent.jspx on which you'll add a link to one of the sample files (help.html).
Create a new Java Server Faces page named MyContent.jspx.
In the Applications Navigator, right-click ViewController, and select New.
In the Categories pane, under Web Tier, select JSF.
Under Items, select JSF JSP, and click OK.
Click Next to skip the Welcome page.
In the File Name field, enter: MyContent
Under Type, click JSP Document, and then click Next.
Choose Automatically Expose UI Components in a New Managed Bean, and then click Next.
On the Tag Libraries page, make sure the following libraries appear in the Selected Libraries pane:
ADF Faces Components 10_1_3_2_0
ADF Faces HTML 10_1_3_2_0
ADF Portlet Components 10_1_3_2_0
Customizable Components Core 10_1_3_2
JSF Core 1.0
JSF HTML 1.0
There is no need to set any other options, so click Finish on this page.
MyContent.jspx should open in the Visual Editor, ready for us to begin adding content from the file system. (If the page doesn't appear, click the Design tab.)
In the Data Control Palette, expand the getURI(String) node for MyTutorialContent.
You should see one parameter (path), as well as one method return attribute URI listed here (Figure 7-6).
Figure 7-6 Data Control Palette - MyTutorialContent.getURI
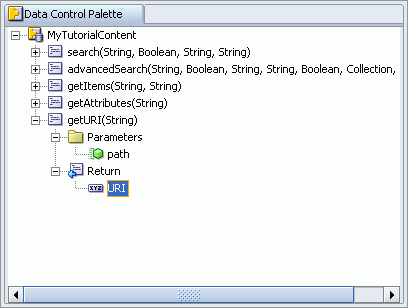
Select the URI node, and drag and drop it onto MyContent.jspx.
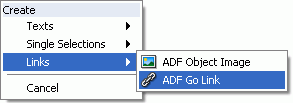
When you drag an item from the Data Control Palette and drop it on a page, JDeveloper displays a context menu of suitable components.
From the context menu, choose Links, and then ADF Go Link, as shown in Figure 7-7.
Figure 7-7 JDeveloper Context Menu for getURI
To publish a link to a Help page located at C:\TutorialContent\help.html, use the path parameter to point to the file by entering: /help.html
Make sure that you include a forward slash (Figure 7-8).
Figure 7-8 GetURI - Action Binding Editor

Click OK.
You should see a new goLink on MyContent.jspx with default link text goLink1.
In the Structure window, double-click af:goLink - goLink1 to edit the default properties.
The default link text is goLink1. Replace this text with the word Help (Figure 7-9).
The expression in the Destination field, #{bindings['getURI_returnURI'].inputValue}, fetches the URI of the Help page.
Figure 7-9 GoLink Properties - Configuring Help Link
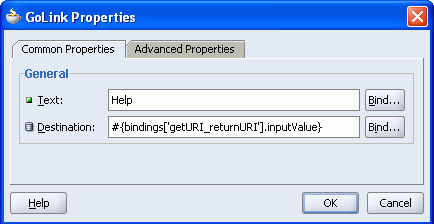
Click OK to close the GoLink Properties window.
Click the Save All icon in the JDeveloper toolbar.
Before running the page, stop the embedded OC4J Server. Choose Run, Terminate, Embedded OC4J Server from the main menu.
Right-click MyContent.jspx, and select Run to see the Help link in action.
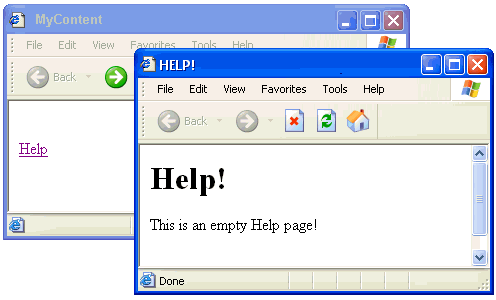
When the page appears in your browser window, you should see the new Help link. Click the link to check that the correct file is displayed. Your browser should look like the one displayed in Figure 7-10.
Figure 7-10 File Link Through the File System Data Control
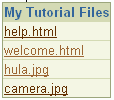
In this step, you'll learn how to publish file and folder information in a table using the data control method getItems. You'll then create a table (similar to the one shown in Figure 7-11) that lists all the files located at C:\TutorialContent. Each file name in the table will contain a hyperlink to the actual file.
Figure 7-11 File System Content Displayed as Hypertext Links
In the Applications Navigator, double click MyContent.jspx to open the page in the Visual Editor.
In the Data Control Palette, expand the getItems node for MyTutorialContent. You should see two parameters (path and type) and the Return options shown in Figure 7-12.
Figure 7-12 Data Control Palette - MyTutorialContent.getItems
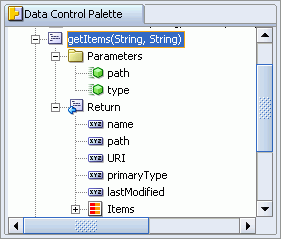
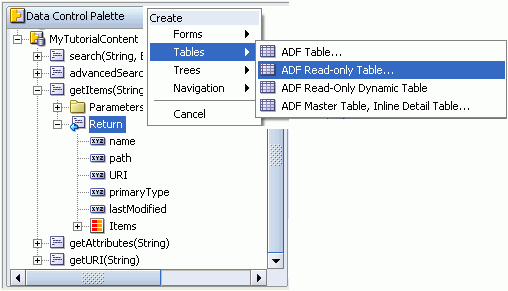
First, let's create a table that lists every file and folder available through this data control. To do this, highlight the Return node, drag it onto the page, and drop it below the Help link (af:goLink - Help).
When you drag an item from the Data Control Palette and drop it on a page, JDeveloper displays a context menu of suitable UI components. File system items can be displayed in a form, table, tree, or navigation item.
Choose Tables from the context menu, and then ADF Read-only Table, as shown in Figure 7-13.
Figure 7-13 JDeveloper Context Menu for getItems
You should now see the Action Binding Editor (Figure 7-14).
To display everything under the data control's base path, enter / for the path parameter. Make sure that you enter a forward slash, not a backslash here.
Leave the type blank for now. This implies that the table must display both files and folders. Later on you'll configure the table to show files only.
Figure 7-14 getItems - Action Binding Editor

Click OK.
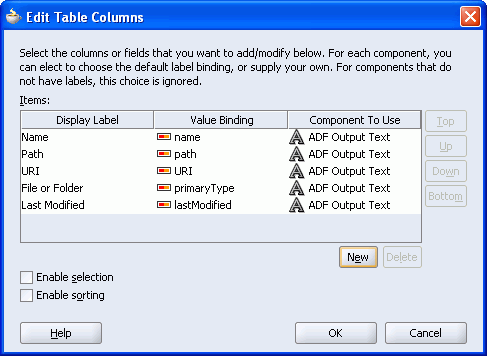
You should see the Edit Table Columns window (Figure 7-15).
Figure 7-15 Edit Table Columns - Defaults
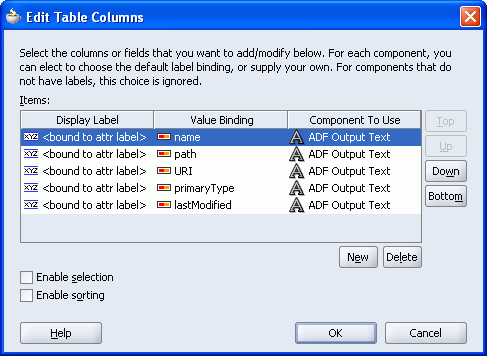
Let's take a quick look at some of the display options available on this page. In addition to the file/folder name (name), you can publish additional content attributes such as path, URI, primaryType, and lastModified. All attributes are published by default, with default labels but you can customize the content displayed. You can remove attributes, edit display labels, and change the display order to suit your precise requirements.
For now, let's just edit the Display Labels to make them more meaningful.
Click <bound to attr label> (next to name) and enter: Name
Now edit the Display Label for the other attributes (path, URI, primaryType, lastModified). Enter new Display Labels such as Path, URI, File or Folder, and Last Modified as shown in Figure 7-16.
Figure 7-16 Edit Table Columns - Customizing DIsplay Labels
Click OK.
You should see a table on MyContent.jspx that looks something like Figure 7-17.
Figure 7-17 Read-Only Table for Publishing Folder Content

Let's see the page in a browser. Right-click MyContent.jspx, and select Run.
When the page appears in your browser window, you should see a list of all the file and folders available through the MyTutorialContent data control (for example, everything under the directory C:\TutorialContent) as shown in Figure 7-18.
Figure 7-18 Browser - Folder Content Displayed in a Table

By default, the table displays file/folder attributes as read-only text (af:outputText). In the next step, you'll learn how to display the Name attribute as an ADF GoLink (af:goLink).
In the Structure window as shown in Figure 7-19, expand the first column of the table (af:column - Name) to reveal the default display format af:outputText - #{row.name}.
Figure 7-19 Default Display Format for the Name Column
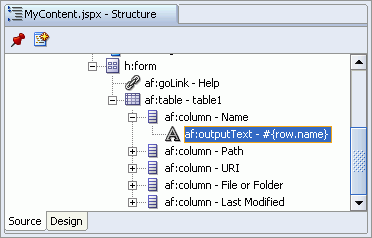
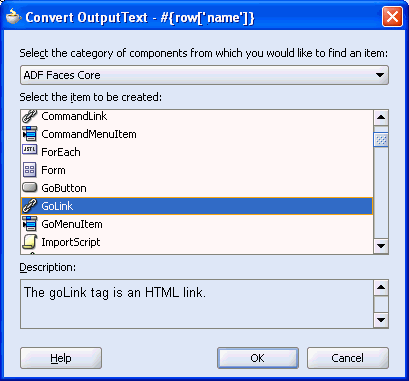
Right-click af:outputText - #{row.name}, and click Convert.
From the pull-down menu, choose ADF Faces Core.
Choose GoLink (Figure 7-20).
Figure 7-20 Convert OutputText to a GoLink
Click OK, and then click OK again to confirm the conversion.
For this tutorial, we want the GoLinks to display file/folder names (name) as hyperlinks. To do this, you'll need to edit the default GoLink properties.
In the Structure window, right-click the new af:goLink - goLink 1, and click Properties to display the default settings.
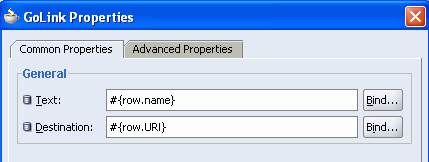
The default link text is goLink 1. To display file/folder names instead (name), use the binding editor to build the required expression #{row.name} as shown in Figure 7-21:
For the Text field, click Bind.
Expand JSP Objects, and then expand row.
Double-click name to select the expression #{row.name}.
Click OK.
To generate URIs for the HTTP hyperlinks:
For the Destination field, click Bind.
Expand JSP Objects, and then expand row.
Double-click URI to select the expression #{row.URI}.
Click OK.
Figure 7-21 GoLink Properties - Configuring File Names as Hyperlinks
Before running the page again, stop the embedded OC4J Server. Choose Run, Terminate, Embedded OC4J Server from the main menu.
Run MyContent.jspx again.
This time you should see a list of hyperlinked file/folder names like the one shown in Figure 7-22.
Figure 7-22 Browser - Folder Content Displayed as Hyperlinks

Click one of the file names.
The file you pick should display in a browser window.
Click the name of a folder.
This time you'll see an authorization error because you cannot access a folder through a direct URL. Folders may be accessed through a data control only.
Before moving onto the next step, let's summarize what you've done so far. First you created a table based on the MyTutorialContent data control. You saw how, by default, the table publishes file system information in plain, unformatted text. You then applied some formatting to the file and folder names to display them as hypertext links.
To finish off, let's tidy up the table. Let's configure the table to show only the Name column, and limit the display to files only.
Back in JDeveloper, configure the table to show the Name column only:
In the Structure window, right-click the af:table -table1 node, and choose Properties.
Click the Column Summary tab. Use the Delete button to remove all but the Name column (Figure 7-23).
Figure 7-23 Table Properties - Editing Columns

Click the Column Details tab.
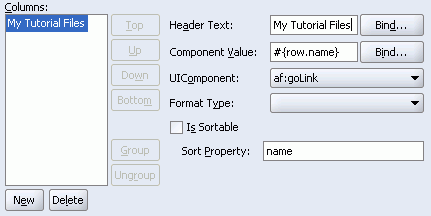
For Header Text, enter My Tutorial Files as shown in Figure 7-24.
Figure 7-24 Table Properties - Editing Column Display Options
Click OK.
To configure the table to show files only (not folders), you'll need to edit the page definition file:
Right-click MyContent.jspx, and select Go to Page Definition.
In the Structure window, expand bindings and getItems (Figure 7-25).
Figure 7-25 Configure the type Property in MyContentPageDef.xml
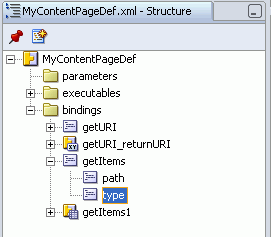
Double-click type.
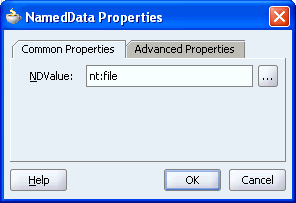
The type options are nt:file and nt:folder. To specify display files only, enter nt:file in the NDValue field, and click OK as shown in Figure 7-26.
Figure 7-26 NDValue - Configuring File Display Only
Let's take a moment to examine a couple of binding settings for the data control that are set by default in the page definition file. You may want to use these settings for your own application, so it's important to understand what they do:
In Structure view, expand the executables section.
Select the method iterator getItemsIter.
From the View menu, choose Property Inspector to view the default settings.
The RangeSize property controls how many file/folder items are displayed on each page. For this tutorial, let's keep the default RangeSize 10.
The CacheResults property determines whether table content is cached. By default, the results are cached (true) but caching may not be desirable for some applications where content changes frequently and real time updates are critical. Set this property to false.
When you run the page, you'll see that the file list updates dynamically whenever the page is refreshed.
Click the Save All icon in the JDeveloper toolbar.
Run the page again.
The list of files should look something like Figure 7-27. This time, no folders are displayed.
Figure 7-27 Browser - Files Only Displayed as Hypertext Links

Test that caching is disabled. Rename one of the files on your file system, and then refresh the browser.
As you chose not to cache the table content, you'll see the new file name immediately.
In this lesson you learnt how to publish file system content in a table. In the next lesson you'll display the same content in a tree.
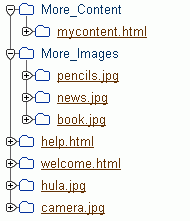
In this step you'll publish file and folder content in a hierarchal tree format using the getItems method. You'll create a tree (similar to the one shown in Figure 7-28) displaying files located at C:\TutorialContent and each file name in the tree will provide a hyperlink to the actual file. But first, let's create a new data control.
Figure 7-28 File System Content Published in a Tree
In the Applications Navigator, right-click Model, and choose New.
Expand the Business Tier node, and select Content Repository.
Select Content Repository Data Control, and then click OK.
Click Next to skip the Welcome page.
Name the data control. Enter MyTutorialContent2, and then click Next.
We want to use this data control to publish content from a file system, so click the Repository Type drop-down list, and choose File System.
In the Base Path field, enter the path to the content you unzipped earlier, for example C:\TutorialContent, and then press Enter.
Click the Test button to check whether you've entered the connection details correctly. You should see a Success! message.
If you get an error message, click OK and edit the Base Path, taking care to specify the full path. If the test is successful, click OK to close the message box, then click Finish.
The new data control should be available in the Data Control Palette, so let's display that now. From the View menu, select Data Control Palette (Figure 7-29).
Figure 7-29 Data Control Palette - MyTutorialContent2
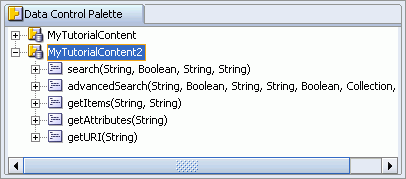
Now, let's publish content available through this data control in an hierarchal tree format.
In the Applications Navigator, double click MyContent.jspx to open the page in the Visual Editor.
In the Data Control Palette, expand the GetItems node under MyTutorialContent2 (Figure 7-30).
Highlight the Return node, drag it onto the page, and drop it below the table (af:Table - table1).
From the context menu, select Create Trees, ADF Tree as shown in Figure 7-31.
Figure 7-31 JDeveloper Context Menu for getItems
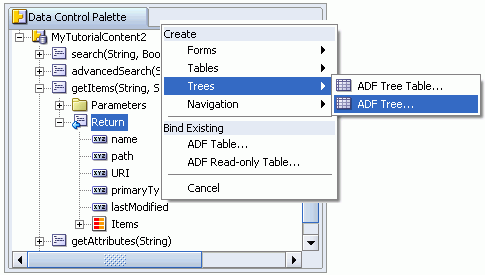
You should see the Action Binding Editor.
To create a tree that displays everything under the base path (C:\TutorialContent), enter / for the path parameter as shown in Figure 7-32. Make sure you enter a forward slash, not a backslash.
Leave the type blank, as the tree must show both files and folders.
Click OK.
The Tree Binding Editor is displayed (Figure 7-33). Let's take a quick look at this page.
Figure 7-33 Tree Binding Editor - Default Edit Rule Tab
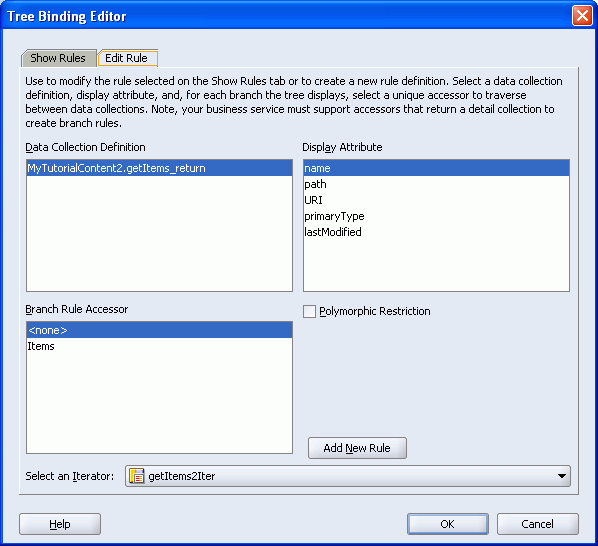
Rules define how tree data controls fetch and display hierarchical data. The default rule settings (Figure 7-33) show getItems is the root of the tree, that tree nodes (or branches) may display only the name attribute, and that tree nodes may not display children—Branch Rule Accessor is <none>.
In the next few steps you'll edit these default settings and define a rule that will expose files/folders under each node in a hierarchical format and enable you to hyperlink file names.
In the Display Attribute list, multi-select the attributes name, URI, and primaryType as shown in Figure 7-34.
You'll use the name attribute to display file/folder names in the tree, and you'll use the URI, and primaryType attributes to build hyperlinks to file content. The other attributes (path and lastModified) are not used in this tutorial so there is no need to select them here.
Figure 7-34 Tree Binding Editor - Rule Selections
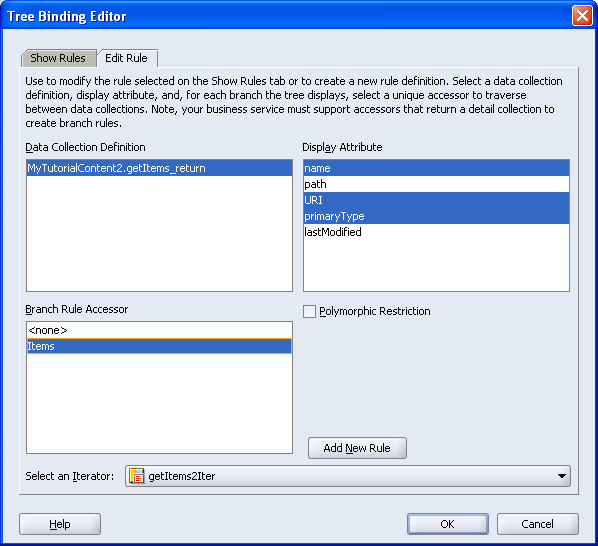
For the Branch Rule Accessor, select Items.
This enables tree nodes to display any children that may exist in a hierarchical format.
Click Add New Rule.
You should see the message shown in Figure 7-35.
Click OK to close the message box and display the Show Rules tab (Figure 7-36).
Figure 7-36 Tree Binding Editor - Show Rules Tab
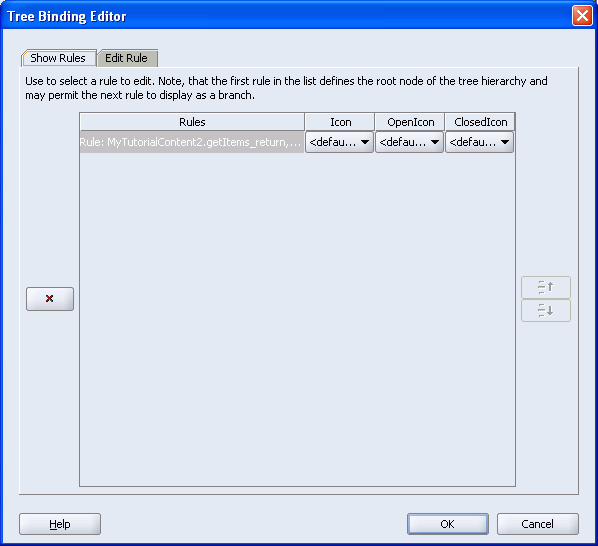
Click OK.
Now you should see a tree structure similar to Figure 7-37 displayed on MyContent.jspx.
Figure 7-37 Tree for Navigating Folder Content

Before running the page again, stop the embedded OC4J Server. Choose Run, Terminate, Embedded OC4J Server from the main menu.
Let's see the page in a browser. Right-click MyContent.jspx, and select Run.
When the page appears in your browser window, you should see a list of files and folders available through the MyTutorialContent2 data control, for example, everything under the directory C:\TutorialContent. Expand the More_Images node to see access content in this subdirectory (Figure 7-38).
Figure 7-38 Folder Content Displayed in a Tree
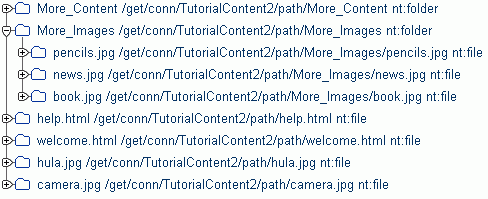
Now let's hide the URI and primaryType attribute. In a moment, you'll use these attributes to build hyperlinks but they don't need to be displayed in the tree.
In the Applications Navigator, select MyContent.jspx.
In Structure window, right-click af: tree - tree1, and choose Properties.
Change the Node Stamp Value to #{node.name}, and click OK.
Let's see what the tree looks like now. Right-click MyContent.jspx, and select Run.
You should see file and folder names only (Figure 7-39).
Figure 7-39 Tree Displays File and Folder Names
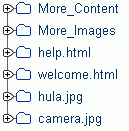
Trees will display the first ten items (by default) but you can customize this through the RangeSize property for the GetItems method in the page's definition file.
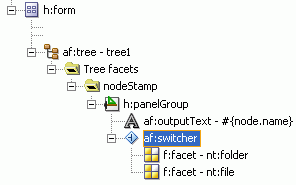
By default, the tree displays file/folder names as read-only text, but let's display them as hyperlinks as you did for the table. Like last time, you want to add hyperlinks to the file names (not folders). Unlike last time, you cannot hide the folders as they're required for navigation through the tree. As an alternative, you can display the folder names as read only text. To accommodate this dual functionality, let's use an ADF Faces Switcher component (af:switcher) with two facets - one for folders and one for files.
In the Structure window, navigate down to the nodeStamp facet to reveal the current display format af:outputText - #{node.name} (Figure 7-40).
Figure 7-40 Default Display Format for Trees
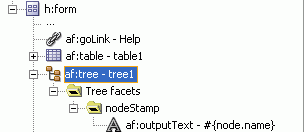
Add an ADF Switcher component:
Right-click nodeStamp, and choose Insert Inside nodeStamp, ADF Faces Core.
Choose Switcher, and then click OK (Figure 7-41).
Right-click af:switcher, and click Properties.
For FacetName, enter the expression: #{node.primaryType}
Click the Advanced Properties tab.
For DefaultFacet, enter nt:file, and then click OK.
Now insert two facets for the switcher:
Right-click af:switcher, choose Insert Inside af:switcher, JSF Core, Facet.
Name the first facet nt:folder, and click OK.
Now repeat these steps, adding a second facet named nt:file (Figure 7-42).
Figure 7-42 Switcher Component with Two Facets
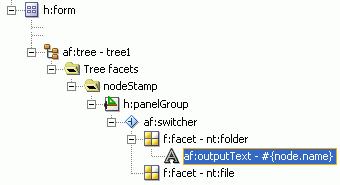
Folder names require no additional formatting. Let's reuse the default display format af:outputText -#{node.name} to display folder names in plain text:
In the Structure Window, select af:outputText - #{node.name}.
Drag and drop the af:outputText component on top of f:facet - nt:folder (Figure 7-43).
Figure 7-43 Display nt:folder Facet as outputText
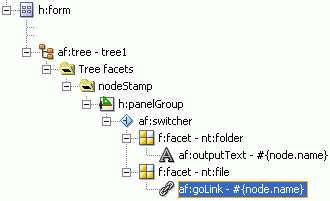
Use an af:goLink component to display file names as hyperlinks:
Right-click f:facet - nt:file, and then choose Insert Inside f:facet - nt:file, ADF Faces Core.
Choose GoLink, and click OK.
Right-click af:goLink - goLink 1, and click Properties.
For the link's Text, enter the expression: #{node.name}
For the link's Destination, enter the expression: #{node.URI}
Click OK.
Use the Structure window to check the af:switcher configuration. It should look like Figure 7-44.
Figure 7-44 Switcher Showing Configured Facets
Click the Save All icon in the JDeveloper toolbar.
Run the page again.
This time, you'll see a tree of hyperlinked file names similar to Figure 7-45.
Click any file name. You should see the content of that file displayed in a new browser window.
Notice that folder names are plain text, a result of our Switcher component.
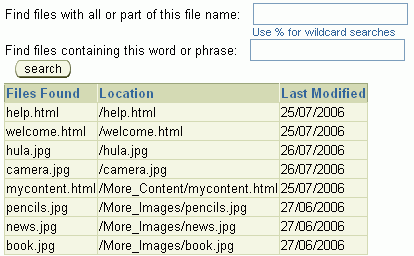
File system data controls provide a Search method for locating data and documents that are exposed through a data control. In this step you'll learn how to use this method to build a search form that enables users to search for content by file name and keyword, and display search results in a table.
At the end of this exercise, your search form will look similar to that shown in Figure 7-46. Let's get started!
Figure 7-46 Search Form Based On Data Control MyTutorialContent2
In the Data Control Palette, expand the Search node under MyTutorialContent2 (Figure 7-47).
Highlight the search node, drag it over to the Structure window, and drop it below the tree (af:Tree - tree1).
From the context menu, select Create Method, ADF Command Button as shown in Figure 7-48.
Figure 7-48 JDeveloper Context Menu for the Search Method
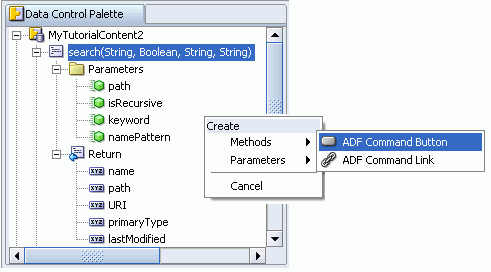
Now you should see the Action Binding Editor.
We want to search for everything under the base path (for example, C:\TutorialContent), so enter / for the path parameter. Make sure you enter a forward slash, not a backslash (Figure 7-49).
Figure 7-49 Action Binding Editor for Search Method
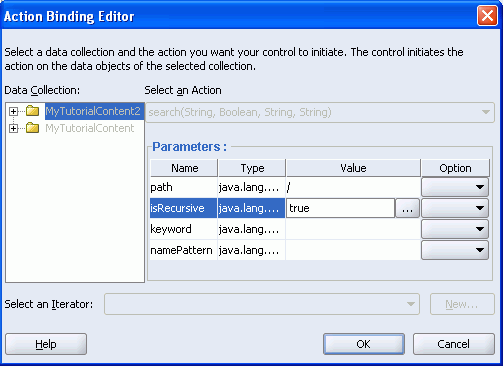
To automatically extend the search to all subdirectories under the location specified through the path attribute, enter true for the isRecursive parameter (Figure 7-49).
Leave the keyword and namePattern fields blank—you're not going to pre-define any search terms or filename criteria for this search. Instead, you'll provide input fields for both these parameters on the search form so that users can drive the search.
Click OK.
You should see a command button labeled search displayed on your page. Now let's add some input fields above this button into which a users may enter search criteria.
To enable users to search by file name, add the namePattern parameter:
In the Data Control Palette, expand the Parameters node, and then select namePattern.
Drag and drop the namePattern parameter above the Search button.
From the Create menu, choose Texts, ADF Input Text w/ Label.
In the Structure window, double-click af:inputText #{bindings.namePattern..., and enter a suitable label, for example: Find files with all or part of this file name:
For a Tip, enter: Use % for wildcard searches
Click OK.
To enable users to search for phrases or keyword within file content, add the keyword parameter to the page:
In the Data Control Palette, expand the Parameters node, and select keyword.
Drag and drop the keyword parameter above the Search button.
From the Create menu, choose Texts, ADF Input Text w/ Label.
In the Structure window, double-click af:inputText #{bindings.keyword..., and enter a suitable label such as: Find files containing this word or phrase:
Click OK.
Your page should look like Figure 7-50.
Figure 7-50 Search Form With Two Input Parameters

Now let's add a table for the search results:
In the Data Control Palette, select the return node below the Search method.
Drag the method return, and drop it below the Search button.
From the Create menu, choose Tables, ADF Read-only Table.
Use the Edit Table Columns dialog to edit some default display settings. First, delete the URI and primaryType columns.
Next, edit the Display Labels for the name, path, and lastModifed columns. For example, enter the labels Files Found, Location, and Last Modified as shown in Figure 7-51.
Figure 7-51 Edit Display Labels for the Search Results Table
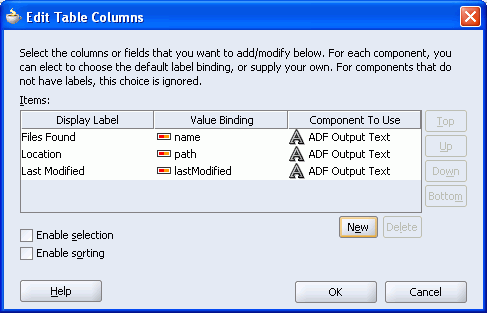
Click OK.
Click the Save All icon in the JDeveloper toolbar.
Now let's display the search form in a browser and run some searches.
Before running the page again, stop the embedded OC4J Server. Choose Run, Terminate, Embedded OC4J Server from the main menu.
Right-click MyContent.jspx, and select Run.
You should see a search form similar to that shown in Figure 7-52.
Figure 7-52 Search Form Based On Data Control MyTutorialContent2

The first field on the form exposes the namePattern parameter. Enter some file name criteria, click the search button, and examine the content displayed in the search result table. Only files matching the name pattern you specify should be displayed.
Try the following searches:
To search for files with the .html file extension, enter %html. Three files should match this pattern.
To search for filenames containing the word help, enter %help%. Only help.html should match.
The second field on the form exposes the keyword parameter. This parameter enables you to search for content inside files. Enter a word or phrase, click the search button, and examine the content displayed in the search result table. Only files containing the words you specify should be displayed.
Remove %help% from the field above, and try the following keyword searches:
To search for files containing the word WebCenter, enter WebCenter. Two files should display.
To search for files containing the words WebCenter and tutorial, enter WebCenter AND tutorial. Only one file contains both these words.
This completes the content integration lesson. You've learnt how to publish file system content in a WebCenter application and discovered how to add search capabilities too. For more detailed information, on this subject, refer to the Oracle WebCenter Framework Developer's Guide.
In the next lesson you'll use Oracle ADF security to secure the pages you've created during this tutorial.