| Oracle® WebCenter Framework Developer's Guide 10g (10.1.3.2.0) Part Number B31074-05 |
|
|
View PDF |
| Oracle® WebCenter Framework Developer's Guide 10g (10.1.3.2.0) Part Number B31074-05 |
|
|
View PDF |
Oracle WebCenter Framework has all the tools a Java developer needs for developing portlets and adding them to WebCenter application pages. Portlet creation wizards enable rapid development of portlet frameworks.
This chapter provides an overview of portlets. It contains the following sections:
A portlet is a reusable Web component that can draw content from many different sources. Figure 14-1 illustrates the Most Active Customers portlet, a portlet constructed at run time using OmniPortlet. For more information about OmniPortlet, see Section 14.3.4, "OmniPortlet".
Figure 14-1 The Most Frequent Customers Portlet
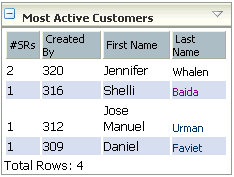
Figure 14-2 illustrates the Customer Details portlet, which works in conjunction with the Most Active Customers portlet. In Most Active Customers, users click a customer name to open the Customer Details portlet and view such information as the customer's e-mail and street addresses.
Portlets provide a means of presenting data from multiple sources in a meaningful and related way. Portlets can display excerpts of other Web sites, generate summaries of key information, perform searches, and access assembled collections of information from a variety of data sources. Because different portlets can be placed on a common page, the user receives a single-source experience. In reality, the content may be derived from multiple sources.
In a WebCenter application, a portlet may or may not be rendered in an inline frame, or <iframe>. Inline frames enable the placement of a document within a rectangular region that includes scrollbars and borders.
Note:
For more information about portlets and inline frames, see Section 4.3.3.6, "iframes and form Tags".Within this inline frame, portlets can display many types of content, including HTML, formatted text, images, or elements of an HTML form.
Portlet anatomy is the visual representation of the portlet on a page. Figure 14-3 illustrates a typical portlet anatomy.
What is rendered on the page is controlled not only by the portlet's own logic, but by the attributes of the portlet tag that binds the portlet to the page. Values for these attributes are specified at the design-time of the application that consumes the portlet, rather than through the portlet's own logic.
The steps to including a portlet on an application page include the following:
Create the portlet.
Deploy the portlet to a portlet container (a producer).
Register the producer with the application that will consume the portlet.
Add the portlet to an application page.
Specify values for attributes of the portlet tag that binds the portlet to the application page.
Note:
For information about attributes of theadfp:portlet tag, see Section 4.3.3, "Setting Attribute Values for the adfp:portlet Tag".For example, at application design time you can specify through portlet tag attributes that the run-time portlet should display a header and that its border should be of a specified thickness and color. In the header, you can include a portlet title as well as an Actions menu icon. The Actions menu icon is displayed on a portlet only when the portlet header is displayed. If you choose not to display a header, then the Actions menu is displayed on a FadeIn-FadeOut toolbar that renders on a mouse rollover.
These elements are sometimes referred to as portlet chrome. The appearance of portlet chrome can be controlled through a style sheet as well as through style-related attributes of the adfp:portlet tag. The values of style-related attributes take precedence over styles specified through a style sheet, or skin.
Note:
For information about skins and style-related attributes, see Chapter 9, "Defining and Applying Styles to Core Customizable Components".Through portlet tag attributes, you can include or omit display commands on the Actions menu. Actions menu items controlled through portlet tag attributes include Maximize and Restore. Maximize causes the maximized portlet to displace all other displayed portlets. These are displayed again once a user selects Restore.
Note:
The Maximize attribute is meaningful for a portlet only when the portlet is placed inside aPanelCustomizable core customizable component.Other Actions menu items controlled through portlet tag attributes include the display or omission of the mode settings that were specified when the portlet was developed. If the portlet was built without including additional modes, then these commands do not appear on the Actions menu even when you indicate that they should through portlet tag attributes. In other words, portlet tag attributes are sometimes merely on/off switches that enable or disable the portlet's own built-in functionality.
Mode settings that appear on the Actions menu include such modes as About, Help, Personalize, and Customize.
Users select Personalize to alter their personal view of the portlet. The Personalize command is displayed on the Actions menu only to authenticated users (that is, users who are logged in). It does not display to Public or unauthenticated users. You must implement some form of application security for users to be able to personalize their portlet views.
Note:
If you are a developer creating portlets, and you want to test the Personalize mode without creating a complete security model for your application, then see Section 10.6, "Configuring Basic Authentication for Testing Portlet Personalization".Customization enables application administrators to edit a portlet's default settings at run time. All users see the results of a customization.
Note:
A typical customization setting is Portlet Title. At run time, the portlet administrator can determine what title should appear in the portlet header. The Portlet Title can also be set at design-time through portlet properties, using thetext attribute of the adfp:portlet tag. Consider however that supplying a value to the text attribute at design-time prevents customization of the Portlet Title at run time.
For additional information about portlet tag attributes, see Section 4.3.3, "Setting Attribute Values for the adfp:portlet Tag".
Portlet resources include the many prebuilt portlets available out of the box from many sources, including Oracle Application Server Portal (OracleAS Portal), Oracle E-Business Suite, and third-party sources. Portlet resources also include programmatic portlets built through the WebCenter application's JSR 168 (standards-based) and Oracle PDK-Java wizards, and through other portlet-building tools. Each of these tools offers different product features that are targeted toward different developer roles.
This section describes different portlet resources, suggests the level of expertise required to use them, and provides examples of when they might best be used. It includes the following subsections:
This section introduces you to the various portlet resources. For specific information about each tool and its benefits, see Chapter 15, "Portlet Technologies Matrix".
What Is It?
The Rich Text portlet, based on the WSRP 2.0 standard, offers browser-based rich text editing at run time. Select Customize from the portlet's Actions menu to invoke a toolbar with all the rich-text editing tools you will need to insert, update, and format display text. Click the editor's Submit button to save your changes and hide the toolbar. (Selecting Refresh from the portlet's Actions menu also hides the toolbar).
With the Rich Text portlet, when an authorized user selects the Customize menu item the portlet enters edit mode while the page that contains the portlet remains in view mode.
Portlet configuration settings—available at design-time—include controls for the portlet's name, description, and display settings.
Who Is the Intended User?
Application developers can add the Rich Text portlet to a page and provide initial content. Unless the application developer prohibits it, end users with the appropriate privileges can update the content of the Rich Text Portlet at run time.
When Should It Be Used?
The Rich Text portlet is a useful tool for run time posting of enterprise announcements and news items. It provides straightforward, easy-to-use controls for entering and formatting display text.
Using the Rich Text Portlet
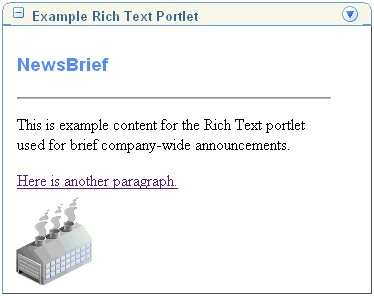
This section steps you through the process of accessing Rich Text portlet controls and tours you through them. To illustrate the process of using the portlet, a simple example of display text was created using a cascading style sheet, text, color, a link, and an image. Remember that you use Rich Text portlet controls at run time, that is, once the portlet has been placed on an application page, and the application page is run.
The following exercise steps you through run time creation of a simple display text example, similar to Figure 14-4.
Note:
At design-time (when you place the Rich Text portlet on an application page), the portlet'sallModesSharedScreen attribute should be set to true. This enables all portlet modes to display without leaving the context of a given page. You can do this by adding the attribute to the adfp:portlet tag or by changing the value through the Oracle JDeveloper Property Inspector.
For information about obtaining the Rich Text portlet, see Section 3.2, "Using the Preconfigured OC4J". For information about adding the Rich Text portlet to a page, see Section 4.3, "Consuming Portlets".
Figure 14-4 Example Display Text in the Rich Text Portlet
To add content through the Rich Text portlet, perform the following steps:
Click the Actions icon in the right corner of the portlet header.
From the resulting menu, select Customize.
The Rich Text editor loads into the portlet.
Toggle the editor to HTML edit mode by clicking the Change Edit Mode icon (see Table 14-1).
Enter a reference to your preferred CSS.
For example:
<link rel="stylesheet" type="text/css" href="http://mycompany.com:7632/stylesheets/newsbriefs.css">
Note, however, that a stylesheet is not required.
Toggle the editor to WYSIWYG edit mode, and enter the following text:
NewsBrief
This is example content for the Rich Text portlet used for brief company-wide announcements.

Here is another paragraph.
Select the text NewsBrief, and click the Text Foreground Color icon (Figure 14-5).
In the color palette, select a color, and then click OK.
With the heading still highlighted, select 4 from the Font Size list.
Toggle the editor to HTML edit mode, wrap the heading and the color and size specifications in the tag for the top heading level in your CSS.
For example:
<h1>
  <font style="color: rgb(82, 140, 255);" size="4">
  <span style="font-family: arial,helvetica,sans-serif;">
  NewsBrief</span></font>
</h1>
Add a horizontal rule after </h1>.
For example:
</h1><hr>
Toggle the editor to WYSIWYG edit mode and highlight the text Here is another paragraph.
Click the Insert Hyperlink icon (Figure 14-6), and enter a hyperlink to a favorite site.
For example:
http://www.oracle.com
Click OK to close the Insert Hyperlink dialog box.
Press Enter to create a new line, and click the Insert Image icon (Figure 14-7).
In the Insert Image dialog box, enter the location of an image.
To obtain any image's location, right-click the image and select Properties from the context menu. The location is available for copying from the image's property sheet.
Click OK to close the Insert Image dialog box.
Click the Submit button below the Rich Text editor to save your changes and exit the editor.
Table 14-1 lists and describes the controls available on the Rich Text portlet edit mode toolbar.
Table 14-1 Rich Text Portlet Controls
| Button/Keystrokes | Mode: WYSIWYG/HTML/Both | Function |
|---|---|---|
|
Ctrl + Z |
WYSIWYG |
Undo last action. Click again to undo preceding actions. |
|
Ctrl + Y |
WYSIWYG |
Redo last action. Click again to perform additional redo's. |
|
|
WYSIWYG |
Select the font in which to set the selected or subsequent text. Choose from the fonts available on your file system. |
|
|
WYSIWYG |
Select a font size in which to set the selected or subsequent text. Values are set against the browser or the current size default.
|
|
|
Both |
Bold selected or subsequent text. |
|
|
Both |
Italicize selected or subsequent text. |
|
|
Both |
Underline selected or subsequent text. |
|
|
WYSIWYG |
Set the text color. |
|
|
WYSIWYG |
Set the text background color. This is also called highlighting. The selected color appears behind the text. |
|
|
Both |
Switch between a graphical edit mode (WYSIWYG) and an HTML edit mode. WYSIWYG is the default. Use the WYSIWYG edit mode to display text as it will appear on your page. Use HTML edit mode to modify the HTML source code. |
|
|
WYSIWYG |
Add/change a link. You can create any kind of standard Web link. For example:
|
|
|
WYSIWYG |
Insert an image. Ultimately, insert the URL to an image. You can obtain an image URL by right-clicking the image and selecting Properties from the context menu. |
|
|
WYSIWYG |
Align the current paragraph left, center, or right. |
|
|
WYSIWYG |
Add/remove a bulleted or numbered list. Once you start a list, every time you press Enter a new bulleted or numbered item is added. Press Enter twice to end the list. |
|
|
WYSIWYG |
Decrease or increase the current paragraph's indentation. Note: You must use these keys to increase or decrease indents in WYSIWYG mode. Using the Tab key does not indent a paragraph. |
|
Ctrl + P |
Both |
Print the content in the editor window. Note: Your cursor must be in the editor window for this key combination to limit printing to the editor's content. |
What Are They?
Prebuilt portlets include partner portlets and integration solutions.
Partner portlets are available through Oracle's partnerships with leading system integrators, software vendors, and content providers. You can access these portlets by using the keywords portal or portlet when searching the Oracle PartnerNetwork Solutions Catalog, available at http://solutions.oracle.com. Examples of these include portlets for the following purposes:
Generating point-to-point driving directions
Accessing Information Technology (IT) information from a wide variety of sources
Viewing summary information about news, stocks, and weather
Portal Integration (POINT) Solutions provide solutions for customers who require basic functionality for popular applications, such as Microsoft Exchange, Lotus Notes, SAP, IMAP, SMTP, and the like. These portlets are available on the Oracle Technology Network (OTN) Portal Integration Solutions page:
http://www.oracle.com/technology/products/ias/portal/point.html
Who Is the Intended User?
Fully developed, downloadable portlets are best suited for use by application developers who understand how to download, install, and register producers in Oracle WebCenter Framework. They are available for use by all levels of experience.
When Should They Be Used?
Use prebuilt portlets when your needs are satisfied by the functions the portlets offer and the level of personalization readily available is sufficient to complete the desired task.
Consider alternatives when you need to extend or personalize the portlet, for example, when you need a different user interface or when the functionality you require is not available out of the box.
What Is It?
Web Clipping is a browser-based declarative tool that enables the integration of any Web application with a WebCenter application. Web Clipping is designed to provide quick integration by leveraging the Web application's existing user interface. Web Clipping has been implemented as a PDK-Java producer.
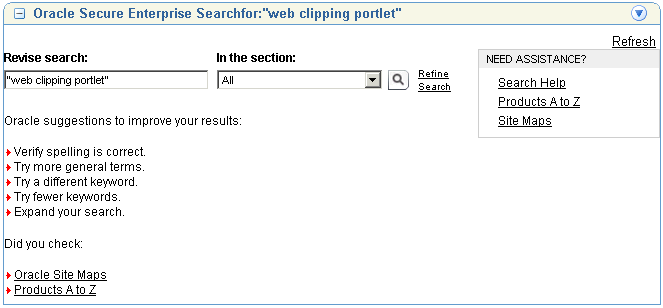
To create a Web Clipping portlet, the WebCenter application developer uses a Web browser to navigate to a Web page that contains desired content. Through the Web Clipping Studio, the application developer can drill down through a visual rendering of the target page to choose the desired the content (Figure 14-8).
Figure 14-8 Selected Web Clipping Displayed in a Web Clipping Portlet
Web Clipping supports the following:
Navigation through various styles of login mechanisms, including form- and JavaScript-based submission and HTTP Basic and Digest Authentication with cookie-based session management.
Fuzzy matching of clippings, If a Web clipping gets reordered within the source page or if its character font, size, or style changes, then it will still be identified correctly by the Web Clipping engine and delivered as the portlet content.
Reuse of a wide range of Web content, including basic support of pages written with HTML 4.0.1, JavaScript, applets, and plug-in enabled content, retrieved through HTTP GET and POST (form submission).
Personalization, enabling an application developer to expose input parameters that users can modify when they personalize the portlet. These parameters can be exposed as public parameters that an application developer can map as page parameters. This feature enables users to obtain personalized clippings.
Integrated authenticated Web content through Single Sign-On, including integration with external applications, which enables you to leverage Oracle Single Sign-On and to clip content from authenticated external Web sites.
Inline rendering, enabling you to set up Web Clipping portlets to display links within the context of the portlet. As a result, when a user clicks a link in the Web Clipping portlet, the results display within the same portlet. You can use this feature with internal and external Web sites.
Proxy Authentication, including support for global proxy authentication as well as authentication for each user. You can specify the realm of the proxy server and whether all users will automatically log in using a user name and password you provide, each user will log in using an individual user name and password, or all users will log in using a specified user name and password.
Open Transport API for customizing authentication mechanisms to clipped sites.
Security Enhancement that enables administrators to control access to content that can be clipped by the Web Clipping portlet.
Who Is the Intended User?
Web Clipping is best suited for use by application developers and component developers who want to leverage an existing Web page for rapid portlet development. This portlet can be added to a page by any user with the appropriate privileges.
When Should It Be Used?
Use Web Clipping when you want to repurpose live content and functionality from an existing Web page and expose it in your WebCenter application as a portlet. Consider alternatives if you want to change the way information is presented in the clipped portlet. That is, you do not need to control the User Interface (UI) or application flow, and you are accessing Web-based applications. For a greater level of control, use OmniPortlet's Web page data source instead of Web Clipping. (See Section 14.3.4, "OmniPortlet".)
The following are some examples of when you can consider using the Web Clipping portlet:
Stock chart portlet. You want to create a portlet that displays the stock market's daily performance chart from your financial advisor's Web site. You could clip this information from an external Web site, even if your company is using a proxy.
Web mail portlet. Your users want to access their confidential Web mail accounts through a portlet and to display their in-boxes in the portlet.
For more information about using Web Clipping, see Chapter 17, "Creating Content-Based Portlets with Web Clipping".
Note:
To use the Web Clipping portlet, OmniPortlet, or the Simple Parameter Form with Windows 2000, you must use Netscape 7.0 or later, or Microsoft Internet Explorer 5.5 or later.What Is It?
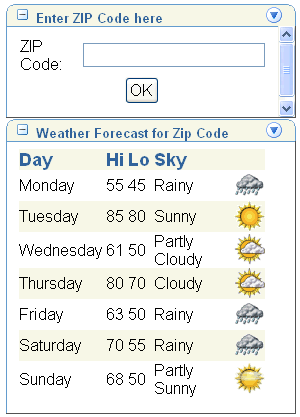
OmniPortlet is a declarative portlet-building tool that enables you to build portlets against a variety of data sources, including XML files, character-separated value files (CSV, for example, spreadsheets), Web Services, databases, Web pages, and SAP data sources. OmniPortlet users can also choose a prebuilt layout for the data. Prebuilt layouts include tabular, news, bullet, form, chart, or HTML. HTML layout enables OmniPortlet users to write their own HTML and inject the data into the HTML. Figure 14-9 shows an OmniPortlet with a tabular format.
Figure 14-9 A Simple Parameter Form (top) and an OmniPortlet Using Tabular Format
Like Web Clipping, OmniPortlet supports proxy authentication, including support for global proxy authentication as well as authentication for each user. You can specify whether all users will automatically log in using a user name and password you provide, each user will log in using an individual user name and password, or all users will log in using a specified user name and password.
You'll find information about OmniPortlet on Portal Center. Navigate to the following URL, then click the Portlet Development link:
http://www.oracle.com/technology/products/ias/portal/index.html
Who Is the Intended User?
Business users with a minimum knowledge of the URLs to their targeted data will find OmniPortlet a valuable tool.
When Should It Be Used?
Use OmniPortlet when you want to build portlets rapidly against a variety of data sources with a variety of layouts. Consider alternatives when you want complete control of the design and functionality of the portlet.
The following are some examples of when you can consider using OmniPortlet:
RSS news feed portlet: You want to create a portlet that displays live, scrolling news information to your users. The data comes from a Really Simple Syndication (RSS) news feed, such as Oracle Technology Network Headlines. You also want the portlet to contain hyperlinks to the news source.
Sales chart portlet: You want to present up-to-date information about your company's sales results. You also want to display data in the form of a pie chart, and your company stores its sales information in a remote relational database.
SAP portlet: You want to display information from a company's SAP system. To minimize the load on the company's SAP Business Suite, the information retrieved from the system must be cached for each user for the entire day.
Note:
The SAP data source is not included with Oracle WebCenter Framework. To learn more about using the SAP data source, visit the Oracle Portal Integration Solutions page on OTN:http://www.oracle.com/technology/products/ias/portal/point.html
For more information about OmniPortlet, see Chapter 16, "Creating Portlets with OmniPortlet".
What Are They?
Programmatic portlets are portlets that you write yourself, in Java, using either the standard Java Portlet Specification (JPS) or PDK-Java. Oracle WebCenter Framework provides two declarative wizards for simplifying the creation of standards-based JSR 168 portlets and Oracle PDK-Java portlets. These wizards assist in the construction of the framework within which you create the portlet. Each wizard may include easy steps for the following:
Configuring general portlet properties
Specifying names and search terms
Setting permissible content types and mapping display modes
Specifying user-customizable preferences
Adding security roles
Enabling default caching
Adding initialization parameters
Adding navigation parameters
Who Is the Intended User?
Use of the wizards is easy, but the creation of portlet logic is best performed by experienced and knowledgeable Java developers who are comfortable with the Java Portlet Specification or PDK-Java and who understand the configuration of producers.
When Should They Be Used?
Use programmatic portlets when you have very specialized business rules or logic or when you require personalized authentication, granular processing of dynamic results, and complete user interface control. Additionally, use programmatic portlets when you need to satisfy any of the following conditions:
Consider using the programmatic approach when the out-of-the-box portlets do not address your needs.
The following list provides a couple of examples of when you can consider using programmatic portlets:
Photo Album portlet: You want to create a a portlet that facilitates uploading, storing, and viewing user photos.
Shopping Cart portlet: You want to create a portlet that facilitates the viewing and purchasing of, for example, company-branded items, such as mouse pads, pens, flash drives, tee shirts, and the like.
For more information about using programmatic portlets, see Chapter 18, "Creating Java Portlets" and Chapter 19, "Enhancing Java Portlets".
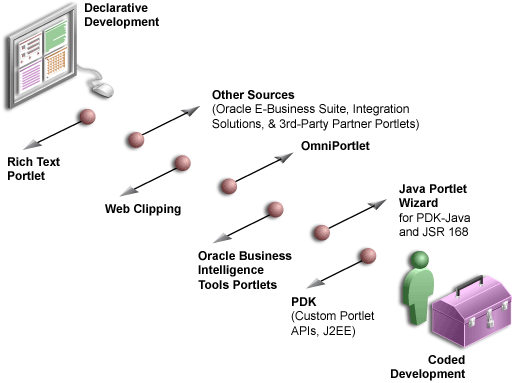
Figure 14-10 illustrates the spectrum of portlet resources described in the previous section. Notice how one end of the spectrum is geared toward a more declarative development environment (that is, develop-through-wizard) while the other end focuses more on hand-coding. You can choose your tool depending on which type of environment is most comfortable and suitable to your skill-base.
For more information about deciding which tool to use, see Chapter 15, "Portlet Technologies Matrix".
Figure 14-10 Portlet Resources from Declarative to Coded Development
