| Oracle® WebCenter Framework Developer's Guide 10g (10.1.3.2.0) Part Number B31074-05 |
|
|
View PDF |
| Oracle® WebCenter Framework Developer's Guide 10g (10.1.3.2.0) Part Number B31074-05 |
|
|
View PDF |
This chapter describes how to use Oracle ADF Security in your WebCenter application to handle authentication and authorization.
This chapter includes the following sections:
Section 10.1, "Introduction to WebCenter Application Security"
Section 10.3, "Creating a Login Component for Your Application"
Section 10.5, "Creating a Public Welcome Page for Your Application"
Section 10.6, "Configuring Basic Authentication for Testing Portlet Personalization"
Section 10.7, "Accessing External Applications Requiring Credentials"
Section 10.8, "Registering Custom Certificates with the Keystore"
Section 10.9, "Overriding Inherited Security on Portlets and Customizable Components"
Section 10.10, "Securing Identity Propagation Through WSRP Producers With WS-Security"
Section 10.11, "Configuring a WebCenter Application to Use LDAP and Single Sign-On"
WebCenter applications are dynamic, run time driven, and often involve input from users in the form of customization and personalization. Therefore, the use of traditional J2EE security is limiting. To go beyond the limitations of J2EE security, you can use Oracle Application Development Framework (Oracle ADF) security, which is based on the Java Authentication and Authorization Service (JAAS). JAAS is a standard security Application Programming Interface (API) that is added to the Java language through the Java Community Process and enables applications to authenticate users and enforce authorization.
J2EE security secures a path based on roles. For example, in the SRDemo application, three core roles, which are J2EE security roles, determine who is authorized to perform certain functions or to have access to pages. Each user must be classified with one of three roles: user, technician, or manager. During the development of the application, security constraints are defined that map specific URL patterns to a specified J2EE security role. For example, the URL pattern /app/management/* can be mapped to the manager role so that only managers can access those pages. Constraints and users or security roles are defined in the web.xml file, while the mapping of the static roles to those within the identity management solution is defined in the deployment descriptor for the application server (in OC4J, this is the orion-web.xml file). Because both of these files are deployed with the application, you cannot change the security constraints at run time. To create a new role, you must redeploy the application.
The use of the JAAS-based Oracle ADF Security model addresses these problems. Oracle ADF implements a JAAS security model through integration with JAZN, Oracle's implementation of the JAAS service. While to date, JAAS has mostly been used for authentication, it was also designed to enable for the definition of an authorization model. (After all, that is what the second A in JAAS is all about!). Traditionally this required the use of custom code and was not easy to implement, but Oracle ADF Security simplifies the implementation of a JAAS authorization model by exposing it in a declarative way.
With Oracle ADF Security, the required permissions (activities) to access an application are not a static role definition, but instead are deployed with the application. Because these permissions are mapped at run time, changes in the security profile information, such as the addition of a new role after deployment, will automatically be applied without a need to update the application. Furthermore, because Oracle ADF Security is not constrained by the URL to a secured resource, you can define more granular permissions to resources. In your applications, you can also use Expression Language (EL) to show or hide items on a page based on a user's permissions, which are defined in the run time policy store. This policy store can be defined in one of the two JAZN resource providers: JAZN-XML, which specifies the permission grants in the file system-jazn-data.xml, or JAZN-LDAP, which stored these grants in an LDAPv3-compliant directory, such as Oracle Internet Directory.
Using Oracle ADF Security, you can simplify the organization of your application. Because you can specify security by a declarative permission rather than through the URL mapping of a security constraint, the location of the resource to be secured is no longer mandated by those security constraints and you can organize pages in whatever structure is logical for your application. For example, you can store pages in a single flat directory structure based on their file type (jsp, jspx, and so on), or in a more traditional hierarchical directory tree.
While Oracle ADF Security adds significant new functionality to an application, the JAAS specification itself is part of the J2EE declarative security model. That is, it is an extension of the overall J2EE container security platform. Thus, the more granular Oracle ADF Security implementation can be viewed as an extension to the standard J2EE container security and is executed after the standard security constraints have been processed.
Within the Oracle ADF framework, JAAS-based security is enforced by the use of specific servlet filters and the data binding layer of the application. The filters and the binding layer work together to trap incoming requests, determine the current user's permissions, and block or enable the request accordingly.
The use of Oracle ADF security enables WebCenter applications to easily adjust to real-world business security requirements, because rather than securing paths, you secure actions with JAAS. JAAS-based Oracle ADF Security provides:
More granular declarative inter-portlet security. Because J2EE security is URL-based or page-based, it is not possible to have a finer level of access control. With Oracle ADF security, different roles can perform different levels of activity at the same URL.
The ability to create new roles and their associated access privileges at run time, because the policies are stored external to the application.
Simplified permission assignment by using hierarchical roles, which enable for the inheritance of permissions. While J2EE security roles that are used by J2EE security constraints are flat, JAAS permissions reference enterprise roles, which can be nested.
The following topics are covered in this section:
Oracle ADF Security enables for implicit and explicit authentication. In an implicit authentication scenario, as shown in Figure 10-1, when an unauthenticated user tries to access a page, the adfBindings servlet filter intercepts the request and checks to see if the page is defined as viewable by anyone.
On the first access to a page, if there is no subject defined, then one is created containing the anonymous user principal and the anyone role principal. With this role principal, the user can access any page on which the view privilege has been granted to the anyone role. For example, public.jsp. See Section 10.1.2, "Authorization" for a discussion on authorization.
However, if the requested page is secured (that is, not defined as viewable to anyone, such as mypage.jspx) then the adfBindings servlet filter redirects the request to the Oracle ADF authentication servlet (Step 1), passing in the URL to the requested page as the success URL.
Figure 10-1 Oracle ADF Security Implicit Authentication
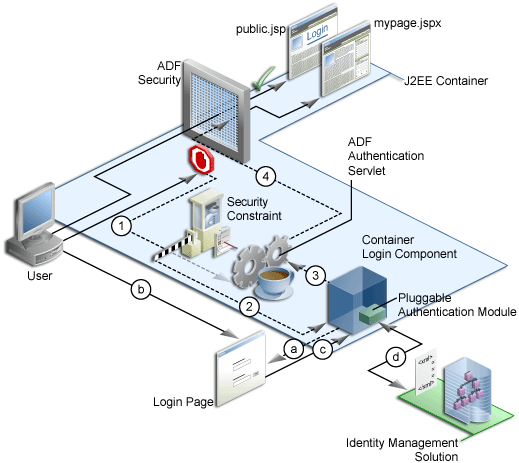
The adfAuthentication servlet has a J2EE security constraint on it, that results in the J2EE container invoking the configured login mechanism (Step 2). Based on the container's login configuration, the user is prompted to authenticate. In the case of form-based authentication, the appropriate login form is displayed (Step a) and the user enters his credentials (Step b), after which the form is posted back to the container's j_security_check() method (Step c).
The J2EE container authenticates the user, using the configured pluggable authentication module (Step d) and on successful authentication, the container redirects the user back to the servlet that initiated the authentication challenge. In this case, that is the adfAuthentication servlet (Step 3). On returning to the adfAuthentication servlet, the success URL value is used to subsequently redirect to the originally requested URL (Step 4).
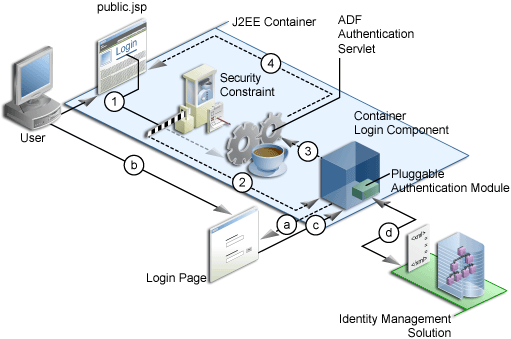
In an explicit authentication scenario, as shown in Figure 10-2, an unauthenticated user (with only the anonymous user principal and anyone role) clicks the Login link on a public page (Step 1). The Login link is a direct request to the adfAuthentication servlet, which is secured through a J2EE security constraint.
In this scenario, the current page is passed as a parameter to adfAuthentication servlet. As with the implicit case, the security constraint redirects the user to the container's login component (Step 2). After the container authenticates the user, as described in steps a through d in the implicit authentication case, the request is returned to the adfAuthentication servlet (Step 3), which subsequently returns the user to the public page, but now with his new user and role principal.
Figure 10-2 Oracle ADF Security Explicit Authentication
This section describes how the authorization functionality has moved to a policy store definition that is accessed at run time and contains permissions against actions on objects. These permissions are established when setting the authorization on the objects in Oracle JDeveloper.
Figure 10-3 illustrates the authorization process.
Figure 10-3 Oracle ADF Security Authorization
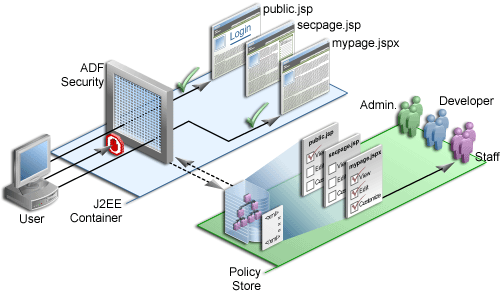
The user is a member of the enterprise role Staff in the identity management solution. When the user tries to access mypage.jspx, the Oracle ADF Security enforcement logic intercepts the request and checks the page definition of that page to see if permission is required.
Because the user has not yet logged in, the security context does not have a subject (a container that represents the user) yet, and it creates a subject with the anonymous user principal (a unique definition of the user) and the anyone role principal.
Any permission granted to the anyone role effectively makes the secured resource a public resource, accessible by all users (both authenticated and unauthenticated). Hence, with the anyone role principal, the user can access any page on which the view privilege has been granted to the anyone role. For example, the public.jsp page.
Because mypage.jspx requires the view privilege to a role other than anyone, the user is challenged to authenticate. After successful authentication, the user will have a specific subject. The security enforcement logic checks the policy store to determine which role is required to view mypage.jspx and whether the user is a member of that role. In this case, the view privilege has been granted to the role Staff and because the user is a member of this role, he is enabled to navigate to mypage.jspx.
Similarly, when the user tries to access secpage.jsp, a page to which the user does not have the view privilege, access is denied.
Oracle ADF features a number of security-aware components, such as pages and data controls. These components map to a specific permission class that has a set of predefined scoped actions. By granting a permission to an action, a developer can authorize a user or role to perform the specified action on the associated secured component.
Caution:
In this release, policy information in the JAAS policy store is not scoped by application. As a result, if two applications refer to the same permission target, then they will both refer to the same grants against that target. This may produce unintentional results. To avoid this, applications should name their resources accordingly to provide for application scoping. For example, instead of simply calling a pagePage1.jspx, a more specific name such as App1_Page1.jspx will help isolate the policies.Oracle ADF Security defines the following four authorization points:
Page
Method
Iterator
Attribute
Using the Authorization Editor shown in Figure 10-10, you can define the desired authorization to perform an action on an object to a specific role.
The Authorization Editor exposes enterprise roles that are defined in the policy store (the system-jazn-data.xml file located in the embedded OC4J) and displays the actions that are defined against a specific component type (a page, a method, an iterator, or an attribute). Examples of these actions are View and Edit. To implement the authorization policy, check the action against one or more of the displayed roles.
The Authorization Editor writes the permission information to the policy store. The policy defines a permission type, the resource that is secured, the actions that can be performed against that resource, and to whom that policy is being assigned or granted. The policy is defined by a Grant, which contains both a Grantee and one or more Permissions.
A Grantee defines to whom the policy is applied. Example 10-1 shows how grants are defined in the system-jazn-data.xml file.
Example 10-1 Grants in the system-jazn-data.xml file
<grant>
  <grantee>
    <principals>
      <principal>
        <class>oracle.adf.share.security.authentication.ADFRolePrincipal</class>
        <name>anyone</name>
      </principal>
      . . .
    </principals>
  </grantee>
  <permissions>
    <permission>
       <class>oracle.adf.share.security.authorization.RegionPermission</class>
       <name>oracle.srdemo.view.pageDefs.app_SRWelcomePageDef</name>
       <actions>view</actions>
    </permission>
    . . .
  </permissions>
</grant>
In this Grant, the role principal anyone has been assigned View permission on the SRWelcome page. This permission has been specified against the associated page definition file of the SRWelcome page.
Note:
Page security policies are implemented through theRegionPermission class. In this sample, the anyone role has also been given permission to execute any method in the application (defined by the MethodPermission class) through the use of the wildcard (*) as the name of the method.Page Permission
Page authorization policies are defined against the Page Definition file. To edit page permissions, perform the steps in Section 10.2.3.2, "Securing Pages in Your Application".
The available actions for a page are shown in Table 10-1.
Table 10-1 Page Permissions
| Action | Description |
|---|---|
|
View |
View the page. |
|
Personalize |
Personalize portlets on the page. This page permission is required if you want to personalize portlets that are exposed on a page. Personalization enables you to make changes that are visible only to yourself. |
|
Customize |
Customize a page. Changes made will be visible to all users. |
|
Edit |
Edit content displayed on the page. The Edit action is not applicable for this release. |
|
Grant |
Grant privileges to other users. This action is not used in the design time. |
Caution:
Granting View permissions to a page does not automatically grant access to any methods, iterators, and attributes that are added to the page. These must be secured separately.Method Permission
Method permissions secure the ability to execute specific named method classes within the application.
The available actions for methods are shown in Table 10-2.
Method permissions are often used to enforce application security within a page rather than access to a page itself. For example, you can hide a Delete button based on the user's ability or inability to execute the delete method.
Iterator permission
Iterator permissions relate to the ability to scroll through a data set that is exposed through a data control and perform Data Manipulation Language (DML)-style actions on that data.
The available actions for iterators are shown in Table 10-3.
Table 10-3 Iterator Permissions
| Action | Description |
|---|---|
|
Create |
Create a new record |
|
Read |
Read the current data set pointed to by the iterator |
|
Update |
Update the currently selected data set |
|
Delete |
Delete the currently selected data set |
Attribute permission
Attribute permissions relate to the ability to view and update the specific attributes of an object returned within an iterator.
The available actions for attributes are shown in Table 10-4.
It is a common requirement that some portal pages should be seen by all users regardless of their specific access privileges. An Internet site's Welcome page, for example, should be seen by all visitors to the site, while a corporate site should be public only to those who have identified themselves through authentication.
In both cases, the page may be considered public, because the ability to view the page is not defined by the users' specific permissions. Rather, the difference is whether the user is anonymous or a known identity.
The use of public is different from traditional J2EE security, which does not let you to distinguish between completely unsecured (security has not been turned on or implemented) and public content.
In the Oracle ADF Security model, you explicitly differentiate between the absence of security and public access to content, by granting access privileges to the anyone role principal. anyone is a role that encompasses both known and anonymous users (thus, permission granted to anyone enables access to a resource by unauthenticated users, for example, guest users). To implement public access to authenticated users only, the policy must be defined for the users role principal.
External Applications and Credential Provisioning in the Oracle WebCenter Suite provide a means of accessing content from applications that require user authentication. When an Oracle PDK portlet producer's implementation depends on an application that handles its own authentication, you can associate that producer with an external application definition. At design time, this is a simple matter of registering the external application, then selecting the external application from a list when you register or edit an Oracle PDK portlet producer. At run time, the producer uses the information associated with the external application to authenticate the user to the application, and consequently consume its portlets. Note that the producer code is responsible for actually performing the authentication interaction with the external application. The external application support provided with Oracle WebCenter Suite simply provides the information needed for authentication to the portlet producer through the Oracle PDK.
The user provides login credentials when prompted and these credentials are preserved in a credential store. The credential store subsequently supplies that information during authentication. The user supplies the credentials only once. This information is stored at the WebCenter application end, mapped to the user's WebCenter application user name. The mapping information is read from the credential store for further requests. The portlet run time framework obtains the user's mapped credentials from the credential store.
The Credential Provisioning page is a JSF page (.jspx) that is built based on the information provided through the external application definition. At run time, the Credential Provisioning page displays login data fields composed of the data fields specified through external application registration. Users fill in the data fields with their login information. Login information is passed to the producer, which in turn passes the login values to the application. The application provides the producer with the requested portlets. Entering the credentials in the Credential Provisioning page also results in the credentials being persisted in the credential store.
For example, a producer provides a weather portlet from a portlet-producing application that has its own authentication mechanism. The developer:
Registers an external application through the External Application Registration Wizard that captures information about the application's authentication mechanism.
Adds a Credential Provisioning page that is a prebuilt page. This page can be modified for look and feel. At run time, this page displays the login data entry fields specified through external application registration.
Associates the external application to an Oracle PDK Portlet Producer, during producer registration or edit.
At run time, when a user accesses the weather portlet, a login page (that is, the Credential Provisioning page) is displayed, and the user enters login information. This information is passed through the producer to the portlet-providing application, which then passes the weather portlet back to the producer (after authentication). The producer, in turn, provides the weather portlet to the portlet-consuming application, which displays the portlet to the user.
The login information the user entered is preserved in a credential store, which handles logins for future sessions. The user does not have to enter login information again (unless the user's credentials change).
For information about how to register an external application and create a Credential Provisioning page, see Section 10.7, "Accessing External Applications Requiring Credentials".
This section describes how you can secure your application by using Oracle ADF Security, which is based on JAAS. Defining security for your application involves the following high-level steps:
Section 10.2.1, "Defining Roles for Developing Secured WebCenter Applications"
Section 10.2.4, "Enforcing Security Policies in Your Application"
Section 10.2.5, "Configuring Deployment Descriptor Files with Security Information"
As WebCenter security is based on a role-based access control mechanism with permissions granted to enterprise roles, you must create the appropriate roles in the identity management system that you use in the development environment. In the case of development environment, these roles should exist in the system-jazn-data.xml file, which is the default identity management solution.
There are two options for defining these roles:
The developer maintains a list of the actual roles that will be used in the production environment and uses these roles for policy definition. This enables for simple migration of policies at deployment time.
The developer defines a list of temporary role names that represent the ultimate production roles and uses these roles for policy definition. At deployment time, these policies must be updated to reflect the actual production roles. See Section 12.2.4.2, "Updating Policy Information (Optional)" for information about how to update the policy information in the app-jazn-data.xml file while deploying your application.
To create a set of test roles and users within the development environment, see the appendix titled "How to Set Up the Tutorial Identity Store" in the Oracle WebCenter Framework Tutorial.
Secure your application by running the ADF Security Wizard as follows:
In the Applications Navigator, select ViewController.
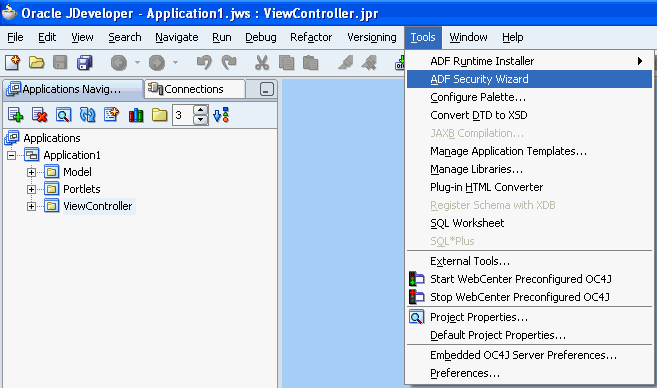
From the Tools menu, choose ADF Security Wizard as shown in Figure 10-4. The ADF Security Wizard will guide you through the configuration process.
Figure 10-4 ADF Security Wizard Option in the Tools Menu
If needed, click Next to skip the Welcome page.
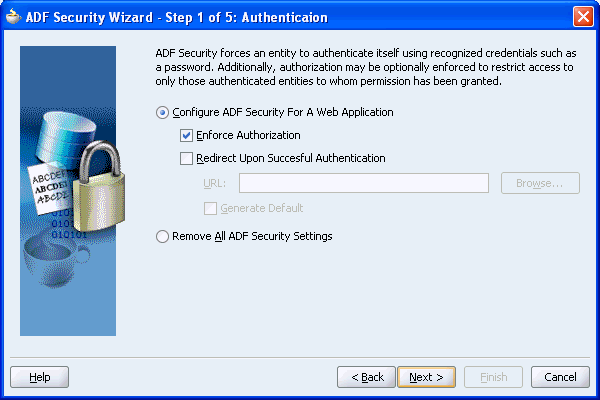
Select Enforce Authorization as shown in Figure 10-5, if it is not selected. This option configures the adfAuthentication servlet and configures authorization rules (appropriate filters to enable for checking of the current user's permissions on the page).
Figure 10-5 Authentication Page of the ADF Security Wizard
Click Next to move to the next page of the wizard.
Choose the appropriate JAAS provider to use with the application. Oracle ADF Security authenticates users against a resource provider. By default, this is the lightweight JAZN XML Provider which stores its realm and policy information in system-jazn-data.xml.
Click Next to display the next page of the wizard.
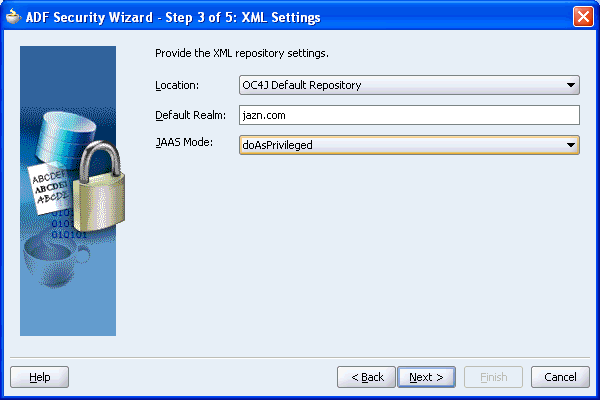
On this page, set the Location to OC4J Default Repository, Default Realm to jazn.com, and set JAAS Mode to doAsPrivileged as shown in Figure 10-6 and click Next.
Figure 10-6 XML Settings Page of the ADF Security Wizard
On the Login page, choose the form of authentication that will be used by the application. This process of authentication is delegated to the container in which the application is running and will use the security manager that is defined within the application.
Click Next to display the final page of the wizard, shown in Figure 10-7.
Figure 10-7 Resources Page of the ADF Security Wizard
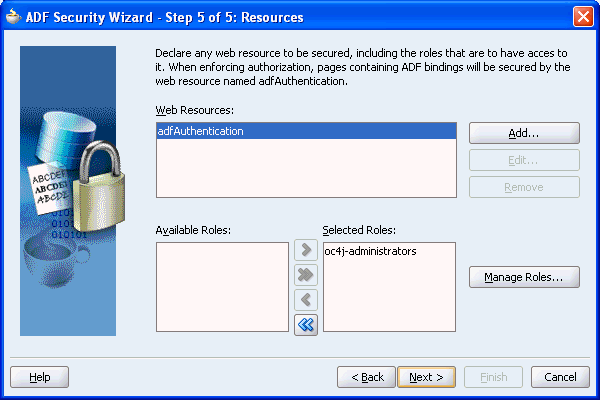
This page defines resources within your application that are to be secured, using standard J2EE security constraints. With the JAAS-based security model used by WebCenter applications the only web resource that must be secured using a security constraint is the adfAuthentication servlet.
As authentication is delegated to the container, the use of a security constraint against the adfAuthentication servlet enables for the definition of a single standard URL that can be used as a login or logout link throughout the application.
Note:
J2EE container managed security defines a standard method for logon. There is no standard to log out of an application, so while the login process is delegated to the container, the logout process is handled by the adfAuthentication servlet itself.While you may use this page to add further security constraints on web resources used by the application, you must not delete the adfAuthentication resource. Deleting it would prevent the ability to log on to the application. As every user of the application is required to be able to log on, the security constraint defined against the adfAuthentication servlet should enable all users to access this web resource. As such, the security role associated with the constraint should encompass all users.
As the only seeded role in the container is oc4j-administrators, you must create an appropriate new role for all users. For example, ValidUsers.
Click Manage Roles.
Click Add, and enter the name ValidUsers.
Later on, you'll map this J2EE role to one of the identity store roles, users. This role maintains a list of every valid user. From a security perspective, allocating permissions to this role effectively defines an authenticated public resource. That is, it would be available to all users without a need for the definition of specific permissions
Click OK. The ValidUsers role should appear in the list.
Click Close.
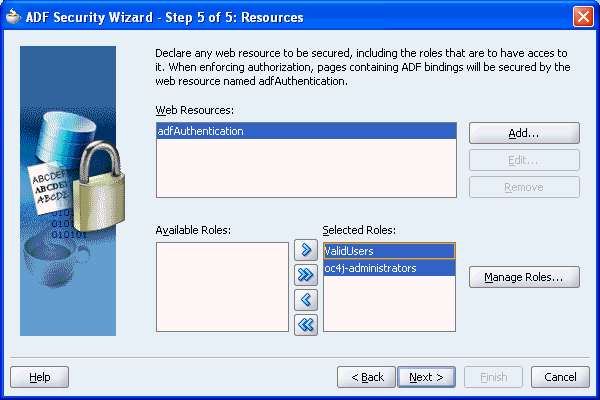
Click the double arrow (Add All) to move everything in the Available Roles list to the Selected Roles list as shown in Figure 10-8. You can remove oc4j-administrators from the Selected Roles list.
Figure 10-8 Final Page of ADF Security Wizard
Click Next and then click Finish.
What Happens When You Use the ADF Security Wizard
Once ADF security has been enabled, all your application resources are secured by default. That means that all pages, iterators, attributes, and methods in your application are now secure and require an explicit security policy. Therefore, once the security wizard is run, you must explicitly grant the appropriate privilege (for example, view on a page), or a security violation will be raised.
By executing the ADF Security Wizard, the files that configure your application to be secured are updated. Table 10-5 shows which files are updated and the changes that are made to the files.
Table 10-5 Files updated by the ADF Security Wizard
| File | Configuration Performed by the ADF Security Wizard |
|---|---|
|
|
|
|
|
See Appendix C, "Files for WebCenter Applications" for more information.
This section covers the following topics:
Section 10.2.3.1, "Getting Information from the Oracle ADF Security Context"
Section 10.2.3.3, "Securing Iterators, Attributes, and Methods in Your Application"
Section 10.2.3.5, "Using Regular Expressions to Define Policies on Groups of Resources"
The implementation of security in a WebCenter application is by definition an implementation of the security infrastructure of the Oracle ADF framework. As such, the security context of the framework enables access to information that will be required as you define the policies and the overall security for your application.
This section contains the following topics:
Determining if Security is Enabled
As the enforcement of Oracle ADF Security can be turned on and off at the container level independent from the application, you should determine if Oracle ADF Security is enabled prior to making permission checks. This can be achieved by evaluating the isAuthorizationEnabled() method of the Oracle ADF Security context as shown in Example 10-2.
Example 10-2 Using the isAuthorizationEnabled() Method of the Oracle ADF Security Context
if (ADFContext.getCurrent().getSecurityContext().isAuthorizationEnabled()){
  //Permission checks are performed here.
}
Determining if the User is Authenticated
As the user principal in a WebCenter application is never null (that is, it is either anonymous for unauthenticated users or the actual user name for authenticated users), it is not possible to simply check if the user principal is null, to determine if the user has logged on or not. As such, you must use a method to take into account that a user principal of anonymous indicates that the user has not authenticated. This can be achieved by evaluating the isAuthenticated() method of the Oracle ADF Security context as shown in Example 10-3.
Example 10-3 Using the isAuthenticated() Method of the Oracle ADF Security Context
// ============ User's Authenticated Status =============
public boolean isAuthenticated() {
_authenticated = ADFContext.getCurrent().getSecurityContext().isAuthenticated();
    return _authenticated;
}
Determining the Current User Name
WebCenter applications support the concept of public pages that, while secured, are available to all users. Furthermore, components on the WebCenter pages, such as portlets, require knowledge of the current user identity. As such, the user name in a WebCenter application will never be null. If an unauthenticated user accesses the page, the user name "anonymous" will be passed to page components.
You can determine the current user's name by evaluating the getUserName() method of the Oracle ADF Security context as shown in Example 10-4. This method returns the string "anonymous" for all unauthenticated users and the actual authenticated user's name for authenticated users.
Example 10-4 Using the getUserName() Method of the Oracle ADF Security Context
// ============ Current User's Name/PrincipalName =============
     public String getCurrentUser() {
      _currentUser = ADFContext.getCurrent().getSecurityContext().getUserName();
         return _currentUser;
     }
Because the traditional method for determining a user name in a Faces-based application (FacesContext.getCurrentInstance().getExternalContext().getRemoteUser()) returns null for unauthenticated users, you need to use additional logic to handle the public user case if you use that method.
Determining Membership of a J2EE Security Role
Although WebCenter application security is centered around JAAS policies, you will likely still need to use J2EE security roles to secure components within an application page based on role membership. As WebCenter applications are JavaServer Faces-based applications, you can use the isUserInRole(roleName) method of the Faces external context as shown in Example 10-5 to determine if a user is in a specified role.
In this example, a convenience method (checkIsUserInRole) is defined. The use of this method within a managed bean enables you to expose membership of a named role as an attribute, which can then be used in EL.
This section describes the steps involved in securing the pages in your application. You can restrict page access to the role members that you defined in the identity store and dictate the actions that role members can perform on the page. This configuration is stored in the page definition file (<page_name>PageDef.xml). You can access this file as shown in Figure 10-9.
Note:
When users run a portlet that has an Edit mode, the personalize option in the portlet menu appears only to authenticated users of the application. Anonymous or public users will not see the option to personalize the portlet through Edit mode. Hence, you must have implemented some form of security for your application in order for users to personalize their portlets. If you are a developer creating portlets and pages, then you may want to quickly test the Edit mode of your portlet without creating a complete security model for your application. See Section 10.6, "Configuring Basic Authentication for Testing Portlet Personalization" for an explanation of how you can quickly add the necessary security for testing portlet personalization.To enable security for a page in your application, perform the following steps:
Right-click your *.jspx page in the Applications Navigator.
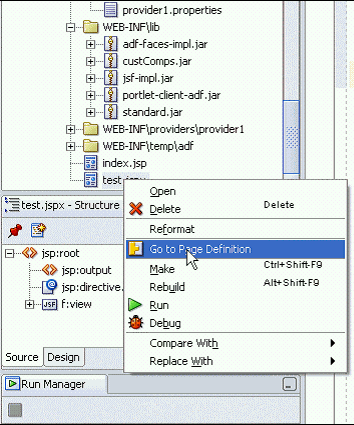
Choose Go to Page Definition as shown in Figure 10-9.
Figure 10-9 Go To Page Definition Option in Applications Navigator
If the Page Definition does not exist yet, then click Yes to create one for the selected page.
In the Structure pane, right-click <page_name>PageDef and choose Edit Authorization.
The Authorization Editor should list the identity store roles for your application and the page actions available to each role:
Grant - Users may administer (grant or revoke) page permissions. This action is not used in the design time.
Edit - Users may edit content displayed on the page. The Edit action is not applicable for this release.
Customize - Users may modify the page. Users who are not granted this permission, will not be able to modify the page.
Personalize - Users may personalize portlets on the page. For users who are not granted this permission, links or buttons that put page portlets into personalization mode are not displayed.
View - Users may view the page. Users who are not granted this permission will see an authorization error when they try to access the page.
Note:
To define a public page, grant View permission to the pseudo roleanyone, which does not physically exist in the identity management solution. When a request for a WebCenter application is received from an unauthenticated user, a subject is created with the role principal anyone and the user principal anonymous.Use the Authorization Editor to grant various permissions on the selected page.
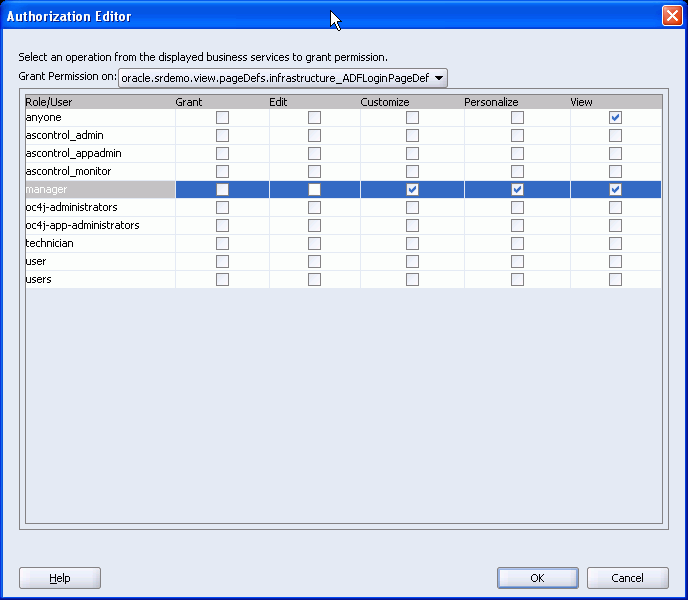
For example, Figure 10-10 shows that users with the manager role can view, personalize, and customize the selected page, while users with the anyone role can view the page.
Figure 10-10 Authorization Editor Used for Defining Security
Click OK. A security policy has now been defined for the page. You can repeat the same steps for other pages in your application.
Note:
While there is a one-to-one relationship between the page definition file and the page you are securing, it is also possible to secure areas within a page (for example, aShowOneTab) by using a headless (dummy) page definition file that represents a specific section of the page. This page definition is not actually tied to a physical page, but can still have a policy defined for it.
As such, by defining view permission on this headless page definition, you can show and hide a section of a page by referencing the headless page definition rather than the actual page definition of a target page.
If the section of the page can be secured by role membership, then the isUserInRole method described in "Determining Membership of a J2EE Security Role" can also be used.
Certain Oracle ADF objects are "security-aware," meaning that there are predefined component-specific permissions that a developer can grant for a given resource.
Once Oracle ADF Security has been configured, all objects that access the binding layer are now secured and you must explicitly define appropriate access rights to those objects. This includes all the iterators, attributes, and methods that may be added to the page, in components such as content integration datacontrols. As such, when you define access policies on a page, you must not only define the policy for the page itself, but also for the iterators, attributes, and methods contained within that page.
For more information about securing iterators, attributes, and methods, see the section titled "Implementing Authorization Using Oracle ADF Security" in the Oracle Application Development Framework Developer's Guide.
Note:
To simplify the addition of a policy to all the iterators, attributes, and methods contained within your page, you can use regular expressions to define named sets of objects, enabling a single policy to cover multiple secured objects. See Section 10.2.3.5, "Using Regular Expressions to Define Policies on Groups of Resources" for more information about using regular expressions to define policies on groups of resources.This section describes the procedure for defining security on Java Content Repository (JCR) data controls that are used for adding content to your page at design time. For information about data controls, see Section 5.3, "Using JCR Data Controls: Examples". To enable security for new method iterators, method action bindings, and attribute bindings of a data control that you created in the page definition, perform the following steps:
See Also:
Section 10.1.2.1, "Oracle ADF Permissions" for information about permissions.In the Application Navigator, right-click your JSPX page and select Go to Page Definition. The page definition is displayed.
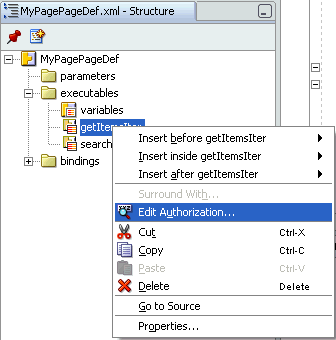
To grant permission on method iterators, expand the executables node in the Structure pane, right-click a method iterator, and select Edit Authorization, as shown in Figure 10-11.
Figure 10-11 Authorization Option for a Method Iterator
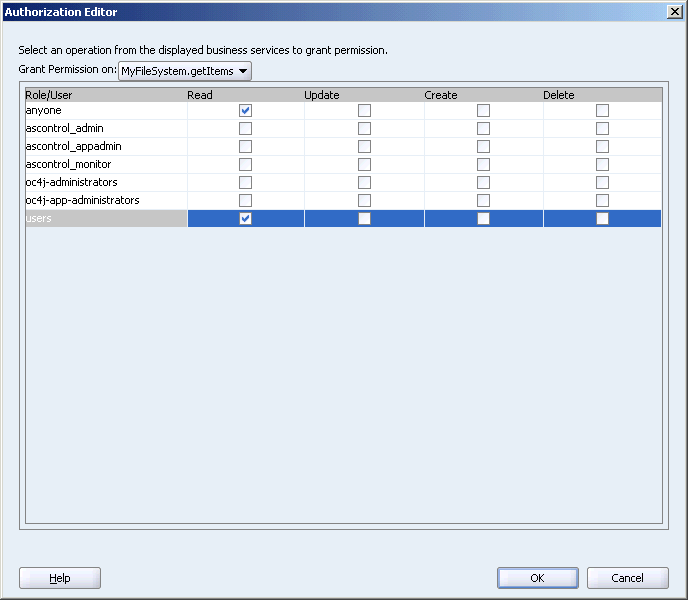
In the Authorization Editor dialog box, set only the Read permission, as shown in Figure 10-12.
Figure 10-12 Authorization Editor for a Method Iterator
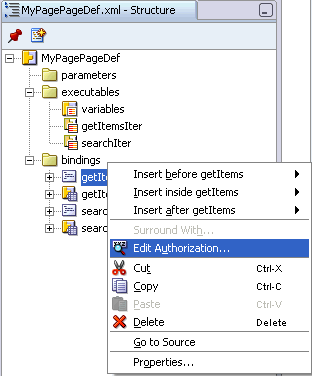
To grant permission on method action bindings, expand the bindings node in the Structure pane, right-click a method action binding, and select Edit Authorization, as shown in Figure 10-13.
Figure 10-13 Edit Authorization Option for a Method Action Binding
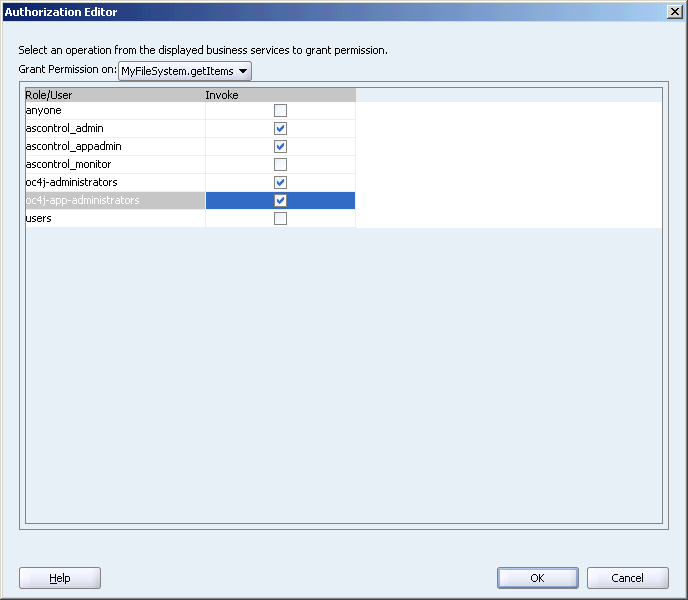
In the Authorization Editor dialog box, set only the Invoke permission, as shown in Figure 10-14.
Figure 10-14 Authorization Editor for a Method Action Binding
Click OK.
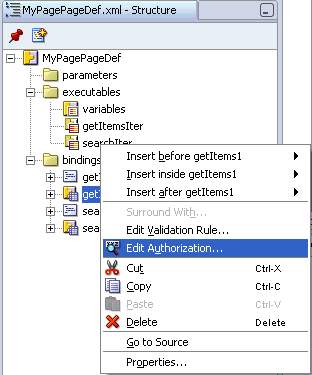
To grant permission on attribute bindings, expand the bindings node in the Structure pane, right-click an attribute binding, and select Edit Authorization, as shown in Figure 10-15.
Figure 10-15 Authorization Option for an Attribute Binding
In the Authorization Editor dialog box, set only Read permissions, as shown in Figure 10-16.
Figure 10-16 Authorization Editor for an Attribute Binding
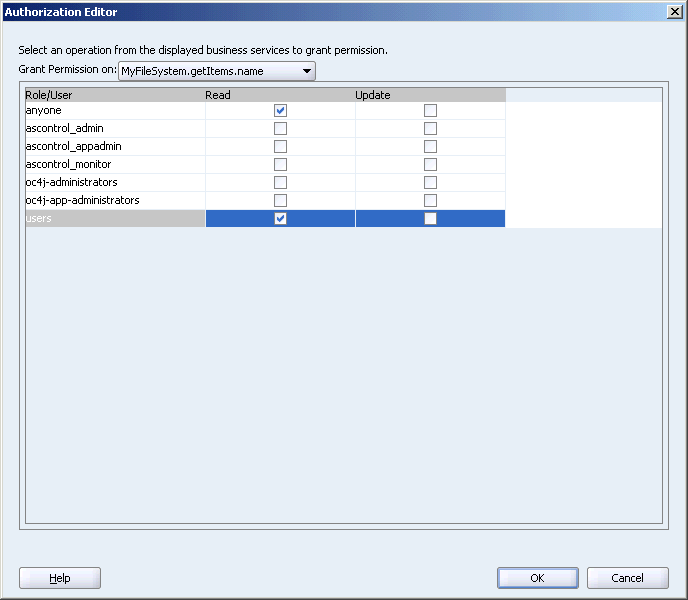
To set permissions for other available operations, select the operations from the Grant Permission on list.
Click OK.
Once Oracle ADF security has been enabled, all your application resources are secured by default. That means that all pages, iterators, attributes, and methods in your application are now secure and require an explicit security policy. Therefore, once the ADF Security Wizard is run, you must explicitly grant the appropriate privilege (for example, View on a page), or a security violation will be raised.
Consider Example 10-6, in which each method name starts with method_.
Example 10-6 Method Permission Defined in the system-jazn-data.xml File
<principal>
 <class> oracle.adf.share.security.authentication.ADFRolePrincipal
</class>
 <name>anyone</name>
</principal>

<permission>
   <class oracle.adf.share.security.authorization.MethodPermission </class>
   <name>method_1</name>
   <actions>invoke</actions>
</permission>

<permission>
   <class> oracle.adf.share.security.authorization.MethodPermission </class>
   <name>method_2</name>
   <actions>invoke</actions>
</permission>

<permission>
   <class> oracle.adf.share.security.authorization.MethodPermission </class>
   <name>method_3</name>
   <actions>invoke</actions>
</permission>

<permission>
   <class> oracle.adf.share.security.authorization.MethodPermission </class>
   <name>method_4</name>
   <actions>invoke</actions>
</permission>
...
As there are potentially many more individual methods for which the anyone role must be granted the invoke privilege, you can greatly simplify the policy definition by replacing the name with a regular expression that represents the set of methods to which anyone is granted the invoke permission.
For example, the previous listing of permissions could be replaced with a single permission, as shown in Example 10-7.
Example 10-7 Using Regular Expressions to Define Permission for Methods
<principal>
 <class> oracle.adf.share.security.authentication.ADFRolePrincipal
</class>
 <name>anyone</name>
</principal>

<permission>
   <class oracle.adf.share.security.authorization.MethodPermission </class>
   <name>method_*</name>
   <actions>invoke</actions>
</permission>
As the Authorization Editor does not support the use of regular expressions in the user interface, you must edit the policy directly in the policy store.
Caution:
If the policy is updated manually, consider the following important points:You must propagate the manual changes made in the policy store to the app-jazn-data.xml file before you deploy the application. See Section 12.2.4.2, "Updating Policy Information (Optional)" for the steps to be performed.
You must restart Oracle Containers for J2EE (OC4J) each time your policy has been modified.
The use of more complex regular expressions enables you to define business rules in the policy, thus creating a very targeted set of permissions. For example, you can grant the invoke permission on all methods and deny specific methods at the same time by defining a subtraction set in your regular expression. Example 10-8 shows how the invoke permission is granted to the anyone role for all methods except those where the method name starts with delete.
Example 10-8 Granting the Invoke Permission to the anyone Role for Specific Methods
<principal>
   <class>oracle.adf.share.security.authentication.ADFRolePrincipal</class>
   <name>anyone</name>
</principal>
…
<permission>
   <class>oracle.adf.share.security.authorization.MethodPermission</class>
   <name>[^(delete)].*</name>
   <actions>invoke</actions>
</permission>
Table 10-6 shows some of the basic regular expression metacharacters that you can use in your policy definitions.
Table 10-6 Description of Metacharacters
| Metacharacter | Description |
|---|---|
|
[abc] |
a, b, or c (included in list) |
|
[^abc] |
Any character except a, b, or c (negation) |
|
[a-zA-Z] |
a to z or A to Z, inclusive (range) |
|
[a-d[m-p]] |
a to d, or m to p ~= [a-dm-p](union) |
|
[a-z&&[def]] |
d, e, or f (intersection) |
|
[a-z&&[^bc]] |
a through z, without b and c: [ad-z] (subtraction) |
|
[a-z&&[^m-p]] |
a through z, and not m through p |
While the existence of a policy will prevent unauthorized users from accessing a secured resource, trying to access the resource would result in a security exception. A good security practice dictates that a user should not be aware of resources and capabilities to which they do not have access.
For example, if a user does not have permission to view an administrative page, then all navigation components that point to that page should be dynamically removed for that user.
While the application must first evaluate the policy to determine whether the user has the appropriate permission, ultimately the ability to attempt access to a secured resource or function (such as a delete button) is controlled by the User Interface (UI) component's Rendered property.
By default the Rendered property is set to true. By dynamically changing this value based on the permission, the UI component can be shown or hidden. For example, if the user has the appropriate permission, the Rendered property should be set to true so that the UI component is shown. If they do not have permission, the property should be set to false and the UI component is hidden from view.
Note:
The ability to evaluate a policy is limited to the current request. Therefore, it is important to understand where the policy evaluation occurrs, because evaluating the policy at anything other than the request scope can lead to unexpected results.The following sections discuss evaluating policies using EL and Java. EL enables you to evaluate the policy directly in the UI, while the use of Java enables you to evaluate the policy from within a managed bean.
This section covers the following topics:
The use of EL within a UI element enables for properties to be defined dynamically, resulting in modification of the UI component at run time. In the case of securing resources, the UI property of interest is the rendered property, which enables the developer to show and hide components based on available permissions.
To evaluate a policy using EL, you must use the permissioninfo method in the binding layer (#{bindings...}) that relates to the associated permission type (page, method, attribute, and iterator). The permissioninfo method returns true or false, based on whether the user has permission to perform the specified action.
In the case of pages, the target page definition is passed as an argument to the permissioninfo method. For all other permission types, the secured object is explicitly named under the bindings element.
The following tables show the EL that is required to determine if a user has the associated permission. If the user has the appropriate permission, the EL expression evaluates to true, otherwise it returns false.
Table 10-7 EL to Determine Action Permission on Pages
| Privileged Action | Required EL |
|---|---|
|
View |
|
|
Personalize |
|
|
Customize |
|
|
Edit |
|
|
Grant |
|
Note:
In the case of page permission, the value of the page definition can be specified dynamically by using late-binding EL within a managed bean.Table 10-8 EL to Determine Action Permission on Methods
| Privileged Action | Required EL |
|---|---|
|
Invoke |
|
Table 10-9 EL to Determine Action Permission on Iterators
| Privileged Action | Required EL |
|---|---|
|
Read |
|
|
Create |
|
|
Update |
|
|
Delete |
|
Table 10-10 EL to Determine Action Permission on Attributes
| Privileged Action | Required EL |
|---|---|
|
Read |
|
|
Update |
|
Note:
ThepermissionInfo attribute of the ADF Bindings layer is not exposed in the Variables Navigator of the Bind to Data dialog box (the bindings editor). As such, the EL expressions that are defined in Table 10-7 to Table 10-10 must be entered manually into the property field or in the Expression field of the Bind to Data dialog box.To associate the rendering of a navigation component to a user's granted permissions on a target page, perform the following steps:
Open the page that contains the navigation component in Design view.
Select the component that is used to navigate to the secured page.
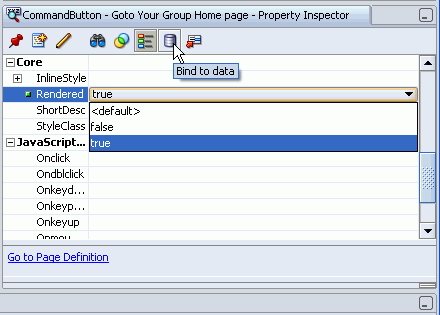
In the Property Inspector, select the Rendered property.
Click the Bind to Data icon as shown in Figure 10-17.
Figure 10-17 Binding the Rendered Property to Data
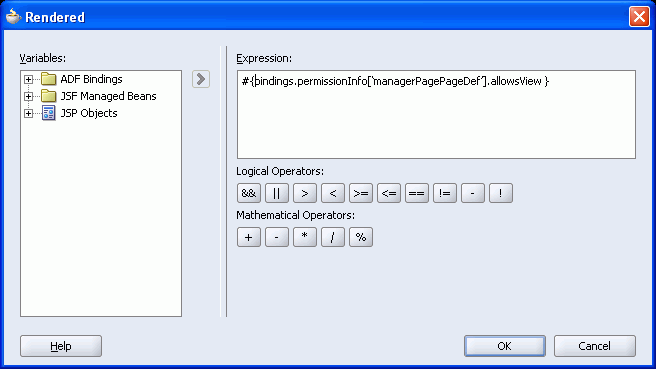
Enter the EL expression, #{bindings.permissionInfo['managerPagePageDef'].allowsView} as shown in Figure 10-18. In this example, managerPage is the secured target page.
Figure 10-18 Defining EL in the Bind to Data Dialog Box
Click OK.
Run the application. The component will be rendered or hidden based on the user's ability to view the target page.
Delayed Evaluation of EL for Session-Scoped Managed Beans
The ability to evaluate a security permission is scoped to the request. If you want to evaluate permissions to access a target page from a managed bean that is scoped to a higher level than Request (for example, a global menu that is backed by a session-scoped managed bean), you must implement delayed EL evaluation (late-binding). By passing in the target page as a managed property of the bean you ensure that the EL is evaluated only after the required binding information is available to the session-scoped bean. As EL is evaluated immediately when the page is executed, placing the EL expression directly in the properties of a UI component, backed by a session-scoped bean, would result in an out-of-scope error.
Example 10-9 shows a property (Authorized) of a session-scoped bean that returns true or false based on a user's ability to view a named target page. In this case, the _targetPageDef variable is a managed property containing the name of the target page. Within the UI, the EL would reference the authorized property rather than bindings.permissionInfo.
Example 10-9 Delayed EL Evaluation in a Session-Scoped Managed Bean
public boolean isAuthorized()
{
 if (_targetPageDef != null) {
  FacesContext ctx = FacesContext.getCurrentInstance();
  ValueBinding   vb = ctx.getApplication().createValueBinding (
  "#{bindings.permissionInfo['" + _targetPageDef + "'].allowsView}" );
  if (vb != null) {
    Object authResult = vb.getValue(ctx);
    return (Boolean) authResult;
    }
  else  {
    ctx.addMessage(null, new FacesMessage (
    FacesMessage.SEVERITY_WARN, "Access Permission not defined! " , null));
    return(true);
    }
}
To evaluate the security policies from within Java, you can use the hasPermission method of the Oracle ADF Security context. This method takes a permission object (defined by the resource and action combination) and returns true if the user has the corresponding permission.
In Example 10-10, a convenience function is defined to enable you to pass in the name of the page and the desired action, returning true or false based on the user's permissions. As this convenience function is checking page permissions, the RegionPermission class is used to define the permission object that is passed to the hasPermission method.
Example 10-10 Using the hasPermission Method to Evaluate Access Policies
private boolean TestPermission (String PageName, String Action)  {
  Permission p = new RegionPermission("view.pageDefs." + PageName + "PageDef", Action);
  if (p != null) {
     return ADFContext.getCurrent().getSecurityContext().hasPermission(p);
 }
 else {
     return (true);
 }
As it is possible to determine the user's permission for a target page from within a backing bean, you can now use this convenience method to dynamically alter the result of a Faces navigation action. In Example 10-11, you can see that a single command button can point to different target pages depending on the user's permission. By checking the View permission from the most secured page (the manager page) to the least secured page (the public welcome page), the command button will direct the user to the page that corresponds to their permission level by applying the appropriate action. The backing bean that returns the appropriate action is using the convenience method defined in Example 10-10.
Example 10-11
//CommandButton Definition
<af:commandButton text="Goto Your Group Home page"
  binding="#{backing_content.commandButton1}"
  id="commandButton1"

  action="#{backing_content.getSecureNavigationAction}"/>

//Backing Bean Code
    public String getSecureNavigationAction() {
      String ActionName;
      if (TestPermission("ManagerPage", "view"))
        ActionName = "goToManagerPage";
      else if (TestPermission("EmployeePage", "view"))
        ActionName = "goToEmployeePage";
      else
        ActionName = "goToWelcomePage";
      return (ActionName);
    }
As WebCenter applications are pure J2EE applications, even though the ADF Security Wizard has configured to implement JAAS-based security, it is still necessary to define the role mapping for any J2EE security roles that are used by the application to the corresponding roles in the identity management solution. For example, you must map the J2EE security role ValidUsers (the role that was defined in the previous section for the ADFAuthentication servlet) to the corresponding role that encompasses all users. You define role mapping in the orion-web.xml file. When you run an application in the embedded OC4J in Oracle JDeveloper, the application is run in place and it is not actually deployed to the container. As such, there are some additional deployment descriptor requirements for running the secured application directly inside Oracle JDeveloper's embedded OC4J.
This section contains the following topics:
To create the orion-web.xml deployment descriptior file, perform the following steps:
In the Applications Navigator, right-click ViewController and select New.
Select All Technologies from the list at the top.
In the panel on the left, expand General and then select Deployment Descriptors. The panel on the right lists the different types of deployment descriptors that are available, as shown in Figure 10-19.
Figure 10-19 Deployment Descriptor Selection
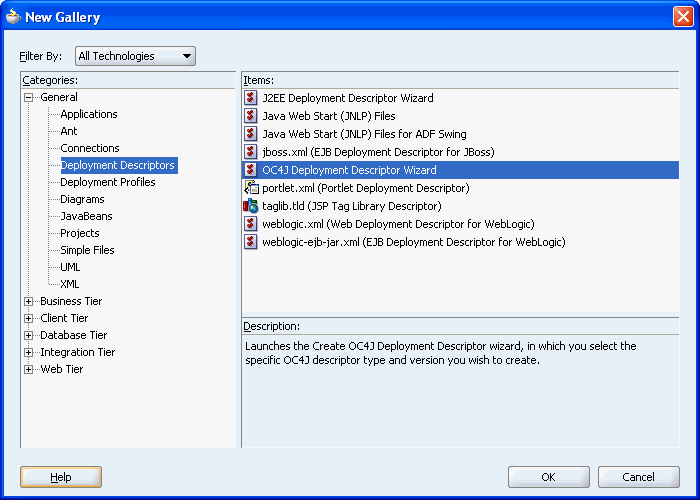
Select OC4J Deployment Descriptor Wizard and then click OK.
This starts the OC4J Deployment Descriptor Wizard.
Click Next to skip the Welcome page.
Select orion-web.xml and then click Next.
The file name will be grayed out if the file already exists.
Select 10.0 and then click Finish.
You will now see orion-web.xml in the Applications Navigator, under View Controller, Web Content, WEB-INF.
To map the J2EE security roles that you defined within your application to the identity store roles, perform the steps in this section.
Note:
At a minimum, you must define a mapping for the J2EE security role that is associated with the security constraint protecting the ADFAuthentication servlet.This section uses an example where the J2EE Security role ValidUsers is mapped to the identity store role users. Configure security role mappings in orion-web.xml as follows:
Right-click orion-web.xml and select Properties to set some additional deployment options.
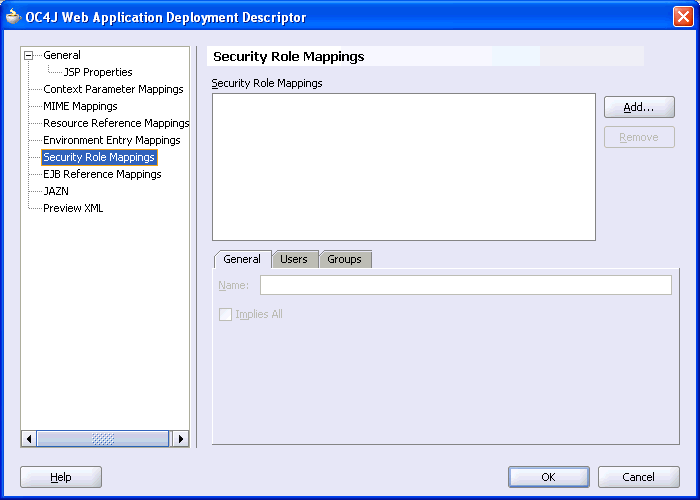
Select Security Role Mappings in the panel on the left. This displays a panel on the right where you can add these security role mapping as shown in Figure 10-20.
Figure 10-20 OC4J Web Application Deployment Descriptor Dialog Box
Create the security role mappings as follows:
Click Add. This displays a window, as shown in Figure 10-21.
Figure 10-21 Create Security Role Mapping Dialog Box
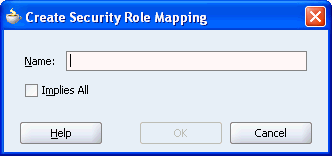
For Name, enter the J2EE security role name, ValidUsers.
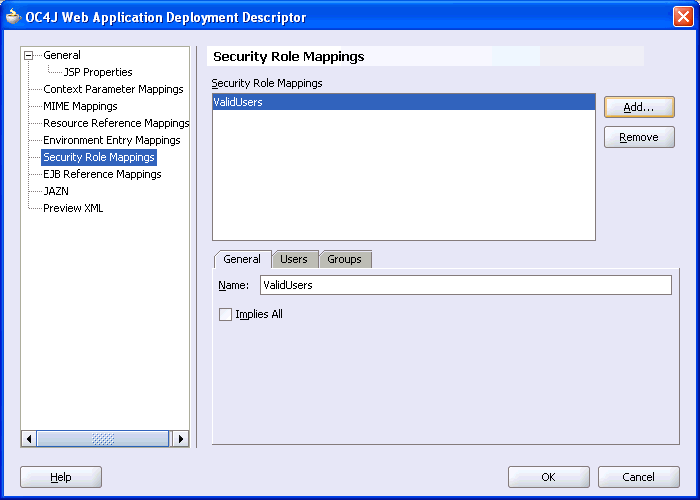
Click OK. The role name that you just entered is displayed in the mappings panel and also on the General tab, as shown in Figure 10-22. To edit the role name use the Name property on the General tab.
Figure 10-22 ValidUsers Role in the Security Role Mappings Section
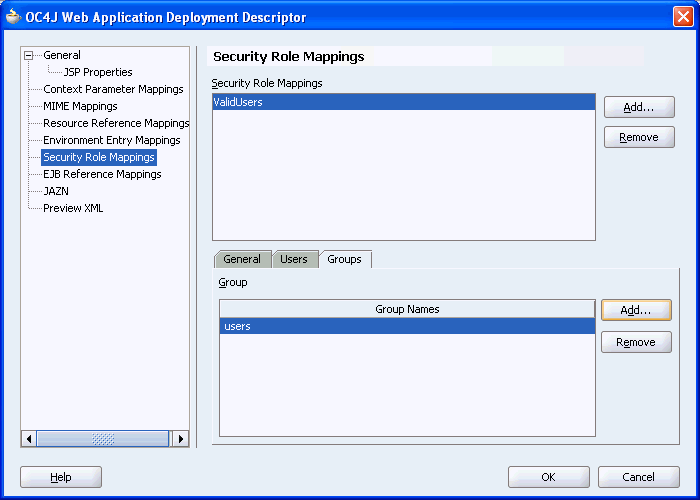
Click the Groups tab. Note that the J2EE security role ValidUsers is highlighted in the mappings panel. This means that you are about to map a group of users to this J2EE security role.
Click the Add button that is to the right of the Group Names panel. The Group dialog box is displayed as shown in Figure 10-23.
For Group Name, enter users.
Click OK.
In this step you mapped the J2EE security role ValidUsers to the identity store role users. This mapping is shown in Figure 10-24.
Figure 10-24 ValidUsers Role Mapped to users Group
Click OK to save changes to the OC4J deployment descriptor.
If you examine the source code for the configuration file orion-web.xml, then you should see the security-role-mapping entry as follows:
<security-role-mapping name="ValidUsers" impliesAll="false">
   <group name="users"></group>
</security-role-mapping>
This completes the OC4J Web application deployment descriptor configuration requirements for deployment to a remote application server. To run your application in the embedded OC4J, the extra configuration described in the next section must be performed.
While deploying a WebCenter application to a remote application server requires you to run the Predeployment tool as well as the JAZN Migration tool, Oracle JDeveloper's embedded OC4J enables you to run the application directly. When the application is deployed to a remote application server (or standalone OC4J), the required JAAS mode is determined from the orion-application.xml deployment descriptor file, which is configured by the ADF Security Wizard. However, when running the application in Oracle JDeveloper's embedded OC4J, you must also specify the JAAS information in the orion-web.xml deployment descriptor file. If you do not add this information to the orion-web.xml file, then the security will be enforced on a deployed server, but it will not be reflected when you run it in the embedded OC4J. To to enforce security when running in the embedded OC4J, perform the following steps:
Right-click orion-web.xml and select Properties to set some additional deployment options.
Select JAZN in the panel on the left. This displays several JAAS authentication options.
Select Run as Mode and Do as Privileged Mode, as shown in Figure 10-25.
Figure 10-25 Authentication Options Selection
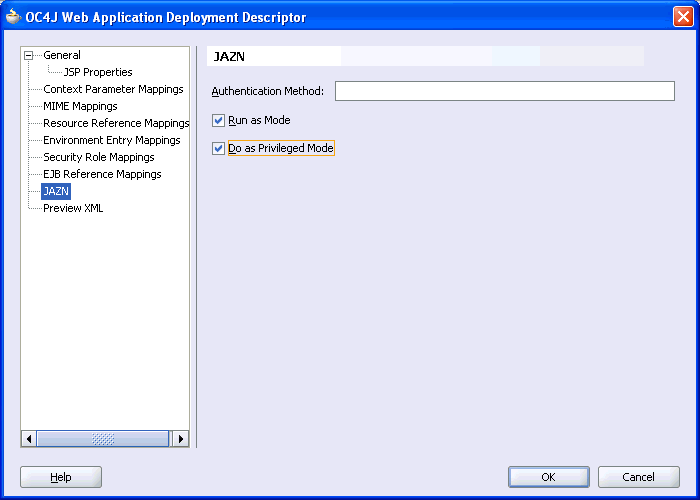
The Run as Mode option indicates that your servlet has special privileges and the Do as Privileged Mode option specifies the privileges that are enabled.
Setting both options adds the following line to orion-web.xml:
<jazn-web-app runas-mode="true" doasprivileged-mode="true"/>
In this section you will create a standard login component that can be added to any page in your application to enable users to authenticate or subsequently log off. This component keeps track of the authenticated state of the user and returns the appropriate login or logout URLs and icons. Furthermore, it keeps track of the name of the current user (anonymous or the name of the logged in user). Hence, using this login component enables the developer a single, consistent object. Figure 10-26 shows a login icon added to the global menu facet of an Oracle ADF application page.
The login component will redirect the users back to the current page once they are authenticated.
Note:
You may want to alter the component's code to redirect to a welcome page if the current page is not publicly accessible.To create a login component, perform the following steps:
Open your application's ViewController project.
In the Applications Navigator, expand the WEB-INF node and open the faces-config.xml file.
In the Structure pane, select the Overview tab.
Right-click Managed Beans and select Insert managed-bean. The Create Managed Bean dialog box is displayed.
Specify authNLink for the name, view.util.AuthNLink for the class, and set the scope to session, as shown in Figure 10-27. Select Generate Class If It Does Not Exist, if it is not already selected.
Figure 10-27 Create Managed Bean Dialog Box
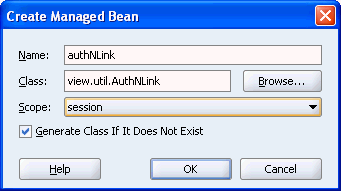
Click OK and open the view.util.AuthNLink.java file under the application sources.
Add the following private variables to the managed bean definition as shown in bold in the following example:
public class AuthNLink {
    private boolean _authenticated = false;
    private String _label = null;
    private String _icon = null;
    private String _url = null;
    private String _currentUser = null;
From the Source menu, select Generate Accessors.
Expand each node and check the getter methods (the ones that start with is and get) as shown in Figure 10-28.
Figure 10-28 Generate Accessors Dialog Box
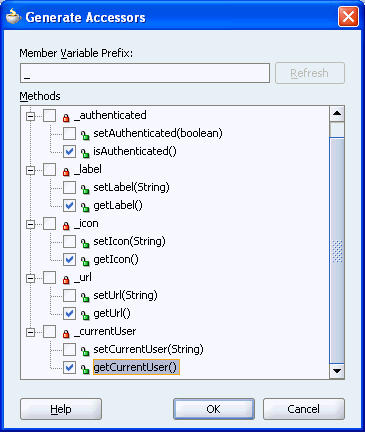
Define the methods, as shown in Example 10-12.
Note:
Import theADFContext and FacesContext when prompted, by pressing ALT-Enter with the cursor over the appropriate line.This example has fixed English labels. To internationalize the code, you can define these strings in a resource bundle. See the section titled "Internationalizing Your Application" in Oracle Application Development Framework Developer's Guide for more information about internationalization.
Example 10-12 Login Component Code
// ============ User's Authenticated Status =============
    public boolean isAuthenticated() {
     _authenticated =
ADFContext.getCurrent().getSecurityContext().isAuthenticated();
    return _authenticated;
    }
    // ================== Link Label =======================
     public String getLabel()
     {
      // toggle link text based on authenticated state of the user.
      if (isAuthenticated())
         { _label = "Click here to log in"; }
      else
         { _label = " Click here to log out";  }
       return _label;
     }
    // ================== Link Icon =======================
    public String getIcon() {
        // toggle icon based on authenticated state of the user.
        if (isAuthenticated())
            _icon = "logout.gif";
        else
            _icon = "login.gif";
        return (_icon);
    }
    // ================== Link URL =======================
     public String getUrl()
     {
       String currentPage = null;
       String urlBaseRef  = null;
       String urlBaseRef2 = null;
       FacesContext fctx = FacesContext.getCurrentInstance();
            currentPage = "/faces" + fctx.getViewRoot().getViewId();
                    if (isAuthenticated())
        _url = "/adfAuthentication?logout=true&end_url=" + currentPage;
       else
        _url = "/adfAuthentication?success_url=" + currentPage;
       return (_url);
     }
    // ============ Current User's Name/PrincipalName =============
     public String getCurrentUser() {
      _currentUser = ADFContext.getCurrent().getSecurityContext().getUserName();
         return _currentUser;
     }
In this code, the component uses the isAuthenticated method of the Oracle ADF Security Context to determine if the user is currently authenticated and modifies the link text, the link text URL, and the associated icon accordingly.
Copy your login and logout image files (GIF, JPG, or PNG files) to the public_html directory of your project.
Note:
The images used should reference the appropriate skin image if your application uses skins. See Chapter 9, "Defining and Applying Styles to Core Customizable Components" for more information about skins.Adding the Login Component to a Page
To add a login component to a page, perform the following steps:
Create an Oracle ADF Faces page. See Section 4.2, "Building WebCenter Application-Enabled Pages in Oracle JDeveloper with Oracle ADF" for more information.
Open the page in Design view.
From the Component Palette, select ADF Faces Core.
Select a menuButtons component and drag it onto the page.
Note:
If you are using an Oracle ADFPanelPage component to lay out the page, you should place the global navigation items such as the login link in the menuGlobal facet. This will place the link in a consistent location on the page (by default, this is the top-right corner of the page).Select a goMenuItem and drag it onto the MenuButtons component.
In the Property Inspector, set the Text, Destination, and Icon properties of the goMenuItem to the values provided in the following table:
| Property | Value |
|---|---|
| Text | #{authNLink.label} |
| Destination | #{authNLink.url} |
| Icon | #{authNLink.icon} |
To set these properties, navigate to the authNLink node under JSF Managed Beans in the Binding to Data dialog box and set the values provided in the table. You can access the Bind to Data dialog box in either of the following ways:
Right-click goMenuItem in the Structure pane and click Properties. In the Properties dialog box, click the Bind to Data icon next to the property.
In the Property Inspector, click the Bind to Data icon in the filed next to the property.
Figure 10-29 and Figure 10-30 show the settings for the Text and Destination properties in the Bind to Data dialog box.
Figure 10-29 Bind to Data Dialog Box for the Text Property
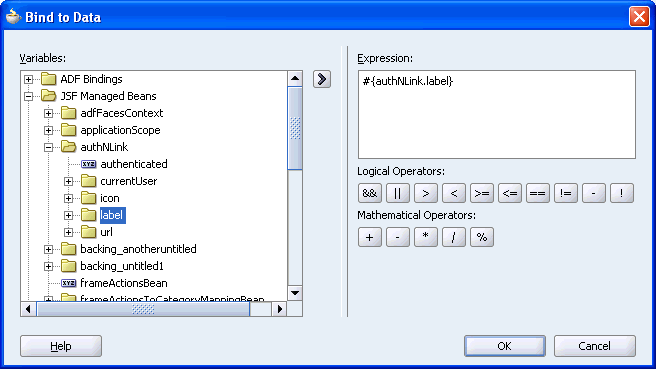
Figure 10-30 Bind to Data Dialog Box for the Destination Property
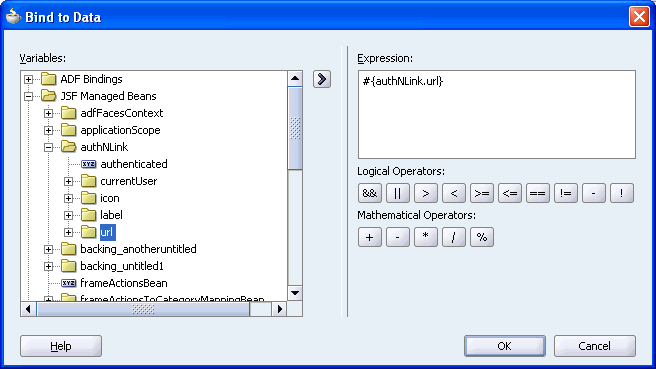
As the login component keeps track of the current user, you can also display the user's name on your page. To do this, from the Component Palette, select ADF Faces Core and drag an OutputFormatted component onto the page.
Set the value of the OutputFormatted to The Current User is <i>#{authNLink.currentUser}</i>.
Save the page and run it. It will look similar to Figure 10-31.
Note:
To enforce security in your application, you must first perform the steps described in Section 10.2, "Setting Up Security for Your Application". You must, at a minimum, grant view privileges to the anyone role.Click Log in and log in as a user with the appropriate credentials. Once logged in, the page will look similar to Figure 10-32.
In this section you will create the new login page that users are redirected to for authentication. WebCenter applications typically have a notion of public pages and enable for explicit as well as implicit authentication. This means that users can log in to the application by clicking the login link before they navigate to secured content (explicit), or they can navigate to a secured page, which will redirect them to the login page for the application (implicit). See Section 10.1, "Introduction to WebCenter Application Security" for more information about implicit and explicit authentication. Figure 10-33 shows a sample login page you are going to build in this chapter. The addition of portlets to the login page enables the login page itself to be indistinguishable from the other pages in your WebCenter application.
Note:
This section discusses creating an Oracle ADF Faces-based login page that enables you to include customizable components and portlets. However, if adding these components is not a requirement, then a simple JSP or HTML login page can be also used.Container-based authentication relies on the j_SecurityCheck method within the container's security model. Both the Oracle ADF Faces-based login page and the simplified login pages use this method to enforce authentication.
See the section titled "Step 1: Creating a Login Page" in the Oracle WebCenter Framework Tutorial for a detailed discussion on how to build a simple login page.
Creating a Login page for your application involves the following tasks:
Section 10.4.1, "Creating an Oracle ADF Faces-Based Login Page"
Section 10.4.4, "Configuring the web.xml File for an Oracle ADF Faces-Based Login Page"
To create the Oracle ADF Faces-based login page, perform the following steps:
In the Applications Navigator, under the ViewController project, right-click your application and select New.
In the New Gallery dialog box, expand the Web Tier node.
Select JSF.
In the Items list, select JSF JSP.
Click OK to display the Create JSF JSP dialog box.
If you are on the Welcome page of the wizard, then click Next to display the JSP File page.
In the File Name field, specify a name for your login page. For example, ADFLogin.jspx.
Select JSP Document (*.jspx).
Click Next to display the Component Binding page.
Select Automatically Expose UI Components in a New Managed Bean.
Click Next to display the Tag Libraries page and select ALL Libraries.
Make sure that the following libraries are listed in Selected Libraries:
JSF Core
JSF HTML
ADF Faces Components
ADF Faces HTML
ADF Portlet Components
Customizable Components Core
Click Finish to create the page.
Save the page.
From the Component Palette, select Customizable Components Core.
Select the PanelCustomizable and drag it onto the Structure pane above the h:form node. Because you will be creating a custom HTML form in the PanelBox, click No in the Confirm Add Form Element dialog box.
In the Property Inspector, set the layout of the Panel Customizable to Horizontal.
In the Structure pane, drag the h:form node onto the cust:panelCustomizable node as shown in Figure 10-34.
Open the Component Palette, select ADF Faces Core and drag a PanelBox above the h:form tag in the Structure pane.Set the Text property of the PanelBox to Login as shown in Figure 10-35.
Figure 10-35 Text Property of the panelBox
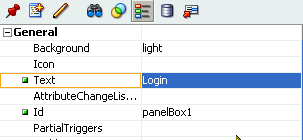
Select an OutputText component and drag it onto the PanelBox component.
Save the page.
In the next section, you will see how the backing bean injects the appropriate login form into this PanelBox area.
Now that you have created the login page as an Oracle ADF Faces page, you cannot just add the login form using form elements from the component palette. This would cause the form elements to be serialized and remapped at run time by the Oracle ADF Faces life cycle. Instead, you can inject the HTML for the login form at run time, by including it in the backing bean and dynamically showing this at run time. To include the HTML code in a backing bean and to reference the HTML login form in the login page, perform the following steps:
In the Applications Navigator, expand the Application Resources node and open the <Page_Name>.java backing bean, for example, ADFLogin.java.
To define the bean _loginFormBlock, create a new attribute by adding the following in the declaration section of the ADFLogin.java file:
private String _loginFormBlock;
Add the get method for this attribute right before the closing brace (}) in this Java class as shown in Example 10-13.
Example 10-13 LoginFormBlock code that injects the Login Form into the Login Page
public String getLoginFormBlock()
{
    String htmlBlock      = null;
    String userNameLabel  = "Username";
    String passwordLabel  = "Password";
    String buttonLabel    = "Login";


    htmlBlock = "\n\n" +
     "<!-- === Login Form Block Generated in Backing Bean ==== -->\n" +
     "<form name=\"LoginForm\" id=\"LoginForm\" \n" +
     "      action=\"j_security_check\" method=\"POST\" >\n" +
     " <table cellspacing=\"5\" cellpadding=\"0\" border=\"0\" width=\"50%\">\n" +
     " <tr>\n" +
     "  <td nowrap>" + userNameLabel + "</td>\n" +
     "  <td nowrap><input type=\"text\" name=\"j_username\"/></td>\n" +
     " </tr>\n" +
     " <tr>\n" +
     "  <td nowrap>" + passwordLabel + "</td>\n" +
     "  <td nowrap><input type=\"password\" name=\"j_password\"/></td> \n" +
     " </tr>\n" +
     " <tr>\n" +
     "  <td><input type=\"submit\" value=\"" + buttonLabel + "\"/></td> \n" +
     " </tr>\n" +
     " </table>\n" +
     "</form>\n" +
     "<!-- ================================================= -->\n\n" ;
    _loginFormBlock = htmlBlock;
    return (_loginFormBlock);
    }
This code returns the entire login block as a simple output string (simplifying the need for <verbatim> tags).
Save the Java file.
In the Property Inspector, set the value of the previously created outputText object to the following value of the loginFormBlock attribute, as shown in Figure 10-36:
#{backing_ADFLogin.loginFormBlock}
This will result in the full sting appearing as "Text" within the page as shown in Figure 10-37.
Figure 10-37 Login Form Block Generated in the Backing Bean
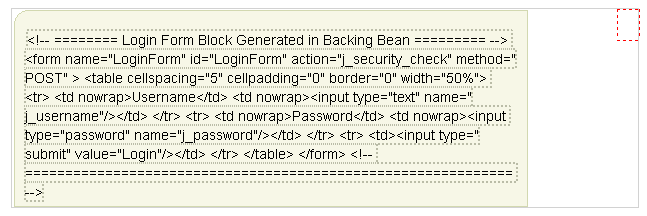
In the Property Inspector, set the Escape property of the outputText object to False to render the string as static HTML as shown in Figure 10-38.
Save the file.
While this step is optional, the benefit of using an Oracle ADF Faces-based login page for your WebCenter application is that you can add portlets to the page to add customizable information to the page or make it part of the application itself. In this example, you will add a Rich Text portlet and an OmniPortlet to the login page. See Section 14.3.1, "Rich Text Portlet" and Section 14.3.4, "OmniPortlet" for more information.
Make sure your portlet producers have been registered before proceeding. See Section 4.3.1.1, "Registering WSRP Portlet Producers" and Section 4.3.1.2, "Registering PDK-Java Portlet Producers" for details.
To add portlets to the login page, perform the following steps:
Drag a PanelCustomizable onto the h:form tag in the Structure pane.
From the Component Palette, select RichTextPortlet Producer, then select the Rich Text portlet from the list and drag it onto the PanelCustomizable component.
From the Component Palette, select ADF Faces Core and drag an ObjectSeparator below the Rich Text portlet on the PanelCustomizable component.
From the Component Palette, select OmniPortlet Producer, then select the OmniPortlet from the list and drag it onto the PanelCustomizable component.
Save the page. It will look like Figure 10-39.
Because the login page is called from the container as part of the login process, the request must be forwarded to the ADF binding filter to establish the appropriate portlet and security context. To do this, you must configure a mapping for the ADF Binding filter in the web.xml file. To do this, perform the following steps:
In the Applications Navigator, expand the WEB-INF node, right-click web.xml and select properties to open the property palette.
Select Filter Mappings in the left panel and click add to define a new mapping for the adfBindings Filter. This displays the Create Web Application Filter Mapping dialog box.
Specify adfBindings for the filter name and click the Servlet Name option and specify Faces Servlet as the servlet name. Ensure that the Forward and Include dispatcher types are selected as shown in Figure 10-40.
Figure 10-40 Create Web Application Filter Mapping Dialog Box
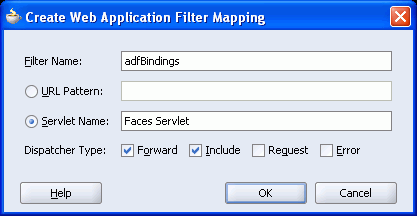
Click OK.
As the login page is called directly from the container, it is not part of the Oracle ADF Faces navigation process. As such, you must force a call to the Oracle ADF Faces servlet when calling the login page. To do this, perform the following steps:
Expand the WEB-INF node in the Applications Navigator, right-click web.xml and select properties to open the property palette.
Click Login Configuration in the properties Panel.
Set the value of the Login Page to include a reference to the Oracle ADF Faces servlet such that the login page can be part of the Oracle ADF Faces life cycle faces/ADFlogin.jspx page as shown in Figure 10-41.
Figure 10-41 Adding a Reference to the Faces Servlet in the Login Configuration

Click OK to save the changes to web.xml.
As the application is secured by Oracle ADF security, all pages in the application are secured and therefore need explicit policies defined against them. As all users are required to be able to log on, the login page must be publicly accessible. If the page is not defined as public then the container will continually redirect to the defined authentication point before enabling access to the page (which in this case is the authentication page).
You must define the appropriate privileges for the login page so that users with specific roles can perform specific actions. For example, all users (the role anyone) must be able to view the page, while specific users that are required to edit the portlets must have customize permission on the login page.
Note:
To enforce security in your application, you must first configure the security infrastructure for your application as described in Section 10.2, "Setting Up Security for Your Application".To define access policies on the login page, perform the following steps:
In the Applications Navigator, right-click ADFLogin.jspx.
Select Go to Page Definition.
Click Yes, if you are prompted to create a new page definition. The page definition file opens in the Structure pane.
Right-click the Page Definition file and select Edit Authorization. This displays the Authorization Editor.
Grant View privilege to anyone.
Click OK.
As the Login Page contains customizable portlets, the appropriate role must be granted Customize privilege on the page.
Given that the login page contains customizable portlets, which will be edited by a group of users that has the appropriate permission, the login page must also be accessible from within the application itself (for example, from an administration page). In that case the user is directed to the page through the standard Oracle ADF Faces navigation rather than directly from the container. As such, the login component does not make sense and hence should not be rendered, thus preventing authenticated users from accidentally submitting the login form again. Figure 10-42 shows the login page as seen by an authenticated user.
Figure 10-42 Login Page Seen by an Authenticated User

Click the PanelBox in the previously created ADFLogin.jspx page and set the rendered property to be false if the user is currently authenticated. To do this, use the authenticated property of the authNLink managed bean as shown in Figure 10-43.
Figure 10-43 Setting the Rendered Property Based on the Authenticated State of the User

Ensure that you have a navigation case defined in the faces-config.xml file to enable an authenticated user to access the login page. You can then use the appropriate Oracle ADF Faces navigation component in your application to enable you to navigate to the login page to customize it.Save the pages and run the application.
As WebCenter applications are generally secured, there is always a need for a starting point or home page for unauthenticated users. To create this public welcome page, you create an Oracle ADF Faces page to act as the entry point for the application, which contains links to other pages within the application. However, only links to public pages should be rendered to unauthenticated users and conversely, links to secured pages should be rendered only after the user has logged in and has the appropriate privileges to view the target page.
To create a public page for your application, perform the following tasks:
After you have created a regular Oracle ADF Faces page as described in Section 4.2, "Building WebCenter Application-Enabled Pages in Oracle JDeveloper with Oracle ADF", you must make the page accessible to all users (authenticated as well as unauthenticated). To do this, you must perform the following steps:
Note:
To enforce security in your application, you must first perform the steps described in Section 10.2, "Setting Up Security for Your Application".Right-click the welcome page, for example, welcome.jspx, and go to the page definition. Create a new one if prompted.
In the Structure pane, right-click the page definition and select Edit Authorization. The Authorization Editor is displayed.
Grant the View privilege to the role anyone.
Grant Customize and Personalize privileges as required.
Click OK and save the page.
This will add the view privilege to the anyone role in the system-jazn-data.xml file. In an application protected by Oracle ADF Security each user is automatically made a member of this pseudo role (the anyone role principal is automatically added to the user's subject). Therefore, a public page is a special type of secured page that is available to everyone. This is different from J2EE security, in which a public page is defined by the simple lack of security constraints against that page. The Oracle ADF Security model, therefore differentiates between a page secured for public access and the absence of a secured implementation.
You can add login and logout links to your public welcome page so that users can explicitly log in and out while they are in the application. While J2EE Container managed security supports the concept of authentication when accessing a secured resource, there is no standard way to log out and stay within a secured application. However, this is a common practice in WebCenter applications. Either staying on the same page if that page is public or returning to the welcome page if that page is secured. While adding the login and logout links to each page would let the user to end their login session anywhere within the application (and return to the welcome page), having these links on the welcome page enables them to explicitly authenticate on entering the application.
To add the login and logout links, you must add a login component to your application and then add the login and logout links to your page as described in Section 10.3, "Creating a Login Component for Your Application".
As an anonymous user should not have access to any secured pages, any navigation component on the welcome page that points to a secured page should be hidden from view based on the following two criteria:
Is the user authenticated with a known user identity?
Does the specified user identity have permission to view the target?
If either of these criteria has not been met, the rendered attribute of any navigation component on a public page that point to a secured resource, must have its rendered property set to false, thus hiding it from the anonymous user. To enforce these rules within your welcome page, see section Section 10.2.4, "Enforcing Security Policies in Your Application".
Portlet personalizations are tied to particular, authenticated users. Hence, when running a portlet that has an Edit mode, the Personalize option in the portlet's dropdown menu only appears to authenticated users of the application. Anonymous or public users will not have the option to personalize the portlet. If you are a developer creating portlets and pages, then you may want to quickly test the Edit mode of your portlet without creating a complete security model for your application. To perform this sort of testing, you can easily configure some very basic authentication for your application and then remove it when you are done testing:
Note:
This procedure is useful for any portlet that has an Edit mode (Omniportlet, Web Clipping, JPS, and PDK-Java).Create a user sking and the manager role as described in Section 10.2.1, "Defining Roles for Developing Secured WebCenter Applications".
Secure your application using the ADF Security Wizard as described in Section 10.2.2, "Configuring Security for Your Application". On the Login page of the wizard, select HTTP Basic Authentication (RFC 2617). This specifies that the application will use basic authentication.
Secure the page that contains your portlets by performing the steps in Section 10.2.3.2, "Securing Pages in Your Application".
Create the orion-web.xml file to run your application in the embedded OC4J as described in Section 10.2.5.1, "Creating the Deployment Descriptor File".
Run the page in the embedded OC4J and log in as a valid user and test your portlet's edit mode.
When you are done testing your portlet's Edit mode, you can quickly remove this test security by do the following:
In the Applications Navigator, click the project that contains a page with the portlet you want to test.
From the Tools menu, choose ADF Security Wizard.
If the Welcome page appears, then click Next.
Choose Remove All ADF Security Settings.
Click Next until you come to the Finish page of the wizard. Click Finish. The security is removed. If you want to ensure that the security has been removed, then exit your browser and rerun the application. When you access the page, you should not be prompted to login and the personalize option should be gone from the portlet's dropdown menu.
When an Oracle PDK portlet producer's implementation depends on an application that handles its own authentication, you must associate that application with the producer. At design time, this is a simple matter of registering the external application, then selecting the external application from a list when you register or edit an Oracle PDK portlet producer.
The Oracle WebCenter Suite provides a means of registering external applications with a WebCenter application and adding a Credential Provisioning page for use in logging into the external application. For more information about the Credential Provisioning page, see Section 10.1.3, "External Application Credentials and Portlets".
Caution:
In this release, WebCenter application external application support is for use in portlets only. That is, portlets can return a user's stored credential set for an application and use it to authenticate the user to a remote application. However, there is currently no support for directly linking to an external application from the portlet. For example, starting an external application from a link on a WebCenter application page. It is important to ensure that portlets that are developed to use external applications avoid the use of direct (deep) links to an external application, because this would result in an authentication request but, the login URL is not sent to portlets. This happens because there is no automatic proxy single sign-on. If possible, Oracle recommends that portlets use an inline rendering model, where URLs to the external application are accessed through the portlet's framework.This section provides information about registering external applications and adding a Credential Provisioning page. Additionally, it describes the process of editing and deleting registration details. It contains the following subsections:
This section provides information about registering external applications and editing and deleting registration details. It contains the following subsections:
Section 10.7.1.2, "Editing External Application Registration Details"
Section 10.7.1.3, "Deleting External Application Registration Details"
See Also:
Section 4.3, "Consuming Portlets"Use the Register External Application Wizard to identify and store information about the type of data required to authenticate to an external application, such as the names of login.
To register an external application:
In the Applications Navigator, right-click a WebCenter application or project and select New from the context menu.
In the New Gallery, select External Applications under the General node.
In the right pane, select External Application, and click OK.
This opens the Register External Application Wizard.
On the Welcome page, click Next to move to the Name page.
Optionally, before leaving the Welcome page, select the Skip this Page Next Time check box to forgo viewing the Welcome page on subsequent uses of this wizard.
On the Name page, in the Name field enter a unique name to identify the application.
This name must be unique within the WebCenter application.
Click Next.
On the General page, in the Login URL field enter the URL to which the HTML login page is submitted.
View the HTML source of the application's login form to retrieve this URL.
Note:
The Predeployment tool does not enable for modification of external application data at the predeployment stage. Therefore, if your external application is hosted on a different computer or instance, then you must update the external application login URL just prior to creating an EAR file from the WebCenter deployment profile. Change the first part of the login URL fromhttp://m1.abc.com:7777/ to, for example, http://lbr.abc.com/.In the User Name/ID FieldName field, enter the label that the application uses for the user name field, for example, User Name.
In the Password FieldName field, enter the label that the application uses for the password field, for example Password.
From the Authentication Method list, select the application's login method.
Choose from the following:
GET
Presents a page request to a server. Submits the login credentials as part of the login URL.
POST
Submits login credentials within the body of a form.
BASIC
Submits login credentials as part of the login URL. Note that the Basic authentication method poses a security risk because the user name and password are exposed in certain instances.
Click Next.
On the Additional Fields page, enter the names and values of any additional fields that are submitted with the external application's login form:
Click the Add Field button to create a new input field:
Field Name
Enter a unique name for any additional field that requires user input on the external application HTML login form.
Field Value
Enter a default value for the corresponding field name.
Display to User
Select to display the field on the external application login screen. If the field is not displayed (unchecked), then a default value must be specified, which will be used to login into the external application for all users. If the value is user-specific, then the field must be displayed to the user who can then provide values for it in the external application Credential Provisioning page.
Note:
The Delete Field option can be used to delete selected rows.Click OK to register the external application.
Once you have registered the external application, you must associate a producer with it. You can do this when you register an Oracle PDK-Java Portlet Producer or when you edit one. Relevant settings include Associate producer with external application, on the producer's Connection tab, and Enable Producer Sessions, on the producer's Registration Details tab (for external applications, this property should be enabled automatically). For more information, see Section 4.3.1.2, "Registering PDK-Java Portlet Producers".
Note:
If you register a producer that requires external application authentication, but do not associate this producer with the external application, then when you add a portlet from this producer to a JSF JSP page and run the page, you may find the Update login credentials link that points to a Credential Provisioning page (that was created for another producer requiring external application authentication) may be displayed with the following error:1. External application ID was found to be null while rendering the Credential Provisioning page! 2. Cause: The credential page was probably run standalone. 3. Action: The credential page needs to be invoked from the link in portlets, from producers associated with the external application. Running the credential page standalone is not supported.
After external application registration, create a Credential Provisioning page. This page provides a means for dynamically displaying external application authentication data fields (that is, a login page). Additionally, any application that uses external application portlets should have their pages protected, including the Credential Provisioning page. This can be accomplished through the ADF Security Wizard, on the Oracle JDeveloper Tools menu. For more information about the Credential Provisioning page, see Section 10.7.2, "Working with Credential Provisioning Pages".
Use the Edit External Application Registration Information Wizard to revise the registration details provided for an external application.
To edit external application registration details:
In the Applications Navigator, right-click an external application and select Edit from the context menu.
In the Edit External Application Registration Information Wizard, click a tab to bring it forward and revise its values.
Choose from the following:
Name
General
Additional Fields
For more information, see Section 10.7.1.1, "Registering an External Application".
Click OK to save your changes and exit the wizard, or click Cancel to exit the wizard without saving.
To delete external application registration information, perform the following steps:
In the Applications Navigator, right-click an external application and select Delete from the context menu.
Alternatively, you can select an external application in the Applications Navigator and from the Edit menu, select Delete.
In the External Application Delete dialog box, select Yes.
If you are deleting the lone external application registration in the WebCenter application, then remember to also remove its associated Credential Provisioning page from each of the application's projects. In addition, Oracle recommends that you deregister the Oracle PDK portlet producer with which the external application is associated. If you do not deregister the associated producer after deleting the external application, then the portlets of these providers are likely to stop functioning and throw run time errors.
Credential Provisioning pages consume application registration details to provide an application login page where users can enter their credentials and authenticate to the external application. User credentials are preserved in a credential store, which handles logins for future sessions. The user does not have to enter login information again (unless the user's credentials change).
This section provides information about adding a Credential Provisioning page at design time and adding credentials at run time. It contains the following subsections:
The Credential Provisioning page is a JSF page (.jspx) that is built based on the information provided through external application registration.
To add a Credential Provisioning page:
Register an external application.
For more information, see Section 10.7.1.1, "Registering an External Application".
In the Applications Navigator, right-click a project scoped for creating portlets and select New from the context menu.
For information about creating projects scoped for creating portlets, see Section 3.1, "Creating a WebCenter Application".
In the New Gallery, select External Applications under the General node.
In the right pane, select Credential Provisioning Page.
Click OK.
The file CredentialProvisioner.jspx is added to the root of the project by default under the Web Content node in the Applications Navigator. If you should manually move or rename this page, then you must update the navigation rule, more precisely, the <to-view-id> entry in the _adfp_external_apps_credential_page <from-outcome> navigation rule, to reflect this change.
The dynamic rendering of login information is made possible through data binding with extAppCredentialProvBean. Although you are free to adjust the look and feel of this page however you want, you must not in any way alter any extAppCredentialProvBean entries in the faces-config.xml file.
Should you mistakenly alter extAppCredentialProvBean entries, then you can overwrite this file by adding the Credential Provisioning page again from the New gallery.
At run time, the Credential Provisioning page displays login data fields. In addition to the user name and password fields, data fields specified through external application registration are also displayed. Users fill in the fields with their login information. This information is passed to the producer, which in turn passes the login values to the application. The application provides the producer with the requested portlet.
The user provides login credentials when prompted and these credentials are preserved in a credential store. The credential store subsequently supplies that information during authentication. The user supplies credentials only once (unless those credentials change).
To add credentials to a Credential Provisioning page at run time:
On the portlet page, enter the user name to access the external application.
Enter the password to access the external application.
Fill in any other fields provided.
The inclusion of additional information-gathering fields will vary according to the external application definition being accessed.
Click OK to store credentials and return to the portlet page, from which you can now access the portlet.
For future portlet sessions, this login will be transparent, as your user credentials are supplied from the credential store. The login page will display again should your credentials change.
If required, then you must access the Credential Provisioning page at run time only by clicking the Update login information link in the external application portlet. Do not try to access the Credential Provisioning page by invoking it directly or in any other manner.
Note:
The Credential Provisioning page must be added within each project containing pages with portlets from external application-enabled producers. If this is not done, then at run time, you will not be able to access the Update login information link on the portlet.Secure Sockets Layer (SSL) Communication requires the use of trusted certificates issued by a certificate authority, which vouches for the authenticity of the certificates that it issues or signs. Widely accepted certificate authorities are listed in the keystore, the cacerts file, available in the <JDEV_HOME>\jdk\jre\lib\security directory. If a portlet producer uses a security certificate issued by a non-widely accepted certificate authority and you try to access portlets from this producer, a security alert is displayed informing you that the security certificate was issued from a certificate authority you do not trust. This means the certificate is not available in the keystore. To avoid being prompted each time you access such portlets, you must register this certificate with the keystore.
To register a certificate with the keystore, perform the following steps:
Navigate to <JDEV_HOME>\jdk\jre\lib\security.
Back up the cacerts file.
Access the producer URL in Internet Explorer to get the certificate.
Note:
Recent versions of FireFox do not provide a means to export certificates.In the Security Alert dialog box, shown in Figure 10-44, click View Certificate.
In the Certificate dialog box, click the Certification Path tab.
The dummy child certificate is selected by default as shown in Figure 10-45. Select the root certificate and click View Certificate.
Click the Details tab, and click Copy to File.
In the Certificate Export Wizard, accept the default settings and click Next until you reach the File to Export screen, shown in Figure 10-46.
Figure 10-46 File to Export Screen of the Certificate Export Wizard
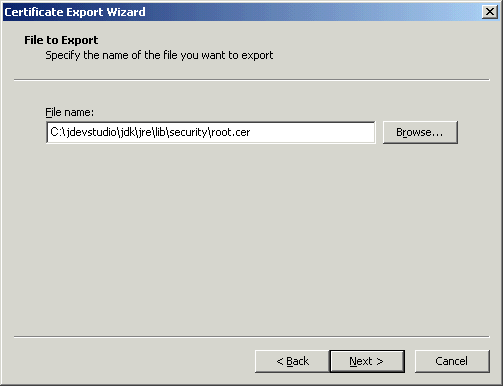
In the File Name field, enter <JDEV_HOME>\jdk\jre\lib\security\root.cer and click Next.
Click Finish.
In the command prompt, set your default directory to <JDEV_HOME>\jdk\jre\lib\security and run the following command:
keytool -import -file root.cer -keystore cacerts -storepass changeit
By running this command, the root.cer certificate is imported into the keystore.
Enter y at the prompt to confirm that you trust this certificate.
Verify that the cacerts file is updated with the certificate.
Individual actions on portlets and customizable components are not secured by default. Rather, the ability to customize a portlet or customizable component as a whole is inherited from the page permissions. If you want to grant more granular activities within a portlet or customizable component, then you can override the page-level security inheritance and define security directly on the required actions.
The ability of a user to perform actions on portlets and customizable components is inherited from the page security based on the value of the application-wide switch, enableSecurity, in the adf-config.xml file. If you selected the WebCenter application template while creating your application, then the adf-config.xml file is located in the <APPLICATION_NAME>/.adf/META-INF directory. The enableSecurity element is not available by default in adf-config.xml. To override or extend the page-level security inheritance for portlets and customizable components, you must add the enableSecurity element under the portlets security and customizable components security sections in the adf-config.xml file, as shown in Example 10-14 and Example 10-15.
Example 10-14 enableSecurity Element in the Portlet Security Section in adf-config.xml
<!--
==============================================================================
PORTLETS ACTIONS SECURITY
==============================================================================
-->
<adfp:adf-config-child xmlns:adfp="http://xmlns.oracle.com/adfp/portlet">
  <adfp:enableSecurity value="true"/>
    <adfp:actionsCategory>
       ..........................................
</adfp:adf-config-child>
Example 10-15 enableSecurity Element in the Customizable Components Security Section in adf-config.xml
<!--
==============================================================================
CUSTOMIZABLE COMPONENTS ACTIONS SECURITY
==============================================================================
-->
<cust:customizableComponentsSecurity
xmlns:cust="http://xmlns.oracle.com/adf/faces/customizable">
  <cust:enableSecurity value="true"/>
    <cust:actionsCategory>
       ..........................................
</cust:customizableComponentsSecurity>
Security for actions on portlets and customizable components can be implemented at the following levels:
Page level: You can define security for portlets and customizable components such that page-level privileges are inherited by these components. This is the default behavior.
By default, portlets and customizable components inherit permissible actions from the defined page-level permissions such as personalize or customize. That is, a user who has customize privileges on the page has permission on the customize action for the components on that page. The enableSecurity element enables you to override the security inheritance behavior and can take either of the following values:
true: If set to true (the default), then the ability for a user to modify a component will first be determined from the page permissions and then adjusted according to the current set of actions defined for that type of permission. If a user has customize permission, then the actions that constitute the customize category (move, customize, and so on) are available to the user, but they will be overridden by the actions that are defined in the adf-config.xml file. For example, a page designer wants to enable the end user to be able to customize portlets, but not customize the page layout. By setting enableSecurity to true, the page designer enforces that users must first have customize permission on the page. Setting customizeActionsCategory to false for customizable components will prevent the customization of the page layout, yet still enabling portlet customization. (As the default for customizeActionsCategory is true, it does not need to be set explicitly for portlets.).
false: If set to false, then the behavior is to ignore the user's page permissions and base the available actions on the manually specified list in the adf-config.xml file. In this case, the actions are global and available to all users. That is, the default page privileges (View, Personalize, and Customize for portlets and View and Customize for customizable components) are available for all portlets and customizable components.
Actions category level: You can define security on all actions for portlets or customizable components that belong to a named category.
You can add an actionsCategory element in the adf-config.xml file to define security on multiple actions simultaneously. Depending on the actionCategory attributes that you enable, appropriate privileges are provided on the portlets or customizable components.
Actions level: You can define security on individual actions for portlets or customizable components.
You can use the actions element in the adf-config.xml file to enable or disable individual actions. Depending on the actions attributes that you enable, appropriate privileges are provided on the portlets or customizable components.
Notes:
Privileges can be inherited from the parent only. Inheritance from a component in any other position in the hierarchy is not supported
Although the security override implementation for portlets and customizable components is similar, they are independent from each other. Therefore, if you place a portlet inside a customizable component (for example, in a PanelCustomizable component), the portlet will not inherit override settings from the customizable component. Instead it will use the security override settings that are defined for portlets.
Settings made at the actions category level or actions level are applicable for all component instances in the application. These settings cannot be made for a single instance of a portlet or customizable component.
The following sections describe how you can implement security on portlets and customizable components actions, at the actions category level and actions level:
You can define portlet security if actions on portlets are inherited from the page at the application level by setting enableSecurity to true in the portlets security section of the adf-config.xml file. A value of true implies that the user's permissions are determined from the page permission and then augmented according to the actionsCategory and actions elements specified. By defining actions categories and individual actions, you can control the exposure of the individual actions available within the given page permissions.
To implement security for actions on portlets at various levels as described earlier, you must define security settings at the following sections:
You can add an actionsCategory element in the portlets security section in the adf-config.xml file to define the group of actions that are exposed on the portlets within the application. Depending on the actionsCategory attributes that you enable, appropriate privileges are provided on the portlets. Table 10-11 describes the different actionsCategory attributes and the portlet actions they support by default.
Table 10-11 actionsCategory Attributes and Portlets Actions Mapping
| Attribute Value | Actions Supported |
|---|---|
|
viewActionsCategory |
Render isHelpModeAvailable isNormalModeAvailable isAboutModeAvailable isPreviewModeAvailable isDetailModeAvailable isLinkModeAvailable isPrintModeAvailable |
|
customizeActionsCategory |
isMovable isCustomizeModeAvailable isMinimizable isMaximizable isConfigModeAvailable |
|
personalizeActionsCategory |
isPersonalizeModeAvailable |
Example 10-16 shows the actionsCategory entry that you can add to the portlets security section in the adf-config.xml file. In this example, customizeActionsCategory is set to false to prevent customization. You can use Expression Language (EL) for the values of these elements.
Example 10-16 actionsCategory Element in the Portlets Security Section
<!--
==============================================================================
PORTLETS ACTIONS SECURITY
==============================================================================
-->
<adfp:adf-config-child xmlns:adfp="http://xmlns.oracle.com/adfp/portlet">
  <adfp:enableSecurity value="true"/>
    <adfp:actionsCategory>
      <adfp:actionCategory name="viewActionsCategory" value="true"/>
      <adfp:actionCategory name="customizeActionsCategory" value="false"/>
      <adfp:actionCategory name="personalizeActionsCategory" value="true"/>
    </adfp:actionsCategory>

    <adfp:actions>
    ..........................................
    </adfp:actions>

</adfp:adf-config-child>
You can use the actions element in the portlets security section of the adf-config.xml file to enable or disable individual portlet actions. Depending on the action attributes that you enable, appropriate privileges are provided on the portlets.
Example 10-17 shows an example of an actions entry that you can add to the portlets security section in the adf-config.xml file. You can use EL for the values of these elements. In this case you prevent customization by setting isCustomizeModeAvailable to false.
Example 10-17 actions Element in the Portlets Security Section
<!--
==============================================================================
PORTLETS ACTIONS SECURITY
==============================================================================
-->
<adfp:adf-config-child xmlns:adfp="http://xmlns.oracle.com/adfp/portlet">
  <adfp:enableSecurity value="true"/>
    <adfp:actionsCategory>
    ..........................................
    </adfp:actionsCategory>

    <adfp:actions>
      <adfp:action name="Render" value="true"/>
      <adfp:action name="isMovable" value="true"/>
      <adfp:action name="isCustomizeModeAvailable" value="false"/>
      <adfp:action name="isPersonalizeModeAvailable" value="true"/>
    </adfp:actions>

</adfp:adf-config-child>
Using EL to Prevent Customization of Portlets Outside of Business Hours
An example to show when you may need to override inherited portlet security is an application that is configured to disable portlet customization outside of standard business hours. For this, you must first create a managed bean (for example, a managed bean called appBusinessRules), containing the method shown in Example 10-18.
Example 10-18 InsideBizHours Method Defined in appBusinessRules Managed Bean
public String isInsideBizHours()
  {
    Calendar rightNow = Calendar.getInstance();
    int      currentHr = rightNow.get(rightNow.HOUR_OF_DAY);

    // Do not enable customize operation outside of standard business hours

    if ((currentHr > 9) && (currentHr < 17))
       return "true";
    else
       return "false";
  }
You can then reference this managed bean from the actionsCategory element in the portlet security section of the adf-config.xml file, as shown in Example 10-19.
Example 10-19 InsideBizHours Method Referenced in the adf-config.xml File
<adfp:adf-config-child xmlns:adfp="http://xmlns.oracle.com/adfp/portlet">
  <adfp:enableSecurity value="true"/>

    <adfp:actionsCategory>
      <adfp:actionCategory name="customizeActionsCategory"
      value="#{appBusinessRules.InsideBizHours}"/>
    </adfp:actionsCategory>

</adfp:adf-config-child>
In this example, the customizeActionsCategory will be set to true only if the application is run within business hours. Outside of these hours, the portlet cannot be customized even if the user had that permission granted on the page. All other categories that are not explicitly defined, will be inherited from the page.
Using EL to Prevent Personalization and Customization of Portlets Outside the Corporate Network
In this example the managed bean checks the IP address of the request to determine whether the user has accessed the application through the corporate proxy server or from within the corporate network. In this simple example, assume that if the request has the proxy server's IP address, then it is coming from outside the corporate network. In general it is not advised to base security strictly on IP addresses, because these can be compromised. For this, you must add the method shown in Example 10-20 to the managed bean:
Example 10-20 InsideCorpNetwork Method Defined in appBusinessRules Managed Bean
public boolean isInsideCorpNetwork()
  {
    // Do not enable personalize and customize operations
    // for requests that go through the corporate proxy

    FacesContext       ctx = FacesContext.getCurrentInstance();
    ExternalContext    ectx = ctx.getExternalContext();
    HttpServletRequest myrequest = (HttpServletRequest) ectx.getRequest();
    String             currentIP = myrequest.getRemoteAddr();

    if (currentIP.equals(getProxyServerIP()))
        return false;
    else
        return true;
  }
You can then reference this managed bean from the actionsCategory element in the portlet security section of the adf-config.xml file, as shown in Example 10-21.
Example 10-21 InsideCorpNetwork Method Referenced in the adf-config.xml File
<adfp:adf-config-child xmlns="http://xmlns.oracle.com/adfp/portlet">
  <adfp:enableSecurity value="true"/>

    <adfp:actionsCategory>
      <adfp:actionCategory name="customizeActionsCategory"
                           value="#{appBusinessRules.InsideCorpNetwork}"/>
      <adfp:actionCategory name="personalizeActionsCategory"
                           value="#{appBusinessRules.InsideCorpNetwork}"/>
    </adfp:actionsCategory>
</adfp:adf-config-child>
In this example, the customizeActionsCategory and the personalizeActionsCategory will be set to true only if the IP address of the request for the application does not match that of the corporate proxy. The assumption is that the internal requests would have a valid client IP address. All other categories that are not explicitly defined, will be inherited from the page.
You can define security for actions on customizable components at the application level if enableSecurity is set to true in the customizable components security section of the adf-config.xml file. By default, this element is set to true when you implement security for your application. A value of true implies that permission checks are made in addition to the actionsCategory and actions values specified in the adf-config.xml.
To implement security for actions on customizable components at various levels as described earlier, you must perform the tasks outlined in the following sections:
You can add an actionsCategory element in the customizable components security section in the adf-config.xml file to define security on multiple customizable components actions simultaneously. Depending on the actionsCategory attributes that you enable, appropriate privileges are provided on the customizable components.
Table 10-12 describes the different actionsCategory attributes and the customizable components actions they support by default.
Table 10-12 actionsCategory Attributes and Customizable Components Actions Mapping
| Attribute Value | Actions Supported |
|---|---|
|
viewActionsCategory |
Render isHelpAvailable |
|
customizeActionsCategory |
isMovable isCustomizeModeAvailable isMinimizable isMaximizable isShowContentEnabled |
|
editActionsCategory |
isEditable |
Example 10-22 shows the actionsCategory entry that you can add to the customizable components security section in the adf-config.xml file.
Example 10-22 actionsCategory Element in the Customizable Components Security Section
<!--
==============================================================================
CUSTOMIZABLE COMPONENTS ACTIONS SECURITY
==============================================================================
-->
<cust:customizableComponentsSecurity
xmlns:cust="http://xmlns.oracle.com/adf/faces/customizable">
  <cust:enableSecurity value="true"/>

  <cust:actionsCategory>
    <cust:actionCategory name="viewActionsCategory" value="true"/>
    <cust:actionCategory name="customizeActionsCategory" value="false"/>
    <cust:actionCategory name="editActionsCategory" value="true"/>
  </cust:actionsCategory>

  <cust:actions>
  ..........................................
  </cust:actions>

</cust:customizableComponentsSecurity>
You can use EL for the values of these elements, as shown in Example 10-23.
Example 10-23 EL Used in Customizable Components an actionCategory Entry
<cust:actionsCategory>
  <cust:actionCategory name="customizeActionsCategory" value="#{appBusinessRules.InsideCorpNetwork}"/>
</cust:actionsCategory>
The managed bean, appBusinessRules, is defined as shown in Example 10-20.
You can use the actions element in the customizable components security section of the adf-config.xml file to enable or disable individual customizable components actions. Depending on the actions attributes that you enable, appropriate privileges are provided on the customizable components.
Example 10-24 shows the actions entry that you can add to the customizable components section of the adf-config.xml file. You can use EL for the values of these elements.
Example 10-24 action Elements in the Customizable Components Security Section
<!--
==============================================================================
CUSTOMIZABLE COMPONENTS ACTIONS SECURITY
==============================================================================
-->
<cust:customizableComponentsSecurity
xmlns:cust="http://xmlns.oracle.com/adf/faces/customizable">
  <cust:enableSecurity value="true"/>

  <cust:actionsCategory>
    ..........................................
  </cust:actionsCategory>

  <cust:actions>
    <cust:action name="isHelpAvailable" value="true"/>
    <cust:action name="isEditable" value="true"/>
    <cust:action name="isCustomizeModeAvailable" value="false"/>
  </cust:actions>

</cust:customizableComponentsSecurity>
You have seen how to enable or disable security for actions on customizable components by editing the adf-config.xml file. The actions and actionsCategory elements in the adf-config.xml file have certain default mappings as shown in Table 10-12. You can change these default mappings by editing the faces-config.xml file. These settings are optional and the steps involved are described in the next section.
The Web Services for Remote Portlets (WSRP) specification indicates that Web Services Security (WS-Security) can be leveraged for providing secure identity propagation between the consumer and the portlet producer. However, WSRP in and of itself does not provide secure identity propagation of the end user's identity to the portlet producer. The WSRP specification explicitly defers to other security standards for secure identity propagation and does not go into the specific WS-Security profiles or options that should be employed. In the absence of a secure mechanism, WSRP defines the concept of user categories, which can be mapped to security roles like the ones used by the JSR168 portlets. By using a combination of WSRP and WS-Security, you can ensure end-to-end security.
Identity propagation without WS-Security
When using WSRP without WS-Security, the userContext structure within the SOAP message contains user profile information and user category information. This information is not considered secure and should only be used for personalization and customization functionality. It should not be used for authorization of sensitive resources. This information is also exposed in the JSR168 APIs, isUserInRole(role) and getUserPrincipal. The code in Example 10-25 shows how a sample portlet's markup rendering code may use the isUserInRole API to decide what content to display.
Example 10-25 isUserInRole(role) API
private void doViewHtml(RenderRequest request, RenderResponse response)
          throws PortletException,
                 IOException {
        // To do: markup the required content.
        PrintWriter out = response.getWriter();
        out.print("<p>Welcome");
        out.println("</p>");
        if (request.isUserInRole("moderator")){
            out.println("<p>MODERATOR</p>" );
        } else {
            out.println("<p>not moderator</p>" );
        }
        if (request.isUserInRole("participant")){
            out.println("<p>PARTICIPANT</p>" );
        } else {
            out.println("<p>not participant</p>" );
        }
        if (request.isUserInRole("viewer")){
            out.println("<p>VIEWER</p>" );
        } else {
            out.println("<p>not viewer</p>" );
        }
    }
Identity Propagation with WS-Security
When WS-Security is leveraged with WSRP, the user's identity is propagated outside of the SOAP message body, in the WS-Security header. This is a user assertion, using the Username Token format, and is digitally signed to authenticate the consumer and to ensure the integrity of the assertion.
When this mechanism is used, the JSR 168 APIs isUserInRole and getUserPrincipal are established based on the security context resulting from the WS-Security authentication, rather than the information in the SOAP message's userContext.
The use of WS-Security adds some complexity to the configuration and management of the WebCenter application and the set of producers it consumes. However, when the situation warrants its use, it becomes an important ingredient of the SOA architecture that ensures the security of the information being published by the WebCenter application.
Oracle WebCenter Framework supports the following token profiles (to digitally sign the security token and message body to ensure authenticity and integrity):
Username token without password
SAML token (uses the sender vouches method that the producer uses to confirm the subject assertion)
Digitally signing the security token and the SOAP message body accomplishes the following objectives:
Consumer Authentication
Assertion and Message Integrity
Consumer Authentication
When a portlet producer is generating sensitive information, for example paystub information, it is imperative that it only responds to requests to show the information from a legitimate consumer.
By using WS-Security, and having the producer digitally sign the security token and the message body, the producer can verify the signature using the public key of the legitimate consumer. If the signature cannot be verified, then it means that the request may have come from a fraudulent consumer. By requiring the verification of the digital signature, the sensitive information will only be sent to the legitimate consumer.
Assertion and Message Integrity
In addition to verifying the identity of the consumer making the Web Service requests, digitally signing the security token and the message body also ensures that the token and the message have not been tampered with. This prevents such problems as man-in-the-middle attacks where a legitimate request might be intercepted and the user name in the security token replaced with another user name to see the paystub information coming back for the other user. By digitally signing the token, it cannot be tampered with. Any modification to the token would result in the inability to verify the signature on the producer end, and would result in a SOAP fault to be returned instead of the requested paystub information.
Supported Producers
WS-Security implementation is supported by the Oracle WebCenter Suite 10.1.3.2 WSRP container. Other WSRP vendors may also be able to support the WS-Security configuration of Username Token without password, with XML digital signature on the Username Token and the SOAP Message body.
Security Domain Implication
When using secure identity propagation as described in this section, the user name of the user authenticated to the consumer (WebCenter application) is propagated to the producer without any remapping or providing any credentials. There is an inherent assumption that the producer understands this user name and can locate this user in its associated security domain. Consequently, it is highly desirable to ensure that the consumer and producer share the same security provider (identity store) to simplify the management of this configuration.
Figure 10-47 summarizes the overall WSRP portlet security architecture.
Figure 10-47 WSRP Portlet Security Architecture
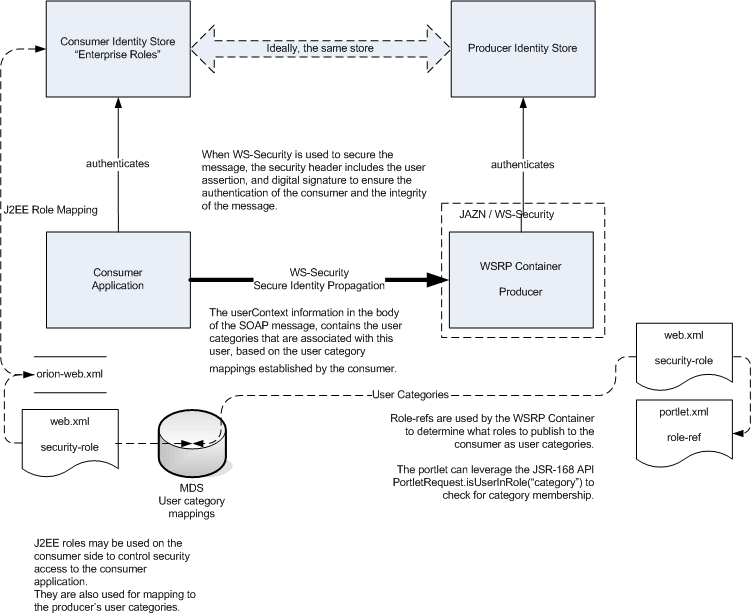
The following sections discuss how to secure access to JSR-168 standards-based WSRP portlets from WebCenter applications:
The security credentials of the WSRP producer and WebCenter application can be obtained and managed either by using a Java Key Store (JKS), or an Oracle wallet. A keystore or wallet is a file that provides information about available public and private keys. Keys are used for a variety of purposes, including authentication and data integrity. User certificates and the trust points needed to validate the certificates of peers are also stored securely in the wallet or keystore.
See the Oracle Application Server Web Services Security Guide for information about the Oracle wallet and JKS.
This section covers the following topics:
Section 10.10.1.1, "Setting Up Keystores Using an Oracle Wallet"
Section 10.10.1.2, "Setting Up the Keystores Using Java Keystore"
You can use the orapki utility to generate Oracle wallets. This section covers the following topics:
Creating a Wallet for the Certificate Authority
Certificates are signed data structures that bind a network identity with a corresponding public key. Certificates can be of two types; user certificates and trusted certificates. User certificates are used by end entities, including server applications, to validate an end entity's identity in a public and private key exchange. In comparison, trusted certificates are any certificates that you trust, such as those provided by CAs to validate the user certificates that they issue.
In this section, you generate your own Certificate Authority (CA) for testing purposes. If you want to use a real Certificate Authority, then this step can be bypassed. A Certificate Authority is the entity that vouches for the authenticity of the certificates that it issues or signs.
To create a Certificate Authority, perform the following steps:
Create a directory to hold the Certificate Authority related files, and navigate to that directory as shown in the following example:
mkdir ca
cd ca
Create the wallet to represent the Certificate Authority by using the orapki utility located in the ORACLE_HOME/bin directory as shown in the following example:
orapki wallet create -wallet ca_wallet -pwd welcome1
Add a self-signed root certificate to the wallet as shown in the following example:
orapki wallet add -wallet ca_wallet -pwd welcome1 -dn "cn=root_test,c=us" -keysize 2048 -self_signed -validity 3650
Export the public key of the Certificate Authority, in the form of a certificate for use by other wallets you will be creating, as shown in the following example:
orapki wallet export -wallet ca_wallet -pwd welcome1 -dn "cn=root_test,c=us" -cert root_test.cer
cd ..
This command exports the self-signed certificate to the root_test.cer file to the ca directory.
Creating a Wallet for the Consumer
In this section, you create a wallet for the consumer. The consumer here is the WebCenter application, which consumes portlets generated by the remote portlet producer over WSRP.
To create a wallet for the consumer, perform the following steps:
Create a directory, say consumer, in the ca directory you created earlier, to hold all related files, and navigate to the consumer directory as shown in the following example:
mkdir consumer
cd consumer
Create an empty wallet and specify a password for wallet access as shown in the following example:
orapki wallet create -wallet consumer_wallet -pwd welcome1
Add an entry into the wallet from which a certificate request can be generated and generate the request as shown in the following example:
orapki wallet add -wallet consumer_wallet -pwd welcome1 -dn "cn=mywebcenter,c=us" -keysize 2048
Export the certificate request from the wallet, as shown in the following example:
orapki wallet export -wallet consumer_wallet -pwd welcome1 -dn "cn=mywebcenter,c=us" -request creq.txt
This command exports the certificate request to the specified file, creq.txt.
Generate a signed certificate using the Certificate Authority wallet you created earlier and the certificate request you just created. To do this, use the command shown in the following example:
orapki cert create -wallet ../ca_wallet -pwd welcome1 -request creq.txt -cert mywebcenter.cer -validity 3650
This command creates a certificate, cert.txt, with a validity of 3650 days. This is analogous to the Certificate Authority issuing a certificate.
Inspect the certificate by using the command shown in the following example and observe that it indicates the issuer as the Certificate Authority, test_root, from the Certificate Authority wallet:
orapki cert display -cert mywebcenter.cer -complete
Following is the output from this command
{ fingerprint = d72ad668f2080eec50b65d3254e7b4d5, notBefore = Mon Dec 04 14:38:5
4 PST 2006, notAfter = Thu Dec 01 14:38:54 PST 2016, holder = CN=mywebcenter,C=u
s, issuer = CN=root_test,C=us, serialNo = 0, sigAlgOID = 1.2.840.113549.1.1.4,
key = { modulus = 314884176036895407457111380339124001153916819457886938130073164
66491702054112788966463056555272544102605057391702786162416825660680989204938981
36083123707588730587306333857150738020737960803324519027546624976478615482735062
49311969288116920907810200123456329599692568441307608473442677638235059030372763
96576120231060821377869996681090896136038676747964745359958271161004529457095590
40284680296091276073838918946308169577415359123456663657894033293472170366722836
45060044652256894479892976475267015999868137477785728310679164218193742125023418
72105028176137424737248643367731491981820389154137052649234214917208418497, exponent = 65537 } }
Add the Certificate Authority's root certificate to the consumer wallet as shown in the following example:
orapki wallet add -wallet consumer_wallet -pwd welcome1 -trusted_cert -cert ../root_test.cer
Note:
If you are using a real Certificate Authority, such as Verisign or any Certificate Authority from the following list, then you do not need to perform this step:CN=GTE CyberTrust Root,O=GTE Corporation,C=US
OU=Class 3 Public Primary Certification Authority,O=VeriSign\, Inc.,C=US
OU=Class 2 Public Primary Certification Authority,O=VeriSign\, Inc.,C=US
OU=Class 1 Public Primary Certification Authority,O=VeriSign\, Inc.,C=US
OU=Secure Server Certification Authority,O=RSA Data Security\, Inc.,C=US
CN=GTE CyberTrust Global Root,OU=GTE CyberTrust Solutions\, Inc.,O=GTE Corporation,C=US
CN=Entrust.net Secure Server Certification Authority,OU=(c) 2000 Entrust.net Limited,OU=www.entrust.net/SSL_CPS incorp. by ref. (limits liab.), O=Entrust.net
CN=Entrust.net Certification Authority (2048),OU=(c) 1999 Entrust.net Limited,OU=www.entrust.net/CPS_2048 incorp. by ref. (limits liab.), O=Entrust.net
CN=Entrust.net Secure Server Certification Authority,OU=(c) 1999 Entrust.net Limited,OU=www.entrust.net/CPS incorp. by ref. (limits liab.), O=Entrust.net, C=US
These well-known Certificate Authority root certificates are already present in the Oracle wallet. If you are creating your own Certificate Authority for testing, or using a less well-known Certificate Authority, then you should do the following step to add the root certificate used for issuing the certificate into the wallet.
Add the newly issued user certificate, mywebcenter.cer, that represents the WebCenter application's identity into the wallet, as shown in the following example:
orapki wallet add -wallet consumer_wallet -pwd welcome1 -user_cert -cert mywebcenter.cer
Display the contents of the wallet by using the command shown in the following example:
orapki wallet display -wallet consumer_wallet -pwd welcome1
Following is the output from this command:
Requested Certificates:

User Certificates:
Subject:        CN=mywebcenter,C=us

Trusted Certificates:
Subject:        CN=root_test,C=us
Subject:        CN=GTE CyberTrust Root,O=GTE Corporation,C=US
Subject:        OU=Class 3 Public Primary Certification Authority,O=VeriSign\, Inc.,C=US
Subject:        OU=Class 2 Public Primary Certification Authority,O=VeriSign\, Inc.,C=US
Subject:        OU=Class 1 Public Primary Certification Authority,O=VeriSign\, Inc.,C=US
Subject:        OU=Secure Server Certification Authority,O=RSA Data Security\, Inc.,C=US
Subject:        CN=GTE CyberTrust Global Root,OU=GTE CyberTrust Solutions\, Inc.,O=GTE Corporation,C=US
Subject:        CN=Entrust.net Secure Server Certification Authority,OU=(c) 2000
Entrust.net Limited,OU=www.entrust.net/SSL_CPS incorp. by ref. (limits liab.),
O=Entrust.net
Subject:        CN=Entrust.net Certification Authority (2048),OU=(c) 1999
Entrust.net Limited,OU=www.entrust.net/CPS_2048 incorp. by ref. (limits liab.),O=Entrust.net
Subject:        CN=Entrust.net Secure Server Certification Authority,OU=(c) 1999
Entrust.net Limited,OU=www.entrust.net/CPS incorp. by ref. (limits liab.),O=Entrust.net,C=US
Creating a Wallet for the Producer
The final step of the keystore setup process is generating the wallet for the producer to use. The producer will need the public key of the consumer to verify the authenticity of the security tokens received from the consumer in the WS-Security headers of the requests it receives over its getMarkup interface.
To do so, it needs a wallet that contains the certificate of the consumer and the root certificate used to sign it. These are added to the wallet as trusted certificates.
To create a wallet for the producer, perform the following steps:
Create the directory for the producer in the ca directory you created earlier, and navigate to that producer as shown in the following example:
mkdir producer
cd producer
Create an empty wallet using the command shown in the following example:
orapki wallet create -wallet producer_wallet -pwd welcome1
If required, add the root certificate of the CA to the wallet as shown in the following example:
orapki wallet add -wallet producer_wallet -pwd welcome1 -trusted_cert -cert ../root_test.cer
Add the consumer's certificate as a trusted certificate to the producer's wallet as shown in the following example:
orapki wallet add -wallet producer_wallet -pwd welcome1 -trusted_cert -cert ../consumer/mywebcenter.cer
Display the contents of the wallet by using the command shown in the following example:
orapki wallet display -wallet producer_wallet -pwd welcome1
The Java Keystore (JKS) is the proprietary keystore format defined by Sun Microsystems. To create and manage the keys and certificates in the JKS, use the keytool utility that is distributed with the Java JDK.
This section discusses how to configure keystores and keys using a JKS. To enable Web Services Security (WS-Security) trusted authentication for the WSRP producer and WebCenter application, you must first configure keystores at both consumer and producer sides. Use the keytool utility provided with Oracle JDeveloper under <JDEV_HOME>/jdk/bin to set up keystores.
This section covers the following topics:
Creating a Java Keystore for the Consumer
The consumer here is the WebCenter application, which consumes portlets generated by the remote portlet producer over WSRP. To create a Java keystore for the consumer, perform the following steps:
Go to JDEV_HOME/jdk/bin and open a command prompt.
Create a new key pair (a public key and an associated private key) using the genKey command as follows:
keytool -genkey -alias consumer -keyalg "RSA" -sigalg "SHA1withRSA" -dname
"CN=test, OU=Unknown, O=Unknown, L=Unknown, ST=California, C=US" -keypass
welcome1 -keystore consumer.jks -storepass welcome1
Display the keystore. The command shown in the following example displays the contents of the keystore:
keytool -list -v -keystore consumer.jks -storepass welcome1
Create a certificate request file for the signature key pair using the following command:
keytool -certreq -file consumer.csr -alias consumer -keystore consumer.jks -keypass welcome1 -storepass welcome1
Request a trusted certificate from a Certificate Authority (CA).
There are many public Certification Authorities, such as VeriSign, Thawte, Entrust, and so on. You can also run your own Certification Authority using products such as the Netscape or Microsoft Certificate Servers or the Entrust CA product for your organization.
Create a root.cer file, copy and paste the contents of the root certificate provided by the CA into this file.
Import the root certificate using the following command:
keytool -import -file root.cer -keystore consumer.jks -storepass welcome1
Repeat this step for any intermediate certificates from the CA.
Create a trusted.cer file, copy and paste the contents of the trusted certificate provided by the CA into this file.
Import the trusted certificate using the following command:
keytool -import -file trusted.cer -alias consumer -keypass welcome1 -keystore consumer.jks -storepass welcome1
Creating a Java Keystore for the Producer
The next step of the keystore setup process is generating the Java keystore for the producer. The producer uses the public key of the consumer to verify the authenticity of the security tokens received from the consumer in the WS-Security headers of the requests it receives over its getMarkup interface. To do this, the producer needs a Java keystore that contains the certificate of the consumer and the root certificate used to sign it. These certificates are added to the Java keystore as trusted certificates.
To create a Java keystore for the producer, perform the following steps:
Go to JDEV_HOME/jdk/bin and open a command prompt.
Export the certificate from the consumer Java keystore using the following command:
keytool -export -file producer.cer -alias consumer -keystore consumer.jks -storepass welcome1
Import the certificate you exported in the previous step into the producer Java keystore using the following command:
keytool -import -file producer.cer -alias consumer -keystore producer.jks -storepass welcome1
The required configuration on the producer end will vary depending on the WSRP container that you are consuming through your application. You can consume portlets from the Oracle WSRP Container running on Oracle WebCenter Suite 10.1.3.2.0.
Notes:
For integration with Oracle WebCenter Framework, the token profile that must be configured is Username Token with no password or SAML token.The example in this section discusses the configuration for the Oracle WSRP Container on an Oracle WebCenter Suite 10.1.3.2.0 installation. This is the Oracle WSRP container deployed onto Oracle Application Server release 10.1.3.2.0. This leverages WS-Security integration with OC4J.
Deploying and Configuring the Producer
Before you configure the producer for WS-Security, you must first deploy your standards-compliant portlet producer to the Oracle WebCenter Suite 10.1.3.2.0 WSRP Container by performing the steps in Section 18.9, "Deploying Your Portlet to an Application Server".
After you have deployed the producer, configure the producer for WS-Security by performing the following steps:
Navigate to the following URL to access the Application Server Control Console:
http://<host_name>.<domain>:<port>/em
For example:
http://server.domain.com:7781/em
To find the URL for your console, look at the readme.txt file. After installation, this text file is saved to the following location:
On UNIX: ORACLE_HOME/install/readme.txt
On Windows: ORACLE_HOME\install\readme.txt
Log in.
The user name and password are those you specified during installation.
On the Application Server Control Console home page, navigate to the OC4J instance. For example, OC4J_WebCenter.
Click the Web Services tab.
If you do not see any Web services listed, then it is because the Web service has not been requested yet and as a result, it is not visible in the Application Server Control Console.
To enable the display of the Web service interfaces in Application Server Control Console, perform the following steps:
Click the Applications tab, then click the application. For example, richtextportlet.
On the Application page, click the web module of the producer application.
On the Web Module page, click the Test Web Module link.
On the Test Web Module page, you see the base URL of the producer as a standard web module.
Add /info to the base URL as shown in Figure 10-48.
Figure 10-48 Editing the Base URL of the Producer

Click Test Web Module.
On the WSRP Producer Test Page, under Web Services Description Language (WSDL) URLs, click one of the links.
The WSDL of the portlet is displayed in a browser.
If you selected WSRP v1 WSDL, then in this WSDL, you should find a line that shows the location of the WSRP Base Service as shown in Example 10-26 and Figure 10-49:
Example 10-26 Base Service URL in WSRP v1 WSDL
http://hostname.company.com:7781/secondSampleV1/portlets/WSRPBaseService
Figure 10-49 Base Service URL in WSRP v1 WSDL

If you selected WSRP v2 WSDL, then in this WSDL, you should find a line that shows the location of the WSRP Markup Service as shown in Example 10-27 and Figure 10-50:
Example 10-27 Markup Service URL in WSRP v2 WSDL
http://hostname.company.com:7782/secportlet/portlets/WSRP_v2_Markup_Service
Figure 10-50 Markup Service URL in WSRP v2 WSDL
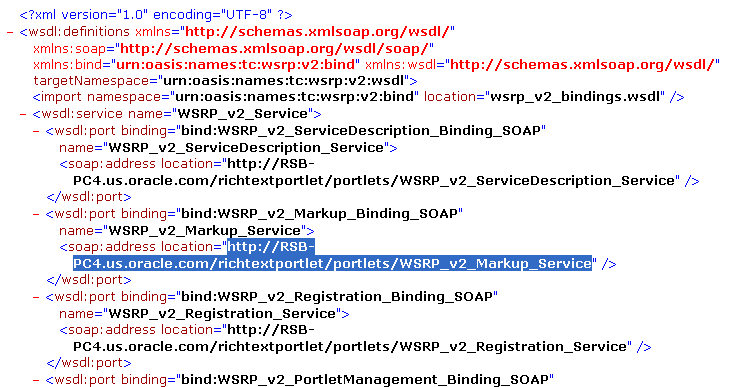
Copy one of these URLs into a browser window to access the WSRP Base or Markup Service.
You can ignore the resulting screen. The reason for requesting this page is to get WSRPBaseService (or Markup) to show up in the list of Web Services as shown in Figure 10-51. This service, which includes the getMarkup interface is the only one that must be configured for WS-Security.
On the Application page, click Web Services.
Click WSRP_v2_Markup_Service.
Click the Administration tab.
On the Administration tab, shown in Figure 10-51, click the Edit Configuration icon adjacent to the Security feature.
Figure 10-51 WSRPBaseService in Application Server Control Console
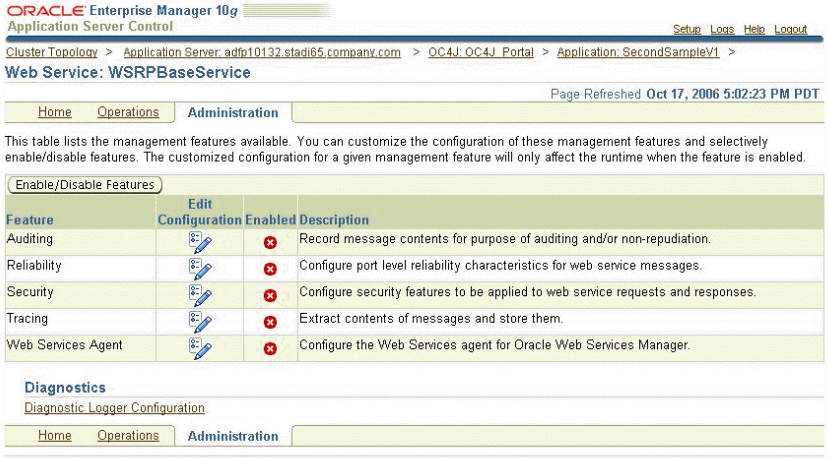
On the Edit Security Configuration Page, shown in Figure 10-52, you can perform port level or operation level configurations.
Figure 10-52 Edit Security Configuration Page
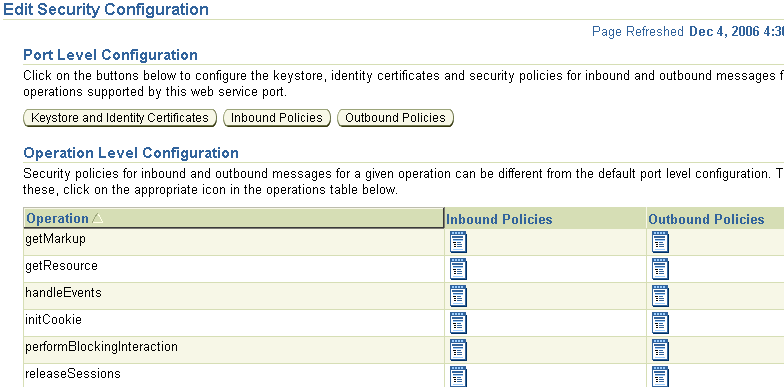
Configuring the Keystore
To configure the keystore, perform the following tasks:
In the Application Server Control Console, click the Applications tab, the relevant application link, the Web Service tab, the WSRPBaseService link, the Administration tab, and then Enable /Disable Feature.
Select Security from the list and click Move to move Security to the Enabled Features list.
Click OK.
Click Edit Configuration next to Security.
Click Keystore and Identity Certificates and select Use Application Specific Keystore. Enter the following values for the keystore:
On the Keystore and Identity Certificates page, shown in Figure 10-53, specify the following values for the keystore:
Keystore Name = <Any name>
Keystore Path =  <Keystore path in the file system>
Keystore Type = JKS
Keystore Password = <Keystore password>
Confirm Keystore Password = <same as above><>
Note:
Leave the Identity Certificates section empty if you are using an Oracle wallet. WS-Security code looks for the appropriate certificate in the wallet to verify the signature.Figure 10-53 Keystore and Identity Certificates Page
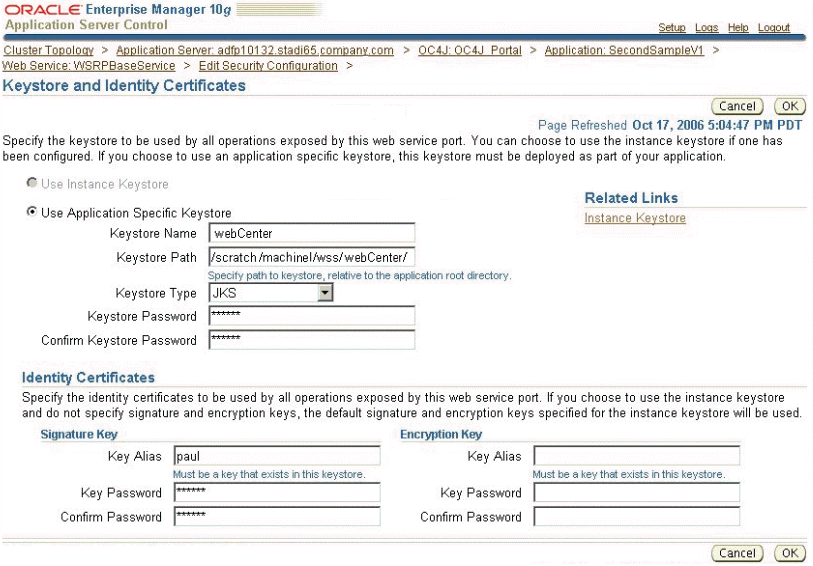
Click OK.
Configuring the Inbound Policy
To configure the inbound policy, perform the following steps:
In the Application Server Control Console, click the Applications tab, the relevant application link, the Web Service tab, the WSRPBaseService link, the Administration tab, and then Enable /Disable Feature. Select Security from the list and click OK.
Click the Edit Configuration icon displayed against the Security feature.
Click Inbound Policies.
On the Inbound Policies Authentication page in the Application Server Control Console, if you select User Username /Password Authentication as shown in Figure 10-54, then specify the password type.
If you are using SAML authentication, then you must select Accept Sender Vouches and Verify Signature.
Optionally, click the Integrity tab and select the Require Message Body to be Signed option, as shown in Figure 10-55.
Figure 10-55 Integrity Tab of Inbound Policies Page
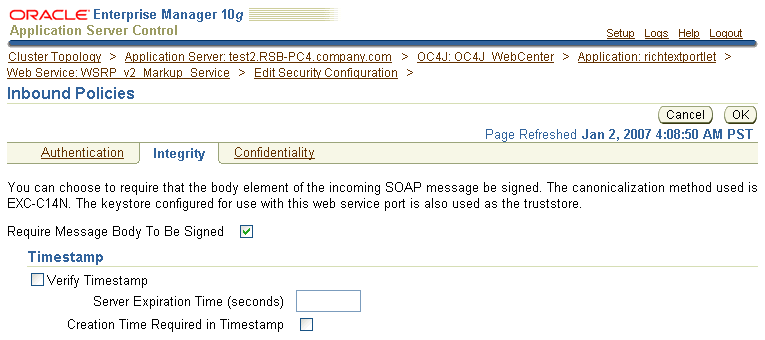
The message body is signed at the consumer end. By selecting this option, the signature on the message body is verified at the producer end, thereby adding extra integrity protection for the request.
Click OK.
Note:
When you redeploy your WebCenter application, you must configure inbound policies again.Configuring the Web Service for Username Token without Password
Perform this configuration when the user is already authenticated and trusted, and only its existence in the identity store must be verified. You can configure the Web service for Username Token without a password by manually editing the wsmgmt.xml file.
Note:
Performing this configuration using the Application Server Control Console is not supported in this release.The wsmgmt.xml file is an instance-level configuration file, which holds the entire security configuration for the Web services deployed in an OC4J instance. If an inbound element is configured, then the server interceptor uses the wsmgmt.xml file at run time to enforce the security policy.
To perform this configuration manually, do the following:
Locate the wsmgmt.xml file under the OC4J_HOME/config/ directory, where OC4J_HOME is the location of OC4J under the Oracle home directory. Example 10-28 shows the code from this file.
Example 10-28 Sample wsmgmt.xml File
<port app="SecondSampleV1" web="SecondSampleV1" service="WSRP_v1_Service" port="WSRPBaseService">
  <runtime enabled="security">
    <security>
      <key-store name="portal" path="/scratch/pencarna/wss/portal/portal.jks"
 type="JKS" store-pass="->SecondSampleV1.WSRPBaseService.keystore.portal.jks"/>
      <signature-key alias="paul" key-pass="->SecondSampleV1.WSRPBaseService.key.paul"/>
      <inbound>
        <verify-username-token password-type="PLAINTEXT" require-nonce="false" require-created="false"/>
      </inbound>
    </security>
  </runtime>
</port>
In this file, change the following line:
<verify-username-token password-type="PLAINTEXT" require-nonce="false" require-created="false"/>
To:
<verify-username-token>
  <property name="username.token.allow.nopassword" value ="true"/>
</verify-username-token>
The value of the username.token.allow.nopassword Boolean property determines whether the Web service will authenticate a username token without requiring a password.
Save the wsmgmt.xml file.
The consumer of the WSRP portlets is the WebCenter application. This section describes the configuration steps needed on the WebCenter application to include WS-Security headers in the portlet requests.
This section covers the following topics:
Transferring Keystore Information to the Consumer System
To enable your WebCenter Application to use the keystore, the consumer keystore must be moved to the system that is running the application.
To move the consumer keystore, perform the following steps:
Navigate to the C:\ca\consumer\consumer_wallet directory.
FTP or copy the ewallet.p12 file to the system that is running the WebCenter Application.
Updating the Keystore Path
After you deploy the WebCenter application to an Oracle Application Server instance, you must update the keystore path on this instance to use an absolute path. For example, /scratch/machine1/product/10.1.3.2.0/OracleAS_1/j2ee/OC4J_WebCenter/applications/myWSRPApp/adf/META-INF/webCenter.jks.
You can use the setCredential operation in the Credentials MBean in Application Server Control Console to update the keystore path. The Credentials MBean is an application MBean used to update secure properties related to a connection. Perform the setCredential operation by following the steps in Section 12.5, "Updating Credentials in a Deployed Application".
Restart the OC4J instance after updating the keystore path.
Configuring the Consumer for a Username Token Profile
You can define security settings for a user name token profile at the consumer end while registering the WSRP producer with your WebCenter application using Oracle JDeveloper.
To register the WSRP producer with your WebCenter application and to define security, perform the following steps:
In the Applications Navigator in Oracle JDeveloper, right-click the project under which to create the producer and select New from the context menu.
In the New Gallery dialog box, under Categories, expand the Web Tier node and select Portlets.
Under Items, select WSRP Producer Registration.
Click OK.
Step through the Register WSRP Portlet Producer Wizard by specifying the following:
On Step 1, specify a unique name for the connection.
On Step 2, specify the producer's URL Endpoint.
On Step 3, accept the Default Execution Time value of 60.
On Step 4, specify the following:
Token Profile: Username Token
Default User: <user_ name>
XML Signature: Binary Security Token
On Step 5, specify the following:
Store Path: Click Browse to navigate and select the keystore you created in Section 10.10.1.2, "Setting Up the Keystores Using Java Keystore".
Store Password: <Keystore password>
Store Type: <Populated automatically>
Signature Key Alias: Select from the populated aliases.
Signature Key Password: <Password for the certificate alias>
See Section 4.3.1.1, "Registering WSRP Portlet Producers" for a description of these fields.
Click Finish to complete the registration.
Create a new JSF JSP page, UNTPage.jspx, under the ViewController project.
Select Automatically Expose UI Components in a New Managed Bean for the page.
Use the following libraries:
ADF Faces Components
ADF Faces HTML
ADF Portlet Components
Customizable Components
JSF Core
JSF HTML
In the Component Palette, select the producer you registered earlier and drop a portlet inside the form (use the Structure pane to verify it is inside the form).
Optionally, secure the page by performing the steps in Section 10.2.3.2, "Securing Pages in Your Application".
Run the page and log in using the appropriate credentials. You should be able to see the portlet.
Configuring the Consumer for a SAML Token Profile
You can define security settings for a SAML token profile at the consumer end while registering the WSRP producer with your WebCenter application using Oracle JDeveloper.
To register the WSRP producer with your WebCenter application and to define security, perform the following steps:
In the Applications Navigator in Oracle JDeveloper, right-click the project under which to create the producer and select New from the context menu.
In the New Gallery dialog box, under Categories, expand the Web Tier node and select Portlets.
Under Items, select WSRP Producer Registration.
Click OK.
Step through the Register WSRP Portlet Producer Wizard by specifying the following:
On Step 1, specify a unique name for the connection.
On Step 2, specify the producer's URL Endpoint.
On Step 3, accept the Default Execution Time value of 60.
On Step 4, specify the following:
Token Profile: SAML Token
Default User: <user_ name>
Issuer Name: www.oracle.com
XML Signature: Binary Security Token
On Step 5, specify the following:
Store Path: Click Browse to navigate and select the keystore you created in Section 10.10.1.2, "Setting Up the Keystores Using Java Keystore".
Store Password: <Keystore password>
Store Type: <Populated automatically>
Signature Key Alias: Select from the populated aliases.
Signature Key Password: <Password for the certificate alias>
See Section 4.3.1.1, "Registering WSRP Portlet Producers" for a description of these fields.
Click Finish to complete the registration.
Create a new JSF JSP page, UNTPage.jspx, under the ViewController project.
Select Automatically Expose UI Components in a New Managed Bean for the page.
Use the following libraries:
ADF Faces Components
ADF Faces HTML
ADF Portlet Components
Customizable Components
JSF Core
JSF HTML
In the Component Palette, select the producer you registered earlier and drop a portlet inside the form (use the Structure pane to verify it is inside the form).
Optionally, secure the page by performing the steps in Section 10.2.3.2, "Securing Pages in Your Application".
Run the page and log in using the appropriate credentials. You should be able to see the portlet.
In the production environment, applications are deployed to OC4J in Oracle Application Server. Typically, the OC4J instance would use an LDAP-based Oracle Internet Directory as the repository for Oracle Identity Management and Oracle Single Sign-On for authentication. Therefore, it is necessary that you configure your WebCenter application to use Oracle Internet Directory or an external LDAP provider as the identity store and to use Single Sign-On for authentication.
This configuration is done while deploying the application to an OC4J in Oracle Application Server. For information about the steps involved in deploying your WebCenter application, see Figure 12-4.
This section covers the following topics:
Section 10.11.1, "Configuring a WebCenter Application to Use Oracle Internet Directory"
Section 10.11.2, "Configuring a WebCenter Application to Use Oracle Single Sign-On"
Section 10.11.3, "Configuring a WebCenter Application to Use Java Single Sign-On"
Section 10.11.4, "Configuring a WebCenter Application to Use an External LDAP Provider"
Section 10.11.5, "Configuring a WebCenter Application to Use Oracle Access Manager"
You can configure your WebCenter application to use Oracle Internet Directory in either of the following ways:
Run the ADF Security Wizard and select the default Lightweight XML Provider on the Oracle JAAS Provider screen, shown in Figure 10-56, and then configure the application at run time using Application Server Control Console to use an LDAP-based Provider, like Oracle Internet Directory.
Run the ADF Security Wizard and select LDAP Provider on the Oracle JAAS Provider screen, shown in Figure 10-56, to start with an LDAP-based provider directly. In this case, it is expected that you use the same LDAP provider at run time that you used in the development environment.
Note:
This option will only work for authentication. If you are using Oracle ADF authorization and plan to use the authorization screen to establish permission grants for the security aware components, then this setting does not result in the policies being stored automatically in the LDAP server. Therefore, if you are using Oracle ADF authorization, then you must use the XML provider during development and then configure for the LDAP provider during or after deployment.Figure 10-56 Oracle JAAS Provider Screen in the ADF Security Wizard
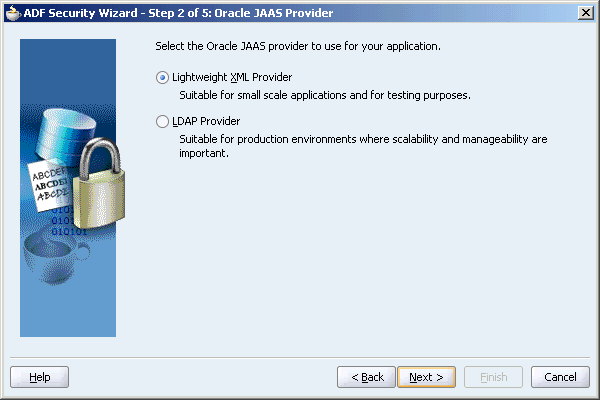
The steps to configure your WebCenter application to use Oracle Internet Directory are as follows:
Developing a WebCenter Application and Setting Up Oracle ADF Security
Associating the OC4J instance with Oracle Internet Directory
Changing the Security Provider for Your WebCenter Application to Use Oracle Internet Directory
Developing a WebCenter Application and Setting Up Oracle ADF Security
Develop a WebCenter application and set up Oracle ADF Security for this application using the ADF Security Wizard.
Packaging Your WebCenter application
In this step, all the required files are packaged in a standard J2EE format and directory structure, as an EAR file. Follow the steps in Section 12.2.1, "Packaging Your WebCenter Application" for performing this task.
Predeploying Your WebCenter application
In this step, the development references contained in the file are modified to be the target references. The targeted EAR file is created using the Predeployment tool packaged with Oracle JDeveloper. Follow the steps in Section 12.2.2.2, "Predeploying WebCenter Applications and JCR Adapter-based Applications" for performing this task.
Associating the OC4J instance with Oracle Internet Directory
Prior to deploying your WebCenter application to an OC4J instance in Oracle Application Server, you must associate Oracle Internet Directory with the OC4J instance.
Perform this task only if the OC4J instance is not already associated with Oracle Internet Directory. Use the Application Server Control Console to associate your OC4J instance with an instance of the LDAP-based Oracle Internet Directory, the repository for Oracle Identity Management. To do this, perform the following steps:
In the Application Server Control Console, navigate to the OC4J Home page for your instance and click the Administration tab.
In the resulting Administration page, choose the Identity Management task (one of the Security tasks).
In the resulting Identity Management page, choose Configure.
This assumes no Oracle Internet Directory instance was previously associated with the OC4J instance, so that the Oracle Internet Directory host name and port are listed as not configured. If a different Oracle Internet Directory instance was previously associated with this OC4J instance, then see section titled "Changing the Oracle Internet Directory Association" in the Oracle Containers for J2EE Security Guide.
In the resulting Configure Identity Management: Connection Information page, do the following:
Specify the fully qualified host name for the Oracle Internet Directory instance (myoid.oracle.com, for example).Specify the distinguished name for the Oracle Internet Directory user, such as cn=orcladmin. Each user in a directory must have a unique distinguished name. The user specified here must belong to the iASAdmins role in the Oracle Internet Directory instance.Specify the password for the Oracle Internet Directory user. This will also be set as the default password for the oc4jadmin user created in Oracle Internet Directory (unless the oc4jadmin account had previously been created, due to associating a different OC4J instance with the Oracle Internet Directory instance).Specify whether to use SSL connections or non-SSL connections to the Oracle Internet Directory instance, and the appropriate port to use. The port for SSL is typically 636; for non-SSL it is typically 389. (To change the SSL or port setting later, you would have to redo the OC4J-Oracle Internet Directory association, as described in the section in the OC4J Security Guide referenced in the previous step.)When you are done, go to the next page.
In the Configure Identity Management: Application Server Control page, you can optionally specify Oracle Identity Management as the security provider for Application Server Control. (If you do this, then only users and roles defined in the Oracle Internet Directory instance will be able to access Application Server Control.)
When you are done, go to the next page.
In the Configure Identity Management: Deployed Applications page, you can optionally specify Oracle Internet Directory (actually, Oracle Identity Management), with or without SSO, as the security provider for each deployed application in the OC4J instance.
When you are done, choose Configure, and restart the instance when prompted. This completes the OC4J-Oracle Internet Directory association process and takes you back to the Identity Management page.
Deploying Your WebCenter Application
You are now ready to deploy your WebCenter application to an OC4J instance using Application Server Control Console. Follow the steps in Section 12.2.3, "Deploying Your WebCenter Application Using Application Server Control Console" to perform this task.
Note:
You can change the security provider to Oracle Internet Directory during deployment as one of the points in the deployment plan. In case this is not done, the following section describes how to change the security provider to Oracle Internet Directory after deployment.At this point your WebCenter application will be running, but as the policy information has not been migrated yet, all the security features will not be working.
Changing the Security Provider for Your WebCenter Application to Use Oracle Internet Directory
The next step is to add Oracle Internet Directory as the security provider for your WebCenter application. To do this, perform the following steps:
In the Application Server Control Console, navigate to the OC4J instance that contains your WebCenter application, select your application, and click the Administration tab.
In the resulting Administration page, choose the Security Provider task.
Click Change Security Provider.
From the Security Provider Type list, select Oracle Identity Management Security Provider.
Click OK.
Restart your WebCenter application.
Migrating Security and Application Roles
The tasks involved in migrating security and application roles to Oracle Internet Directory are as follows:
Use the JAZN Migration tool to migrate policy information from the app-jazn-data.xml file packaged as part of the application EAR file to an LDIF file for the LDAP-based Oracle Internet Directory.
This tool facilitates the transition from the development environment to a deployed production environment.
Example 10-29 describes the syntax to facilitate migration from XML to LDAP.
Example 10-29 Syntax for XML to LDAP Migration
java oracle.security.jazn.tools.JAZNMigrationTool
-D binddn -w passwd -h ldaphost -p ldapport -st xml -dt ldap -sf
<source file> -df <dest file> -m policy|realm|all(default)
See Section 12.2.4.3, "Using the JAZN Migration Tool" for more information about using the JAZN Migration tool.
Modify the LDIF file to remove any entries that already exist in Oracle Internet Directory. User passwords have to comply with the Oracle Internet Directory password policies.
Use the ldapmodify command to add the policy information in the LDIF file to Oracle Internet Directory. Follow the steps in Section 12.2.4.4, "Using the ldapmodify Command-Line Tool" for performing this task.
See Also:
Oracle Internet Directory Administrator's Guide for more information about theldapmodify command.Configuring Role Mapping
If the development environment was configured with the corresponding enterprise role references and the subsequent migration of JAZN information was performed using the JAZN Migration tool in all mode, then the deployed application will have the correct role mapping available to it.
However, if the development environment used temporary roles to map policies and security constraints, then you must convert these role references to the appropriate enterprise role prior to deploying these policies. For example, if the developer used the enterprise role mymanagers for a role that equates to the hr-directors role on the deployment server, then the app-jazn-data.xml file and the orion-application.xml file must be updated accordingly. In app-jazn-data.xml, you change the policy information before you run the JAZN Migration tool as shown in Example 10-30.
Example 10-30 Grants in an app-jazn-data.xml File
<grant>
  <grantee>
    <principals>
      <principal>
        <realm-name>jazn.com</realm-name>
        <type>role</type>
        <class>oracle.security.jazn.spi.xml.XMLRealmRole</class>
        <name>hr-directors</name>
      </principal>
    </principals>
  </grantee>
  <permissions>
    <permission>
      <class>oracle.adf.share.security.authorization.RegionPermission</class>
      <name>view.pageDefs.welcomePageDef</name>
      <actions>customize,personalize,view</actions>
    </permission>
  </permissions>
</grant>
Likewise, the J2EE security to enterprise role mapping defined in the orion-application.xml file (located in the ORACLE_HOME/j2ee/home/application-deployments/<Application_Name> directory), must be updated to reflect the deployment server's enterprise roles. For example, you can change the mapping of the J2EE security role hr_managers from the role used in development to the production role hr-directors as shown in Example 10-31.
Example 10-31 Security Role Mapping in the orion-application.xml File
<security-role-mapping name="hr_managers">
  <group name="hr-directors" />
</security-role-mapping>
Restarting OC4J
Restart your OC4J instance.
Your WebCenter application is now ready for use.
Oracle Single Sign-On authenticates users against Oracle Internet Directory. Therefore, to configure your WebCenter application to use Oracle Single Sign-On, you must first configure the OC4J instance to use Oracle Internet Directory by performing the steps described in the section, "Associating the OC4J instance with Oracle Internet Directory".
To use Oracle Single Sign-On with your application, perform the following steps:
In the Application Server Control Console, navigate to the OC4J Home page for your instance and click the Administration tab.
In the resulting Administration page, choose the Security provider task.
Select the Enable SSO Authentication option.
Perform all the steps described in the section titled "Configure SSO (Optional)" in the Oracle Containers for J2EE Security Guide.
While performing the steps in the OC4J Security Guide, under the first step, "Run the SSO Registration Tool", use the following example to run the SSO Registration Tool:
% $ORACLE_HOME/sso/bin/ssoreg.sh -oracle_home_path $ORACLE_HOME \
-site_name myhost.mydomain.com -config_mod_osso TRUE \
-mod_osso_url http://myhost.mydomain.com:7777 -remote_midtier \
-config_file $ORACLE_HOME/Apache/Apache/conf/osso/midtier_osso.conf
A new file will be created with the name you specify, containing the SSO partner application configuration for the middle tier you are associating with SSO. Copy this file to the middle tier you are configuring.
Note:
Usingosso.conf as the configuration file name will result in an error because you should not overwrite the existing osso.conf file.It is recommend that the file name indicate the host and port of the middle tier. For example, midtier1_7779_osso.conf.Click OK.
The Java Single Sign-On (SSO) solution does not rely on additional required infrastructureS like other Oracle Single Sign-On products. Java SSO is based on the OracleAS JAAS Provider Identity Management framework.
To configure your WebCenter application to use Java SSO, you must start the Java SSO application in one of the OC4J instances, and then configure Java SSO and partner applications through Application Server Control Console.
For the actual steps to be performed and information about how to set this up in a distributed environment, see the chapter titled "OC4J Java Single Sign-On" in the Oracle Containers for J2EE Security Guide.
You can configure Java SSO to work with Oracle Internet Directory or any external LDAP provider. You can do this using Application Server Control Console, or by setting the <jazn> element in orion-application.xml file to LDAP. See the chapter titled "OC4J Java Single Sign-On" in the Oracle Containers for J2EE Security Guide for the actual steps to be performed.
You can configure your WebCenter application to use an external LDAP provider as the identity store. To do this, perform the following steps:
Configure your WebCenter application to use an LDAP provider in either of the following ways:
Run the ADF Security Wizard and select the default Lightweight XML Provider on the Oracle JAAS Provider screen, shown in Figure 10-56, and then configure the application at run time using Application Server Control Console to use an LDAP-based Provider, like Oracle Internet Directory.
Run the ADF Security Wizard and select LDAP Provider on the Oracle JAAS Provider screen, shown in Figure 10-56, to start with an LDAP-based provider directly. In this case, it is expected that you use the same LDAP provider at run time that you used in the development environment.
Develop a WebCenter application and set up Oracle ADF Security for this application using the ADF Security Wizard.
Package your WebCenter application by performing the steps in Section 12.2.1, "Packaging Your WebCenter Application".
Predeploy your WebCenter application by performing the steps in Section 12.2.2, "Predeploying Your WebCenter Application".
Follow the steps in Section 12.2.3, "Deploying Your WebCenter Application Using Application Server Control Console" to deploy your WebCenter application.
Add the external LDAP provider as the security provider by performing the steps in "Changing the Security Provider for Your WebCenter Application to Use Oracle Internet Directory" and selecting Oracle Security Provider for 3rd Party LDAP Server from the Security Provider Type list.
If you are using an LDAP provider for the first time, then configure role mapping by performing the steps in "Configuring Role Mapping".
Restart OC4J.
Use the JAZN Migration tool to migrate policy information from the app-jazn-data.xml file packaged as part of the application EAR file to an XML file for the external LDAP provider.
Example 10-32 describes the syntax to facilitate migration of the app-jazn-data.xml file to a system-jazn-data.xml file for the external LDAP provider.
Example 10-32 Sample XML to XML Migration
java oracle.security.jazn.tools.JAZNMigrationTool -st xml -dt xml
-sf ORACLE_HOME/j2ee/OC4J_Apps/applications/webCenterArchive1/adf/META-INF/app-jazn-data.xml
-df ORACLE_HOME/j2ee/OC4J_Apps/config/system-jazn-data.xml -m all
See Section 12.2.4.3, "Using the JAZN Migration Tool" for more information.
This is to migrate policy information only (to the target system-jazn-data.xml file)—you cannot use JAZN Migration tool to directly migrate user and role information into the external LDAP provider, because external LDAP providers store only user and group information. Policies and other information is stored in XML files. The JAZN Migration tool cannot create an LDIF file appropriate for external LDAP providers. It is capable of creating LDIF files (with the appropriate with the directory information tree and schema) only for Oracle Internet Directory.
Manually edit the migrated policy information to use LDAPPrincipal.
After you migrate the policy information as discussed in the previous step, the resulting entries in the target system-jazn-data.xml file will have grantees referencing the XMLRealmRole principal class. For use with an external LDAP provider, these entries must be updated to reference the LDAPPrincipal class instead. For example, assume system-jazn-data.xml includes the following principal configuration in a grantee element:
<principal>
<realm-name>jazn.com</realm-name>
<type>role</type>
<class>oracle.security.jazn.spi.xml.XMLRealmRole</class>
<name>jdoe</name>
</principal>
This must be updated manually to remove the <realm-name> and <type> elements and to specify LDAPPrincipal instead of XMLRealmRole, as follows:
<principal>
<class>oracle.security.jazn.realm.LDAPPrincipal</class>
<name>jdoe</name>
</principal>
If the name has a realm prefix such as jazn.com/jdoe, then the realm prefix must be removed so that the name is simply jdoe.
Manually create any necessary user and role accounts in the external LDAP provider. Ensure that the user and role names you create conform to the principals referenced in the policy configuration you migrated to the target server in Step 9.
See Oracle Internet Directory Administrator's Guide for information about performing this task.
See Also:
See the chapter titled "Authorization in OC4J" in the Oracle Containers for J2EE Security Guide to know more about the JAAS mode and how to configure it.To configure your WebCenter application to use Oracle Access Manager, formerly known as Oracle COREid Access and Identity, see the chapter titled "Oracle Access Manager" in the Oracle Containers for J2EE Security Guide.
When switching from the file-based security provider to Oracle Access Manager, the policies in system-jazn-data.xml must be updated as specified in the "Oracle Access Manager" chapter of the Oracle Containers for J2EE Security Guide.
Additionally, consider the following:
The grantee element should not have realm-name and type subelements. If the name is prefixed with a realm, then it must be removed. For example, jazn.com/users must be changed to users.
References to the class oracle.security.jazn.spi.xml.XMLRealmRole must be changed to oracle.security.jazn.realm.CoreIDPrincipal.
The grant shown in Example 10-33 must be updated to the one shown in Example 10-34.
Example 10-33 system-jazn-data.xml File Content with realm-name and type Subelements
<grant>
   <grantee>
      <principals>
         <principal>
            <realm-name>jazn.com</realm-name>
            <type>role</type>
            <name>page-viewer</name>
         </principal>
      </principals>
   </grantee>
   <permissions>
      <permission>
         <class>oracle.adf.share.security.authorization.MethodPermission</class>
         <name>testjcr.getItems</name>
         <actions>invoke</actions>
      </permission>
      <permission>
         <class>oracle.adf.share.security.authorization.MethodPermission</class>
         <name>testjcr.advancedSearch</name>
         <actions>invoke</actions>
      </permission>
      <permission>
         <class>oracle.adf.share.security.authorization.RegionPermission</class>
         <name>view.pageDefs.PortalExtAppPageDef</name>
         <actions>view</actions>
      </permission>
      . . .
   </permissions>
</grant>
Example 10-34 system-jazn-data.xml File for Use with Oracle Access Manager
<grant>
   <grantee>
      <principals>
         <principal>
            <class>oracle.security.jazn.realm.CoreIDPrincipal</class>
            <name>page-viewer</name>
         </principal>
      </principals>
   </grantee>
   <permissions>
      <permission>
         <class>oracle.adf.share.security.authorization.MethodPermission</class>
         <name>testjcr.getItems</name>
         <actions>invoke</actions>
      </permission>
      <permission>
         <class>oracle.adf.share.security.authorization.MethodPermission</class>
         <name>testjcr.advancedSearch</name>
         <actions>invoke</actions>
      </permission>
      <permission>
         <class>oracle.adf.share.security.authorization.RegionPermission</class>
         <name>view.pageDefs.PortalExtAppPageDef</name>
         <actions>view</actions>
      </permission>
      . . .
   </permissions>
</grant>
In addition to performing the configuration tasks described in the Oracle Containers for J2EE Security Guide, you must perform the following tasks:
If you are using an LDAP provider for the first time, then configure role mapping by performing the steps in "Configuring Role Mapping".
Restart OC4J.
Use the JAZN Migration tool to migrate policy information from the app-jazn-data.xml file packaged as part of the application EAR file to an XML file for the external LDAP provider.
Example 10-35 describes the syntax to facilitate migration of the app-jazn-data.xml file to a system-jazn-data.xml file for the external LDAP provider.
Example 10-35 Sample XML to XML Migration
java oracle.security.jazn.tools.JAZNMigrationTool -st xml -dt xml
-sf ORACLE_HOME/j2ee/OC4J_Apps/applications/webCenterArchive1/adf/META-INF/app-jazn-data.xml
-df ORACLE_HOME/j2ee/OC4J_Apps/config/system-jazn-data.xml -m all
See Section 12.2.4.3, "Using the JAZN Migration Tool" for more information.