26 Designing Task Display Forms for Human Tasks
The human workflow service creates tasks for users to interact with the business process. Each task has two parts—the task metadata and the task form. The task form is used to display the contents of the task to the user's worklist.
Oracle BPM Worklist displays all worklist tasks that are assigned to a user or a group. When a worklist user drills down into a specific task, the task display form renders the details of that task. For example, an expense approval task may show a form with line items for various expenses, and a help desk task form may show details such as severity, problem location, and so on.
This chapter describes how to design and customize task display forms using ADF task flows in Oracle JDeveloper.
This chapter contains the following sections:
-
Section 26.2, "Associating the Task Flow with the Task Service"
-
Section 26.3, "Creating an ADF Task Flow Based on a Human Task"
-
Section 26.5, "Refreshing Data Controls When the Task XSD Changes"
-
Section 26.8, "Deploying a Composite Application with a Task Flow"
-
Section 26.9, "Displaying a Task Display Form in the Worklist"
-
Section 26.10, "Displaying a Task in an Email Notification."
26.1 Introduction to the Task Display Form
If your SOA composite includes a human task, then you need a way for users to interact with the task. The integrated development environment of Oracle SOA Suite includes Oracle Application Development Framework (Oracle ADF) for this purpose. With Oracle ADF, you can design a task display form that depicts the human task in the SOA composite.
The task display form is a Java Server Page XML (.jspx) file that you create in the Oracle JDeveloper designer where you created the SOA composite containing the human task. Note that you must set the page encoding to UTF-8 in Oracle JDeveloper before creating the Java Server Page XML file. You can do this in Oracle JDeveloper by choosing Tools > Preferences > Environment, and selecting UTF-8 using the Encoding dropdown list.
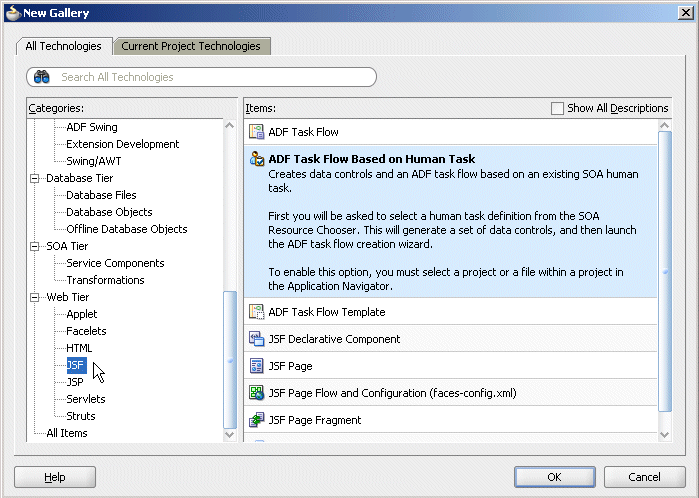
Figure 26-1 shows the Oracle JDeveloper ADF Task Flow Based on Human Task option where you start creating a task display form.
Figure 26-1 ADF Task Flow Based on a Human Task, in Oracle JDeveloper
Description of "Figure 26-1 ADF Task Flow Based on a Human Task, in Oracle JDeveloper"
26.2 Associating the Task Flow with the Task Service
When you create an ADF task flow based on a human task, you must select a task metadata file to generate the data control. This data control is used to lay out the content on the page and connect to the workflow service engine at execution time to retrieve task content and act on tasks. See Chapter 14, "Getting Started with ADF Task Flows," in Oracle Fusion Middleware Fusion Developer's Guide for Oracle Application Development Framework for more information.
The hwtaskflow.xml file is used to capture the details on connecting with the service engine. By default, it uses remote EJBs to connect to the workflow server. The SOA server URL and port are automatically determined by using WebLogic Server runtime MBeans. However, you can override these by explicitly specifying the URL and port information here.
Seed a user that has ORMI privileges so that the task details application can connect to the workflow service. You can seed this user by using Oracle Enterprise Manager Fusion Middleware Control.
26.3 Creating an ADF Task Flow Based on a Human Task
ADF task flows are used to model the user interface for the task details page. You can create the task flow in the same application that contains the human task or in a separate application.
You must have previously created a human task (.task file) as part of a SOA composite before you can create a task flow. See Chapter 25, "Designing Human Tasks" for how to create the.task file.
If the task flow is in the same application as the human task, create a different project for the task flow. If the SOA composite contains multiple human tasks, create a separate project for each ADF task flow associated with each human task. By using an ADF task flow, you create data controls based on the task parameters and outcomes.
To autogenerate an ADF task form, access the human task in the SOA composite application (form and task are in the same application). See Section 26.3.1, "How To Autogenerate an ADF Task Flow for a Human Task," for more information.
To create an ADF task form in a separate application, create the new application and project and browse for the .task file for the human task. See Section 26.3.2, "How To Create an ADF Task Flow Based on a Human Task," for more information.
26.3.1 How To Autogenerate an ADF Task Flow for a Human Task
The.task file that specifies the human task is easily associated with the task flow when the two are located in the same application.
To autogenerate an ADF task flow for a human task:
-
Open the BPEL process within the SOA composite application.
-
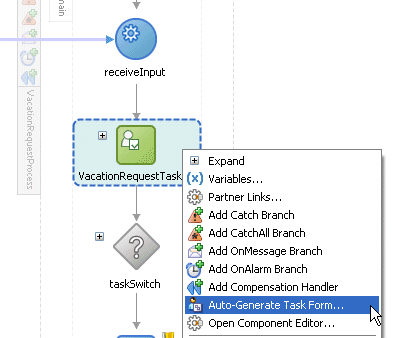
Right-click the human task activity and select Auto-Generate Task Form, as shown in Figure 26-2.
Figure 26-2 Autogenerating a Task Display Form
Description of "Figure 26-2 Autogenerating a Task Display Form"
-
Provide a project name and a directory path (or use the default), and click OK.
The form is displayed in the designer, in the taskDetails1.jspx tab.
The task flow and task display form are complete and ready to be deployed.
26.3.2 How To Create an ADF Task Flow Based on a Human Task
The ADF Task Flow Based on Human Task option (shown in Figure 26-1) creates an ADF task flow and additional artifacts to make deployment easier. When you select the .task file to associate with the ADF task flow, human task data controls are created based on the task parameters and outcomes. These are then available to use in the JSPX page. You must have access to the SOA composite project while creating the task flow project.
To create an ADF task flow based on a human task:
-
From the File main menu, select New > Applications > SOA Application.
-
Click OK.
-
Provide an application name and directory information (or accept the default), and click Finish.
-
Right-click the project name and select New.
-
Under Web Tier, select JSF.
-
Select ADF Task Flow Based on Human Task and click OK.
-
In the SOA Resource Browser, find and select the
.taskfile where you defined the human task and click OK.-
If the human task is in the same application as the task definition, then click File to use the file browser to navigate to the
.taskfile, which is typically in the composite directory. -
If the human task is in a different application, then click Resource Palette to use the MDS resource catalog and find the
.taskfile in the composite application. -
If the
.taskfile is located within the current application, then click Application.
This displays the Create Task Flow dialog and creates the data controls.
-
-
In the Create Task Flow dialog, accept the defaults and click OK.
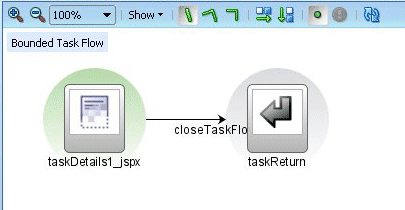
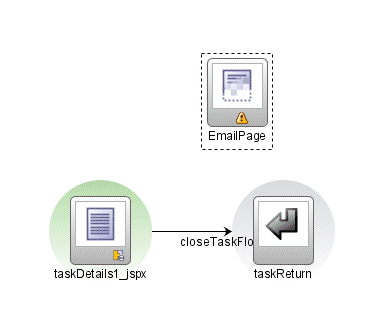
The taskDetails1_jspx icon appears in the designer, as shown in Figure 26-3.
The task flow has a view, a control flow, and a task return.
To continue creating the task display form, see the following:
or
26.3.3 What Happens When You Create an ADF Task Flow Based on a Human Task
With an ADF task flow based on a human task, the task flow application has task data controls that wire the task form with the workflow services. The data controls provide the following:
-
Various parameters and operations to access task data and act on it
-
Drop handlers with which you can create interface regions to display the contents of the task
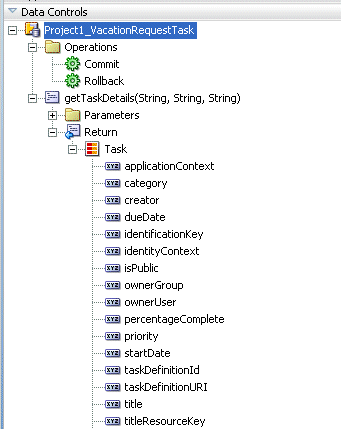
The human task-aware data controls appear in the Data Controls panel of the Oracle JDeveloper Application Navigator, as shown in Figure 26-4.
Figure 26-4 The Task Collection in the Data Controls Panel
Description of "Figure 26-4 The Task Collection in the Data Controls Panel"
The data controls for the task (represented by the Task node in the figure) have drop handlers to render the task display form. See Section 26.4, "Creating a Task Display Form," for more information.
26.4 Creating a Task Display Form
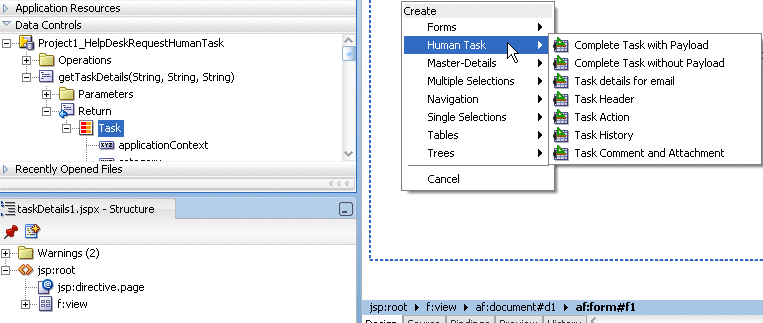
Use the human task drop handler to create a task display form. The human task drop handler is designed to autogenerate the following:
-
Complete task with payload
-
Complete task without payload
-
Task details for email
-
Task header
-
Task action
-
Task history
-
Task comment and attachment
The human task drop handler appears in the context menu of the designer, as shown in Figure 26-5.
Figure 26-5 Human Task Drop Handler for Creating the Task Display Form
Description of "Figure 26-5 Human Task Drop Handler for Creating the Task Display Form"
Other ADF drop handlers—for forms, tables, trees, and so on (shown in Figure 26-5)—can also be used to create task display forms. See Oracle Fusion Middleware Fusion Developer's Guide for Oracle Application Development Framework for more information about standard ADF drop handlers.
This option creates the combination of all the preceding task display form components (the task header, task history, task actions, and task comments and attachments), plus the interface for the payload. The payload interface is created as follows:
-
All text nodes are created as text input fields.
-
If an element has
maxOccurs="unbounded", then it appears as a table. -
Nested tables are not rendered; that is, if an element has
maxOccurs="unbounded"and it has a child withmaxOccurs="unbounded", then the child element is not rendered. -
If there are multiple levels of nesting, then drag and drop the individual sections and use a standard ADF drop handler.
This option creates the combination of all of the preceding task display form components (the task header, task history, task actions, and task comments and attachments).
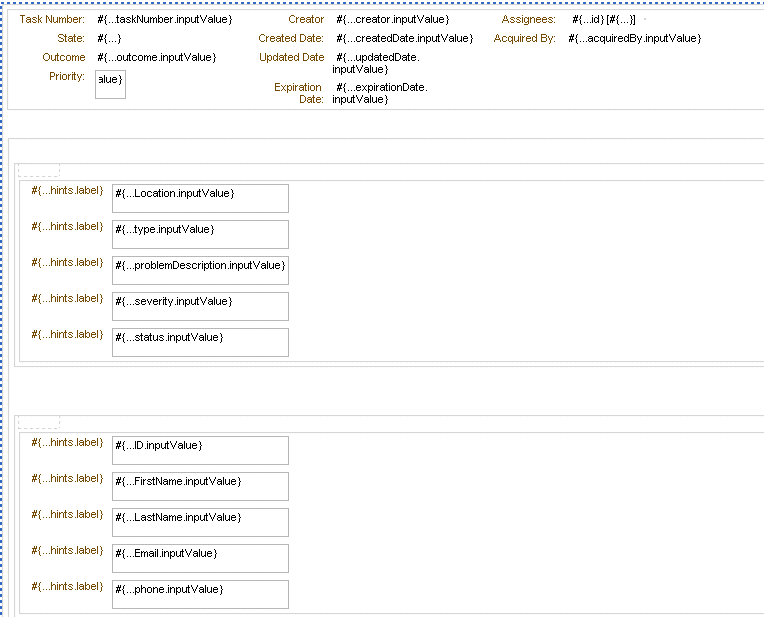
This option creates an ADF region that renders well when sent by email. It generates the form shown in Figure 26-6.
Figure 26-6 Task Display Form for Email Notification
Description of "Figure 26-6 Task Display Form for Email Notification"
See Section 26.7, "Creating an Email Notification," for more information.
All the standard header fields are added to the task display form. This includes the task number and title; the state, outcome, and priority of the BPEL process, and information about who created, updated, claimed, or is assigned to the task. The header also displays dates related to task creation, last modification, and expiration. You can add or remove header fields as required for your task display.
Figure 26-7 shows an example of header information.
Buttons for task actions are also created in the header, as shown in Figure 26-8.
Figure 26-8 Task Header: Task Action Buttons

Description of "Figure 26-8 Task Header: Task Action Buttons"
The following task actions appear from the Actions dropdown list or as buttons. The tasks that appear depend on the state of the task (assigned, completed, and so on) and the privileges that are granted to the user viewing the task. For example, when a task is assigned to a group, only the Claim button appears. After the task is claimed, other actions such as Reject and Approve appear.
The first three custom actions appear on the task form as buttons: Claim, Dismiss, and Resume. Only those buttons applicable to the task appear. Other actions are displayed under the Actions list, starting with Request for Information, Reassign, and Route. Systems actions—Withdraw, Pushback, Escalate, Release, Suspend, and Renew—follow the custom actions, followed by the Save button. These actions require no further dialog to complete.
-
Claim—A task that is assigned to a group or multiple users must be claimed first. Claim is the only action available in the Task Action list for group or multiuser assignments. After a task is claimed, all applicable actions are listed.
-
Dismiss—This action is used for a task that requires the person acting on the task to acknowledge receipt, but not take any action (like an FYI).
-
Resume—A task that was halted by a Suspend action can be worked on again. See Suspend.
-
Request for Information—You can request more information from the task creator or any of the previous assignees. If reapproval is not required, then the task is assigned to the next approver or the next step in the business process.
-
Reassign—Managers can reassign a task to reportees. A user with BPMWorkflowReassign privileges can reassign a task to anyone. The Reassign option also provides a Delegate function. A task can be delegated to another user or group. The delegated task appears in both the original user's and the delegated user's worklists. The delegated user can act on behalf of the original assignee, and has the same privileges for that task as the original assignee.
-
Route—If there is no predetermined sequence of approvers or if the workflow was designed to permit ad hoc routing, then the task can be routed in an ad hoc fashion. For such tasks, a Route button appears on the task details page. From the Routing page, you can look up one or more users for routing. When you specify multiple assignees, you can choose whether the list of assignees is for simple (group assignment to all users), sequential, or parallel assignment. In the case of parallel assignment, you provide the percentage of votes required for approval.
-
Withdraw—Only the task creator can withdraw (cancel) the task. The Comments area is available for an optional comment. The business process determines what happens next.
-
Pushback—This action sends a task up one level in the workflow to the previous assignee.
-
Escalate—An escalated task is assigned to the user's manager. The Comments area is available for an optional comment.
-
Release—Releasing a task makes it available to other assignees. A task assigned to a group or multiple users can then be claimed by the other assignees.
-
Suspend—This action suspends the expiration date indefinitely, until the task is resumed. Suspending and resuming tasks are available only to users who have been granted the
BPMWorkflowSuspendrole. Other users can access the task by selecting Previous in the task filter or by looking up tasks in the Suspended status. Buttons that update a task are disabled after suspension. -
Renew—Renewing a task extends the task expiration date seven days (
P7Dis the default). The renewal duration is controlled from Oracle Enterprise Manager Grid Control Console. A renewal appears in the task history. The Comments area is available for an optional comment. -
Save—Changes to the task are saved.
While you are creating a task display form, all possible system action buttons appear, although only those actions that are appropriate for the task state and fit the user's privileges appear in the worklist.
The history of task actions appears on the task details page, and is displayed in the worklist as a history table. The history includes the following fields:
-
Version number
-
Participant name—the person who acted on the task
-
Action—for example, if the task was approved or assigned
-
Updated By—name of the person who last updated the task
-
Action date
See Figure 27-19, "History: Graphical View" and Figure 27-20, "History: Full Task Actions" for how task history is displayed in Oracle BPM Worklist, including the options to take a history snapshot, list future participants, and list full task actions.
A trail of comments with the comment date and comment writer's user name is maintained throughout the life cycle of a task.
Files or reference URLs associated with a task can be added by any of the human task participants.
Figure 26-9 shows an example of the comments and attachments region.
Figure 26-9 Comments and Attachment Region

Description of "Figure 26-9 Comments and Attachment Region"
26.4.1 How To Create a Task Display Form Using the Complete Task with Payload Drop Handler
The following steps describe how to use a drop handler that creates the task display form, including the payload, without building each region individually. To build each region individually, see Section 26.4.2, "How To Create Task Display Form Regions Using Individual Drop Handlers."
To create a task display form using the Complete Task with Payload drop handler:
-
In the designer, double-click taskDetails1_jspx.
-
In the Create JSF Page dialog, provide a file name and directory information (or accept the defaults) and click OK.
-
In the Data Controls panel of the Application Navigator, expand the human task node, then the getTaskDetails node, and then the Return node.
-
Drag the Task icon into the taskDetails.jspx window.
-
Select Human Task, and then Complete Task with Payload.
-
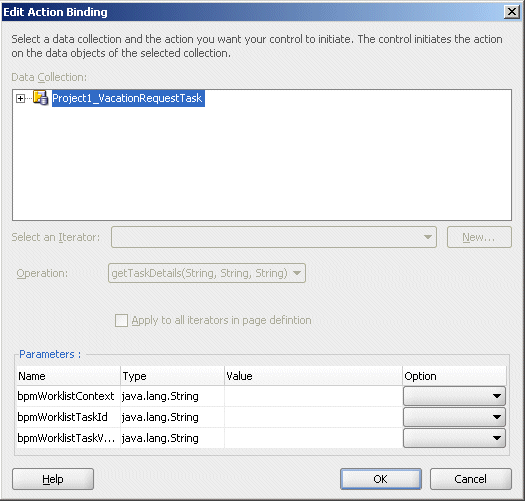
In the Edit Action Binding dialog, shown in Figure 26-10, click OK.
-
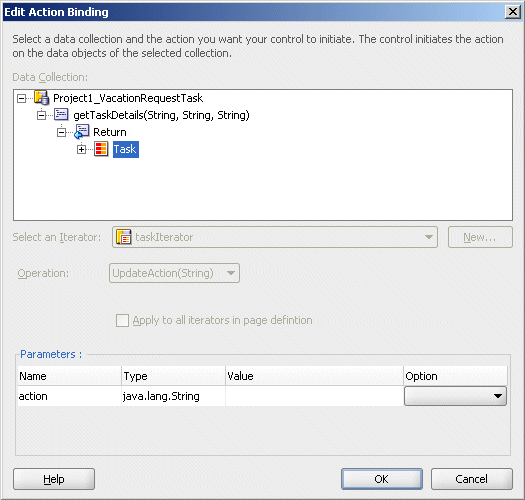
In the next Edit Action Binding dialog, the data collection is selected, as shown in Figure 26-11; click OK.
Figure 26-11 Select the Data Collection and Action
Description of "Figure 26-11 Select the Data Collection and Action"
The task display form is displayed, as shown in Figure 26-12.
26.4.2 How To Create Task Display Form Regions Using Individual Drop Handlers
You can create a display form with multiple regions using the individual Task Header, Task Action, Task History, and Task Comment and Attachment drop handlers shown in Figure 26-13.
Figure 26-13 Using Human Task Drop Handlers
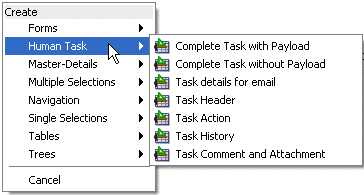
Description of "Figure 26-13 Using Human Task Drop Handlers"
Task Header provides both header and task actions, so you do not need the Task Action drop handler when you use Task Header. Use Task Action when you want the actions dropdown menu and buttons, but not header details.
To create the task display form without building each region individually, see Section 26.4.1, "How To Create a Task Display Form Using the Complete Task with Payload Drop Handler."
Before you create this task display form, you must have created the following:
-
A new application and SOA project, and a human task service.
-
An ADF task flow based on the human task. See Section 24.3.2.2, "How to Create the Vacation Request Process," for more information.
To create task display form regions using individual drop handlers:
-
In the Create JSF Page dialog, provide a file name and directory information (or accept the defaults) and click OK.
-
In the Data Controls panel of the Application Navigator, expand the human task node, then the getTaskDetails node, and then the Return node.
-
Drag the Task icon into the taskDetails.jspx window.
-
Select Human Task, and then Task Header.
This creates the Actions dropdown list and buttons for task actions, as shown in Figure 26-14, and header details, as shown in Figure 26-15.
Figure 26-14 Designing the Task Display Form: Buttons for Task Actions

Description of "Figure 26-14 Designing the Task Display Form: Buttons for Task Actions"
Figure 26-15 Designing the Task Display Form: Task Headers

Description of "Figure 26-15 Designing the Task Display Form: Task Headers"
-
Drag additional Task icons into the JSPX designer, selecting these options with each iteration:
-
Human Task, then Task History
-
Human Task, then Task Comment and Attachment
The task display form now has multiple regions for task action dropdown lists and buttons, task header details, task history, and comments and attachments.
-
To continue creating the task display form, see Step 1 in Section 26.4.3, "How To Add the Payload to the Task Display Form."
26.4.3 How To Add the Payload to the Task Display Form
In addition to adding the payload, you can create task display form regions. See Step 1 in Section 26.4.2, "How To Create Task Display Form Regions Using Individual Drop Handlers."
To add the payload to the task display form:
-
Expand Layout.
-
Drag Panel Group Layout between the Header and Comment sections.
-
In the Data Controls panel, expand Task, and then Payload.
-
Drag the payload data collection to the left of the Panel Group Layout area.
An alternative to dropping the payload node onto the form is to expand the payload node and drop the necessary child elements onto the form. For example, to create a read-only form for the VacationRequest payload, expand the payload node, drag the Vacation Request Process Request node onto the form, and select Forms > ADF Read-only Form.
-
From the context menu, select Forms, then ADF Read-only Form, as shown in Figure 26-16.
Figure 26-16 Adding ADF Read-Only Fields to the Task Display Form Payload Region
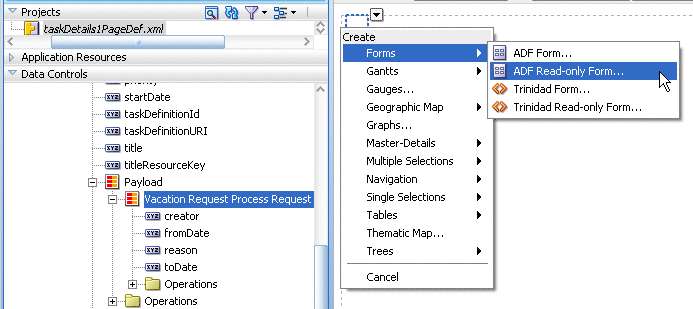
Description of "Figure 26-16 Adding ADF Read-Only Fields to the Task Display Form Payload Region"
-
In the Edit Form Fields dialog, accept the defaults and click OK.
This creates read-only fields in the payload region, between the Details and History sections.
The payload regions appear, as shown in Figure 26-17.
Figure 26-17 The Payload Region of the Task Display Form

Description of "Figure 26-17 The Payload Region of the Task Display Form"
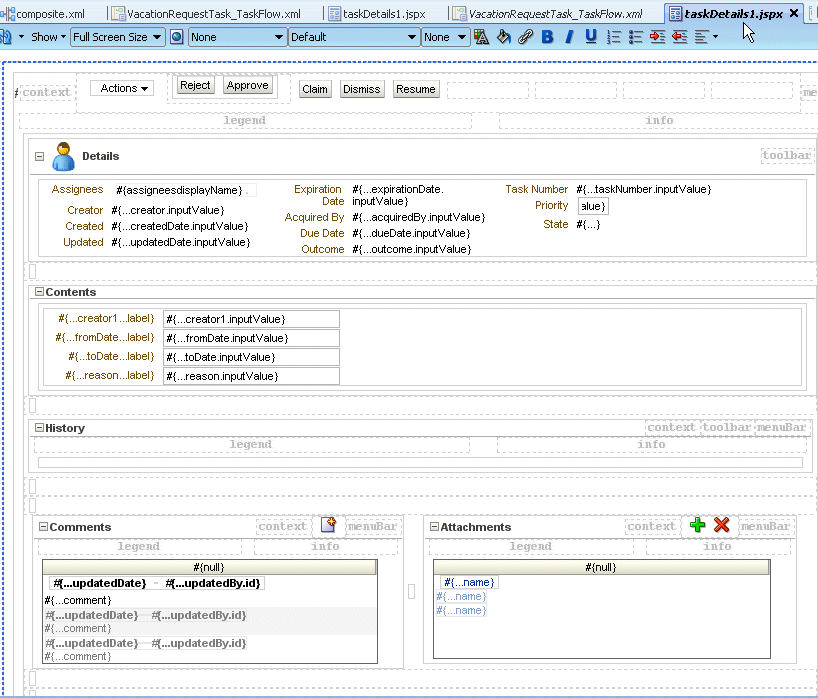
The task display form, shown in Figure 26-18, is complete and ready to be deployed.
Figure 26-18 The Task Display Form (taskDetails.jspx)
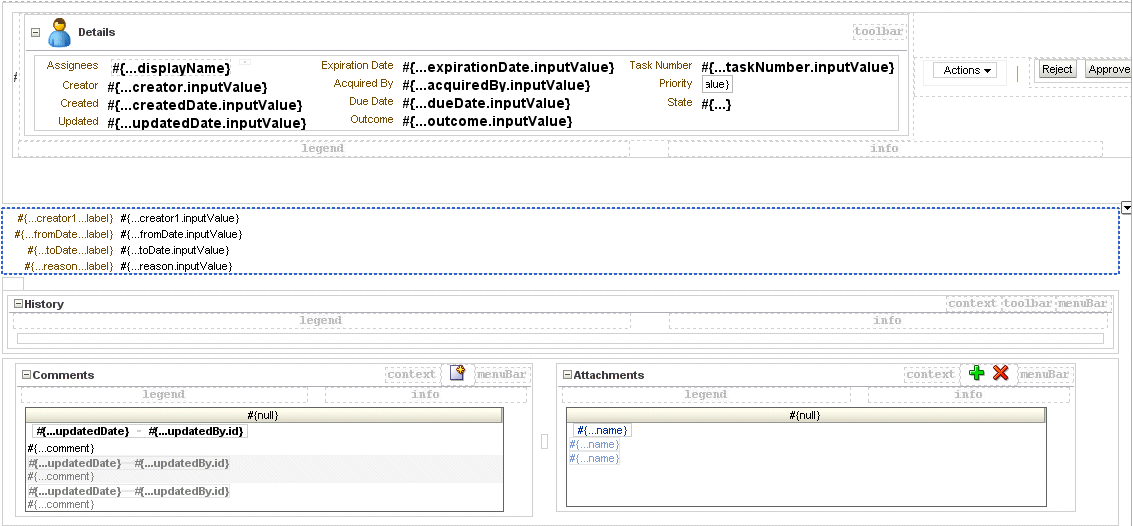
Description of "Figure 26-18 The Task Display Form (taskDetails.jspx)"
26.4.4 What Happens When You Create a Task Display Form
The form you designed is saved in the taskDetails.jspx file at
JDev_Oracle_Home\mywork\task_form_application_name\project_name\public_html
The task display form is ready to be deployed. See Section 26.8, "Deploying a Composite Application with a Task Flow."
26.5 Refreshing Data Controls When the Task XSD Changes
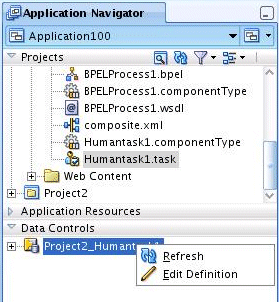
When task metadata changes, refresh the Data Controls view (XSD changes are not refreshed) that is based on that task metadata. The refresh functionality re-creates the data control. Figure 26-19 shows the Refresh option.
-
Right-click the data control.
-
Select the Edit Definition option to display the Refresh Data Control dialog, as shown in Figure 26-20.
Figure 26-20 The Refresh Data Control Button

Description of "Figure 26-20 The Refresh Data Control Button"
26.6 Securing the Task Flow Application
You can use any container-based security for securing the task flow. See Section 29.6.2.1.2, "Requirements for Client Applications For Identity Propagation," for more information. Form-based authentication and SSO-based authentication are available for web security.
If you are sending a notification as email, do not secure the URL with"/notification/secure" to use container-based security because this is accessed by SOA APIs using an internal context that cannot be created outside of SOA. The URL pattern inside security cannot contain "/" (all URLs) and "//notification".
No additional steps are required for identity propagation. Identity is automatically propagated to the server EJBs.
26.7 Creating an Email Notification
A task display form is used to provide an email notification, if email notification is defined as part of the human task. Options for email notification include:
-
Default email notification—Use the first page of the task display form that you create for the human task. The content is sent as an HTML-based email. Images in the task flow are included as attachments so that the notification can be viewed in disconnected mode. However, if you use the Complete Task with Payload or Complete Task without Payload drop handlers, then the generated JSPX file is not suitable for e-mails. In this case, using the custom email notification is recommended.
-
Custom email notification—Use the Task display for email drop handler to create an email notification task page.
Section 29.2, "Notifications from Human Workflow" to review notification settings as part of a human task definition (.task file).
26.7.1 How To Create an Email Notification
To send a custom email notification whose content and layout you have specified (instead of sending the default page), create another JSPX file in which you design an email notification page. Create the notification page by using the custom and standard drop handlers, or use the email notification drop handler. In addition, do the following:
-
Add a router to the task flow. The router directs the task flow to send either the email notification page or the default page, depending on the control flow based on the
bpmClientTypepage flow scope value. -
Edit the generated inline CSS to customize the page. No additional CSS is included at runtime and the ADF CSS is not available at runtime. See the samples notification-101 and notification-102 at
http://www.oracle.com/technology/sample_code/products/hwf
-
Reference images directly from the HTML or JSF page. (Indirect references, for example, an included JSF that in turn includes the image, are not allowed.)
26.7.1.1 Creating a Task Flow with a Router
The control flow case with a router enables you direct the request to a specific page based on certain parameters. For an ADF task flow based on a human task, you need a special page for email notifications. This section describes how to create a special page for email notifications.
To create a task flow with a router:
-
In the Application Navigator, expand the task flow project and double-click project_name _TaskFlow.xml.
The XML file opens in the designer. In the diagram view, you see the taskDetails1.jspx icon.
-
From the Component Palette, select ADF Task Flow, and drag the View icon into the designer.
-
Click view1 below the icon and enter a name for the email notification page.
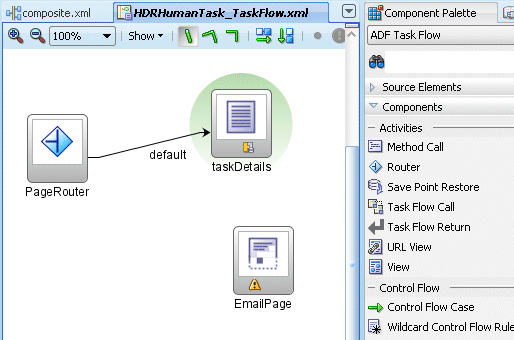
Figure 26-21 shows an example using the name EmailPage.
-
From the Component Palette, drag Router into the designer.
-
Click router1 below the icon and enter a router name.
Figure 26-23 shows an example using the name PageRouter.
-
To ensure that the router is called, right-click the router icon and click Mark Activity > Default Activity, as shown in Figure 26-22.
Figure 26-22 Marking the Router as the Default Activity
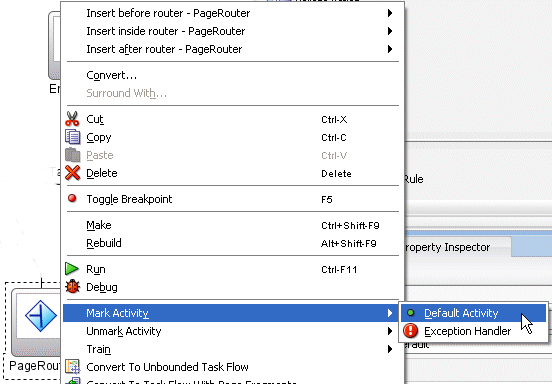
Description of "Figure 26-22 Marking the Router as the Default Activity"
-
Click the router - router_name - Property Inspector tab.
-
In the default-outcome field, enter
default. -
Click Add, and in the Outcome field, enter the name of the email notification page.
-
Use the Expression Builder to enter the following in the expression field:
#{pageFlowScope.bpmClientType=="notificationClient"} -
In the Component Palette, click Control Flow Case.
-
In the designer, drag from the router page icon to taskDetails1.jspx.
The control flow is automatically labeled default, as shown in Figure 26-23.
-
In the Component Palette, click Control Flow Case.
-
In the designer, drag from the router page icon to the email notification page icon.
-
Click the control-flow-case - email_page_name - Property Inspector tab.
-
From the from-outcome list, select the name of the email notification page.
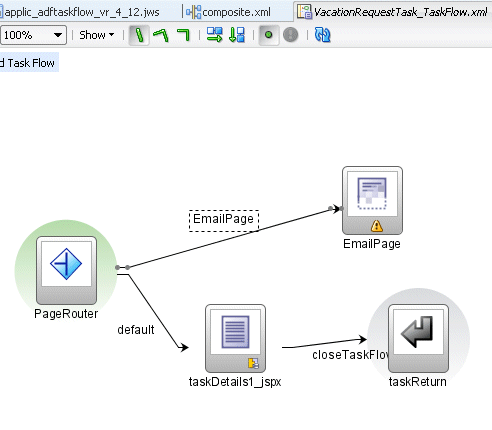
Figure 26-24 shows the completed control flow.
Figure 26-24 Completed Control Flow for an Email Notification
Description of "Figure 26-24 Completed Control Flow for an Email Notification"
To continue creating the email notification page, see Step 1 in Section 26.7.1.2, "Creating an Email Notification Page."
26.7.1.2 Creating an Email Notification Page
Creating an email notification page is similar to creating a task display form, with the addition of defining layout and inline styles. See Oracle Fusion Middleware Web User Interface Developer's Guide for Oracle Application Development Framework for design information.
To create an email notification page:
-
In the Create JSF Page dialog, provide a file name and directory information (or accept the defaults) and click OK.
The EmailPage.jspx tab opens in the designer.
-
From the Component Palette, drag any of the Common Components (for an image, for example) or Layout components into the designer.
-
For the layout component you selected, provide alignment and other details in the Property Inspector tab.
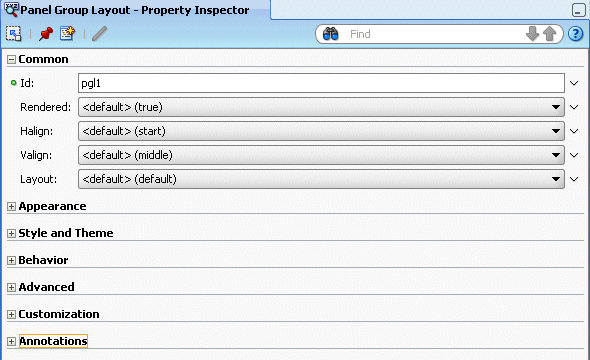
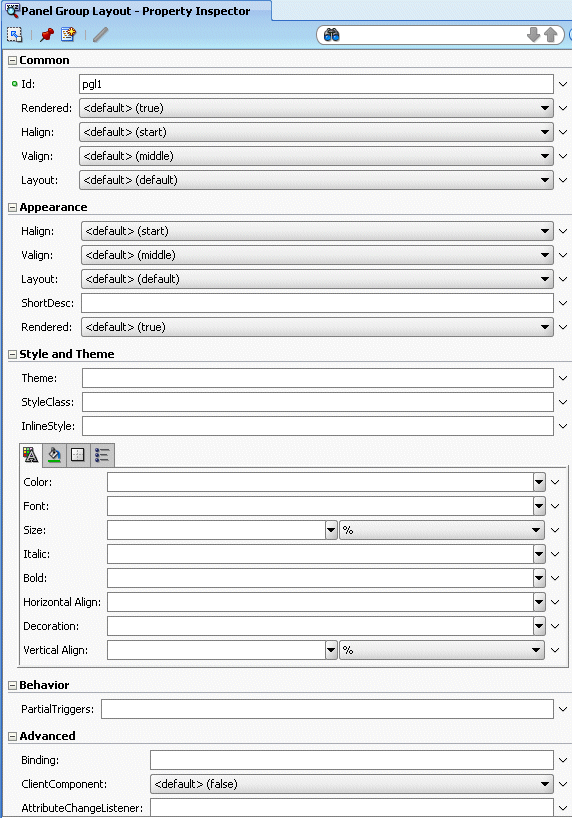
Figure 26-25 shows the layout fields available when Panel Group Layout is selected.
See Oracle Fusion Middleware Web User Interface Developer's Guide for Oracle Application Development Framework for more information about panel group layout.
-
Expand Appearance, Style and Theme, Behavior, Advanced, Customization, and Annotations to specify other details, as shown in Figure 26-26.
Figure 26-26 Specifying a Layout: More Details
Description of "Figure 26-26 Specifying a Layout: More Details"
See Section 2.4.6, "How to Set Component Attributes," in Oracle Fusion Middleware Web User Interface Developer's Guide for Oracle Application Development Framework
-
From the Data Controls panel, expand the human task node, then the getTaskDetails node, and then the Return node.
-
Drag Task into the panel group layout area.
-
Select Human Task, and then Task details for email, as shown in Figure 26-27.
This drop handler includes a header with inline style, a payload using ADF, and a comment using inline style. Because the payload is dynamically generated, it does not include an inline style.
In general, you can find the inline styles for the Header section for each component and use the same style for the Content section for the respective components.
-
In the Edit Action Bindings dialog, select the data collection and click OK.
The email task form is complete and ready to be deployed.
26.7.2 What Happens When You Create an Email Notification Page
The email notification page is sent as HTML content in the email message body. Images on the page are inlined as attachments. Relative URLs are converted to absolute URLs.
26.7.3 What You May Need to Know About Creating an Email Notification Page
A notification may not display correctly in email if the styles used in the fields of the form are not valid for email. Editing the generated inline CSS to customize the page may be required. See Section 26.7.1, "How To Create an Email Notification," for more information.
Security issues can also prevent the form from being rendered correctly. See Section 26.6, "Securing the Task Flow Application," for more information.
26.8 Deploying a Composite Application with a Task Flow
The composite application containing the task flow must be deployed before you can use the task display form in the Worklist Application. The process for deploying an application with a task flow is basically the same as deploying any SOA composite application, as described in Section 26.8.2, "How To Deploy a Composite Application with a Task Flow." See Chapter 43, "Deploying SOA Composite Applications" for more information.
26.8.1 Before Deploying the Task Display Form: Port Changes
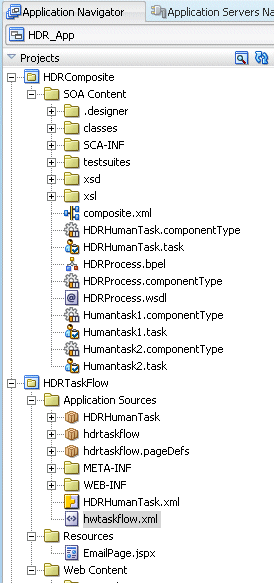
If you are not using the default values for RMI or HTTP ports, open the hwtaskflow.xml file in Oracle JDeveloper to change values. Figure 26-28 shows the file in the Application Navigator.
Example 26-1 shows a sample hwtaskflow.xml file with comments on which values can and cannot be changed.
Example 26-1 Sample hwtaskflow.xml File
<!--Sample hwtaskflow.xml file. This is required for successful deployment of an
ADF Task Flow Based on Human Task application. -->

<?xml version = '1.0' encoding = 'UTF-8'?>
<hwTaskFlows xmlns="http://xmlns.oracle.com/bpel/workflow/hwTaskFlowProperties">

   <!-- Name of the client application used to view the tasks, defaults to
 'worklist' -->

   <ApplicationName>worklist</ApplicationName>

   <!-- Type of ejb lookup used. If not specified, remote lookup is used. Values
 - LOCAL, REMOTE, SOAP -->
   <LookupType>LOCAL</LookupType>

   <!-- Do not modify this element. Value must be 'false' for deployment to
 complete successfully -->


   <TaskFlowDeploy>false</TaskFlowDeploy>

   <!-- Connection details for soa server for remote ejb lookup.
If not specified, default values for ejbProviderUrl is http://localhost/soa-infra
        , aliasKeyName is BPM_SERVICES, keyName is BPM_SERVICES  -->

   <SoaServer>
      <ejbProviderUrl/>
      <aliasKeyName/>
      <keyName/>
      <connectionName/>
   </SoaServer>

   <!-- Connection details for server on which task flow is deployed.
If not specified, default values for hostname is localhost,
        httpPort is 8888 and httpsPort is 443 --> -->

   <TaskFlowServer>
      <hostName/>
      <httpPort/>
      <httpsPort/>
   </TaskFlowServer>

    <!-- Task Flow specific properties -->

<hwTaskFlow>
  <WorkflowName></WorkflowName>
 <TaskDefinitionNamespace></TaskDefinitionNamespace>
  <TaskFlowId></TaskFlowId>
  <TaskFlowFileName></TaskFlowFileName>
 </hwTaskFlow>
</hwTaskFlows>
26.8.2 How To Deploy a Composite Application with a Task Flow
An application server connection is required to do the following.
To deploy a composite application with a task flow:
-
Right-click the composite application name, select Deploy, and then application_name > to > application_server_connection.
If you do not have a connection, select New Connection and use the Application Server Connection wizard.
-
In the Select Deployment Targets dialog, select a server instance.
-
Click OK.
26.8.3 How To Redeploy the Task Display Form
If you change the task display form and want to redeploy it, repeat the deployment step. (Right-click the task form application name, select Deploy, and then application_name > to > application_server_connection.) A message asking you if you want to undeploy the form is displayed. Click OK and deploy the task form again.
26.8.4 How To Deploy a Task Flow as a Separate Application
If you want to deploy the task flow as a separate application, outside of the SOA composite application, then create a new application and project as a container for the task flow. After you deploy the SOA composite application, deploy the task flow application.
26.8.5 How To Deploy a Task Display Form to a non-SOA Oracle WebLogic Server
Follow the steps in these sections to deploy a task display form to a non-SOA Oracle WebLogic Server:
-
Section 26.8.5.1, "Deploying oracle.soa.workflow.jar to a non-SOA Oracle WebLogic Server"
-
Section 26.8.5.2, "Defining the Foreign JNDI Provider on a non-SOA Oracle WebLogic Server"
-
Section 26.8.5.3, "Defining the Foreign JNDI Provider Links on a non-SOA Oracle WebLogic Server"
26.8.5.1 Deploying oracle.soa.workflow.jar to a non-SOA Oracle WebLogic Server
The oracle.soa.workflow.jar shared library is needed on the non-SOA Oracle WebLogic Server. It is available from
ORACLE_JDEV_HOME\jdeveloper\soa\modules\oracle.soa.workflow_11.1.1
Use Oracle WebLogic Server Administration Console to deploy the JAR file.
To deploy oracle.soa.workflow.jar:
-
Go to Oracle WebLogic Server Administration Console at
http://remote_hostname:remote_portnumber/console -
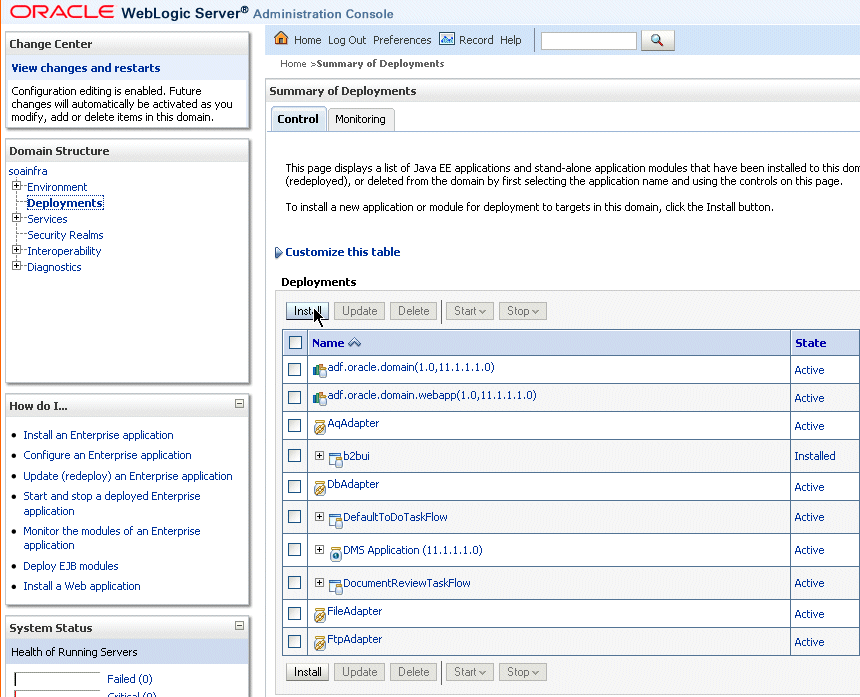
In the Domain Structure area, click Deployments.
-
Click Install, as shown in Figure 26-29.
Figure 26-29 Oracle WebLogic Server Administration Console: List of Deployments
Description of "Figure 26-29 Oracle WebLogic Server Administration Console: List of Deployments"
-
In the Path field, provide the following path and click Next.
ORACLE_JDEV_HOME/jdeveloper/soa/modules/oracle.soa.workflow_11.1.1/oracle.soa.workflow.jar -
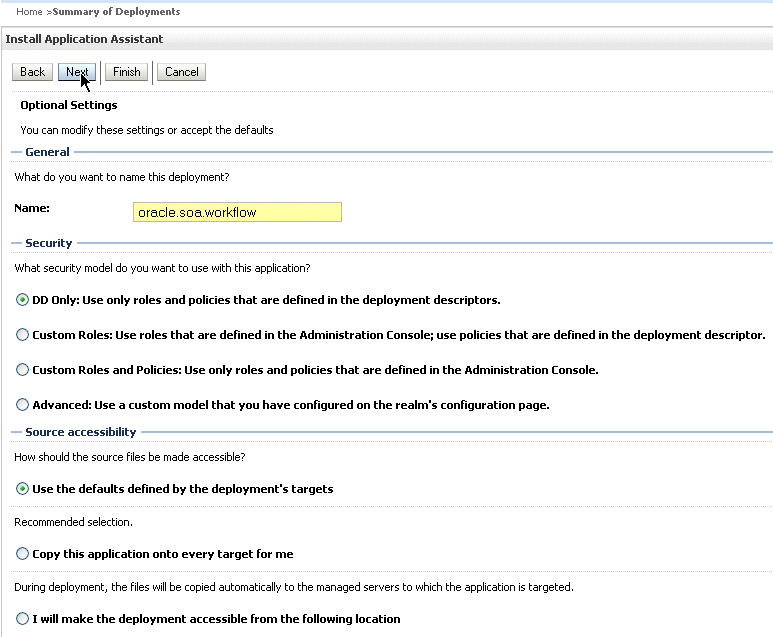
Keep the same name for the deployment and click Next, as shown in Figure 26-30.
Figure 26-30 Oracle WebLogic Server Administration Console: Install Applications Assistant
Description of "Figure 26-30 Oracle WebLogic Server Administration Console: Install Applications Assistant"
-
Select the Deploy as Library option and click Finish.
-
Confirm that the oracle.soa.workflow(11.1.1,11.1.1) library is in the Active state, as shown in Figure 26-31.
Figure 26-31 Oracle WebLogic Server Administration Console: The oracle.soa.workflow Active State

Description of "Figure 26-31 Oracle WebLogic Server Administration Console: The oracle.soa.workflow Active State"
See Section 26.8.5.2, "Defining the Foreign JNDI Provider on a non-SOA Oracle WebLogic Server," to continue.
26.8.5.2 Defining the Foreign JNDI Provider on a non-SOA Oracle WebLogic Server
Use Oracle WebLogic Server Administration Console to complete this portion of the task.
To define the foreign JNDI provider:
-
In the Domain Structure area, expand Services and click Foreign JNDI Providers.
-
Click New.
-
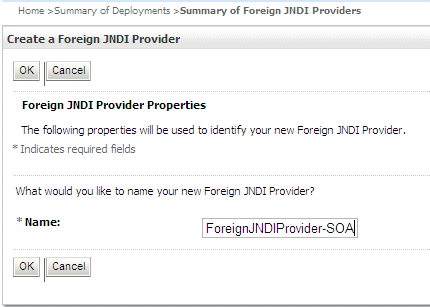
In the Name field, enter
ForeignJNDIProvider-SOA, as shown in Figure 26-32, and click OK.Figure 26-32 Creating a Foreign JNDI Provider
Description of "Figure 26-32 Creating a Foreign JNDI Provider"
-
Click the ForeignJNDIProvider-SOA link.
-
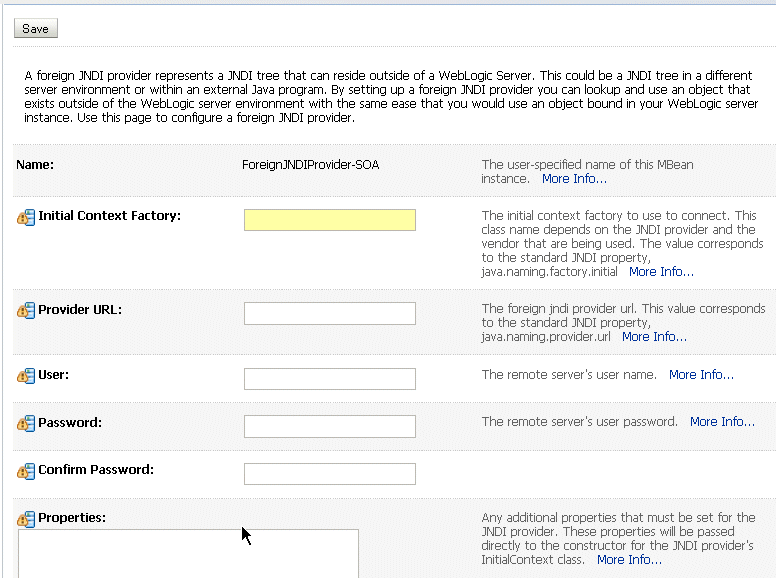
Do the following and click Save.
-
For Initial Context Factory, enter
weblogic.jndi.WLInitialContextFactory. -
For Provider URL, enter
t3://soa_hostname:soa_portnumber/soa-infra. -
For User, enter
weblogic. -
For Password, enter
weblogic.
Figure 26-33 shows the page where you enter this information.
Figure 26-33 Defining the Foreign JNDI Provider
Description of "Figure 26-33 Defining the Foreign JNDI Provider"
-
See Section 26.8.5.3, "Defining the Foreign JNDI Provider Links on a non-SOA Oracle WebLogic Server," to continue.
26.8.5.3 Defining the Foreign JNDI Provider Links on a non-SOA Oracle WebLogic Server
Use Oracle WebLogic Server Administration Console to complete this portion of the task.
To define the foreign JNDI provider links:
-
In the Domain Structure area, expand Services and click Foreign JNDI Providers.
-
Click the ForeignJNDIProvider-SOA link.
-
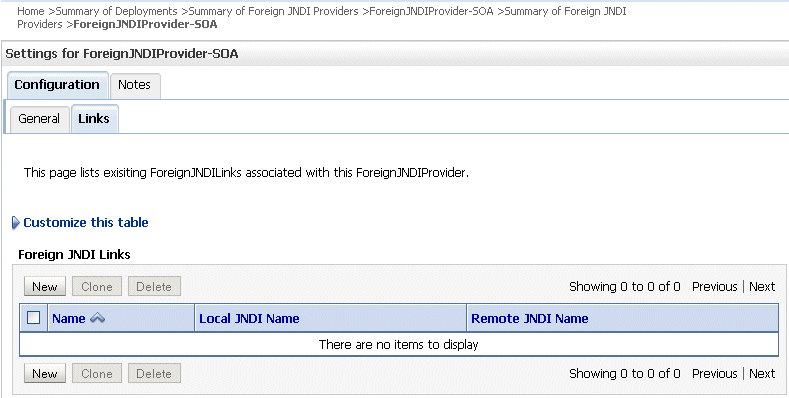
Click the Links tab.
-
Click New.
Figure 26-34 shows the Links tab.
Figure 26-34 Defining the Foreign JNDI Provider Links: The Links Tab
Description of "Figure 26-34 Defining the Foreign JNDI Provider Links: The Links Tab"
-
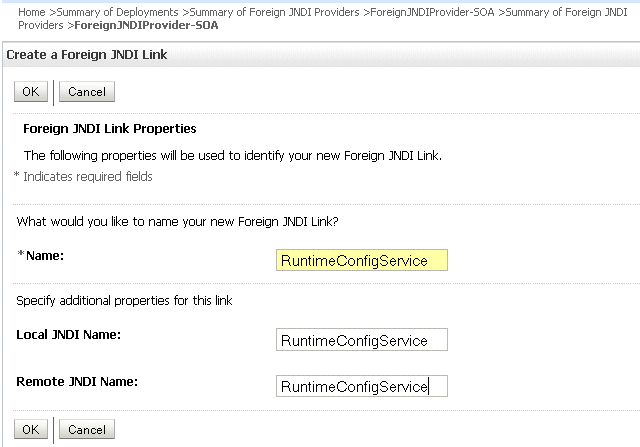
Do the following and click OK.
-
For Name, enter
RuntimeConfigService. -
For Local JNDI Name, enter
RuntimeConfigService. -
For Remote JNDI Name, enter
RuntimeConfigService.
Figure 26-35 shows where you do this.
Figure 26-35 Defining the Foreign JNDI Provider Links: Link Properties
Description of "Figure 26-35 Defining the Foreign JNDI Provider Links: Link Properties"
-
-
Do the following and click OK.
-
For Name, Local JNDI Name, Remote JNDI Name, enter
ejb/bpel/services/workflow/TaskServiceBean. -
For Name, Local JNDI Name, Remote JNDI Name, enter
ejb/bpel/services/workflow/TaskMetadataServiceBean. -
For Name, Local JNDI Name, Remote JNDI Name, enter
TaskReportServiceBean. -
For Name, Local JNDI Name, Remote JNDI Name, enter
TaskEvidenceServiceBean. -
For Name, Local JNDI Name, Remote JNDI Name, enter
TaskQueryService. -
For Name, Local JNDI Name, Remote JNDI Name, enter
UserMetadataService.
-
See Section 26.8.5.4, "Including a Grant for bpm-services.jar," to continue.
26.8.5.4 Including a Grant for bpm-services.jar
To include a grant for bpm-services.jar, edit the system-jazn-data.xml file and then restart the non-SOA Oracle WebLogic Server.
To include a grant for bpm-services.jar:
-
Locate the
system-jazn-data.xmlfile by navigating to the domain directory, soa-infra, and then toORACLE_WEBLOGIC_INSTALL/user_projects/domains/your_domain_name/config/fmwconfig
-
In
system-jazn-data.xml, add the following grant. (If all or some portion of the grant exists, then add only what is missing.)<grant> <grantee> <codesource> <url>file: ORACLE_JDEV_HOME/jdeveloper/soa/modules/oracle.soa.workflow_ 11.1.1/bpm-services.jar</url> </codesource> </grantee> <permissions> <permission> <class>oracle.security.jps.JpsPermission</class> <name>VerificationService.createInternalWorkflowContext</name> </permission> <permission> <class>oracle.security.jps.service.credstore.CredentialAccessPermission </class> <name>credstoressp.credstore.BPM-CRYPTO.BPM-CRYPTO</name> <actions>read,write</actions> </permission> <permission> <class>oracle.security.jps.JpsPermission</class> <name>IdentityAssertion</name> <actions>*</actions> </permission> </permissions> </grant> -
Restart the non-SOA Oracle WebLogic Server.
See Section 26.8.5.5, "Deploying the Application," to continue.
26.8.5.5 Deploying the Application
Deploy the application that contains the task display form to a non-SOA Oracle WebLogic Server the same way other applications are deployed. When you set up the application server connection, specify the domain on the non-SOA server (the domain you specified in Step 1 of Section 26.8.5.4, "Including a Grant for bpm-services.jar.". See Chapter 43, "Deploying SOA Composite Applications" for information on deploying applications.
26.8.6 What Happens When You Deploy the Task Display Form
When the task form is deployed, an automatic association is created between the task metadata and the task flow application URL. Use Oracle Enterprise Manager 11g Fusion Middleware Control to update this mapping. Access the task flow component in the Component Metrics table for a specific SOA composite application. The Administration tab shows the URI for the task form. See Oracle Fusion Middleware Administrator's Guide for Oracle SOA Suite for more information. If the task flow is configured for HTTPS access, you may need to do additional settings in Enterprise Manager.
See Chapter 27, "Using Oracle BPM Worklist" for information on how to act on tasks.
Note:
If you want to access the task display form from a different URL that has a different port number than the hostname and port number previously set in Oracle WebLogic Server Administration Console, then you must change the port number for the front-end in Oracle WebLogic Server Administration Console and redeploy the task display form so that the task details appear correctly in the worklist.26.9 Displaying a Task Display Form in the Worklist
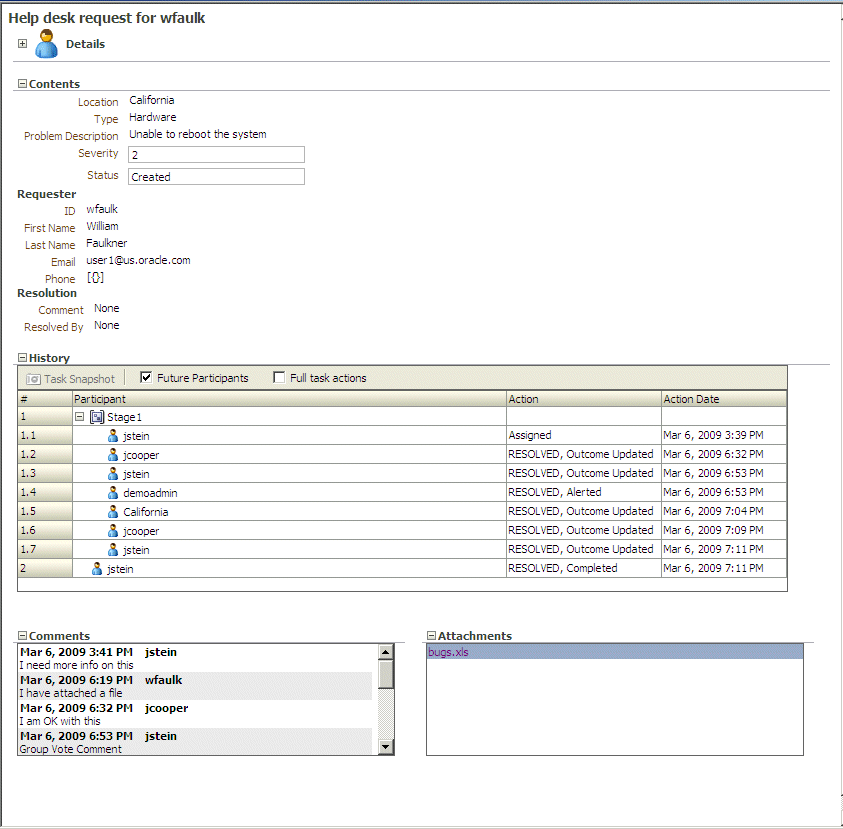
The task display form is displayed in Oracle BPM Worklist, a web-based interface for users to act on their assigned human tasks. Specific actions are available or unavailable depending on a user's privileges.
Figure 26-36 shows how the task display form for the help desk request example is displayed in the Worklist Application task details page.
26.9.1 How To Display the Task Display Form in the Worklist
The task display form is available in Oracle BPM Worklist after you log in. See Section 27.2.1, "How To Log In to the Worklist" for instructions.
26.10 Displaying a Task in an Email Notification
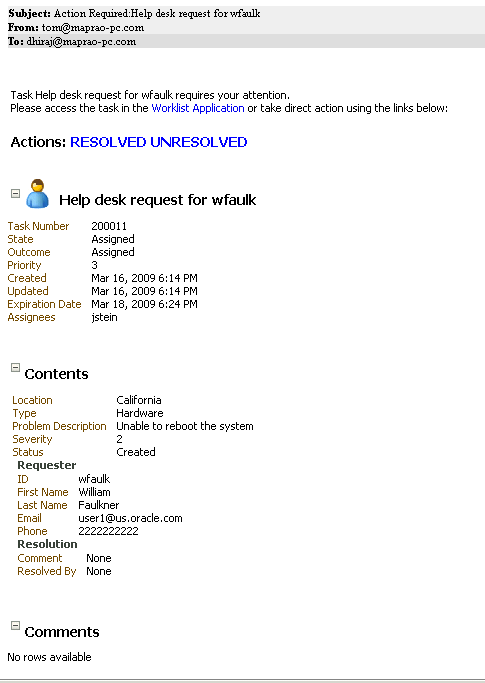
Figure 26-37 shows how an email task notification appears in email.
You can click an available action, RESOLVED or UNRESOLVED, or click the Worklist Application link to log in to the worklist. Clicking an action displays an email composer window in which you can add a comment and send the email.
