15 Working with the Events Service
The Events service provides group calendars, which you can use to schedule meetings, appointments, and any other type of team occasion. Additionally, a dedicated Events page is available to every group space where the space's moderator has enabled the Events service.
Note:
The Events service is available only in the WebCenter Spaces application, not in custom WebCenter applications. Consequently, when we discuss it in this chapter, we do so only within the context of WebCenter Spaces.This chapter explores the features offered through the Events service. It contains the following sections:
This chapter is intended for users who want to use Events service task flows to schedule and track events.
The WebCenter Spaces application administrator has the authority to expose or hide a particular service's task flows. Tasks discussed in this chapter are not available to you if the relevant service is hidden.
Note:
For information about WebCenter Spaces seeded user roles, see Oracle Fusion Middleware Administrator's Guide for Oracle WebCenter.15.1 What You Should Know About the Events Service
Events include appointments, meetings, presentations, or any other kind of gathering that you would schedule for a particular group space.
Events display to all group space members on the group space's dedicated Events page or in any Events task flow that is located on a page in the group space. Members with the required level of permission can schedule or update events.
If your application uses WebCenter's default user roles, the required permissions to create an event are included in both the participant and moderator roles. Participants can manage their own events. Moderators can manage all events.
Your application may provide a variety of locations from which to view events:
-
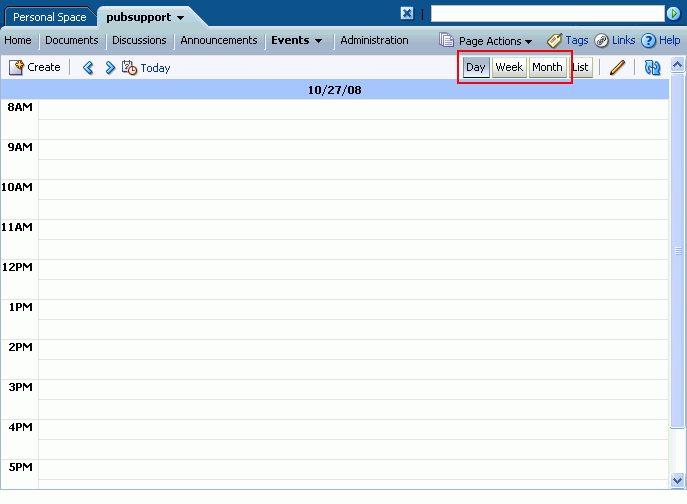
On the Events page (Figure 15-1)
-
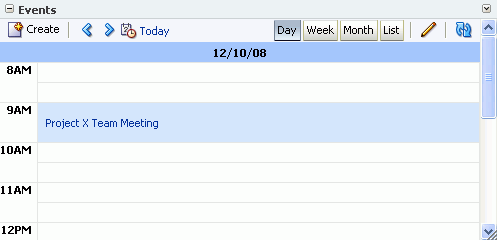
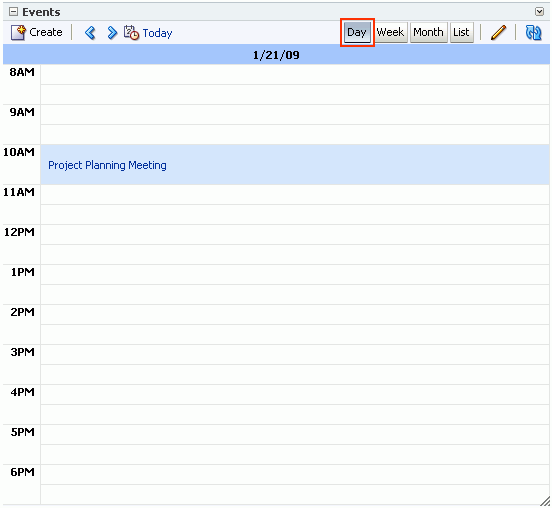
In an Events task flow (Figure 15-2)
-
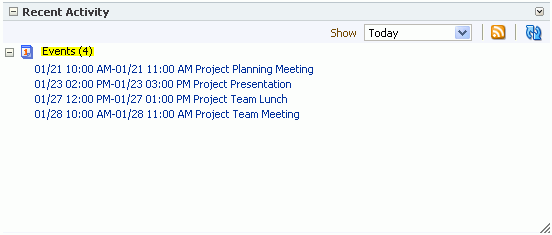
In a Recent Activity task flow (Figure 15-3)
Events are scoped to a particular group space, therefore you cannot create events in your personal space.
Through its tight integration with the Links service, the Events service provides the opportunity to associate events with other WebCenter Spaces items. Linking enables you to associate documents, notes, announcements, discussions, and URLs with an event. For more information, see Chapter 16, "Working with the Links Service."
15.2 Working with the Events Service Task Flow
What would a project or community be without meetings? And what better way to track meetings than on a schedule that is visible to all members of a group? This section describes how to schedule and manage events in WebCenter Spaces. It contains the following subsections:
15.2.1 Viewing Events
You can view events as a grid or a list; choose to display events a day, a week or a month at a time; select the range of hours displayed per day; and include a second time zone in the display.
This section describes how to adjust these event controls. It contains the following subsections:
15.2.1.1 Displaying the Events Page
In every group space, events display on the Events page. The Events page may not display by default. If so, it's easy to display the Events page using the Manage Pages dialog box. This section tells you how.
To display the Events page:
-
Log in to WebCenter Spaces.
For information about logging in, see Section 2.2.1, "Logging In to a WebCenter Application."
-
Go to the group space where you want to display the Events page.
For information about navigating to a group space, see Section 2.4.4, "Opening Group Spaces."
-
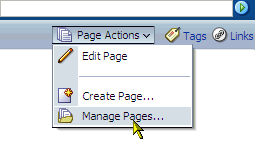
Select the Manage Pages command from the Page Actions menu (Figure 15-4).
-
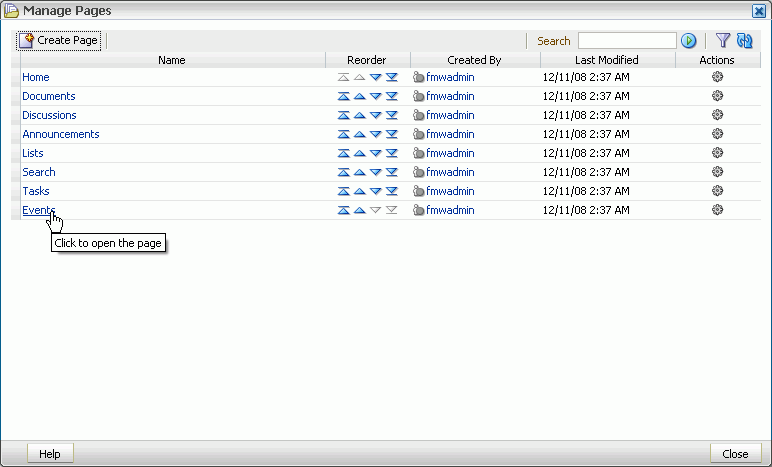
In the Manage Pages dialog box, click the Events page link. (Figure 15-5).
-
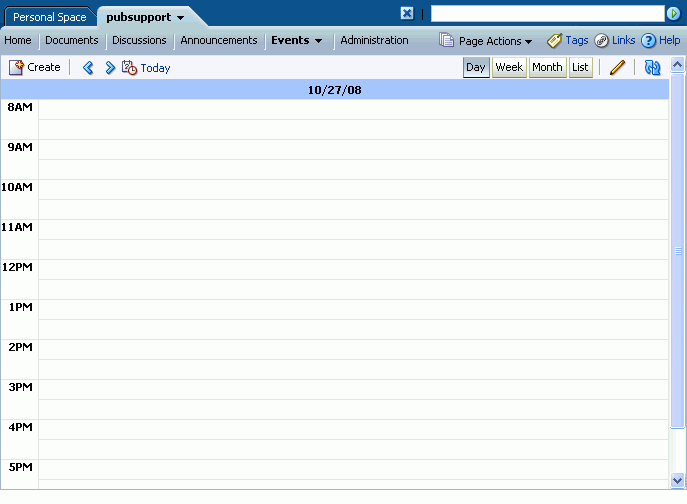
In the group space, there is now a tab for the Events page (Figure 15-6).
-
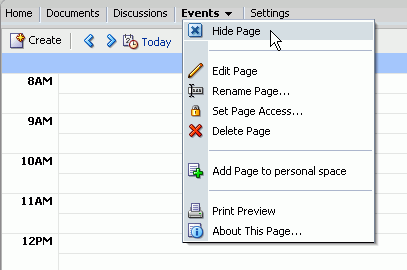
If you later decide that you no longer want to display the Events tab, click the tab and choose Hide Page from the menu (Figure 15-7).
15.2.1.2 Displaying Events by Day, Week, or Month or as a List
You can display events in grid form or in list form. When you display events as a list, all upcoming events for the next year are listed. When you display events as a grid, you can display events by day, week, or month.
Tip:
In List view you can quickly create links to other objects related to the event by clicking the Links icon. For more information about links, see Chapter 16, "Working with the Links Service."To display events by day, week, or month or as a list:
-
Log in to Oracle WebCenter Spaces.
For information about logging in, see Section 2.2.1, "Logging In to a WebCenter Application."
-
Go to the group space where you want to set event display options.
For information about navigating to a group space, see Section 2.4.4, "Opening Group Spaces."
-
Click the Events tab to bring the Events page forward or find the page containing the Events task flow.
If the Events tab is not available, see Section 15.2.1.1, "Displaying the Events Page."
-
On the toolbar:
-
Click Day to display events one day at a time (Figure 15-8).
-
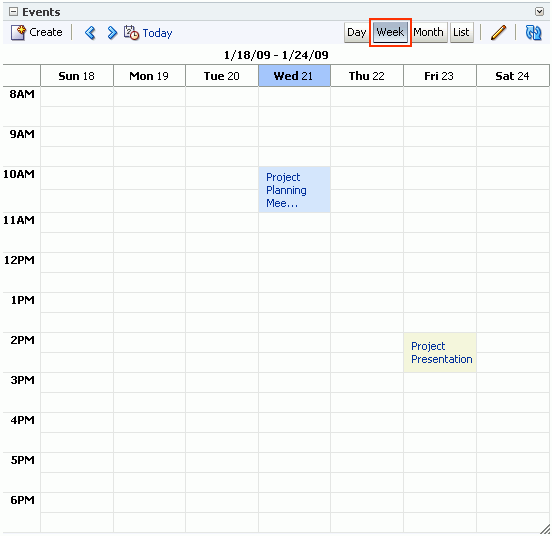
Click Week to display events for the whole week (Figure 15-9).
-
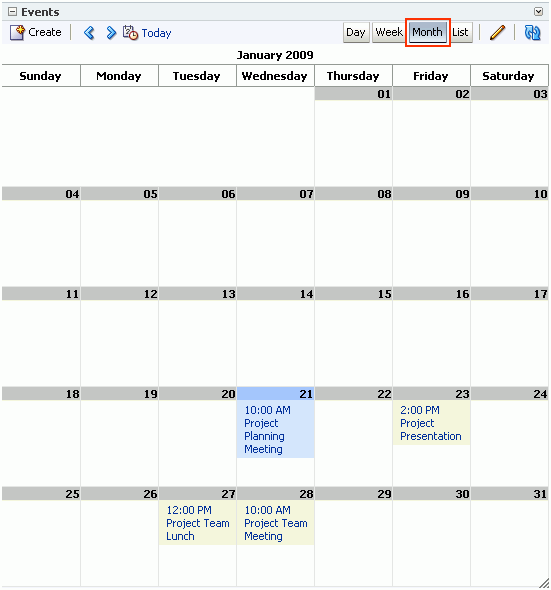
Click Month to display events for the whole month (Figure 15-10).
-
Click List to display a list of upcoming events (Figure 15-11).
The Events page refreshes and appears in the selected mode.
-
15.2.1.3 Viewing Events for a Different Date
Usually, in grid mode, the Events page or task flow displays events for the current day, week, or month. If you want to view events for a different point in time, you can use the previous or next buttons or select a date so that the Events page or task flow displays events for a different date.
To select a date:
-
Log in to Oracle WebCenter Spaces.
For information about logging in, see Section 2.2.1, "Logging In to a WebCenter Application."
-
Go to the group space where you want to select a date for an event.
For information about navigating to a group space, see Section 2.4.4, "Opening Group Spaces."
-
Click the Events tab to bring the Events page forward or find the page containing the Events task flow.
If the Events tab is not available, see Section 15.2.1.1, "Displaying the Events Page."
-
On the toolbar, click the previous or next icon until the appropriate date is displayed.
In Day view, this displays the previous or next day. In Week and List view, this displays the previous or next week. In Month view, this displays the previous or next month.
-
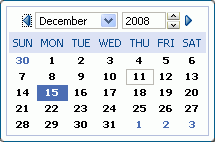
If you know the specific date, on the toolbar, click the Select Date icon (Figure 15-12).
The date picker opens (Figure 15-13). Today's date is boxed, and the currently selected date (which may also be today's date) is highlighted. For example, in Figure 15-13, today's date is the 11th and the selected date is the 15th.
-
Use the date picker to select the month, year, and day.
For example, select a month from the drop-down list; select a year using the controls to the right of the current year, or enter the value yourself; click a date to select a day. Once you select a day, the date picker closes and the Events page or task flow shows events for that date.
-
To quickly return to today's date, click the Today link.
Today's events are displayed in Day view regardless of how you were viewing events previously.
15.2.1.4 Refreshing Your View of Events
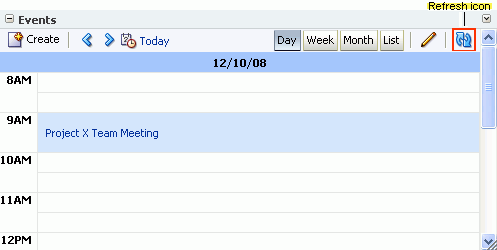
The Events page and Events task flow includes a Refresh icon that you can use to refresh your display of events (Figure 15-14).
This is useful for updating your view of the page or task flow with any recent changes made by other users. Click the Refresh icon and the Events page or task flow redraws, reflecting recent changes.
15.2.1.5 Setting Time Display Preferences
Time display preferences determine the time span covered by the Events page or task flow when events are displayed by day or week.
You can also use time display preferences to identify a secondary time zone. This feature is particularly useful with international workforces. When selecting an hour to hold a meeting, it's useful to know the hours most optimal for meeting in both time zones.
To set up time display preferences:
-
Log in to Oracle WebCenter Spaces.
For information about logging in, see Section 2.2.1, "Logging In to a WebCenter Application."
-
Go to the group space where you want to set time display preferences.
For information about navigating to a group space, see Section 2.4.4, "Opening Group Spaces."
-
Click the Events tab to bring the Events page forward or find the page containing the Events task flow.
If the Events tab is not available, see Section 15.2.1.1, "Displaying the Events Page."
-
Click the Set time display preferences icon on the toolbar (Figure 15-15).
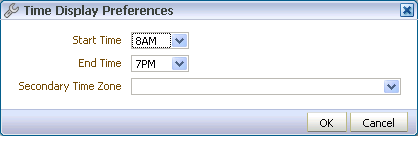
The Time Display Preferences dialog box opens (Figure 15-16).
-
From the Start Time drop-down list, select the first hour to display on the grid.
Choose from 12AM to 11PM.
-
From the End Time drop-down list, select the last hour to display on the grid.
Choose from 12AM to 11PM.
-
Optionally, from the Secondary Time Zone drop-down list select a secondary time zone to display along with the primary time zone.
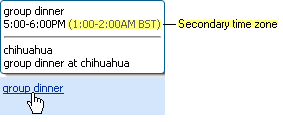
When a user rolls a mouse pointer over the event link in the grid, event details pop up. The secondary time zone appears in the pop-up (Figure 15-17).
-
Click OK to save your changes.
15.2.2 Scheduling an Event
The following section shows you how to schedule an event.
To schedule an event:
-
Log in to Oracle WebCenter Spaces.
For information about logging in, see Section 2.2.1, "Logging In to a WebCenter Application."
-
Go to the group space where you want to schedule an event.
For information about navigating to a group space, see Section 2.4.4, "Opening Group Spaces."
-
Click the Events tab to bring the Events page forward or find the page containing the Events task flow.
If the Events tab is not available, see Section 15.2.1.1, "Displaying the Events Page."
-
Click the Create a new event icon on the toolbar (Figure 15-18).
Note:
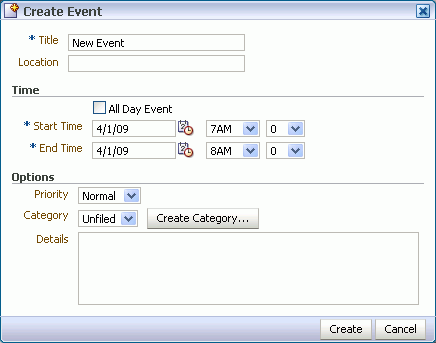
You can also easily invoke the Create Event dialog box by clicking an hour or a date or double-clicking an empty space in a grid view. The advantage of this is that date and start time of the event are automatically specified in the dialog box.The Create Event dialog box opens (Figure 15-19).
-
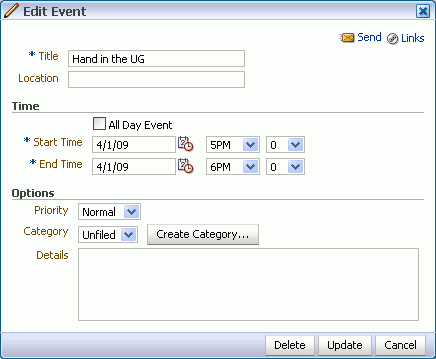
Enter the details of event:
-
In the Title field, enter a brief descriptive title for the event.
For example,
Project Reality Check. -
In the Location field, enter the location of the event.
For example,
Bldg. 5, room 786. -
In the Time section, select All Day Event to block out the entire day for the event.
-
In the Start Time field enter or select a date and time to start the event.
-
In the End Time field enter or select a date and time to end the event.
Note:
All selections under the Options section are optional. -
In the Options section, assign a priority for the event.
Choose from Highest, High, Normal, Low, or Lowest.
-
Select a category to classify this event from the Category drop-down list.
Optionally, click the Create Category button to create a category and automatically select it for this event.
Categories are useful for creating distinct groups of events, organized according to their general purpose.
-
In the Details text box, enter any additional details you want to include.
-
-
Click the Create button to create the event and add it to the Events page (Figure 15-20).
-
In the Send Mail message window, click Yes to send an e-mail notification to all members of the group space distribution list informing them about the event (Figure 15-21).
If you do not want to send a notification, click No.
-
Provide your mail login credentials, if necessary.
The Compose window displays. The To field is automatically populated with the distribution list for the group space. The Events service also provides a default subject and body text and attaches an icalendar file with details of the event.
-
Make any changes that are required and then click Send.
A dialog box opens with a message that asks whether you want to compose another message or close the Compose window.
-
Click Yes to open a new Compose window or No to exit.
15.2.3 Viewing Event Details
The Event page or task flow displays basic information about the event. To view more information, such as the location or additional details, simply hover your mouse over the event.
To view event details:
-
Log in to Oracle WebCenter Spaces.
For information about logging in, see Section 2.2.1, "Logging In to a WebCenter Application."
-
Go to the group space where you want to view event details.
For information about navigating to a group space, see Section 2.4.4, "Opening Group Spaces."
-
Click the Events tab to bring the Events page forward or find the page containing the Events task flow.
If the Events tab is not available, see Section 15.2.1.1, "Displaying the Events Page."
-
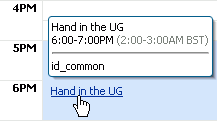
Hover the mouse over a link to an event to display the event details (Figure 15-22).
To view the priority or category of the event you must edit the event. For more information, see Section 15.2.4, "Revising Scheduled Events."
15.2.4 Revising Scheduled Events
For some reason, you may find that you must change some aspect of the event. For example, the time may need changing to accommodate a particular group space member, or the location might become unavailable.
To revise a scheduled event:
-
Log in to Oracle WebCenter Spaces.
For information about logging in, see Section 2.2.1, "Logging In to a WebCenter Application."
-
Go to the group space where you want to revise a scheduled event.
For information about navigating to a group space, see Section 2.4.4, "Opening Group Spaces."
-
Click the Events tab to bring the Events page forward or find the page containing the Events task flow.
If the Events tab is not available, see Section 15.2.1.1, "Displaying the Events Page."
-
Click a link to an event (Figure 15-23).
The Edit Event dialog box opens (Figure 15-24).
-
Revise event details.
-
Click the Update button to save your changes.
15.2.5 Deleting Scheduled Events
To cancel an event, you can delete it from the Events page or task flow.
To delete a scheduled event:
-
Log in to Oracle WebCenter Spaces.
For information about logging in, see Section 2.2.1, "Logging In to a WebCenter Application."
-
Go to the group space where you want to delete a scheduled event.
For information about navigating to a group space, see Section 2.4.4, "Opening Group Spaces."
-
Click the Events tab to bring the Events page forward or find the page containing the Events task flow.
If the Events tab is not available, see Section 15.2.1.1, "Displaying the Events Page."
-
Click a link to an event (Figure 15-25).
-
In the resulting Edit Event dialog box, click the Delete button.
-
Click Delete again in the Delete Confirmation dialog box.
The event is removed from the Events page.
15.3 Setting Events Service Task Flow Properties
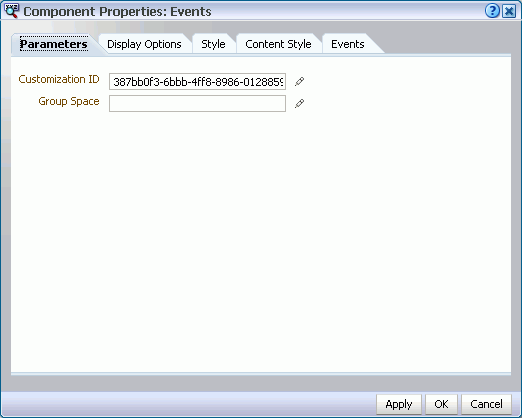
Every task flow includes a set of configurable properties that influence the behavior, content, and look-and-feel of a given task flow instance. You can access these properties through the Component Properties dialog box in Oracle Composer (Figure 15-26). The method for accessing task flow properties is the same from task flow to task flow. For more information, see Section 7.4, "Setting Properties on Page Content."
The component parameters listed on the Parameters tab control the default task flow content and facilitate the wiring of the task flow to page parameters and page definition variables. Parameters are unique to the task flow type. The parameters for the Events service task flow are listed and described in Table 15-1.
Note:
For information about wiring pages and components, see Chapter 8, "Wiring Pages, Task Flows, Portlets, and UI Components."Table 15-1 Parameters for Events Service Task Flows
| Parameter | Description | Task Flow |
|---|---|---|
|
A unique identifier for event view customization. Customization ID assists with maintaining the association of this task flow instance with its customization and personalization settings. This value is set automatically. Do not edit this value. |
Events |
|
|
The name of the group space that is the source of listed events. In WebCenter Spaces, the group space name is available on the General tab of the group space Settings page. Valid values are:
|
Events |
The properties on the Display Options, Style, and Content Style tabs control the appearance and behavior of the task flow and are common to all task flows. For more information, see Section 7.4, "Setting Properties on Page Content."
The contents of the Events tab depend on the events supported by the task flow. For more information, see Section 7.4.7, "Working with Component Contextual Events"
