29 Working with the Search Service
The Search service enables the discovery of information and people through an intuitive user interface, returning only the results you are authorized to view. With all relevant information easily navigable, you do not have to switch between applications performing multiple searches.
This chapter describes the features and functions of the Search service. It contains the following sections:
This chapter is intended for users who want to know how to find content, refine search criteria, and save searches. It describes useful ways to look for content of interest, refine your searches, and save useful search terms.
The application administrator has the authority to expose or hide a particular service's task flows. Tasks discussed in this chapter are not available to you if the relevant service is hidden.
29.1 What You Should Know About the Search Service
Use the Search service to create, run, refine, and save custom searches. By default, WebCenter Search looks for your search terms in every searchable service available to the application (a global search). Content is searched by name and by content. You can configure the services to which a search has access. You can do this in WebCenter Spaces by specifying your personal preferences (see Section 3.3.8, "Setting Preferences for WebCenter Spaces Search Results"). In a custom WebCenter application use the Search Preferences task flow. In WebCenter Spaces, you can also search an individual group space.
In addition to WebCenter Search, the Documents service provides its own search engine for file and folder searches. This helps save time and increases the relevancy of results by narrowing the scope of a search to files. In the WebCenter Spaces application, the Documents service search searches within a specific group or personal space's Document Library. Within a custom WebCenter application, the Documents service search searches through all files available to you. For more information, see Section 14.2.6, "Running Document Searches."
In all cases, searches return only the results you are authorized to view. For example, if you are not a member of the FinanceProject group space, any search hits from that group space do not display in your search results.
Search results return search hits and tag matches. Tag matches display on the Search Results page and in the Search Results window. For more information about tagging, see Chapter 18, "Working with the Tags Service."
Before you run a search, consider setting your personal search preferences. Use search preferences to specify which services to search and the order of services in your search results. For example, you may find that search hits from the Document Library prove more useful that search hits from other services. You can use search preferences to make hits from the Document Library display first in the list of search hits. For more information about setting search preferences in WebCenter Spaces, see Section 3.3.8, "Setting Preferences for WebCenter Spaces Search Results." For information about using the Search Preferences task flow, see Section 29.2.5, "Using the Search Preferences Task Flow in Custom WebCenter Applications."
29.2 Working with Search Service Task Flows
Oracle WebCenter provides search services that span application-wide and beyond. This section describes how to use them. It contains the following subsections:
29.2.1 Searching in a WebCenter application
This section describes how to run a global, application-wide search and how to run a search within a specific group space. It contains the following subsections:
29.2.1.1 Performing a Global Search
Global search provides an application-wide search. All services offer components to be searched. Provided you have permission to access those components, global search covers all of them.
In WebCenter Spaces, by default, you can perform a global search from the search field at the top-right of the application. In a custom WebCenter application, you can perform a global search from any Search task flow, or from the Search Toolbar.
Note:
If a group space is configured to display in full screen mode, the search field at the top-right becomes a group space search field and the search is specific to the current group space.To perform a global search:
-
Log in to WebCenter Spaces or your custom WebCenter application.
For information about logging in, see Section 2.2.1, "Logging In to a WebCenter Application."
-
Locate the global search field and enter a search term.
For example, the search field at the top right of the WebCenter Spaces application is a global search field (Figure 29-1).
-
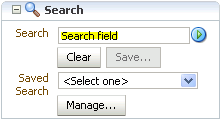
Press Enter or click the Search icon next to the global search field (Figure 29-2).
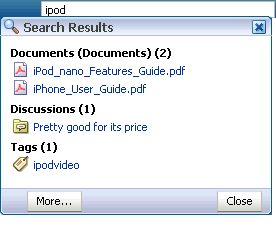
Results display in the Search Results pop-up (Figure 29-3).
Note:
In Figure 29-3, notice that search results are segregated into groups. The first group shows how many hits resulted from documents (2). The second group shows how many hits resulted from discussions (1). The third group shows how many hits resulted from tags (1). -
Click a link to open a result.
Results open differently according to the service that provides them. For example, results from the Documents service open in a new browser tab or window. Results from services that provide resource viewers, such as discussions, lists, or announcements, open in their resource viewer.
-
Optionally, in the results pop-up click the More button.
In WebCenter Spaces, this displays the search results on a separate Search page. In a custom WebCenter application, search results are displayed in a separate window, where you can scroll through all the results.
From here, you can also further refine the search by contributor or last modified date using the Refine Search section. For more information, see Section 29.2.2, "Refining the Display of Search Results." You can also save the search so that you can access the results later. For more information, see Section 29.2.3, "Saving Searches."
You can configure how the search results are displayed. Specifically, you can control which services are included in the search, the order in which those services are listed in the results, and what information is included, such as the type, size, or owner of the object returned. In WebCenter Spaces, you do this in the Search Preferences panel of the Preferences dialog box (for information see Section 3.3.8, "Setting Preferences for WebCenter Spaces Search Results"). In custom WebCenter applications, you set these preferences in the Search Preferences task flow (for information, see Section 29.2.5, "Using the Search Preferences Task Flow in Custom WebCenter Applications").
29.2.1.2 Performing a Group Space Search
In WebCenter Spaces, each group space has its own Search page. You can use this page to restrict your search to that specific group space.
To perform a group space search:
-
Log in to WebCenter Spaces.
For information about logging in, see Section 2.2.1, "Logging In to a WebCenter Application."
-
Go to the group space where you want to run a search.
-
Click the Search tab to bring the Search page forward.
If the Search tab is not available, open the Manage Pages dialog box and select the Search page for display. When the tab opens, click it to bring the page forward. For more information, see Section 2.4, "Hiding, Showing, Opening, and Closing Pages."
-
In the Search task flow, enter a search term in the Search field, and click the Search button, or press Enter.
Note:
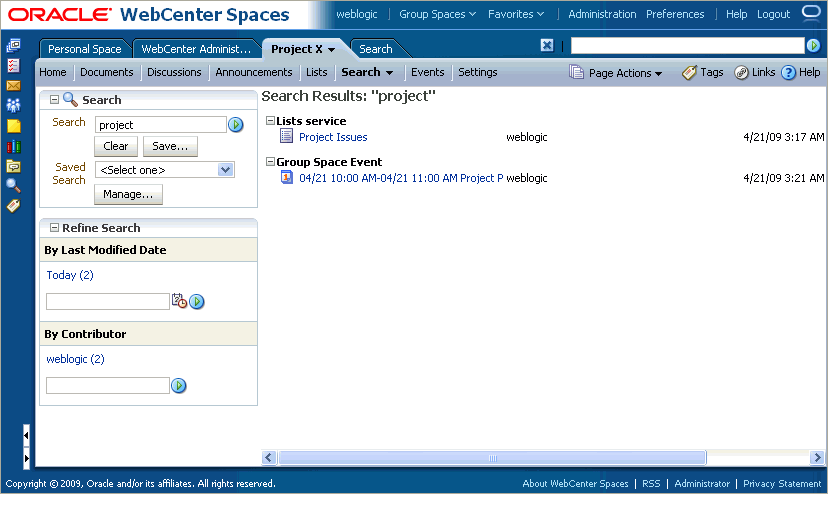
If the group space is configured to display in full screen mode, the search field at the top-right becomes a group space search field and you can perform a group space search by entering your search term in this field.Search results display within the group space's Search page (Figure 29-5).
You can further refine the search by contributor or last modified date using the Refine Search section that also appears on the Search page. For more information, see Section 29.2.2, "Refining the Display of Search Results."
Notice that the Save button in the Search task flow is no longer greyed out, and you can save this search so that you can access the results later. For more information, see Section 29.2.3, "Saving Searches."
You can configure how the search results are displayed. Specifically, you can control which services are included in the search, the order in which those services are listed in the results, and what information is included, such as the type, size, or owner of the object returned. For information about setting display options for group space search results, see Section 3.3.8, "Setting Preferences for WebCenter Spaces Search Results."
29.2.2 Refining the Display of Search Results
The Search service provides a means of narrowing down your searches using refiners, which you can add to the current search to produce a smaller set of results. You can refine your search results by specifying a time range within which the result was last modified and by limiting results to those associated with a particular user. This section tells you how.
Note:
Results from the Tags service and Favorites, which do not supply refiners to the Search service, do not appear in refined searches.To refine the display of search results:
-
Perform a global search as described in Section 29.2.1.1, "Performing a Global Search," and then click the More button in the results pop-up.
Or perform a group space search as described in Section 29.2.1.2, "Performing a Group Space Search."
The search results display on the Search page or in the Search window.
-
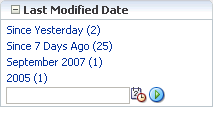
In the Refine Search section, to refine the display of search results by date, select a time-range limitation from the Last Modified Date box (Figure 29-6).
Figure 29-6 The Last Modified Date Box on the Search Results Page
Description of "Figure 29-6 The Last Modified Date Box on the Search Results Page"
For example, click Since Yesterday to view all results that originated since yesterday. Click 2006 to view all results that originated in 2006.
The number next to each time range indicates the search's best guess at how many search results fall within the specified range.
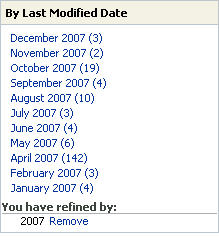
Some date selections, such as years or months, provide additional refinement options when you select them. For example, when you refine a search by all results occurring within 2007, your refined results display and additional refinements appear in the Last Modified Date box. For example, see Figure 29-7.
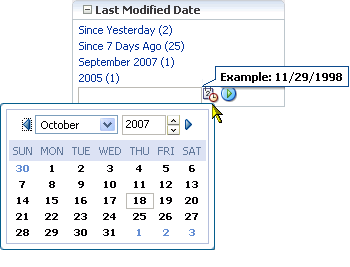
Alternatively, enter a date in the field provided, or click the Select Date icon and select a date from a date picker (Figure 29-8).
-
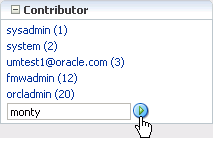
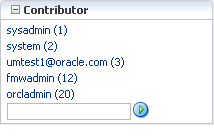
You can also refine the display of search results by contributor (that is, by the user name of the person who created, uploaded, or originated the result) by selecting a contributor from the Contributor box (Figure 29-9).
Figure 29-9 The Contributor Box on the Search Results Page
Description of "Figure 29-9 The Contributor Box on the Search Results Page"
For example, click sysadmin to view all results contributed by the user
sysadmin.The number next to each user name indicates the search's best guess at how many search results are associated with the specified user.
Alternatively, enter a user name in the field provided and click the Search icon (Figure 29-10).
Results created by the selected contributor and provided within the selected time-range display.
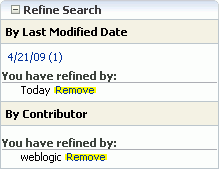
When a refinement is selected, it appears in the relevant box with a Remove link next to it, enabling you to remove the refinements you have applied to search results (Figure 29-11).
Figure 29-11 Remove Links on the Search Results Page
Description of "Figure 29-11 Remove Links on the Search Results Page"
Click the Remove link to remove that particular search results refinement and broaden the list of displayed results.
29.2.3 Saving Searches
After you have performed a search, if it is a search that you are likely to want to perform again, you can save it so that you can run it again later without having to reenter the search terms. You can also add the saved search to other pages to make them easily available to run.
Note:
You can save searches only if you are logged in to the application.Saved searches retain their association with the context where you created them. For example, when you save a search from a particular group space, the next time you run it its results appear on a dynamically generated Search Results subpage of that group space. When you run a global saved search in WebCenter Spaces the results appear on a dynamically generated top-level Search Results page. In custom WebCenter applications, the results of saved searches are displayed in a new Search Results window.
This section contains the following subsections:
29.2.3.1 Saving a Search
Saved searches are useful for the searches you run frequently. They assist in keeping you current as new information is added to the search pool.
To save a search:
-
Perform a global search as described in Section 29.2.1.1, "Performing a Global Search," and then click the More button in the results pop-up.
Or perform a group space search as described in Section 29.2.1.2, "Performing a Group Space Search."
The search results display on the Search page or in the Search window.
-
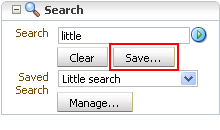
Click the Save button below the search field (Figure 29-12).
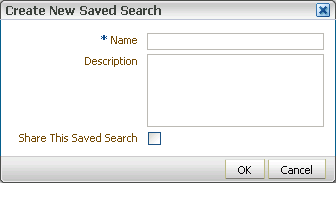
The Create New Saved Search dialog box opens (Figure 29-13).
-
In the Name field, enter a meaningful name for the search.
The value you enter in the Name field is the value that appears on the drop-down list of saved searches.
The search that was in the Search field is saved, no matter what name you give it. For example, if the search term was admin, but you enter jcr in the Name field. The saved search searches for the term admin and not jcr.
-
Optionally, in the Description field, enter a description of the search.
The description is rendered as a tool tip when you move your cursor over the saved search on the Saved Search drop-down list.
-
For group space searches in WebCenter Spaces, select the Share this Saved Search check box to enable other members of the group space to see this search on the drop-down list of saved searches.
If you want this search to be private, clear the Share this Saved Search check box.
-
Click OK to save the search.
The name appears on the drop-down list of saved searches (Figure 29-14).
29.2.3.2 Running a Saved Search
You can run a saved search from several locations. The saved searches to which you have access depends on the location. You can run a saved search from:
-
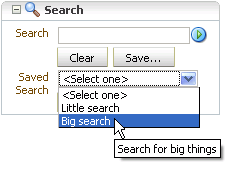
Any page containing the Search task flow (Figure 29-15).
If the Search task flow is on a group space page (including the group space's Search page), it lists your saved searches for the group space and shared saved searches for the group space. If the Search task flow is on the global Search page, it lists your global saved searches. If the Search task flow is on a custom WebCenter application page, it lists your saved searches for the application.
-
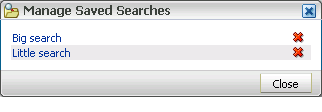
The Manage Saved Searches dialog box, accessible from the Search task flow (Figure 29-16).
The Manage Saved Searches dialog box lists the same saved searches as listed in the Search task flow from which it was launched.
-
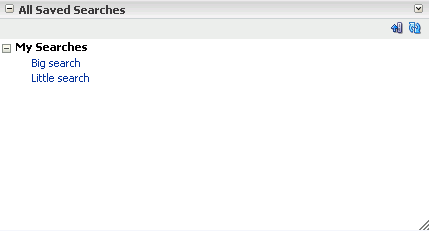
Any WebCenter Spaces page containing the All Saved Searches task flow (Figure 29-17).
In a group space, the All Saved Searches task flow lists all your saved searches for the group space and all shared saved searches for the group space (made both by yourself and other users). It does not list your global saved searches or saved searches made against other group spaces. In a personal space, the All Saved Searches task flow lists all your global saved searches.
-
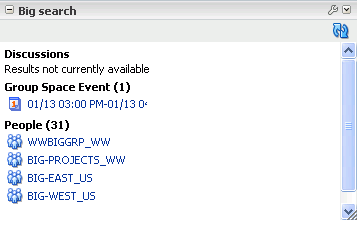
Any WebCenter Spaces page where the saved search was placed (Figure 29-18).
The Saved Search task flow shows the results of the particular search.
-
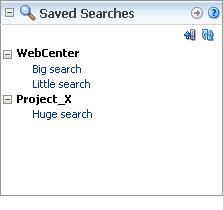
The Sidebar in WebCenter Spaces (Figure 29-19).
The Sidebar lists saved searches personal to you. That is, global and group space searches that you, personally, have saved. It does not list searches saved by other users and shared with you.
To run a saved search:
-
Log in to WebCenter Spaces or your custom WebCenter application.
For information about logging in, see Section 2.2.1, "Logging In to a WebCenter Application."
-
Find the saved search by:
-
Locating the page containing the Search task flow, for example, the group space's Search page.
-
Locating the page containing the All Saved Searches task flow.
-
Locating the page containing the saved search. In this case, the search results are immediately visible.
-
Expanding the Saved Search panel in the WebCenter Spaces Sidebar.
-
-
If you are using the Search task flow, select the search from the Saved Search drop down list.
If you are using the Manage Saved Searches dialog box, the All Saved Searches task flow, or the Saved Search panel in the Sidebar, click the link for the saved search you want to run.
Tip:
To help you pick the right search, the description is rendered as a tool tip when you move your cursor over the name of the saved search. -
View the results on the dynamically-generated Search Results page.
29.2.3.3 Sharing a Saved Search in WebCenter Spaces
In WebCenter Spaces, you can share a saved group space search if you think the results of a search might be useful for other group space members.
Note:
You cannot share global searches, and you cannot share searches in custom WebCenter applications.To share a saved search:
-
Log in to WebCenter Spaces.
For information about logging in, see Section 2.2.1, "Logging In to a WebCenter Application."
-
Go to the group space where the search was performed and saved.
-
Open the Search page.
If the Search page does not display, open the Manage Pages dialog box and select the Search page for display. For more information, see Section 2.4.3, "Showing Hidden Pages."
-
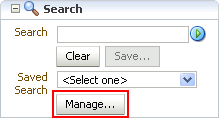
In the Search box, click the Manage button (Figure 29-22).
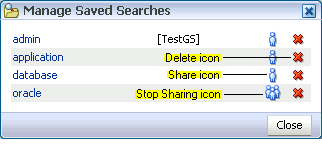
The Manage Saved Searches window opens (Figure 29-23).
-
Click the Share icon next to the saved search you want to share.
The icon changes to indicate that the saved search is now shared. The saved search is now available for other members of the group space to run. The search is listed in the Search task flow Saved Searches list for all group space members and in the All Saved Searches task flow, if one exists.
-
When you no longer want to share a saved search, click the Stop Sharing icon.
-
Click Close.
29.2.3.4 Deleting a Saved Search
When a saved search has outlived its usefulness, WebCenter provides a way to remove it.
To delete a saved search:
-
Log in to WebCenter Spaces or your custom WebCenter application.
For information about logging in, see Section 2.2.1, "Logging In to a WebCenter Application."
-
To delete a global saved search, run the search and then click the More button in the Search Results pop-up. For information about how to run a saved search, see Section 29.2.3.2, "Running a Saved Search."
To delete a group space saved search, go to Search page of the group space where the search was performed and saved.
-
In the Search task flow, click the Manage button (Figure 29-22).
The Manage Saved Searches window opens (Figure 29-23).
-
Click the Delete icon next to the saved search you want to delete.
-
Click the Close button.
29.2.3.5 Adding a Saved Search to a WebCenter Spaces Page
In WebCenter Spaces, if a saved search has particular relevance to the contents of a specific page, you can add the search to that page. The results of the search are then displayed directly on the page.
You can add global saved searches to personal space pages and group space saved searches (both your own and shared ones) to group space pages.
To add a saved search to a WebCenter Spaces page:
-
Log in to WebCenter Spaces.
For information about logging in, see Section 2.2.1, "Logging In to a WebCenter Application."
-
Locate the page to which you want to add the saved search.
-
From the Page Actions menu, choose Edit Page to access Oracle Composer.
-
In the area of the page where you want to add the saved search, click the Add Content button.
-
In the Catalog, click the Searches folder, then the Saved Searches folder.
The saved searches available for you to add to the page are listed.
-
Click the Add icon next to the saved search to add to the page.
-
Click Close.
After you have added a saved search to a page, you can customize it to change the search terms, add refiners, or select the services to search. The changes you make are visible to everyone.
-
In the task flow header, click the Edit icon (Figure 29-24).
-
Customize the search settings as required and then click Apply.
The changes you make here affect only this particular instance of the saved search. If you add the same saved search to the page or to a different page, the original search settings still apply.
-
You can also personalize the saved search when you are viewing the page (rather than editing it by clicking the Personalize icon (Figure 29-25) and making your changes. The changes you make are visible only to you.
29.2.3.6 Adding the All Saved Searches Task Flow to a WebCenter Spaces Page
In WebCenter Spaces, you can provide a quick and easy way of seeing all the saved searches available by adding the All Saved Searches task flow.
In a group space, the All Saved Searches task flow lists all your saved searches for the group space and all shared saved searches for the group space. It does not list your global saved searches or saved searches made against other group spaces. In a personal space, the All Saved Searches task flow lists all your global saved searches.
-
Log in to WebCenter Spaces.
For information about logging in, see Section 2.2.1, "Logging In to a WebCenter Application."
-
Locate the page to which you want to add the All Saved Searches task flow.
-
From the Page Actions menu, choose Edit Page to access Oracle Composer.
-
In the area of the page where you want to add the All Saved Searches task flow, click the Add Content button.
-
In the Catalog, click the Searches folder.
-
Click the Add icon next to the All Saved Searches task flow.
-
Click Close.
29.2.4 Adding the Search Task Flow to a Group Space Page
Each group space has a default Search page where users can perform group space-wide searches. If, however, you think that members of the group space should be able to perform a search from within a different page in the group space, you can add the Search task flow to the page. Bear in mind though, that when search results are displayed in the Search task flow, they may be difficult to read if the task flow is on a page with other content.
To add the Search task flow to a page:
-
Log in to WebCenter Spaces.
For information about logging in, see Section 2.2.1, "Logging In to a WebCenter Application."
-
Locate the page to which you want to add the Search task flow.
-
From the Page Actions menu, choose Edit Page to access Oracle Composer.
-
In the area of the page where you want to add the Search task flow, click the Add Content button.
-
In the Catalog, click the Searches folder.
-
Click the Add icon next to the Search task flow.
-
Click Close.
29.2.5 Using the Search Preferences Task Flow in Custom WebCenter Applications
You can configure how the search results are displayed by setting search preferences. Specifically, you can control which services are included in the search, the order in which those services are listed in the results, and what information is included, such as the type, size, or owner of the object returned.
In custom WebCenter applications, you set these preferences in the Search Preferences task flow.
Note:
In WebCenter Spaces, you set search preferences in the Search Preferences panel of the Preferences dialog box (for information see Section 3.3.8, "Setting Preferences for WebCenter Spaces Search Results").To set search preferences in a custom WebCenter application:
-
Log in to your application.
For information about logging in, see Section 2.2.1, "Logging In to a WebCenter Application."
-
Locate the page that contains the Search Preferences task flow.
Note:
The application developer may not have included the Search Preferences task flow on any page in the application. In this case, you cannot configure these preferences. -
To specify the services to be searched, select one or more services on the Available Services list by checking their check boxes, and then click the Move icon to move them to the Selected Services list.
You can also specify the order in which the search results are displayed by clicking the move up and move down icons next to the Selected Services list.
-
To specify the type of information to display with the search results, click the Columns tab and move one or more items from the Available Columns list to the Selected Columns list. Choose from:
-
Icon to display an icon representing the item type.
-
Title to display linked titles.
-
Person to display the user name of the person who owns the item.
-
Size to display the size of the item, for example, file size.
-
Date to display the date the item was added to the application.
-
Type to display the type of the item, for example image.
You can also specify the order in which this information is displayed by clicking the move up and move down icons next to the Selected Columns list.
-
-
Click OK to save your changes.
29.3 Setting Search Service Task Flow Properties
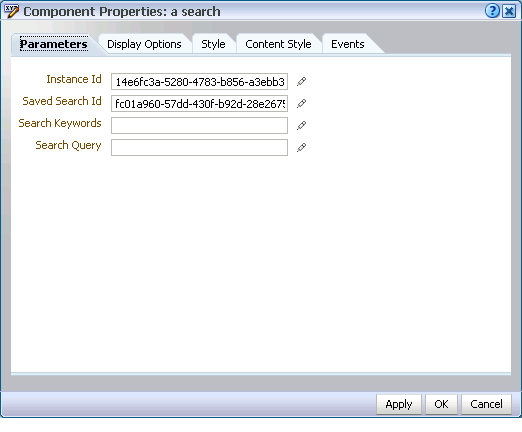
Every task flow includes a set of configurable properties that influence the behavior, content, and look-and-feel of a given task flow instance. You can access these properties through the Component Properties dialog box in Oracle Composer (Figure 29-26). The method for accessing task flow properties is the same from task flow to task flow. For more information, see Section 7.4, "Setting Properties on Page Content."
The component parameters listed on the Parameters tab control the default task flow content and facilitate the wiring of the task flow to page parameters and page definition variables. Parameters are unique to the task flow type. The parameters for the Search service task flows are listed and described in Table 29-1.
Note:
For information about wiring pages and components, see Chapter 8, "Wiring Pages, Task Flows, Portlets, and UI Components."Table 29-1 Parameters for Search service Task Flows
| Parameter | Description | Task Flow |
|---|---|---|
|
Either search keywords or the saved search GUID. This parameter intended for internal use only. Do not change this value unless you want hard-coded search main views. If you do change this value, you must also specify a Resource Type. |
Search |
|
|
A list of IDs of services or executors to omit when displaying search results. This value is intended for internal use only. Do not change this value. |
Search |
|
|
Marker specifying whether the Resource ID parameter means search keywords or saved search GUID. This value is set automatically, and is for internal use only. Do not change it unless you want hard-coded search main views. |
Search |
|
|
A system-generated ID for a particular instance of the saved search on the page. This value is intended for internal use only. Do not change this value. |
Saved Search |
|
|
A system-generated ID for the saved search. This value is intended for internal use only. Do not change this value. |
Saved Search |
The properties on the Display Options, Style, and Content Style tabs control the appearance and behavior of the task flow and are common to all task flows. For more information, see Section 7.4, "Setting Properties on Page Content."
The contents of the Events tab depend on the events supported by the task flow. For more information, see Section 7.4.7, "Working with Component Contextual Events."

